文章目录
- 概述
- 代码实现
- image_trian.py
- def create_model_and_diffusion()
- def create_gaussian_diffusion()
- SpacedDiffusion类
- GaussianDiffusion类 ⭐ LOOK HERE ⭐
- 边角料
- noise scheduling
概述
DM beat GANs作者改进了DDPM模型,提出了三个改进点,目的是提高在生成图像上的对数似然
第一个改进点方差改成了可学习的,预测方差线性加权的权重
第二个改进点将噪声方案的线性变化变成了非线性变换
第三个改进点将loss做了改进,Lhybrid = Lsimple+λLvlb(MSE loss+KL loss),采用了loss平滑的方法,基于loss算出重要性来采样t(不再是均匀采样t),Lvlb不直接采用Lt,而是Lt除以归一化的值pt(∑pt=1),pt是Lt平方的期望值的平方根,基于Lt最近的十个值,更少的采样步骤实现同样的效果
Lvlb,变分下界,L0加到Lt可拆解为3部分
L0 x1预测x0
0到t-1之间的,后验分布,神经网络预测的KL散度
Lt,由于一开始是一个先验的标准分布,不含参的,不参与神经网络优化

论文地址:
https://arxiv.org/abs/2102.09672
https://arxiv.org/pdf/2102.09672.pdf
项目地址:
https://github.com/openai/improved-diffusion
那么εθ的NN模型输入xt和t,输出的量和xt是保持一致的,
这里的NN模型用的是attention-based Unet,但不是本篇的重点,可以看另一篇博客
代码实现
项目地址:
https://github.com/openai/improved-diffusion
image_trian.py
image_train.py编写了大体的训练结构框架,只有短短的几行代码
def main()中
首先create_argparser
args = create_argparser().parse_args()dist_util.setup_dist()logger.configure()logger.log("creating model and diffusion...")
create_argparser函数中定义了字典,数据目录,学习率一些默认的超参数,dict会更新,来源于model_and_diffusion_defaults函数,其返回也是一个字典,但是其键值对和模型和扩散相关的参数,创建argumentParser,遍历字典添加到argparser中,这样省的我们一个个去写手写add_argument,是一个很好的学习的简洁写法
def create_argparser():defaults = dict(data_dir="",schedule_sampler="uniform",lr=1e-4,weight_decay=0.0,lr_anneal_steps=0,batch_size=1,microbatch=-1, # -1 disables microbatchesema_rate="0.9999", # comma-separated list of EMA valueslog_interval=10,save_interval=10000,resume_checkpoint="",use_fp16=False,fp16_scale_growth=1e-3,)defaults.update(model_and_diffusion_defaults())parser = argparse.ArgumentParser()add_dict_to_argparser(parser, defaults)return parserdef add_dict_to_argparser(parser, default_dict):for k, v in default_dict.items():v_type = type(v)if v is None:v_type = strelif isinstance(v, bool):v_type = str2boolparser.add_argument(f"--{k}", default=v, type=v_type)回到main函数,create_model_and_diffusion,得到unet model和diffusion框架,传入的参数是args_to_dict函数的**,args很大超参数,key只需要model和diffusion的部分
model, diffusion = create_model_and_diffusion(**args_to_dict(args, model_and_diffusion_defaults().keys()))model.to(dist_util.dev())schedule_sampler = create_named_schedule_sampler(args.schedule_sampler, diffusion)schedule_sampler = create_named_schedule_sampler(args.schedule_sampler, diffusion)
返回的是一个采样器,可以是均匀采样,uniform,或者是基于loss重要性采样,二阶动量平滑loss,loss-second-moment
logger.log("creating data loader...")data = load_data(data_dir=args.data_dir,batch_size=args.batch_size,image_size=args.image_size,class_cond=args.class_cond,)
load_data函数, 返回的图片,list image files recursively,递归的找到所有图片文件,对data dir下的都遍历一遍,class_cond,类别判断,找到图片的每个类别,假设文件名的下划线的第一部分就是类别,用split做分割,将class排序设置索引,最终模型输出的还是索引
def load_data(*, data_dir, batch_size, image_size, class_cond=False, deterministic=False
):"""For a dataset, create a generator over (images, kwargs) pairs.Each images is an NCHW float tensor, and the kwargs dict contains zero ormore keys, each of which map to a batched Tensor of their own.The kwargs dict can be used for class labels, in which case the key is "y"and the values are integer tensors of class labels.:param data_dir: a dataset directory.:param batch_size: the batch size of each returned pair.:param image_size: the size to which images are resized.:param class_cond: if True, include a "y" key in returned dicts for classlabel. If classes are not available and this is true, anexception will be raised.:param deterministic: if True, yield results in a deterministic order."""if not data_dir:raise ValueError("unspecified data directory")all_files = _list_image_files_recursively(data_dir)classes = Noneif class_cond:# Assume classes are the first part of the filename,# before an underscore.class_names = [bf.basename(path).split("_")[0] for path in all_files]sorted_classes = {x: i for i, x in enumerate(sorted(set(class_names)))}classes = [sorted_classes[x] for x in class_names]dataset = ImageDataset(image_size,all_files,classes=classes,shard=MPI.COMM_WORLD.Get_rank(),num_shards=MPI.COMM_WORLD.Get_size(),)if deterministic:loader = DataLoader(dataset, batch_size=batch_size, shuffle=False, num_workers=1, drop_last=True)else:loader = DataLoader(dataset, batch_size=batch_size, shuffle=True, num_workers=1, drop_last=True)while True:yield from loader
ImageDataset类自定义了dataset,getitem传入index获取每张图片,进行处理获取单张的训练样本,图像处理进行resize,转换RGB格式,归一化到-1到1之间的浮点型
class ImageDataset(Dataset):def __init__(self, resolution, image_paths, classes=None, shard=0, num_shards=1):super().__init__()self.resolution = resolutionself.local_images = image_paths[shard:][::num_shards]self.local_classes = None if classes is None else classes[shard:][::num_shards]def __len__(self):return len(self.local_images)def __getitem__(self, idx):path = self.local_images[idx]with bf.BlobFile(path, "rb") as f:pil_image = Image.open(f)pil_image.load()# We are not on a new enough PIL to support the `reducing_gap`# argument, which uses BOX downsampling at powers of two first.# Thus, we do it by hand to improve downsample quality.while min(*pil_image.size) >= 2 * self.resolution:pil_image = pil_image.resize(tuple(x // 2 for x in pil_image.size), resample=Image.BOX)scale = self.resolution / min(*pil_image.size)pil_image = pil_image.resize(tuple(round(x * scale) for x in pil_image.size), resample=Image.BICUBIC)arr = np.array(pil_image.convert("RGB"))crop_y = (arr.shape[0] - self.resolution) // 2crop_x = (arr.shape[1] - self.resolution) // 2arr = arr[crop_y : crop_y + self.resolution, crop_x : crop_x + self.resolution]arr = arr.astype(np.float32) / 127.5 - 1out_dict = {}if self.local_classes is not None:out_dict["y"] = np.array(self.local_classes[idx], dtype=np.int64)return np.transpose(arr, [2, 0, 1]), out_dictmain的最后代码的部分是实例化TrainLoop类,调用其run_loop函数,就可以开始训练了
logger.log("training...")TrainLoop(model=model,diffusion=diffusion,data=data,batch_size=args.batch_size,microbatch=args.microbatch,lr=args.lr,ema_rate=args.ema_rate,log_interval=args.log_interval,save_interval=args.save_interval,resume_checkpoint=args.resume_checkpoint,use_fp16=args.use_fp16,fp16_scale_growth=args.fp16_scale_growth,schedule_sampler=schedule_sampler,weight_decay=args.weight_decay,lr_anneal_steps=args.lr_anneal_steps,).run_loop()
总体来说:
整个训练框架分为三步,第一步超参数汇总生成argparser,第二步create model and diffusion,第三步trainloop开始训练
这是总体的训练框架,下面看看细节create model and diffusion部分,下面只介绍diffusion的实现,model部分自己随意替换成任意模型网络
def create_model_and_diffusion()
只是一个很顶层的封装函数,没有具体的实现
def create_model_and_diffusion(image_size,class_cond,learn_sigma,sigma_small,num_channels,num_res_blocks,num_heads,num_heads_upsample,attention_resolutions,dropout,diffusion_steps,noise_schedule,timestep_respacing,use_kl,predict_xstart,rescale_timesteps,rescale_learned_sigmas,use_checkpoint,use_scale_shift_norm,
):model = create_model(image_size,num_channels,num_res_blocks,learn_sigma=learn_sigma,class_cond=class_cond,use_checkpoint=use_checkpoint,attention_resolutions=attention_resolutions,num_heads=num_heads,num_heads_upsample=num_heads_upsample,use_scale_shift_norm=use_scale_shift_norm,dropout=dropout,)diffusion = create_gaussian_diffusion(steps=diffusion_steps,learn_sigma=learn_sigma,sigma_small=sigma_small,noise_schedule=noise_schedule,use_kl=use_kl,predict_xstart=predict_xstart,rescale_timesteps=rescale_timesteps,rescale_learned_sigmas=rescale_learned_sigmas,timestep_respacing=timestep_respacing,)return model, diffusion
这篇博客主要讲diffusion实现部分,那么我们可以看到diffusion由create_gaussian_diffusion()函数创建
diffusion = create_gaussian_diffusion(steps=diffusion_steps,learn_sigma=learn_sigma,sigma_small=sigma_small,noise_schedule=noise_schedule,use_kl=use_kl,predict_xstart=predict_xstart,rescale_timesteps=rescale_timesteps,rescale_learned_sigmas=rescale_learned_sigmas,timestep_respacing=timestep_respacing,)
def create_gaussian_diffusion()
create_gaussian_diffusion生成一个扩散过程的框架,这是一个diffusion的顶层封装函数,
def create_gaussian_diffusion(*,steps=1000,learn_sigma=False,sigma_small=False,noise_schedule="linear",use_kl=False,predict_xstart=False,rescale_timesteps=False,rescale_learned_sigmas=False,timestep_respacing="",
):betas = gd.get_named_beta_schedule(noise_schedule, steps)if use_kl:loss_type = gd.LossType.RESCALED_KLelif rescale_learned_sigmas:loss_type = gd.LossType.RESCALED_MSEelse:loss_type = gd.LossType.MSEif not timestep_respacing:timestep_respacing = [steps]return SpacedDiffusion(use_timesteps=space_timesteps(steps, timestep_respacing),betas=betas,model_mean_type=(gd.ModelMeanType.EPSILON if not predict_xstart else gd.ModelMeanType.START_X),model_var_type=((gd.ModelVarType.FIXED_LARGEif not sigma_smallelse gd.ModelVarType.FIXED_SMALL)if not learn_sigmaelse gd.ModelVarType.LEARNED_RANGE),loss_type=loss_type,rescale_timesteps=rescale_timesteps,)
第一步确定加噪的方案,get_named_beta_schedule,生成一个加噪的方案
获得了beta schedule
betas = gd.get_named_beta_schedule(noise_schedule, steps)
然后确定loss type,取决于从命令行传来的超参数是什么,use_kl的话使用rescaled_kl,rescale_learned_sigmas超参数使用rescaled_mse,不设置超参数启动普通的mse
if use_kl:loss_type = gd.LossType.RESCALED_KLelif rescale_learned_sigmas:loss_type = gd.LossType.RESCALED_MSEelse:loss_type = gd.LossType.MSE
create_gaussian_diffusion类最后return了一个实例化
调用了SpacedDiffusion的实例化
return SpacedDiffusion( # 下略
SpacedDiffusion就是Diffusion的实现类嘛?还是一个顶层的封装函数,封装的是一种可以跳过基本扩散过程中的步骤的扩散过程
SpacedDiffusion类
SpacedDiffusion类就是创建扩散模型的框架
timestep_respacing,对timestep做改进
将参数都传入 SpaceDiffusion类中进行实例化,所以这个代码的深度很深
下面看看SpacedDiffusion,这个类继承自GaussianDiffusion类
类的注释:
A diffusion process which can skip steps in a base diffusion process
一种可以跳过基本扩散过程的步骤(skip steps)的扩散过程。
扩散过程类,init函数定义了加噪方案的β,timestep哪些时刻要保留,numstep加噪次数
p_mean_variance函数,p就是神经网络所预测的分布,故p_mean_variance就是神经网络预测的均值和方差,这里调用的是父类的方法super().
training_loss函数,根据传入的超参数不同得到不同目标函数的公式,最简单的就是MSE loss,我们也可以加上kl loss联合起来作为目标函数
_wrap_model函数,对timestep进行后处理,比如对timestep进行scale,对timestep进行一定的优化
class SpacedDiffusion(GaussianDiffusion):"""A diffusion process which can skip steps in a base diffusion process.:param use_timesteps: a collection (sequence or set) of timesteps from theoriginal diffusion process to retain.:param kwargs: the kwargs to create the base diffusion process."""def __init__(self, use_timesteps, **kwargs):self.use_timesteps = set(use_timesteps)self.timestep_map = []self.original_num_steps = len(kwargs["betas"])base_diffusion = GaussianDiffusion(**kwargs) # pylint: disable=missing-kwoalast_alpha_cumprod = 1.0new_betas = []for i, alpha_cumprod in enumerate(base_diffusion.alphas_cumprod):if i in self.use_timesteps:new_betas.append(1 - alpha_cumprod / last_alpha_cumprod)last_alpha_cumprod = alpha_cumprodself.timestep_map.append(i)kwargs["betas"] = np.array(new_betas)super().__init__(**kwargs)def p_mean_variance(self, model, *args, **kwargs): # pylint: disable=signature-differsreturn super().p_mean_variance(self._wrap_model(model), *args, **kwargs)def training_losses(self, model, *args, **kwargs): # pylint: disable=signature-differsreturn super().training_losses(self._wrap_model(model), *args, **kwargs)def _wrap_model(self, model):if isinstance(model, _WrappedModel):return modelreturn _WrappedModel(model, self.timestep_map, self.rescale_timesteps, self.original_num_steps)def _scale_timesteps(self, t):# Scaling is done by the wrapped model.return tclass _WrappedModel:def __init__(self, model, timestep_map, rescale_timesteps, original_num_steps):self.model = modelself.timestep_map = timestep_mapself.rescale_timesteps = rescale_timestepsself.original_num_steps = original_num_stepsdef __call__(self, x, ts, **kwargs):map_tensor = th.tensor(self.timestep_map, device=ts.device, dtype=ts.dtype)new_ts = map_tensor[ts]if self.rescale_timesteps:new_ts = new_ts.float() * (1000.0 / self.original_num_steps)return self.model(x, new_ts, **kwargs)
GaussianDiffusion类 ⭐ LOOK HERE ⭐
下面来看SpacedDiffusion的父类GaussianDiffusion类
位置:improved_diffusion/gaussian_diffusion.py
先看注释:Utilities for training and sampling diffusion models.
训练和抽样扩散模型的实用程序,找了半天,原来这里才是真正的实现类
init函数
model_mean_type,知道这个模型要预测什么,预测的是方差还是噪声还是x0,
model_var_type,方差是固定还是可学习的,还是预测学习线性加权的权重
self.model_mean_type = model_mean_typeself.model_var_type = model_var_type
loss_type,是预测mse还是加kl
self.loss_type = loss_type
rescale-timesteps,对时间进行scale,使得timestep永远缩放到在0到1000之间
self.rescale_timesteps = rescale_timesteps
传入betas,论文中有提到一个扩散的超参数,1维的向量,在0到1之间
betas = np.array(betas, dtype=np.float64)self.betas = betasassert len(betas.shape) == 1, "betas must be 1-D"assert (betas > 0).all() and (betas <= 1).all()self.num_timesteps = int(betas.shape[0])
后面得到一些变量α=1-β,α-bar(α连乘),α-bar-prev(αt-1-bar),α-bar-next(αt+1-bar),根号下的等等α,根号下1-αt-bar,sqrt-recip,倒数根号下alpha等等,用于论文中计算的公式
alphas = 1.0 - betasself.alphas_cumprod = np.cumprod(alphas, axis=0)self.alphas_cumprod_prev = np.append(1.0, self.alphas_cumprod[:-1])self.alphas_cumprod_next = np.append(self.alphas_cumprod[1:], 0.0)assert self.alphas_cumprod_prev.shape == (self.num_timesteps,)# calculations for diffusion q(x_t | x_{t-1}) and othersself.sqrt_alphas_cumprod = np.sqrt(self.alphas_cumprod)self.sqrt_one_minus_alphas_cumprod = np.sqrt(1.0 - self.alphas_cumprod)self.log_one_minus_alphas_cumprod = np.log(1.0 - self.alphas_cumprod)self.sqrt_recip_alphas_cumprod = np.sqrt(1.0 / self.alphas_cumprod)self.sqrt_recipm1_alphas_cumprod = np.sqrt(1.0 / self.alphas_cumprod - 1)
接下来计算扩散过程中后验分布的真实的方差和均值,方差是一个常数可以直接计算,均值和xt有关,但是均值的两个系数是可以先确定的
# calculations for posterior q(x_{t-1} | x_t, x_0)self.posterior_variance = (betas * (1.0 - self.alphas_cumprod_prev) / (1.0 - self.alphas_cumprod))# log calculation clipped because the posterior variance is 0 at the# beginning of the diffusion chain.self.posterior_log_variance_clipped = np.log(np.append(self.posterior_variance[1], self.posterior_variance[1:]))self.posterior_mean_coef1 = (betas * np.sqrt(self.alphas_cumprod_prev) / (1.0 - self.alphas_cumprod))self.posterior_mean_coef2 = ((1.0 - self.alphas_cumprod_prev)* np.sqrt(alphas)/ (1.0 - self.alphas_cumprod))
接着看看类中的其他一些函数,q_mean_variance,基于下面的公式8生成均值和方差,中间的是均值,后面是标准差

def q_mean_variance(self, x_start, t):"""Get the distribution q(x_t | x_0).:param x_start: the [N x C x ...] tensor of noiseless inputs.:param t: the number of diffusion steps (minus 1). Here, 0 means one step.:return: A tuple (mean, variance, log_variance), all of x_start's shape."""mean = (_extract_into_tensor(self.sqrt_alphas_cumprod, t, x_start.shape) * x_start)variance = _extract_into_tensor(1.0 - self.alphas_cumprod, t, x_start.shape)log_variance = _extract_into_tensor(self.log_one_minus_alphas_cumprod, t, x_start.shape)return mean, variance, log_varianceq_sample函数,对上面q-mean-variance进行采样,给定x0和t的情况下采样出xt,这个过程就是重参数的过程
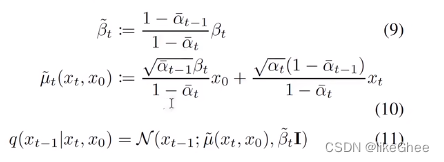
def q_sample(self, x_start, t, noise=None):"""Diffuse the data for a given number of diffusion steps.In other words, sample from q(x_t | x_0).:param x_start: the initial data batch.:param t: the number of diffusion steps (minus 1). Here, 0 means one step.:param noise: if specified, the split-out normal noise.:return: A noisy version of x_start."""if noise is None:noise = th.randn_like(x_start)assert noise.shape == x_start.shapereturn (_extract_into_tensor(self.sqrt_alphas_cumprod, t, x_start.shape) * x_start+ _extract_into_tensor(self.sqrt_one_minus_alphas_cumprod, t, x_start.shape)* noise)q-posterior-mean-variance,基于x0,xt和t计算出公式9和公式10真实分布的均值和方差
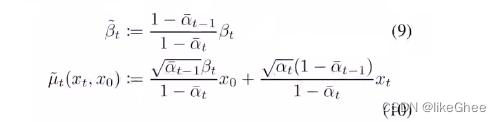
def q_posterior_mean_variance(self, x_start, x_t, t):"""Compute the mean and variance of the diffusion posterior:q(x_{t-1} | x_t, x_0)"""assert x_start.shape == x_t.shapeposterior_mean = (_extract_into_tensor(self.posterior_mean_coef1, t, x_t.shape) * x_start+ _extract_into_tensor(self.posterior_mean_coef2, t, x_t.shape) * x_t)posterior_variance = _extract_into_tensor(self.posterior_variance, t, x_t.shape)posterior_log_variance_clipped = _extract_into_tensor(self.posterior_log_variance_clipped, t, x_t.shape)assert (posterior_mean.shape[0]== posterior_variance.shape[0]== posterior_log_variance_clipped.shape[0]== x_start.shape[0])return posterior_mean, posterior_variance, posterior_log_variance_clipped
p_mean_variance,p分布是神经网络的分布,去建模拟合的分布,得到前一时刻(逆扩散过程)的均值和方差,也包括x0的预测
def p_mean_variance(self, model, x, t, clip_denoised=True, denoised_fn=None, model_kwargs=None):"""Apply the model to get p(x_{t-1} | x_t), as well as a prediction ofthe initial x, x_0.:param model: the model, which takes a signal and a batch of timestepsas input.:param x: the [N x C x ...] tensor at time t.:param t: a 1-D Tensor of timesteps.:param clip_denoised: if True, clip the denoised signal into [-1, 1].:param denoised_fn: if not None, a function which applies to thex_start prediction before it is used to sample. Applies beforeclip_denoised.:param model_kwargs: if not None, a dict of extra keyword arguments topass to the model. This can be used for conditioning.:return: a dict with the following keys:- 'mean': the model mean output.- 'variance': the model variance output.- 'log_variance': the log of 'variance'.- 'pred_xstart': the prediction for x_0."""if model_kwargs is None:model_kwargs = {}B, C = x.shape[:2]assert t.shape == (B,)model_output = model(x, self._scale_timesteps(t), **model_kwargs)if self.model_var_type in [ModelVarType.LEARNED, ModelVarType.LEARNED_RANGE]:assert model_output.shape == (B, C * 2, *x.shape[2:])model_output, model_var_values = th.split(model_output, C, dim=1)if self.model_var_type == ModelVarType.LEARNED:model_log_variance = model_var_valuesmodel_variance = th.exp(model_log_variance)else:min_log = _extract_into_tensor(self.posterior_log_variance_clipped, t, x.shape)max_log = _extract_into_tensor(np.log(self.betas), t, x.shape)# The model_var_values is [-1, 1] for [min_var, max_var].frac = (model_var_values + 1) / 2model_log_variance = frac * max_log + (1 - frac) * min_logmodel_variance = th.exp(model_log_variance)else:model_variance, model_log_variance = {# for fixedlarge, we set the initial (log-)variance like so# to get a better decoder log likelihood.ModelVarType.FIXED_LARGE: (np.append(self.posterior_variance[1], self.betas[1:]),np.log(np.append(self.posterior_variance[1], self.betas[1:])),),ModelVarType.FIXED_SMALL: (self.posterior_variance,self.posterior_log_variance_clipped,),}[self.model_var_type]model_variance = _extract_into_tensor(model_variance, t, x.shape)model_log_variance = _extract_into_tensor(model_log_variance, t, x.shape)def process_xstart(x):if denoised_fn is not None:x = denoised_fn(x)if clip_denoised:return x.clamp(-1, 1)return xif self.model_mean_type == ModelMeanType.PREVIOUS_X:pred_xstart = process_xstart(self._predict_xstart_from_xprev(x_t=x, t=t, xprev=model_output))model_mean = model_outputelif self.model_mean_type in [ModelMeanType.START_X, ModelMeanType.EPSILON]:if self.model_mean_type == ModelMeanType.START_X:pred_xstart = process_xstart(model_output)else:pred_xstart = process_xstart(self._predict_xstart_from_eps(x_t=x, t=t, eps=model_output))model_mean, _, _ = self.q_posterior_mean_variance(x_start=pred_xstart, x_t=x, t=t)else:raise NotImplementedError(self.model_mean_type)assert (model_mean.shape == model_log_variance.shape == pred_xstart.shape == x.shape)return {"mean": model_mean,"variance": model_variance,"log_variance": model_log_variance,"pred_xstart": pred_xstart,}_predict_xstart_from_eps,辅助函数,从预测处的噪声预测x0,对应公式12 
给定xt,t和x0到xt所加的噪声反推出x0
def _predict_xstart_from_eps(self, x_t, t, eps):assert x_t.shape == eps.shapereturn (_extract_into_tensor(self.sqrt_recip_alphas_cumprod, t, x_t.shape) * x_t- _extract_into_tensor(self.sqrt_recipm1_alphas_cumprod, t, x_t.shape) * eps)
_predict_xstart_from_xprev,从xt-1中预测出x0

基于公式10,xt-1就是μ~t,有xt,反推出x0
def _predict_xstart_from_xprev(self, x_t, t, xprev):assert x_t.shape == xprev.shapereturn ( # (xprev - coef2*x_t) / coef1_extract_into_tensor(1.0 / self.posterior_mean_coef1, t, x_t.shape) * xprev- _extract_into_tensor(self.posterior_mean_coef2 / self.posterior_mean_coef1, t, x_t.shape)* x_t)
_predict_eps_from_xstart,从x0和xt,推导eps,对公式8的反推

def _predict_eps_from_xstart(self, x_t, t, pred_xstart):return (_extract_into_tensor(self.sqrt_recip_alphas_cumprod, t, x_t.shape) * x_t- pred_xstart) / _extract_into_tensor(self.sqrt_recipm1_alphas_cumprod, t, x_t.shape)
p_sample,从xt采样出xt-1,所有的p分布都是模型预测的,其实就是推理的函数
def p_sample(self, model, x, t, clip_denoised=True, denoised_fn=None, model_kwargs=None):"""Sample x_{t-1} from the model at the given timestep.:param model: the model to sample from.:param x: the current tensor at x_{t-1}.:param t: the value of t, starting at 0 for the first diffusion step.:param clip_denoised: if True, clip the x_start prediction to [-1, 1].:param denoised_fn: if not None, a function which applies to thex_start prediction before it is used to sample.:param model_kwargs: if not None, a dict of extra keyword arguments topass to the model. This can be used for conditioning.:return: a dict containing the following keys:- 'sample': a random sample from the model.- 'pred_xstart': a prediction of x_0."""out = self.p_mean_variance(model,x,t,clip_denoised=clip_denoised,denoised_fn=denoised_fn,model_kwargs=model_kwargs,)noise = th.randn_like(x)nonzero_mask = ((t != 0).float().view(-1, *([1] * (len(x.shape) - 1)))) # no noise when t == 0sample = out["mean"] + nonzero_mask * th.exp(0.5 * out["log_variance"]) * noisereturn {"sample": sample, "pred_xstart": out["pred_xstart"]}
_vb_terms_bpd, 计算最终的kl散度
kl散度包括两项,当t在0到t之间,用模型预测分布计算高斯分布算一个kl散度,另一项是最后一个时刻,L0 loss,使用的是似然函数,负对数似然函数,使用的是累积分布函数的差分拟合离散的高斯分布
def _vb_terms_bpd(self, model, x_start, x_t, t, clip_denoised=True, model_kwargs=None):"""Get a term for the variational lower-bound.The resulting units are bits (rather than nats, as one might expect).This allows for comparison to other papers.:return: a dict with the following keys:- 'output': a shape [N] tensor of NLLs or KLs.- 'pred_xstart': the x_0 predictions."""true_mean, _, true_log_variance_clipped = self.q_posterior_mean_variance(x_start=x_start, x_t=x_t, t=t)out = self.p_mean_variance(model, x_t, t, clip_denoised=clip_denoised, model_kwargs=model_kwargs)kl = normal_kl(true_mean, true_log_variance_clipped, out["mean"], out["log_variance"])kl = mean_flat(kl) / np.log(2.0)decoder_nll = -discretized_gaussian_log_likelihood(x_start, means=out["mean"], log_scales=0.5 * out["log_variance"])assert decoder_nll.shape == x_start.shapedecoder_nll = mean_flat(decoder_nll) / np.log(2.0)# At the first timestep return the decoder NLL,# otherwise return KL(q(x_{t-1}|x_t,x_0) || p(x_{t-1}|x_t))output = th.where((t == 0), decoder_nll, kl)return {"output": output, "pred_xstart": out["pred_xstart"]}
traning-loss,计算一个使用的loss
def training_losses(self, model, x_start, t, model_kwargs=None, noise=None):"""Compute training losses for a single timestep.:param model: the model to evaluate loss on.:param x_start: the [N x C x ...] tensor of inputs.:param t: a batch of timestep indices.:param model_kwargs: if not None, a dict of extra keyword arguments topass to the model. This can be used for conditioning.:param noise: if specified, the specific Gaussian noise to try to remove.:return: a dict with the key "loss" containing a tensor of shape [N].Some mean or variance settings may also have other keys."""if model_kwargs is None:model_kwargs = {}if noise is None:noise = th.randn_like(x_start)x_t = self.q_sample(x_start, t, noise=noise)terms = {}if self.loss_type == LossType.KL or self.loss_type == LossType.RESCALED_KL:terms["loss"] = self._vb_terms_bpd(model=model,x_start=x_start,x_t=x_t,t=t,clip_denoised=False,model_kwargs=model_kwargs,)["output"]if self.loss_type == LossType.RESCALED_KL:terms["loss"] *= self.num_timestepselif self.loss_type == LossType.MSE or self.loss_type == LossType.RESCALED_MSE:model_output = model(x_t, self._scale_timesteps(t), **model_kwargs)if self.model_var_type in [ModelVarType.LEARNED,ModelVarType.LEARNED_RANGE,]:B, C = x_t.shape[:2]assert model_output.shape == (B, C * 2, *x_t.shape[2:])model_output, model_var_values = th.split(model_output, C, dim=1)# Learn the variance using the variational bound, but don't let# it affect our mean prediction.frozen_out = th.cat([model_output.detach(), model_var_values], dim=1)terms["vb"] = self._vb_terms_bpd(model=lambda *args, r=frozen_out: r,x_start=x_start,x_t=x_t,t=t,clip_denoised=False,)["output"]if self.loss_type == LossType.RESCALED_MSE:# Divide by 1000 for equivalence with initial implementation.# Without a factor of 1/1000, the VB term hurts the MSE term.terms["vb"] *= self.num_timesteps / 1000.0target = {ModelMeanType.PREVIOUS_X: self.q_posterior_mean_variance(x_start=x_start, x_t=x_t, t=t)[0],ModelMeanType.START_X: x_start,ModelMeanType.EPSILON: noise,}[self.model_mean_type]assert model_output.shape == target.shape == x_start.shapeterms["mse"] = mean_flat((target - model_output) ** 2)if "vb" in terms:terms["loss"] = terms["mse"] + terms["vb"]else:terms["loss"] = terms["mse"]else:raise NotImplementedError(self.loss_type)return terms
_extract_into_tensor,辅助函数,从tensor中取出第t时刻
def _extract_into_tensor(arr, timesteps, broadcast_shape):"""Extract values from a 1-D numpy array for a batch of indices.:param arr: the 1-D numpy array.:param timesteps: a tensor of indices into the array to extract.:param broadcast_shape: a larger shape of K dimensions with the batchdimension equal to the length of timesteps.:return: a tensor of shape [batch_size, 1, ...] where the shape has K dims."""res = th.from_numpy(arr).to(device=timesteps.device)[timesteps].float()while len(res.shape) < len(broadcast_shape):res = res[..., None]return res.expand(broadcast_shape)
边角料
一个很小很小的改动,算是技巧的noise scheduling
noise scheduling
原始的DDPM中使用的是线性的增长的β加噪方案,此处使用了余弦的方案,同时控制上界在0.999
def get_named_beta_schedule(schedule_name, num_diffusion_timesteps):"""Get a pre-defined beta schedule for the given name.The beta schedule library consists of beta schedules which remain similarin the limit of num_diffusion_timesteps.Beta schedules may be added, but should not be removed or changed oncethey are committed to maintain backwards compatibility."""if schedule_name == "linear":# Linear schedule from Ho et al, extended to work for any number of# diffusion steps.scale = 1000 / num_diffusion_timestepsbeta_start = scale * 0.0001beta_end = scale * 0.02return np.linspace(beta_start, beta_end, num_diffusion_timesteps, dtype=np.float64)elif schedule_name == "cosine":return betas_for_alpha_bar(num_diffusion_timesteps,lambda t: math.cos((t + 0.008) / 1.008 * math.pi / 2) ** 2,)else:raise NotImplementedError(f"unknown beta schedule: {schedule_name}")