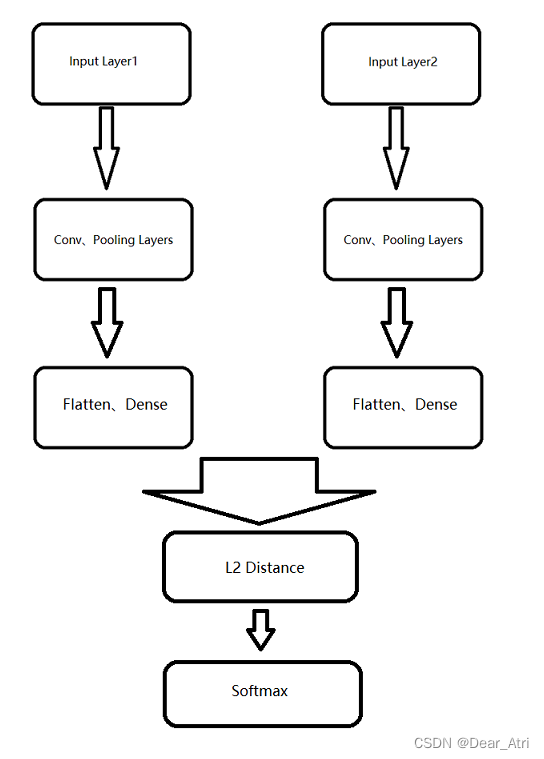
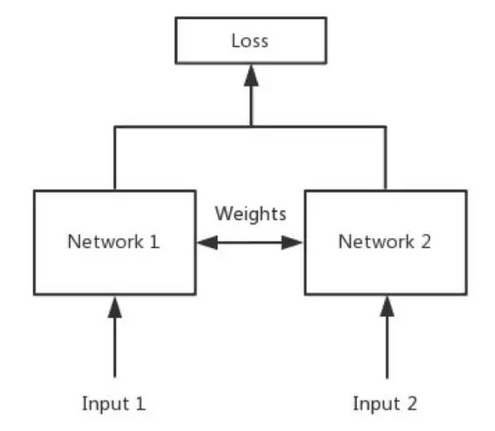
模型结构

上图是孪生网络的简单模型结构,思路很简单,就是输入两个样本到同样的网络(参数结构相同),最后计算两个网络输出的距离,如果距离较近就认为是同一类,较远就认为是不同的类别,在这里,我们可以使用两个同样参数的CNN,利用CNN从图像中提取特征。注意这里必须是同样的CNN,不然两个不同的CNN,即使输入相同,输出也可能认为两者不同。
损失函数
-
Constrastive loss
-
Triplet loss
-
Softmax loss
-
其他损失函数:比如cosine loss,欧式距离等。
模型伪代码
模型代码
class SiameseNetwork(nn.Module):def __init__(self):super(SiameseNetwork, self).__init__()self.cnn1 = nn.Sequential(nn.ReflectionPad2d(1),nn.Conv2d(1, 4, kernel_size=3),nn.ReLU(inplace=True),nn.BatchNorm2d(4),nn.Dropout2d(p=.2),nn.ReflectionPad2d(1),nn.Conv2d(4, 8, kernel_size=3),nn.ReLU(inplace=True),nn.BatchNorm2d(8),nn.Dropout2d(p=.2),nn.ReflectionPad2d(1),nn.Conv2d(8, 8, kernel_size=3),nn.ReLU(inplace=True),nn.BatchNorm2d(8),nn.Dropout2d(p=.2),)self.fc1 = nn.Sequential(nn.Linear(8*100*100, 500),nn.ReLU(inplace=True),nn.Linear(500, 500),nn.ReLU(inplace=True),nn.Linear(500, 5))def forward_once(self, x):output = self.cnn1(x)output = output.view(output.size()[0], -1)output = self.fc1(output)return outputdef forward(self, input1, input2):output1 = self.forward_once(input1)output2 = self.forward_once(input2)return output1, output2
损失函数
class ContrastiveLoss(torch.nn.Module):"""Contrastive loss function.Based on: http://yann.lecun.com/exdb/publis/pdf/hadsell-chopra-lecun-06.pdf"""def __init__(self, margin=2.0):super(ContrastiveLoss, self).__init__()self.margin = margindef forward(self, output1, output2, label):euclidean_distance = F.pairwise_distance(output1, output2)loss_contrastive = torch.mean((1-label) * torch.pow(euclidean_distance, 2) (label) * torch.pow(torch.clamp(self.margin - euclidean_distance, min=0.0), 2))return loss_contrastive
真实案例
基于ORL人脸数据集,利用孪生网络来进行人脸验证。
数据介绍
ORL人脸数据集共包含40个不同人的400张图像,此数据集下包含40个目录,每个目录下有10张图像,每个目录表示一个不同的人。所有的图像是以PGM格式存储,灰度图,图像大小宽度92,高度为112。对每一个目录下,这些图像实在不同的时间、不同的光照、不同的面部表情和面部细节环境下采集的。
可以从http://www.cl.cam.ac.uk/research/dtg/attarchive/facedatabase.html下载此人脸数据集。
程序包导入
import torch
import torchvision
import torch.nn as nn
from torch import optim
import torch.nn.functional as F
import torchvision.transforms as transforms
from torch.utils.data import DataLoader,Dataset
import matplotlib.pyplot as plt
import torchvision.utils
import numpy as np
import random
from PIL import Image
import PIL.ImageOps
print(torch.__version__) #1.1.0
print(torchvision.__version__) #0.3.0
#定义一些超参
train_batch_size = 32 #训练时batch_size
train_number_epochs = 50 #训练的epoch
def imshow(img,text=None,should_save=False): #展示一幅tensor图像,输入是(C,H,W)npimg = img.numpy() #将tensor转为ndarrayplt.axis("off")if text:plt.text(75, 8, text, style='italic',fontweight='bold',bbox={'facecolor':'white', 'alpha':0.8, 'pad':10})plt.imshow(np.transpose(npimg, (1, 2, 0))) #转换为(H,W,C)plt.show()
def show_plot(iteration,loss):#绘制损失变化图plt.plot(iteration,loss)plt.show()
自定义Dataset和Dataloader
自定义的Dataset需要实现 __ getitem __ 和 __ len __ 函数。每次读取一对图像,标签表示差异度,0表示同一个人,1表示不是同一人。
#自定义Dataset类,__getitem__(self,index)每次返回(img1, img2, 0/1)
class SiameseNetworkDataset(Dataset):def __init__(self,imageFolderDataset,transform=None,should_invert=True):self.imageFolderDataset = imageFolderDataset self.transform = transformself.should_invert = should_invertdef __getitem__(self,index):img0_tuple = random.choice(self.imageFolderDataset.imgs) #37个类别中任选一个should_get_same_class = random.randint(0,1) #保证同类样本约占一半if should_get_same_class:while True:#直到找到同一类别img1_tuple = random.choice(self.imageFolderDataset.imgs) if img0_tuple[1]==img1_tuple[1]:breakelse:while True:#直到找到非同一类别img1_tuple = random.choice(self.imageFolderDataset.imgs) if img0_tuple[1] !=img1_tuple[1]:break
img0 = Image.open(img0_tuple[0])img1 = Image.open(img1_tuple[0])img0 = img0.convert("L")img1 = img1.convert("L")if self.should_invert:img0 = PIL.ImageOps.invert(img0)img1 = PIL.ImageOps.invert(img1)
if self.transform is not None:img0 = self.transform(img0)img1 = self.transform(img1)return img0, img1, torch.from_numpy(np.array([int(img1_tuple[1]!=img0_tuple[1])],dtype=np.float32))def __len__(self):return len(self.imageFolderDataset.imgs)#定义文件dataset
training_dir = "./data/faces/training/" #训练集地址
folder_dataset = torchvision.datasets.ImageFolder(root=training_dir)
#定义图像dataset
transform = transforms.Compose([transforms.Resize((100,100)), #有坑,传入int和tuple有区别transforms.ToTensor()])
siamese_dataset = SiameseNetworkDataset(imageFolderDataset=folder_dataset,transform=transform,should_invert=False)
#定义图像dataloader
train_dataloader = DataLoader(siamese_dataset,shuffle=True,batch_size=train_batch_size)
可视化数据集
vis_dataloader = DataLoader(siamese_dataset,shuffle=True,batch_size=8)
example_batch = next(iter(vis_dataloader)) #生成一批图像
#其中example_batch[0] 维度为torch.Size([8, 1, 100, 100])
concatenated = torch.cat((example_batch[0],example_batch[1]),0)
imshow(torchvision.utils.make_grid(concatenated, nrow=8))
print(example_batch[2].numpy())

注意torchvision.utils.make_grid用法:将若干幅图像拼成一幅图像。内部机制是铺成网格状的tensor,其中输入tensor必须是四维(B,C,H,W)。后续还需要调用numpy()和transpose(),再用plt显示。
# https://pytorch.org/docs/stable/_modules/torchvision/utils.html#make_grid torchvision.utils.make_grid(tensor, nrow=8, padding=2, normalize=False, range=None, scale_each=False, pad_value=0) #示例 t = torchvision.utils.make_grid(concatenated, nrow=8) concatenated.size() #torch.Size([16, 1, 100, 100]) t.size() #torch.Size([3, 206, 818]) 对于(batch,1,H,W)的tensor,重复三个channel,详见官网文档源码
准备模型
自定义模型和损失函数
#搭建模型 class SiameseNetwork(nn.Module):def __init__(self):super().__init__()self.cnn1 = nn.Sequential(nn.ReflectionPad2d(1),nn.Conv2d(1, 4, kernel_size=3),nn.ReLU(inplace=True),nn.BatchNorm2d(4),nn.ReflectionPad2d(1),nn.Conv2d(4, 8, kernel_size=3),nn.ReLU(inplace=True),nn.BatchNorm2d(8), nn.ReflectionPad2d(1),nn.Conv2d(8, 8, kernel_size=3),nn.ReLU(inplace=True),nn.BatchNorm2d(8),) self.fc1 = nn.Sequential(nn.Linear(8*100*100, 500),nn.ReLU(inplace=True), nn.Linear(500, 500),nn.ReLU(inplace=True), nn.Linear(500, 5)) def forward_once(self, x):output = self.cnn1(x)output = output.view(output.size()[0], -1)output = self.fc1(output)return output def forward(self, input1, input2):output1 = self.forward_once(input1)output2 = self.forward_once(input2)return output1, output2#自定义ContrastiveLoss class ContrastiveLoss(torch.nn.Module):"""Contrastive loss function.Based on: http://yann.lecun.com/exdb/publis/pdf/hadsell-chopra-lecun-06.pdf""" def __init__(self, margin=2.0):super(ContrastiveLoss, self).__init__()self.margin = margin def forward(self, output1, output2, label):euclidean_distance = F.pairwise_distance(output1, output2, keepdim = True)loss_contrastive = torch.mean((1-label) * torch.pow(euclidean_distance, 2) +(label) * torch.pow(torch.clamp(self.margin - euclidean_distance, min=0.0), 2)) return loss_contrastive
训练
net = SiameseNetwork().cuda() #定义模型且移至GPU
criterion = ContrastiveLoss() #定义损失函数
optimizer = optim.Adam(net.parameters(), lr = 0.0005) #定义优化器
counter = []
loss_history = []
iteration_number = 0
#开始训练
for epoch in range(0, train_number_epochs):for i, data in enumerate(train_dataloader, 0):img0, img1 , label = data#img0维度为torch.Size([32, 1, 100, 100]),32是batch,label为torch.Size([32, 1])img0, img1 , label = img0.cuda(), img1.cuda(), label.cuda() #数据移至GPUoptimizer.zero_grad()output1,output2 = net(img0, img1)loss_contrastive = criterion(output1, output2, label)loss_contrastive.backward()optimizer.step()if i % 10 == 0 :iteration_number +=10counter.append(iteration_number)loss_history.append(loss_contrastive.item())print("Epoch number: {} , Current loss: {:.4f}\n".format(epoch,loss_contrastive.item()))show_plot(counter, loss_history)

测试
现在用testing文件夹中3个任务的图像进行测试,注意:模型从未见过这3个人的图像。
#定义测试的dataset和dataloader
#定义文件dataset
testing_dir = "./data/faces/testing/" #测试集地址
folder_dataset_test = torchvision.datasets.ImageFolder(root=testing_dir)
#定义图像dataset
transform_test = transforms.Compose([transforms.Resize((100,100)), transforms.ToTensor()])
siamese_dataset_test = SiameseNetworkDataset(imageFolderDataset=folder_dataset_test,transform=transform_test,should_invert=False)
#定义图像dataloader
test_dataloader = DataLoader(siamese_dataset_test,shuffle=True,batch_size=1)
#生成对比图像
dataiter = iter(test_dataloader)
x0,_,_ = next(dataiter)
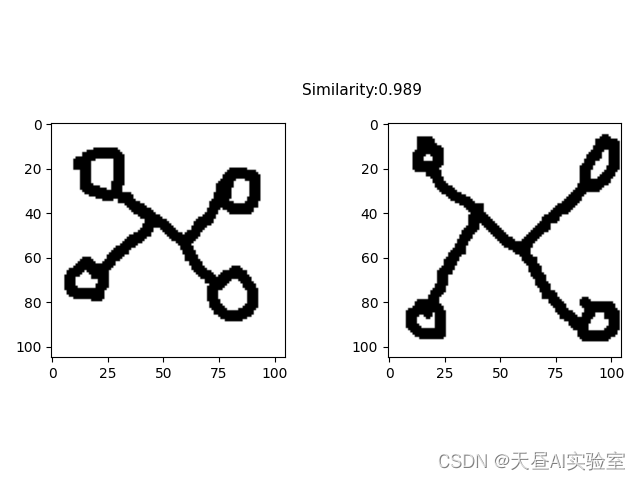
for i in range(10):_,x1,label2 = next(dataiter)concatenated = torch.cat((x0,x1),0)output1,output2 = net(x0.cuda(),x1.cuda())euclidean_distance = F.pairwise_distance(output1, output2)imshow(torchvision.utils.make_grid(concatenated),'Dissimilarity: {:.2f}'.format(euclidean_distance.item()))

参考
-
https://github.com/harveyslash/Facial-Similarity-with-Siamese-Networks-in-Pytorch
-
ORL Faces Database介绍_网络资源是无限的-CSDN博客_orl数据集
-
https://github.com/adambielski/siamese-triplet