文章目录
- irate算法
- 流程
- 特点
- 代码
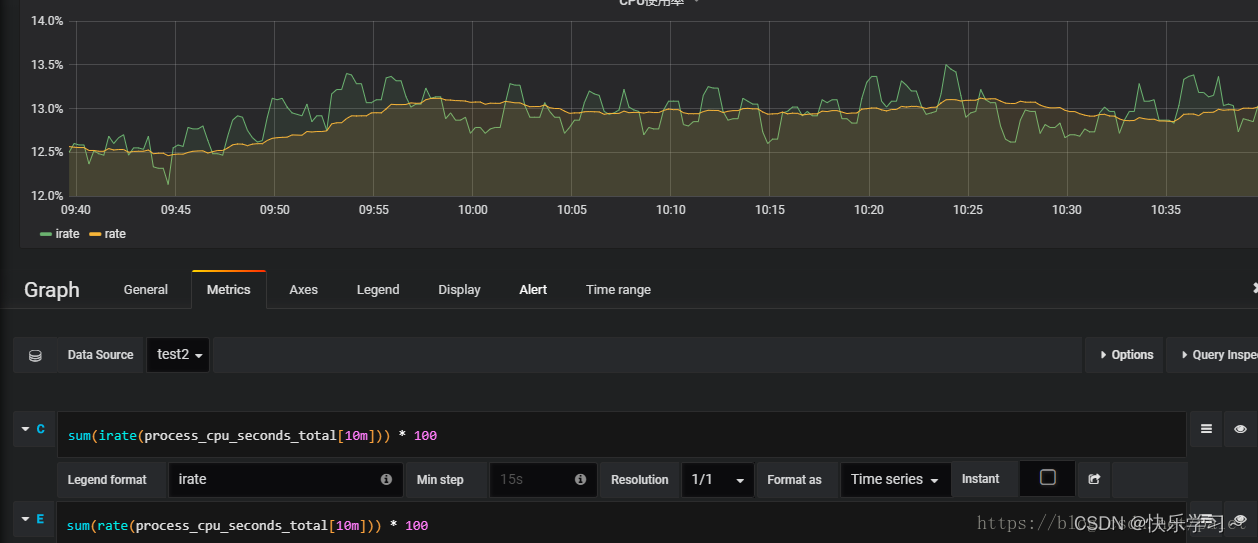
- rate函数
- 流程
- 特点
- 代码
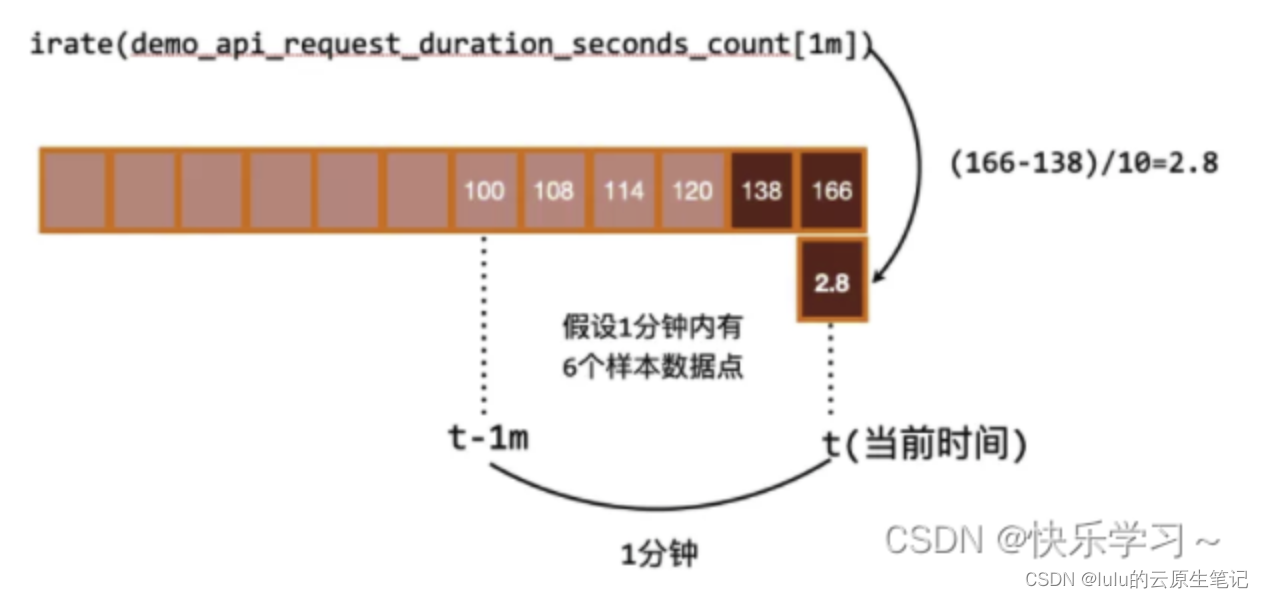
irate算法
流程
-
选取时间范围内最后两个点:end1,end2
-
计算两个点的差值,这里分两种情况:
正常情况下:end2 > end1 ,此时 value = end2 - end1
异常情况下,end2 < end1 ,此时 value = end2
-
计算两个时间点的时间差time = time2 - time1
-
计算最终结果:value / time 并换算毫秒单位
流程图
特点
- 相当于区间内的最后时刻瞬时值
- 只选取了区间最后两个点进行计算
- 如果出现了counter异常类型的值,就会计算出巨大的结果
代码
package promqlvar functions = map[string]*Function{"irate": {Name:       "irate",ArgTypes:   []ValueType{ValueTypeMatrix},ReturnType: ValueTypeVector,// 处理函数 funcIrateCall:       funcIrate,},
}// irate 方法
func funcIrate(vals []Value, args Expressions, enh *EvalNodeHelper) Vector {// 注意,最后一个参数 isRate = truereturn instantValue(vals, enh.out, true)
}// irate 算法内容
// isRate = true
func instantValue(vals []Value, out Vector, isRate bool) Vector {for _, samples := range vals[0].(Matrix) {if len(samples.Points) < 2 {// 少于两个点,无效范围continue}// 取区间内最后两个数值// endindex 的点位lastSample := samples.Points[len(samples.Points)-1]// endindex - 1 的点位previousSample := samples.Points[len(samples.Points)-2]var resultValue float64// irate计算时 isRate = trueif isRate && lastSample.V < previousSample.V {// counter 中出现了明显的异常点,最后两个值是 大--小 的结构,因此 counter 重置resultValue = lastSample.V} else {// 最后两个值是 小--大 的结构,因此直接相减resultValue = lastSample.V - previousSample.V}/* 此时 resultValue有两种情况:1、正常情况时,resultValue=最后两个点的差值,2、counter 类型异常时,resultValue=最后选取的点的值,*/// 两个值的时间间隔sampledInterval := lastSample.T - previousSample.Tif sampledInterval == 0 {// 选取的两个点时间差为0.要舍弃,否则除以0最终会是无限大continue}// irate 时 isRate = trueif isRate {// 变化值除以时间间隔,这里的1000看来默认时间单位是秒,这里除以1000,换算成毫秒?// 此时如果 counter 遇到了 重置点, 那么这里计算出来的值会【异常的大】resultValue /= float64(sampledInterval) / 1000}out = append(out, Sample{Point: Point{V: resultValue},})}return out
}
rate函数
流程
-
查找点集合的值差
如果始终 next > current,那么 value = end - begin
如果中间存在 A = next < current,那么 value = end - begin + 每个异常的落差A
-
计算点集合的时间跨度比例P
计算开头、结尾空隙
计算时间跨度的有效值与时间范围的比例P
-
按照P等比例扩大value的值
-
计算最终结果: value/区间时间跨度
流程图
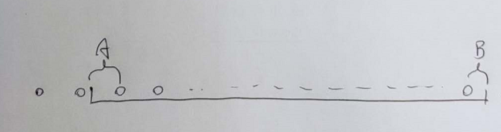
计算点集合落差的异常值
目的&特点:无论中间是否出现倒序情况,都能算出近似于总落差的值

等比例扩大区间的理解
特点
-
相当于区间内的平均值
-
读取了区间内最后一个点与第一个点的差值
-
又等比例扩大了点集合的时间范围到区间跨度
-
因此计算比irate较为严谨
代码
var functions = map[string]*Function{// rate 方法入口"rate": {Name:       "rate",ArgTypes:   []ValueType{ValueTypeMatrix},ReturnType: ValueTypeVector,Call:       funcRate,},
}// rate 入口
func funcRate(vals []Value, args Expressions, enh *EvalNodeHelper) Vector {// isRate = truereturn extrapolatedRate(vals, args, enh, true, true)
}// 算法实现
func extrapolatedRate(vals []Value, args Expressions, enh *EvalNodeHelper, isCounter bool, isRate bool) Vector {ms := args[0].(*MatrixSelector)var (// 默认是毫秒单位matrix     = vals[0].(Matrix)rangeStart = enh.ts - durationMilliseconds(ms.Range+ms.Offset)rangeEnd   = enh.ts - durationMilliseconds(ms.Offset))for _, samples := range matrix {// No sense in trying to compute a rate without at least two points. Drop// this Vector element.if len(samples.Points) < 2 {continue}var (counterCorrection float64lastValue         float64)for _, sample := range samples.Points {// Counter类型数据,但是数值又小于上一次的 value,说明重置了 counter// 否则的话,这个值一直为空if isCounter && sample.V < lastValue {// 所有异常节点的差值累计counterCorrection += lastValue}// 由于是 for 循环,因此这里的 lastValue 最终就是当前点集合最后一个点的值lastValue = sample.V}// 集合首位两个点的差值。 集合最后一个点的值 - 第一个点的值,最后加上了定时器重置的 counter(一般为0)// 这个 counterCorrection 的理解可以参考下图,是计算的关键点resultValue := lastValue - samples.Points[0].V + counterCorrection// 区间开始时间与 第一个点的时间间隔durationToStart := float64(samples.Points[0].T-rangeStart) / 1000// 最后一个点与区间结束时间之间的时间空间,具体算法: 区间结束的时间-区间最后一个点的时间,就是 最后一个点与区间结尾之间的时间间隔durationToEnd := float64(rangeEnd-samples.Points[len(samples.Points)-1].T) / 1000// 区间内所有点的时间差,也就是区间最后一个点时间 - 区间第一个点时间sampledInterval := float64(samples.Points[len(samples.Points)-1].T-samples.Points[0].T) / 1000// 区间内采集点占用的平均时间,也就是  总集合点时间/总点数averageDurationBetweenSamples := sampledInterval / float64(len(samples.Points)-1)if isCounter && resultValue > 0 && samples.Points[0].V >= 0 {// Counters cannot be negative. If we have any slope at// all (i.e. resultValue went up), we can extrapolate// the zero point of the counter. If the duration to the// zero point is shorter than the durationToStart, we// take the zero point as the start of the series,// thereby avoiding extrapolation to negative counter// values.// 这里较为难理解,目的: 区间内是一个递增的序列,假设这个序列是线性的,那么要寻找,这个线性序列的值为0的那个点所在的时间点// 如果这个0所在的时间点在第一个点左边,那么就要砍掉0值左侧的区域// 比如 1 3 5 7这个序列,那么推测的0值位置就在 6*(1/6) = 1,也就是说这个线性序列的0值就是开始的位置durationToZero := sampledInterval * (samples.Points[0].V / resultValue)if durationToZero < durationToStart {// 如果中间counter重置了,这里好像是在找重置时那个0点的位置,我们将会把区间起点调整到0点附近// 如果选择的序列所推测的的0值位置在时间开始与第一个节点之间的位置,那么就要调整整个有效区间的开始位置durationToStart = durationToZero}}// If the first/last samples are close to the boundaries of the range,// extrapolate the result. This is as we expect that another sample// will exist given the spacing between samples we've seen thus far,// with an allowance for noise.// 噪音处理,因为点集合的区间实际上小于时间区间,两边有一段空白,因此这里 *1.1 来扩大了一下点集合的区间范围extrapolationThreshold := averageDurationBetweenSamples * 1.1// 默认是所有集合点的时间差extrapolateToInterval := sampledInterval// 将点集合与区间两端的时间空隙添加到 extrapolateToInterval 中if durationToStart < extrapolationThreshold {// 决定最终区间的起点extrapolateToInterval += durationToStart} else {extrapolateToInterval += averageDurationBetweenSamples / 2}if durationToEnd < extrapolationThreshold {// 决定区间的终点extrapolateToInterval += durationToEnd} else {extrapolateToInterval += averageDurationBetweenSamples / 2}// extrapolateToInterval 是经过调整的区间长度,添加了 集合点与时间区间两端的时间空隙,因此 extrapolateToInterval 会比 sampledInterval 大一点// 这个操作等于按照  实际时间区间/集合点时间区间  这个比例,把 resultValue 这个集合点两端的差值等比例扩大resultValue = resultValue * (extrapolateToInterval / sampledInterval)if isRate {// 利用等比例扩大后的插值,除以时间间隔。计算最终的每次 for 循环的变化率resultValue = resultValue / ms.Range.Seconds()}enh.out = append(enh.out, Sample{Point: Point{V: resultValue},})}return enh.out
}