SV – Coverage 覆盖率
本文内容来自:
- http://www.asic-world.com/systemverilog/coverage.html
- https://verificationguide.com/systemverilog/systemverilog-array-manipulation-methods/
- https://blog.csdn.net/bleauchat/article/details/90445713 (本文的主要来源,只做了部分补充和修改)
————————————————
版权声明:本文为CSDN博主「bleauchat」的原创文章,遵循CC 4.0 BY-SA版权协议,转载请附上原文出处链接及本声明。
原文链接:https://blog.csdn.net/bleauchat/article/details/90445713
@(SV)
文章目录
- SV -- Coverage 覆盖率
- 1. Coverage概念
- 2. 功能覆盖率
- 3. 覆盖点
- 自动或隐式bin(Automatic Bins or Implicit Bins)
- 显式bin
- bins for transitions (bin值域的转变)
- consecutive repetions creation 连续转换
- Non consecutive repetition 非连续转换
- wildcard bins 不定值bins
- ignore_bins 忽略bin
- illegal_bins 非法bin
- Examples
- 4. Cross Coverage 交叉覆盖
- User defined cross bins
- 5. Coverage Options 覆盖率选项
- at_least
- auto_bin_max
- cross_auto_bin_max
- 6. Coverage methods 覆盖率方法
- 7. Coverage system task 覆盖率系统任务
1. Coverage概念
覆盖率用来衡量设计中已经被测部分和未测部分的比例,通常被定义为已达到所需验证部分的百分比.
目标覆盖率是指在验证计划中规定的需要验证点的目标值。 在验证计划中, 当验证点实际覆盖率没有达到 100% 的时候, 说明验证工作还未完成目标方案。 没有达到 100% 的项目需要通过 添 加 测 试 用 例 或 者 修 改 约 束 \color{red}{添加测试用例或者修改约束} 添加测试用例或者修改约束等来对其进行充分的验证;
验证计划中列出的项目都要一一被测试, 当然这需要一个比较全面和完整的验证计划。为此, 在验证环境搭建的前期, 制定验证计划, 明确验证点并确定目标覆盖率是一项艰巨而且细致的工作;
制定验证计划中的功能点的时候, 需要考虑如下三个问题:
1) 哪些功能点需要检查?
2) 这个功能点的哪些数据需要检查?
3) 如何对这些数据进行采样?
哪些功能点需要检查呢? 这要根据设计的具体情况而定, 一般情况下, 以下几类是参考的对象: 功能要求、 接口要求、 系统规范、 协议规范等。 具体验证计划中可能表现为:FIFO 是否溢出和空读、 外部接口是否遵从以太网物理层的传输协议、 是否满足系统规范要求的支持发送超长包、 内部的AMBA 总线是否符合协议要求等;
主要有两种coverage评估方式:
- 代码覆盖率
- 代码覆盖率度量执行了多少“设计代码”。
- 包括行覆盖率、FSM状态机覆盖率、分支覆盖率、条件覆盖率 和path路径覆盖率。
- 行覆盖率: 检查某行代码是否被执行过
- 分支覆盖率: 检查条件分支是否都被执行过
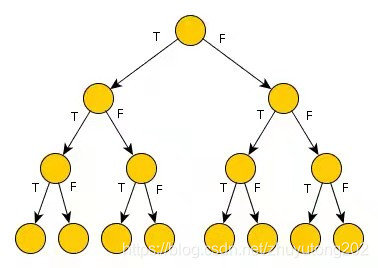
- 条件覆盖率, 表达式覆盖率: 通过真值表分析表达式各种逻辑组合
- 有限状态机覆盖率: 检查每个状态是否被覆盖, 状态之间的跳转是否被执行
- 仿真工具将自动从设计代码中提取代码覆盖率.代码覆盖率就算达到100%,这并不意味着不存在bug.
- 功能覆盖率
- 功能覆盖是一个用户定义的度量,它度量在验证中执行了多少设计规范。
- 面向数据的覆盖(Data-oriented Coverage)——检查数据值的组合。对已进行的数据组合检查.我们可以通过编写覆盖组(coverage groups)、覆盖点(coverage points)和交叉覆盖(cross coverage)获得面向数据的覆盖率.
- 面向控制的覆盖(Control-oriented Coverage)——检查行为序列(sequences of behaviors)是否已经发生.通过编写SVA来获得断言覆盖率(assertion coverage).
2. 功能覆盖率
使用覆盖组结构定义覆盖模型.覆盖组结构(covergroup construct)是一种用户自定义的类型,一旦被定义就可以创建多个实例就像类一样,也是通过new()来创建实例的.覆盖组可以定义在module、program、interface以及class中.在动手编写测试代码之前,我们需要首先弄清楚相关设计的关键特性、边界情形和可能的故障模式,这其实就是验证计划的内容
每一个覆盖组都必须明确一下内容:
- 覆盖点(coverage points),也就是需要测试的变量;
- 一个时钟事件以用来同步对覆盖点的采样(sampling of coverage points);
- 可选的形式参数(Optional formal arguments);
- 覆盖点之间的交叉覆盖(Cross coverage between coverage points);
- 覆盖选项(Coverage options);
语法:
covergroup cov_grp @(posedge clk);cov_p1: coverpoint a;//定义覆盖点
endgroupcov_grp cov_inst = new();//实例化覆盖组
上面例子使用时钟上升沿作为采样点。
covergroup cov_grp;cov_p1: coverpoint a;//cov_p1为覆盖点名,a为覆盖点中的变量名,也就是模块中的变量名
endgroupcov_grp cov_inst = new();
@(abc) cov_inst.sample();
通过.sample()函数在外部申明采样点。
此外,覆盖组中允许带形式参数,外部在引用覆盖组时可以通过传递参数,从而对该覆盖组进行复用,如下:
covergroup address_cov (ref logic [7:0] address,input int low, int high) @ (posedge ce);ADDRESS : coverpoint address {bins low = {0,low};bins med = {low,high};}endgroupaddress_cov acov_low = new(addr,0,10);address_cov acov_med = new(addr,11,20);address_cov acov_high = new(addr,21,30);
3. 覆盖点
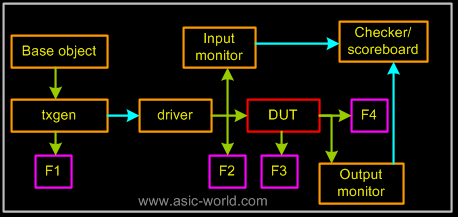
一个覆盖组可以包含多个覆盖点,一个覆盖点可以是一个整型变量也可以是一个整型表达式(integral variable or an integral expression);在验证环境中,覆盖点可以放置在下面四个位置:
每一个覆盖点都与**“bin(仓)”**关联,在每一个采样时钟仿真器都会自增关联的bin值(increment the associated bin value)
bin可以自动创建或者显示定义:
自动或隐式bin(Automatic Bins or Implicit Bins)
对于覆盖点变量范围内的每一个值都会有一个对应的bin,这种称为自动或隐式的bin.例如,对于一个位宽为nbit的覆盖点变量,2^n个自动bin将会被创建.看下面例子:
module cov;logic clk;logic [7:0] addr;logic wr_rd;covergroup cg @(posedge clk);c1: coverpoint addr;c2: coverpoint wr_rd;endgroup : cgcg cover_inst = new();...endmodule
对于覆盖点addr,将会有c1.auto[0] c1.auto[1] c1.auto[2] … c1.auto[255]等256个bin被自动创建;
对于覆盖点wr_rd,将会有c2.auto[0]这一个bin被创建;
隐式bin示例:
module tb;// Declare some variables that can be "sampled" in the covergroupbit [1:0] mode;bit [2:0] cfg;// Declare a clock to act as an event that can be used to sample// coverage points within the covergroupbit clk;always #20 clk = ~clk;// "cg" is a covergroup that is sampled at every posedge clkcovergroup cg @ (posedge clk);//覆盖组中只有mode,取值范围为0~3,而且没有创建bin,这样系统自动创建4个bincoverpoint mode;endgroup// Create an instance of the covergroupcg  cg_inst;initial begin// Instantiate the covergroup object similar to a class objectcg_inst= new();// Stimulus : Simply assign random values to the coverage variables// so that different values can be sampled by the covergroup objectfor (int i = 0; i < 5; i++) begin@(negedge clk);mode = $random;cfg  = $random;$display ("[%0t] mode=0x%0h cfg=0x%0h", $time, mode, cfg);endend// At the end of 500ns, terminate test and print collected coverageinitial begin#500 $display ("Coverage = %0.2f %%", cg_inst.get_inst_coverage());$finish;end
endmodule
输出:

例二:
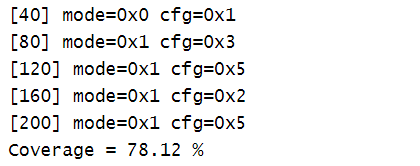
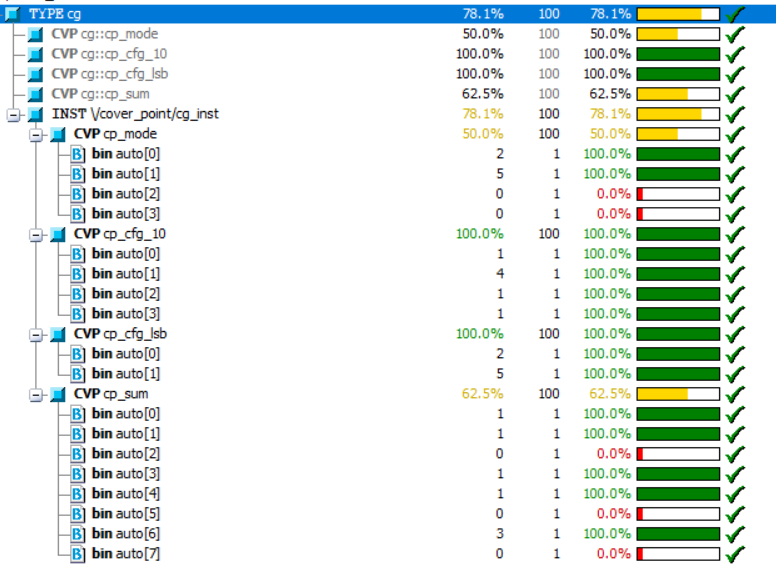
module tb;bit [1:0] mode;bit [2:0] cfg;bit clk;always #20 clk = ~clk;// "cg" is a covergroup that is sampled at every posedge clk// This covergroup has two coverage points, one to cover "mode"// and the other to cover "cfg". Mode can take any value from// 0 -> 3 and cfg can take any value from 0 -> 7covergroup cg @ (posedge clk);//覆盖组定义了4个coverpoint// Coverpoints can optionally have a name before a colon ":"cp_mode    : coverpoint mode;cp_cfg_10  : coverpoint cfg[1:0];cp_cfg_lsb : coverpoint cfg[0];cp_sum     : coverpoint (mode + cfg);endgroupcg  cg_inst;initial begincg_inst= new();for (int i = 0; i < 5; i++) begin@(negedge clk);mode = $random;cfg  = $random;$display ("[%0t] mode=0x%0h cfg=0x%0h", $time, mode, cfg);endendinitial begin#500 $display ("Coverage = %0.2f %%", cg_inst.get_coverage());$finish;end
endmodule
输出:
显式bin
"bins"关键字被用来显示定义一个变量的bin,可以为给定范围内的变量的每个值创建单独的bin,也可以将一个或多个bin指向变量的某个范围.使用显示bin,也就是用户自定义bin可以增加覆盖的准确度!它可以将变量的取值范围限定在你感兴趣的区域内!
显示bin紧跟在对应的覆盖点后面,用{ }包围起来,关键字"bins"后跟着bin名以及变量的值或范围。
格式如下:
covergroup 覆盖组名 @(posedge clk);//时钟可以没有覆盖点名1: coverpoint 变量名1{ bins bin名1 = (覆盖点取值范围);bins bin名2 = (覆盖点取值范围);bins bin名3 = (覆盖点取值范围);.......}//一般会将bin的数目限制在8或16覆盖点名2: coverpoint 变量名2{ bins bin名1 = (覆盖点取值范围);bins bin名2 = (覆盖点取值范围);bins bin名3 = (覆盖点取值范围);.......}。。。。。。endgroup : 覆盖组名//注意对coverpoint的bin的声明使用的是{},这是因为bin是声明语句而非程序语句,后者才用begin..end//围起来,而且{}后也没有加分号,这和end是一样的
示例:
module cov;logic       clk;logic [7:0] addr;logic       wr_rd;covergroup cg @(posedge clk);c1: coverpoint addr { bins b1 = {0,2,7};bins b2[3] = {11:20};bins b3   = {[30:40],[50:60],77};                       bins b4[] = {[79:99],[110:130],140};bins b5[] = {160,170,180};bins b6    = {200:$};bins b7 = default;}c2: coverpoint wr_rd {bins wrrd};endgroup : cgcg cover_inst = new();...
endmodule
上面几个仓的含义如下:
bins b1    = {0,2,7 };               //bin “b1” increments for addr = 0,2 or 7
bins b2[3] = {11:20};                //creates three bins b2[0],b2[1] and b2[3].
//and The 10 possible values are distributed as follows: (11,12,13),(14,15,16)
//and (17,18,19,20) respectively.当不能均等分配时,最后一个数组要多
bins b3    = {[30:40],[50:60],77};   //bin “b3” increments for addr = 30-40 or 50-60 or 77
bins b4[]  = {[79:99],[110:130],140};//creates three bins b4[0],b4[1] and b4[2] with values 79-99,50-60 and 77 respectively
bins b5[]  = {160,170,180};          //creates three bins b5[0],b5[1] and b5[2] with values 160,170 and 180 respectively
bins b6    = {200:$};                //bin “b6” increments for addr = 200 to max value i.e, 255.
default bin;                         // catches the values of the coverage point that do not lie within any of the defined bins.
- 说白了,覆盖组的作用就是将覆盖点的取值范围分为了多个bin,每个bin表示了一段取值范围
- bin就表示了addr的取值范围,如果这个范围内有一个值被取到了,则这个bin就被覆盖了
- 如果所有的bin都被覆盖,则覆盖率为100%
- default 不会用于计算覆盖率,default的意思就是其他值
bins for transitions (bin值域的转变)
可以通过指定序列(sequence)来进行覆盖点的转换:
value1 =>  value2;
range_list_1 => range_list_2;//覆盖点的值从value1转变到value2,value1和value2可以是某个值,也可以是范围covergroup cg @(posedge clk);c1: coverpoint addr{ bins b1   = (10=>20=>30);bins b2[] = (40=>50),(80=>90=>100=>120);bins b3   = (1,5 => 6, 7);bins b4   = default sequence;}c2: coverpoint wr_rd;
endgroup : cgbins b1   = (10=>20=>30);                // addr的值转换次序为 10->20->30,如果没有执行这个次序,则这个bins没有覆盖
bins b2[] = (40=>50),(80=>90=>100=>120); // b2[0] = 40->50 and b2[1] = 80->90->100->120
bins b3 = (1,5 => 6, 7);                // b3 = 1=>6 or 1=>7 or 5=>6 or 5=>7
bins b4 = default sequence;  //其余没有出现的转换序列(sequence)
consecutive repetions creation 连续转换
有的时候希望某个变量值连续出现几次,这个时候就需要用来连续转换序列,如下:
WRITE=>WRITE=>WRITE=>WRITE;//WRITE出现4次//上面的写法过于复杂,可以写成下面:WRITE[*4];//例子:
covergroup address_cov () @ (posedge ce);ADDRESS : coverpoint addr {bins adr_0_2times          = (0[*2]);//0连续出现2次bins adr_1_3times          = (1[*3]);//1连续出现3次bins adr_2_4times          = (2[*4]);//2连续出现4次bins adr1[]          = (1[*1:2]);//1连续出现1~2次}
endgroup
Non consecutive repetition 非连续转换
上面介绍的重复都要求是连续的,下面介绍非连续重复,这用到关键字->和=:
WRITE[->2];等效于: ......=>WRITE.......=>WRITE;covergroup address_cov () @ (posedge ce);ADDRESS : coverpoint addr {bins adr = (0=>2[->2]=>1);//addr=0,然后2出现2次,不要求连续,然后1}endgroup
或者:
WRITE[=2];//WRITE至少出现两次,不要求连续等效于: ....=>WRITE.....=>WRITE.....=>WRITE;例子:covergroup address_cov () @ (posedge ce);ADDRESS : coverpoint addr {bins adr = (0=>2[=2]=>1);//addr=0,然后2至少出现两次,不要求连续,然后1}endgroup
wildcard bins 不定值bins
可以用x,z,?来表示某一位可以不定。
wildcard bins abc = {2'b1?};//覆盖10,11wildcard bins abc = (2'b1x => 2'bx0};//覆盖 10=>00 ,10=>10 ,11=>00 ,11=>10covergroup address_cov () @ (posedge ce);ADDRESS : coverpoint addr {// Normal transition bibswildcard bins adr0  = {3'b11?};// We can use wildcard in transition bins alsowildcard bins adr1  = (3'b1x0 => 3'bx00);wildcard bins adr2  = (3'b1?0 => 3'b?00);}
endgroup
ignore_bins 忽略bin
一组与覆盖点相关联的值的转换可以显式地进行,除了被ignore_bins修饰的bin,ignore_bins用于排除一些取值,如一个3位的数据,假如它的取值仅在0~5之间,如果使用自动bin那么它的覆盖率永远不会到100%,这个时候就可以使用ignore_bins来忽略6、7的取值; ignore_bins 不会用于计算覆盖率;
covergroup cg @(posedge clk);c1: coverpoint addr{ ignore_bins b1 = {6,60,66};ignore_bins b2 = (30=>20=>10); }//被ignore_bins修饰的值都不在覆盖范围之内endgroup : cg
illegal_bins 非法bin
触发illegal bins会终止仿真并报错
covergroup cg @(posedge clk);c1: coverpoint addr{ illegal_bins b1 = {7,70,77};ignore_bins b2 = (7=>70=>77);}endgroup : cg
Examples
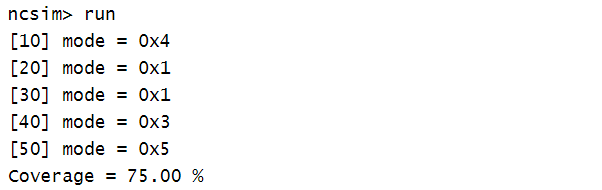
module tb;bit [2:0] mode;// This covergroup does not get sample automatically because// the sample event is missing in declarationcovergroup cg;coverpoint mode {// Declares 4 bins for the total range of 8 values// So bin0->[0:1] bin1->[2:3] bin2->[4:5] bin3->[6:7]bins range[4] = {[0:$]};//将mode的取值分为4个bin,如上}endgroup// Stimulus : Simply randomize mode to have different values and// manually sample each timeinitial begincg cg_inst = new();for (int i = 0; i < 5; i++) begin#10 mode = $random;$display ("[%0t] mode = 0x%0h", $time, mode);cg_inst.sample();//声明的覆盖组没有定义时钟,所以得调用sample()方法进行采样end$display ("Coverage = %0.2f %%", cg_inst.get_inst_coverage());endendmodule输出:
4. Cross Coverage 交叉覆盖
交叉覆盖是在覆盖点或变量之间指定的,必须先指定覆盖点,然后才能定义覆盖点之间的交叉覆盖.
可以通过覆盖点名或者变量名来定义交叉覆盖,看下面例子:
//通过覆盖点来定义交叉覆盖bit [3:0] a, b;covergroup cg @(posedge clk);c1: coverpoint a;c2: coverpoint b;c1Xc2: cross c1,c2;endgroup : cg//通过变量名来定义交叉覆盖bit [3:0] a, b;covergroup cov @(posedge clk);aXb : cross a, b;endgroup//交叉覆盖的通用定义格式:交叉覆盖名:cross 交叉覆盖点名1,交叉覆盖点名2;
由于上面每个覆盖点都有16个bin,所以它们的交叉覆盖总共有256个交叉积(cross product),也就对应256个bin。
bit [3:0] a, b, c;covergroup cov @(posedge clk);BC : coverpoint b+c;aXb : cross a, BC;endgroup
注意:覆盖点中的表达式位宽按照表达式中最大数的位宽来看,所以b+c的位宽仍然是4,仓内有16个数。要符合实际情况(两个4位相加为5位)可以写为a+b+5’b0.
上例的交叉覆盖总共有256个交叉积(cross product),也对应256个bin.
User defined cross bins
在交叉覆盖中,除了使用上面自动创建的bins之外,还可以用户自定义交叉bins,这就用到关键字binsof和intersect,如下:
covergroup address_cov () @ (posedge ce);ADDRESS : coverpoint addr {bins addr0 = {0};bins addr1 = {1};}CMD : coverpoint cmd {bins READ = {0};bins WRITE = {1};bins IDLE = {2};}CRS_USER_ADDR_CMD : cross ADDRESS, CMD {bins USER_ADDR0_READ = binsof(CMD) intersect {0};//默认的bins本来应该是2*3=6个,但是这里只定义了两个bins}CRS_AUTO_ADDR_CMD : cross ADDRESS, CMD {ignore_bins AUTO_ADDR_READ = binsof(CMD) intersect {0};ignore_bins AUTO_ADDR_WRITE = binsof(CMD) intersect {1} && binsof(ADDRESS) intersect{0};}endgroup
5. Coverage Options 覆盖率选项
覆盖率选项用来控制覆盖组、覆盖点和交叉覆盖之间的行为.用下面几个关键字来控制:
at_least
定义一个bin在执行代码过程中至少触发的次数,低于这个触发次数的话,这个bin不算覆盖,默认值是1;
auto_bin_max
当没有bin为显示创建时,定义一个覆盖点的自动bin的最大数量,默认值为64;
cross_auto_bin_max
定义一个交叉覆盖的交叉积(cross product)的自动bin的最大数量,没有默认值;
covergroup cg @(posedge clk);c1: coverpoint addr { option.auto_bin_max = 128;}//addr自动bin的数目最大为128c2: coverpoint wr_rd { option.atleast = 2;}//wr_rd的每个bin至少要触发两次,否则不算覆盖c1Xc2: cross c1, c2 { option.cross_auto_bin_max = 128;}//交叉积的自动bin数目最大为128endgroup : cg//覆盖选项如果是在某个coverpoint中定义的,那么其作用范围仅限于该coverpoint;//如果是在covergroup中定义的,那么其作用范围是整个covergroup;
6. Coverage methods 覆盖率方法
- void sample() : 触发覆盖组的采样
- real get_coverage() : 返回覆盖组覆盖率
- real get_inst_coverage() 返回覆盖组实例的覆盖率
- void set_inst_name(string) : 设置实例名
- void start() : 开启覆盖率收集
- void stop() : 结束收集覆盖率
样例:
module test();logic [2:0] addr;wire [2:0] addr2;assign addr2 = addr + 1;covergroup address_cov;ADDRESS : coverpoint addr {option.auto_bin_max = 10;}ADDRESS2 : coverpoint addr2 {option.auto_bin_max = 10;}endgroupaddress_cov my_cov = new;initial beginmy_cov.ADDRESS.option.at_least = 1;my_cov.ADDRESS2.option.at_least = 2;// start the coverage collectionmy_cov.start();// Set the coverage group namemy_cov.set_inst_name("ASIC-WORLD");$monitor("addr 8'h%x addr2 8'h%x",addr,addr2);repeat (10) beginaddr = $urandom_range(0,7);// Sample the covergroupmy_cov.sample();#10;end// Stop the coverage collectionmy_cov.stop();// Display the coverage$display("Instance coverage is %e",my_cov.get_coverage());endendmodule
7. Coverage system task 覆盖率系统任务
- $set_coverage_db_name(name) : sets the filename of the coverage database into which coverage information is saved at the end of a simulation run.
- $load_coverage_db(name) :loads from the given filename the cumulative coverage information for all coverage group types.
- $get_coverage() :returns as a real number in the range of 0 to 100 the overall coverage of all coverage group types. This number is computed as described above
module test();logic [2:0] addr;wire [2:0] addr2;assign addr2 = addr + 1;covergroup address_cov;ADDRESS : coverpoint addr {option.auto_bin_max = 10;}ADDRESS2 : coverpoint addr2 {option.auto_bin_max = 10;}endgroupaddress_cov my_cov = new;initial begin// Set the database name$set_coverage_db_name("asic_world");$monitor("addr 8'h%x addr2 8'h%x",addr,addr2);repeat (10) beginaddr = $urandom_range(0,7);my_cov.sample();#10;end// Get the final coverage$display("Total coverage %e",$get_coverage());endendmodule