原标题:CDRD TALK|全栈架构Sails.js简介
Sails.js是一个可伸缩的、数据驱动的、面向服务的现代App架构。它致力于构建基于Node.js服务的定制化企业级应用。在Sails.js之前,构建一个实用的产品级Node.js应用的时间成本通常以月为单位计算。但是使用Sails.js后,只需要数周,便可以完成这一切。下面我们一步一步的建立一个基于Sails.js的示例App
环境搭建
打开一个命令行窗口,依次执行下列的命令
安装Node.js:https://nodejs.org/en/
安装Sails.js:
npm install sails -g
新建一个Sails.js的App
sails new test-project
然后你会看到
info: Created a new Sails app `test-project`!
意味着你已经成功创建了一个Sails.js的应用
执行
cd test-project
sails lift
然后你就可以打开浏览器访问localhost:1337,看到Sails.js的欢迎界面应用结构
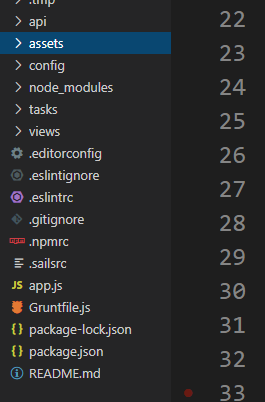
Sails应用的结构与一般的node.js应用目录一致,比较特殊的目录如下:
api
assets
config
tasks
views
api目录实现了一整套的MVC模式的后台接口。
assets目录存放项目所有的静态资源,包括图片,js文件,样式文件,前端模板文件等
config目录存放项目的配置文件,包括项目构建时的环境变量,部署时的语言版本,以及一些session和路由相关的配置
tasks目录存放项目构建时的各种任务,比如打包js文件;监听项目文件的热部署;注入静态资源等。
views目录存放项目的所有界面
重要概念 Middleware(中间件)
中间件概念是node.js应用的一个重要特点。Sails.js使用了一个额外的可配置的中间件栈,这样当服务器收到一个http的请求时,配置好的中间件栈为为这个请求依次执行。
中间件定义在config/http.js:
// ...middleware: { // Define a custom HTTP middleware fn with the key `foobar`:foobar: function(req,res,next){ /*...*/next(); }, // Define another couple of custom HTTP middleware fns with keys `passportInit` and `passportSession`// (notice that this time we're using an existing middleware library from npm)passportInit : require( 'passport').initialize(), passportSession : require( 'passport').session(), // Override the conventional cookie parser:cookieParser: function(req, res, next){ /*...*/next(); }, // Now configure the order/arrangement of our HTTP middlewareorder: [ 'startRequestTimer', 'cookieParser', 'session', 'passportInit', // <==== passport HTTP middleware should run after "session"'passportSession', // <==== (see https://github.com/jaredhanson/passport#middleware)'bodyParser', 'compress', 'foobar', // <==== we can put this stuff wherever we want'methodOverride', 'poweredBy', '$custom', 'router', 'www', 'favicon', '404', '500'] }, customMiddleware: function(app){ //Intended for other middleware that doesn't follow 'app.use(middleware)' conventionrequire( 'other-middleware').initialize(app); } // ...Models and ORM
Sails.js默认安装Waterline,这是一个强大的SQL/noSQL的数据映射引擎(ORM/ODM)。Waterline在数据库之上抽象了一个操作层,可以屏蔽掉底层的数据库操作,显著的简化一个或者多个数据库的交互。
比如使用了表结构的Oracle和Mysql;使用了集合概念的MongoDB;使用了key/value键值对的Redis。它们都有自己的一套操作语言,如果你的项目需要在这几中数据库之间迁移,或者你需要使用多个数据库,那你需要针对不同的数据库编写不同的操作语句,极大的浪费了资源。
你需要做的仅仅是在config/connecttions.js中配置:
// ...connections:{ local_mysql:{ //arbitrary namemodule: 'sails-mysql', user: 'root', password: 'root', url: 'mysql://root:root@localhost:3306/sailstest1'}} // ...Sessions
在Sails.js中,sessions是用来在不同请求之间存储客户端信息的。由于http协议是无状态的协议,所以无法保持客户端的状态.通过sessions,我们可以通过请求中的特定参数,确定是否是来自于统一个客户端的请求,从而达到客户端状态保持效果。
Sails.js的sessions主要由三个组件实现:
session存储,可以是默认的Sails session store,或者数据库。
session管理,Sails.js通过中间件管理session。
请求中的cookie,Sails.js在每次前端发送请求时,都会在cookie添加一个特别的标志位(默认是sails.sid)。
在api/controller下,我们可以新建一个js如下:
module.exports = {login: function(req, res){ // Authentication code here// If successfully authenticatedreq.session.userId = foundUser.id; // returned from a databasereturnres.json(foundUser);}}
它只包含一个login的action方法,如上所示,我们在Sails.js中,我们可以直接通过request访问当前客户端的session。Policies
Sails.js通过policies来实现认证和访问控制相关功能。你可以在api/policies中,配置如下:
// policies/canWrite.jsmodule.exports = functioncanWrite(req, res, next){ vartargetFolderId = req.param( 'id'); // If the requesting user is not logged in, then they are _never_ allowed to write.// No reason to continue-- we can go ahead and bail out now.if(!req.session.me) { returnres.redirect( '/login'); } // Check the database to see if a permission record exists which matches both the// target folder id, the appropriate "type", and the id of the logged-in user.Permission.findOne({ folder: targetFolderId, user: req.session.me, type: 'write'}) .exec( function(err, permission){ // Unexpected error occurred-- use the app's default error (500) handler. > We do this because this should never happen, and if it does, it means there// > is probably something wrong with our database, and we want to know about it!)if(err) { returnres.serverError(err); } // No "write" permission record exists linking this user to this folder.// Maybe they got removed from it? Or maybe they never had permission in the first place...if(!permission) { returnres.redirect( '/login'); } // If we made it all the way down here, looks like everything's ok, so we'll let the user through.// (from here, the next policy or the controller action will run)returnnext(); });}; 接口示例
现在,我们要实际测试一下Sails.js整个数据流程。
1. UserController
我们在api/controllers目录下新建UserController.js文件,如下:
/** * UserController * * @deion :: Server-side logic for managing users * @help :: See http://sailsjs.com/documentation/concepts/Controllers */module.exports = {}; 2. User
我们在api/models目录下新建User.js如下:
/** * User.js * * @deion :: TODO: You might write a short summary of how this model works and what it represents here. * @docs :: http://sailsjs.org/documentation/concepts/models-and-orm/models */module.exports = { attributes: { name: {type: "string"}, age: {type: "integer"} }}; 3. 测试
首先,我们访问一下http://localhost:1337/user
[]
/user接口,表示获取当前用户列表。
然后,我们访问一下http://localhost:1337/user/create?name=abby&age=24
{
“name”: “abby”,
“age”: 24,
“createdAt”: “2017-10-16T10:16:51.154Z”,
“updatedAt”: “2017-10-16T10:16:51.154Z”,
“id”: 2
}
可以看到已经创建了一个名叫abby的用户
这个时候我们在创建一个用户:http://localhost:1337/user/create?name=connor&age=28
然后访问http://localhost:1337/user
[
{
“createdAt”: “2017-10-16T10:14:55.028Z”,
“updatedAt”: “2017-10-16T10:16:31.173Z”,
“id”: 1,
“name”: “connor”,
“age”: 28
},
{
“name”: “abby”,
“age”: 24,
“createdAt”: “2017-10-16T10:16:51.154Z”,
“updatedAt”: “2017-10-16T10:16:51.154Z”,
“id”: 2
}
]
接着,我们修改connor用户:http://localhost:1337/user/update/1?name=connor123&age=30
然后查看用户列表http://localhost:1337/user:
[
{
“createdAt”: “2017-10-16T10:14:55.028Z”,
“updatedAt”: “2017-10-16T10:20:28.337Z”,
“id”: 1,
“name”: “connor123”,
“age”: 30
},
{
“name”: “abby”,
“age”: 24,
“createdAt”: “2017-10-16T10:16:51.154Z”,
“updatedAt”: “2017-10-16T10:16:51.154Z”,
“id”: 2
}
]
最后我们删除abby用户http://localhost:1337/user/destroy/2
[
{
“createdAt”: “2017-10-16T10:14:55.028Z”,
“updatedAt”: “2017-10-16T10:20:28.337Z”,
“id”: 1,
“name”: “connor123”,
“age”: 30
}
]
可以看到,当我们创建一个User的controller和model的时候,Sails.js自动为我们实现关于这个user的增删改查接口,这在很多时候可以节省很多的开发时间。
服务端界面渲染
很多时候,我们需要服务端直接渲染好界面返回前端,而不是返回一些数据。下面我们一步一步实现服务端的渲染
1. 配置路由 // config/routes.jsmodule.exports.routes = { '/': { view: 'homepage'}, 'get /renderUser': 'UserController.renderUser'} 2. 修改UserController.js // api/UserController.jsmodule.exports = { renderUser: function(req, res){ varparams = _.extend(req.query || {}, req.params || {}, req.body || {}); varid = params.id; User.findAll().exec( function(err, users){ res.view( 'manage/renderUser', {users: users}); }); }} 3. 用户列表界面
| 姓名 | 年龄 |
然后我们访问:http://localhost:1337/renderUser:
姓名 年龄
connor 28
访问控制
目前来说,访问控制通常是根据用户请求时的cookie中的某个标志位来校验。这里我们简单实现一下拦截用户请求,校验后返回对应的结果。修改代码如下:
// api/policies/sessionAuth.jsmodule.exports = function(req, res, next){ // User is allowed, proceed to the next policy,// or if this is the last policy, the controllerif(req.cookies.authenticated === '1') { returnnext(); } // User is not allowed// (default res.forbidden() behavior can be overridden in `config/403.js`)returnres.forbidden( 'You are not permitted to perform this action.');}; module.exports.policies = { // config/policies.js'*': true, 'UserController': { '*': false, 'renderUser': 'sessionAuth'}}
可以看到我们取request带有cookies里面的authenticated属性,如果属性为1,那么可以访问网站,否则抛出错误。然后,我们访问http://localhost:1337/renderUser:网站会抛出一个403(Forbidden)错误。这个时候,我们在cookie中加入authenticated = 1,如下:

然后再访问http://localhost:1337/renderUser,可以发现已经可以正常访问了。
数据库的配置
以上,我们完成了一个网站从前端到后台的业务层面的相关代码。但是我们还有一个很重要的地方没有涉及,那就是我们的数据库。我们先看看Sails.js默认的数据存储:
// config/connections.jsmodule.exports.connections = { localDiskDb: { adapter: 'sails-disk'}}
这里的sails-disk是sails默认的存放数据的方式,我们可以在项目根目录的.temp/localDiskDb.db文件中看到:
{ " data": { "user": [ { "name": "connor", "age": 28, "createdAt": "2017-10-17T05:48:47.682Z", "updatedAt": "2017-10-17T05:48:47.682Z", "id": 11} ]}, " schema": { "user": { "name": { "type": "string"}, "age": { "type": "integer"}, "id": { "type": "integer", "autoIncrement": true, "primaryKey": true, "unique": true}, "createdAt": { "type": "datetime"}, "updatedAt": { "type": "datetime"}}}, " counters": { "user": { "id": 11}}}
可以看到,我们之前定义的user的表,以及一条connor的用户数据。但是,在真实的产品级服务中,我们不可能使用这种方式来存储数据,下面我们实现一个Sails.js把数据存储到mysql中的示例。
1. 安装Mysql
前往 mysql 下载地址,下载免费的Mysql社区版本,并且按照安装提示,安装好mysql。之后,建立一个测试用的sails-test数据库,并建一个user表:包含name和age两个属性。
2. Sails.js代码 // config/connections.jsmodule.exports.connections = { someMysqlServer: { adapter: 'sails-mysql', host: '127.0.0.1', user: 'root', //optionalpassword: '123456', //optionaldatabase: 'sails_test'//optional},} // config/models.jsmodule.exports.models = { connection: 'someMysqlServer', migrate: 'alter'};
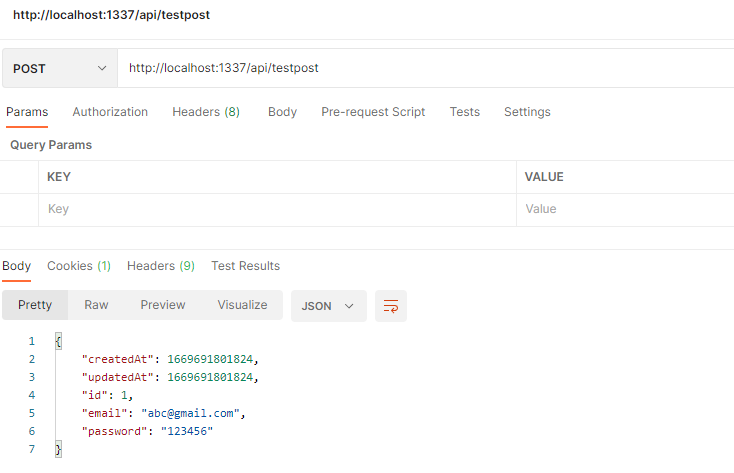
然后,我们访问http://localhost:1337/user/create?name=abby&age=24创建一个abby用户。登录mysql,查看use表:
可以看到abby这条数据确实插入了mysql数据库中。
结语
至此,我们已经使用Sails.js完成了一整套的网站业务。可以发现,由于我们使用了Sails.js这个架构,给我们带来了极大的方便,各种基础业务:数据库链接、前端路由、后台渲染、访问控制等,都已经封装得比较完善。我们只需要关注业务逻辑,无需关心底层实现。当然,Sails.js在我写作这篇文章时已经是过时的架构,但是我们依然可以吸取这种全栈架构的思路,如果对全栈架构有兴趣,可以到meteor这个地方去看看最新最火的Java全栈架构。返回搜狐,查看更多
责任编辑: