一、 简介
Chrony是一个开源自由的网络时间协议 NTP 的客户端和服务器软软件。它能让计算机保持系统时钟与时钟服务器(NTP)同步,因此让你的计算机保持精确的时间,Chrony也可以作为服务端软件为其他计算机提供时间同步服务。
Chrony由两个程序组成,分别是chronyd和chronyc
chronyd是一个后台运行的守护进程,用于调整内核中运行的系统时钟和时钟服务器同步。它确定计算机增减时间的比率,并对此进行补偿。
chronyc提供了一个用户界面,用于监控性能并进行多样化的配置。它可以在chronyd实例控制的计算机上工作,也可以在一台不同的远程计算机上工作。
NTP 是网络时间协议(Network Time Protocol)的简称,通过 udp 123 端口进行网络时钟同步。
RHEL7中默认使用chrony作为时间服务器,也支持NTP,需要额外安装。
NTP与chrony不能同时存在,只能用其中一个,并将另一个mask掉。
二、安装与配置
#yum -y install chrony
#systemctl enable chronyd
#systemctl start chronyd
chrony.conf 默认配置
Chrony的配置文件是/etc/chrony.conf
# 使用 pool.ntp.org 项目中的公共服务器。以server开,理论上想添加多少时间服务器都可以。
# Use public servers from the pool.ntp.org project.
# Please consider joining the pool (http://www.pool.ntp.org/join.html).
server 0.centos.pool.ntp.org iburst
server 1.centos.pool.ntp.org iburst
server 2.centos.pool.ntp.org iburst
server 3.centos.pool.ntp.org iburst# 根据实际时间计算出服务器增减时间的比率,然后记录到一个文件中,在系统重启后为系统做出最佳时间补偿调整。
# Record the rate at which the system clock gains/losses time.
driftfile /var/lib/chrony/drift# 如果系统时钟的偏移量大于1秒,则允许系统时钟在前三次更新中步进。
# Allow the system clock to be stepped in the first three updates if its offset is larger than 1 second.
makestep 1.0 3# 启用实时时钟(RTC)的内核同步。
# Enable kernel synchronization of the real-time clock (RTC).
rtcsync# 通过使用 hwtimestamp 指令启用硬件时间戳
# Enable hardware timestamping on all interfaces that support it.
#hwtimestamp *# Increase the minimum number of selectable sources required to adjust the system clock.
#minsources 2# 指定 NTP 客户端地址,以允许或拒绝连接到扮演时钟服务器的机器
# Allow NTP client access from local network.
#allow 192.168.0.0/16# Serve time even if not synchronized to a time source.
#local stratum 10# 指定包含 NTP 身份验证密钥的文件。
# Specify file containing keys for NTP authentication.
#keyfile /etc/chrony.keys# 指定日志文件的目录。
# Specify directory for log files.
logdir /var/log/chrony# 选择日志文件要记录的信息。
# Select which information is logged.
#log measurements statistics tracking
三、使用
1.服务端配置
chrony.conf 修改两处
# Use public servers from the pool.ntp.org project.
# Please consider joining the pool (http://www.pool.ntp.org/join.html).
server s1a.time.edu.cn iburst
server ntp.aliyun.com iburst# Allow NTP client access from local network.
allow 192.168.0.0/16
设置开机启动,重启服务
systemctl enable chronyd
systemctl restart chronyd# 查看时间同步状态
timedatectl status
# 开启网络时间同步
timedatectl set-ntp true
2.客户端配置
chrony.conf 修改两处
# Use public servers from the pool.ntp.org project.
# Please consider joining the pool (http://www.pool.ntp.org/join.html).
server 192.168.8.5 iburst# Allow NTP client access from local network.
allow 192.168.8.5
设置开机启动,重启服务
systemctl enable chronyd
systemctl restart chronyd
查看时间同步状态
timedatectl status
开启网络时间同步
timedatectl set-ntp true四、chronyc 命令
查看 ntp_servers
chronyc sources -v
查看 ntp_servers 状态
chronyc sourcestats -v
查看 ntp_servers 是否在线
chronyc activity -v
查看 ntp 详细信息
chronyc tracking -v
强制同步下系统时钟
chronyc -a makestep五、timedatectl 命令
查看日期时间、时区及 NTP 状态
timedatectl
查看时区列表
timedatectl list-timezones
timedatectl list-timezones |  grep  -E "Asia/S.*"
修改时区
timedatectl set-timezone Asia/Shanghai
修改日期时间(可以只修改其中一个)
timedatectl set-time "2021-04-15 15:50:20"
开启 NTP
timedatectl set-ntp true/flase六、授时中心
210.72.145.44 国家授时中心
ntp.aliyun.com 阿里云
s1a.time.edu.cn 北京邮电大学
s1b.time.edu.cn 清华大学
s1c.time.edu.cn 北京大学
s1d.time.edu.cn 东南大学
s1e.time.edu.cn 清华大学
s2a.time.edu.cn 清华大学
s2b.time.edu.cn 清华大学
s2c.time.edu.cn 北京邮电大学
s2d.time.edu.cn 西南地区网络中心
s2e.time.edu.cn 西北地区网络中心
s2f.time.edu.cn 东北地区网络中心
s2g.time.edu.cn 华东南地区网络中心
s2h.time.edu.cn 四川大学网络管理中心
s2j.time.edu.cn 大连理工大学网络中心
s2k.time.edu.cn CERNET桂林主节点
s2m.time.edu.cn 北京大学
ntp.sjtu.edu.cn 202.120.2.101 上海交通大学
七、系统时钟与硬件时钟之间同步
设置硬件时钟
-w,--systohc
hwclock -w
设置系统时钟
-s, --hctosys
hwclock -s
修改配置文件方式
vim /etc/sysconfig/ntpd
将系统时间写入BIOS,与 hwclock -w 效果相同
SYNC_HWCLOCK=yes八、常见时区
(1)UTC 整个地球分为二十四时区,每个时区都有自己的本地时间。在国际无线电通信场合,为了统一起见,使用一个统一的时间,称为通用协调时(UTC, Universal Time Coordinated)。
(2)GMT 格林威治标准时间 (Greenwich Mean Time)指位于英国伦敦郊区的×××格林尼治天文台的标准时间,因为本初子午线被定义在通过那里的经线。(UTC与GMT时间基本相同,本文中不做区分)
(3)CST 中国标准时间 (China Standard Time)
GMT + 8 = UTC + 8 = CST
(4)DST夏令时(Daylight Saving Time) 指在夏天太阳升起的比较早时,将时间拨快一小时,以提早日光的使用。(中国不使用)
九、实例
[root@rhel7.9 ~]# timedatectl set-time "2020-02-23 12:23:01"       <<========设置系统时间,因为开启了时间同步所以报错
Failed to set time: Automatic time synchronization is enabled
[root@rhel7.9 ~]# systemctl stop chronyd
[root@rhel7.9 ~]# timedatectl set-time "2020-02-23 12:23:01"         <<==========stop chronyd 后修改系统时间,报错依旧
Failed to set time: Automatic time synchronization is enabled
[root@rhel7.9 ~]# systemctl status chronyd
● chronyd.service - NTP client/serverLoaded: loaded (/usr/lib/systemd/system/chronyd.service; enabled; vendor preset: enabled)Active: inactive (dead) since 四 2021-04-15 15:45:37 CST; 21s agoDocs: man:chronyd(8)man:chrony.conf(5)Process: 13722 ExecStartPost=/usr/libexec/chrony-helper update-daemon (code=exited, status=0/SUCCESS)Process: 13716 ExecStart=/usr/sbin/chronyd $OPTIONS (code=exited, status=0/SUCCESS)Main PID: 13720 (code=exited, status=0/SUCCESS)4月 15 15:40:54 rhel7.9 systemd[1]: Starting NTP client/server...
4月 15 15:40:54 rhel7.9 chronyd[13720]: chronyd version 3.4 starting (+CMDMON +NTP +REFCLOCK +RTC +PRIVDROP +SCFILTER +SIGND +ASYNCDNS +SECHASH +IPV6 +DEBUG)
4月 15 15:40:54 rhel7.9 chronyd[13720]: Frequency 8.664 +/- 0.118 ppm read from /var/lib/chrony/drift
4月 15 15:40:54 rhel7.9 systemd[1]: Started NTP client/server.
4月 15 15:41:02 rhel7.9 chronyd[13720]: Selected source 119.28.206.193
4月 15 15:43:16 rhel7.9 chronyd[13720]: Source 124.108.20.1 replaced with 84.16.67.12
4月 15 15:45:37 rhel7.9 systemd[1]: Stopping NTP client/server...
4月 15 15:45:37 rhel7.9 chronyd[13720]: chronyd exiting
4月 15 15:45:37 rhel7.9 systemd[1]: Stopped NTP client/server.
[root@rhel7.9 ~]#
[root@rhel7.9 ~]# date
2021年 04月 15日 星期四 15:46:13 CST
[root@rhel7.9 ~]#
[root@rhel7.9 ~]#
[root@rhel7.9 ~]# timedatectl set-ntp false
[root@rhel7.9 ~]#
[root@rhel7.9 ~]# timedatectl set-time "2020-02-23 12:23:01"
[root@rhel7.9 ~]# systemctl status chronyd
● chronyd.service - NTP client/serverLoaded: loaded (/usr/lib/systemd/system/chronyd.service; disabled; vendor preset: enabled)Active: inactive (dead)Docs: man:chronyd(8)man:chrony.conf(5)4月 15 15:40:34 rhel7.9 systemd[1]: Stopped NTP client/server.
4月 15 15:40:54 rhel7.9 systemd[1]: Starting NTP client/server...
4月 15 15:40:54 rhel7.9 chronyd[13720]: chronyd version 3.4 starting (+CMDMON +NTP +REFCLOCK +RTC +PRIVDROP +SCFILTER +SIGND +ASYNCDNS +SECHASH +IPV6 +DEBUG)
4月 15 15:40:54 rhel7.9 chronyd[13720]: Frequency 8.664 +/- 0.118 ppm read from /var/lib/chrony/drift
4月 15 15:40:54 rhel7.9 systemd[1]: Started NTP client/server.
4月 15 15:41:02 rhel7.9 chronyd[13720]: Selected source 119.28.206.193
4月 15 15:43:16 rhel7.9 chronyd[13720]: Source 124.108.20.1 replaced with 84.16.67.12
4月 15 15:45:37 rhel7.9 systemd[1]: Stopping NTP client/server...
4月 15 15:45:37 rhel7.9 chronyd[13720]: chronyd exiting
4月 15 15:45:37 rhel7.9 systemd[1]: Stopped NTP client/server.
[root@rhel7.9 ~]#
[root@rhel7.9 ~]# timedatectl status          <<============ 显示当前系统和RTC设置Local time: 日 2020-02-23 12:23:39 CSTUniversal time: 日 2020-02-23 04:23:39 UTCRTC time: 日 2020-02-23 04:23:39Time zone: Asia/Shanghai (CST, +0800)NTP enabled: no
NTP synchronized: noRTC in local TZ: noDST active: n/a
[root@rhel7.9 ~]# timedatectl set-ntp true
[root@rhel7.9 ~]# timedatectl status      Local time: 日 2020-02-23 12:24:14 CSTUniversal time: 日 2020-02-23 04:24:14 UTCRTC time: 日 2020-02-23 04:24:14Time zone: Asia/Shanghai (CST, +0800)NTP enabled: yes
NTP synchronized: noRTC in local TZ: noDST active: n/a
[root@rhel7.9 ~]# systemctl start chronyd
[root@rhel7.9 ~]#
[root@rhel7.9 ~]# timedatectl statusLocal time: 四 2021-04-15 15:48:52 CSTUniversal time: 四 2021-04-15 07:48:52 UTCRTC time: 日 2020-02-23 04:24:44Time zone: Asia/Shanghai (CST, +0800)NTP enabled: yes
NTP synchronized: yesRTC in local TZ: noDST active: n/a
[root@rhel7.9 ~]# timedatectl set-time "2020-02-23 12:23:01"
Failed to set time: Automatic time synchronization is enabled
[root@rhel7.9 ~]#
[root@rhel7.9 ~]# timedatectl set-ntp false          <<============= 禁用基于NTP的网络时间同步
[root@rhel7.9 ~]# systemctl status chronyd
● chronyd.service - NTP client/serverLoaded: loaded (/usr/lib/systemd/system/chronyd.service; disabled; vendor preset: enabled)Active: inactive (dead)Docs: man:chronyd(8)man:chrony.conf(5)2月 23 12:24:12 rhel7.9 systemd[1]: Starting NTP client/server...
2月 23 12:24:12 rhel7.9 chronyd[15212]: chronyd version 3.4 starting (+CMDMON +NTP +REFCLOCK +RTC +PRIVDROP +SCFILTER +SIGND +ASYNCDNS +SECHASH +IPV6 +DEBUG)
2月 23 12:24:12 rhel7.9 chronyd[15212]: Frequency 8.646 +/- 0.520 ppm read from /var/lib/chrony/drift
2月 23 12:24:12 rhel7.9 systemd[1]: Started NTP client/server.
2月 23 12:24:18 rhel7.9 chronyd[15212]: Selected source 84.16.67.12
2月 23 12:24:18 rhel7.9 chronyd[15212]: System clock wrong by 36041047.965352 seconds, adjustment started
4月 15 15:48:26 rhel7.9 chronyd[15212]: System clock was stepped by 36041047.965352 seconds
4月 15 15:51:05 rhel7.9 chronyd[15212]: chronyd exiting
4月 15 15:51:05 rhel7.9 systemd[1]: Stopping NTP client/server...
4月 15 15:51:05 rhel7.9 systemd[1]: Stopped NTP client/server.
[root@rhel7.9 ~]#
[root@rhel7.9 ~]# timedatectl set-time "2020-02-23 12:23:01"      <<=========== 再次设置时间成功
[root@rhel7.9 ~]# timedatectl set-ntp true      <<============ 启用基于NTP的网络时间同步
[root@rhel7.9 ~]#
[root@rhel7.9 ~]# systemctl status chronyd
● chronyd.service - NTP client/serverLoaded: loaded (/usr/lib/systemd/system/chronyd.service; enabled; vendor preset: enabled)Active: active (running) since 日 2020-02-23 12:23:25 CST; 4s agoDocs: man:chronyd(8)man:chrony.conf(5)Process: 16110 ExecStartPost=/usr/libexec/chrony-helper update-daemon (code=exited, status=0/SUCCESS)Process: 16103 ExecStart=/usr/sbin/chronyd $OPTIONS (code=exited, status=0/SUCCESS)Main PID: 16105 (chronyd)Tasks: 1CGroup: /system.slice/chronyd.service└─16105 /usr/sbin/chronyd2月 23 12:23:25 rhel7.9 systemd[1]: Starting NTP client/server...
2月 23 12:23:25 rhel7.9 chronyd[16105]: chronyd version 3.4 starting (+CMDMON +NTP +REFCLOCK +RTC +PRIVDROP +SCFILTER +SIGND +ASYNCDNS +SECHASH +IPV6 +DEBUG)
2月 23 12:23:25 rhel7.9 chronyd[16105]: Frequency 8.645 +/- 0.714 ppm read from /var/lib/chrony/drift
2月 23 12:23:25 rhel7.9 systemd[1]: Started NTP client/server.
[root@rhel7.9 ~]#
[root@rhel7.9 ~]# date
2021年 04月 15日 星期四 15:52:14 CST
在使用timedatectl 设置系统时间时间必须停止NTP时间同步
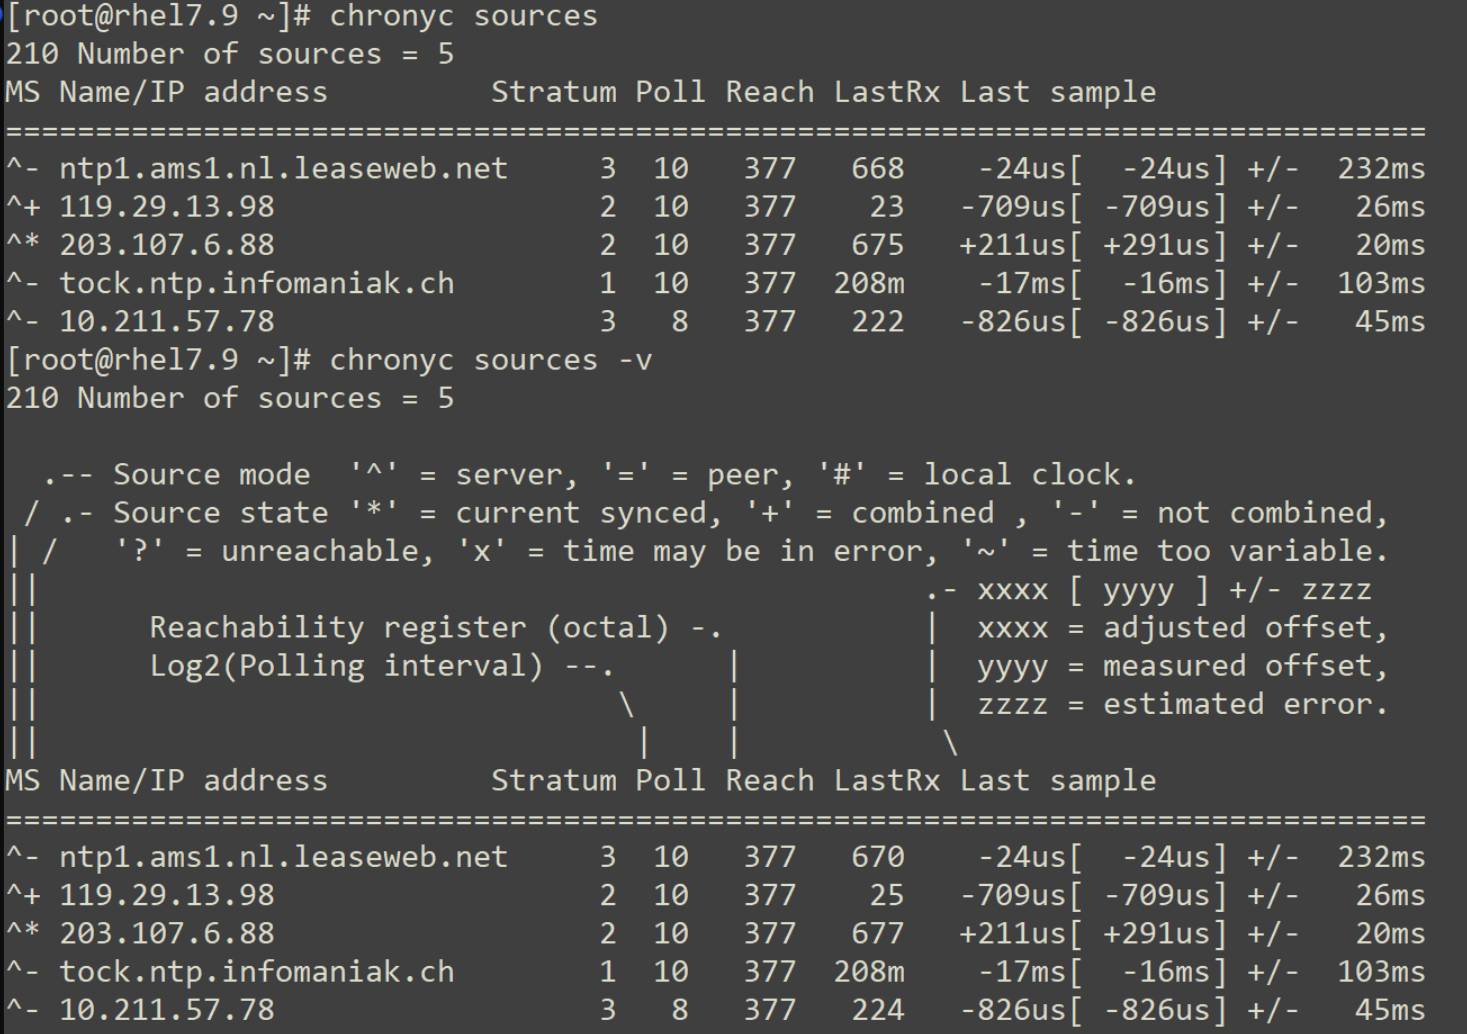
十、chronyc sources 输出结果解析
M
这表示信号源的模式。^表示服务器,=表示对等方,#表示本地连接的参考时钟。
S
此列指示源的状态。
* 表示chronyd当前同步到的源。
+ 表示可接受的信号源,与选定的信号源组合在一起。
- 表示被合并算法排除的可接受源。
? 指示已失去连接性或其数据包未通过所有测试的源。它也显示在启动时,直到从中至少收集了3个样本为止。
x 表示chronyd认为是虚假行情的时钟(即,其时间与大多数其他来源不一致)。
〜 表示时间似乎具有太多可变性的来源。
Name/IP address
这显示了源的名称或IP地址,或参考时钟的参考ID。
Stratum
这显示了来源的层,如其最近收到的样本中所报告的那样。层1表示一台具有本地连接的参考时钟的计算机。与第1层计算机同步的计算机位于第2层。与第2层计算机同步的计算机位于第3层,依此类推。
Poll
这显示轮询源的速率,以秒为单位的时间间隔的以2为底的对数。因此,值为6表示每64秒进行一次测量。chronyd会根据当前情况自动更改轮询速率。
Reach
这显示了源的可达性寄存器以八进制数字打印。寄存器有8位,并在每个从源接收或丢失的数据包上更新。值377表示从最后八次传输中收到了对所有用户的有效答复。
LastRx
此列显示多长时间前从来源接收到了最后一个好的样本(在下一列中显示)。未通过某些测试的测量将被忽略。通常以秒为单位。字母m,h,d或y表示分钟,小时,天或年。
Last sample
此列显示上次测量时本地时钟与源之间的偏移。方括号中的数字表示实际测得的偏移量。可以用ns(表示纳秒),us (表示微秒),ms(表示毫秒)或s(表示秒)作为后缀。方括号左侧的数字表示原始测量值,已调整为允许此后施加于本地时钟的任何摆度。
+/-指示器后面的数字表示测量中的误差范围。正偏移表示本地时钟位于源时钟之前。
[root@rhel7.9 ~]# chronyc add server 10.210.57.78
200 OK
[root@rhel7.9 ~]# chronyc sources -v
210 Number of sources = 5.-- Source mode  '^' = server, '=' = peer, '#' = local clock./ .- Source state '*' = current synced, '+' = combined , '-' = not combined,
| /   '?' = unreachable, 'x' = time may be in error, '~' = time too variable.
||                                                 .- xxxx [ yyyy ] +/- zzzz
||      Reachability register (octal) -.           |  xxxx = adjusted offset,
||      Log2(Polling interval) --.      |          |  yyyy = measured offset,
||                                \     |          |  zzzz = estimated error.
||                                 |    |           \
MS Name/IP address         Stratum Poll Reach LastRx Last sample
===============================================================================
^- ntp1.ams1.nl.leaseweb.net     3  10   377   651  -4572us[-4572us] +/-  227ms
^- 119.29.13.98                  2   9   377    17  +2553us[+2553us] +/-   26ms
^* 203.107.6.88                  2  10   377   656  -1432us[-1106us] +/-   19ms
^- tock.ntp.infomaniak.ch        1   9   377   52m    -16ms[  -16ms] +/-  103ms
^? 10.211.57.78                  3   6     1    10  +1089us[+1089us] +/-   34ms
[root@rhel7.9 ~]# chronyc sources -v
210 Number of sources = 5.-- Source mode  '^' = server, '=' = peer, '#' = local clock./ .- Source state '*' = current synced, '+' = combined , '-' = not combined,
| /   '?' = unreachable, 'x' = time may be in error, '~' = time too variable.
||                                                 .- xxxx [ yyyy ] +/- zzzz
||      Reachability register (octal) -.           |  xxxx = adjusted offset,
||      Log2(Polling interval) --.      |          |  yyyy = measured offset,
||                                \     |          |  zzzz = estimated error.
||                                 |    |           \
MS Name/IP address         Stratum Poll Reach LastRx Last sample
===============================================================================
^- ntp1.ams1.nl.leaseweb.net     3  10   377   843  -4572us[-4572us] +/-  227ms
^- 119.29.13.98                  2   9   377   208  +2553us[+2553us] +/-   26ms
^* 203.107.6.88                  2  10   377   847  -1432us[-1106us] +/-   19ms
^- tock.ntp.infomaniak.ch        1   9   377   56m    -16ms[  -16ms] +/-  103ms
^- 10.211.57.78                  3   6    17     6  +1225us[+1225us] +/-   37ms
上面示例中刚加入的NTP部分显示是 ?即不可达的,过了两分钟再查看状态变成了 -