Elasticsearch提供的Java客户端有一些不太方便的地方:
- 很多地方需要拼接Json字符串,在java中拼接字符串有多恐怖你应该懂的
- 需要自己把对象序列化为json存储
- 查询到结果也需要自己反序列化为对象
因此,我们这里就不讲解原生的Elasticsearch客户端API了。
而是学习Spring提供的套件:Spring Data Elasticsearch。
一、简介
Spring Data Elasticsearch是Spring Data项目下的一个子模块。
查看 Spring Data的官网:http://projects.spring.io/spring-data/

Spring Data 的使命是为数据访问提供熟悉且一致的基于 Spring 的编程模型,同时仍保留底层数据存储的特殊特征。
它使使用数据访问技术、关系和非关系数据库、map-reduce 框架和基于云的数据服务变得容易。
这是一个伞形项目,其中包含许多特定于给定数据库的子项目。
这些项目是通过与这些令人兴奋的技术背后的许多公司和开发商合作开发的。
特征
-
强大的存储库和自定义对象映射抽象
-
从存储库方法名称派生的动态查询
-
提供基本属性的实现域基类
-
支持透明审计(创建、最后更改)
-
可以集成自定义存储库代码
-
通过 JavaConfig 和自定义 XML 命名空间轻松集成 Spring
-
与 Spring MVC 控制器的高级集成
-
跨店持久化实验支持
1、Spring Data Elasticsearch


Spring Data for Elasticsearch 是 Spring Data 项目的一部分,该项目旨在为新数据存储提供熟悉且一致的基于 Spring 的编程模型,同时保留特定于存储的特性和功能。
Spring Data Elasticsearch 项目提供了与 Elasticsearch 搜索引擎的集成。Spring Data Elasticsearch 的关键功能领域是以 POJO 为中心的模型,用于与 Elastichsearch 文档交互并轻松编写 Repository 样式的数据访问层。
(1)特征
-
Spring 配置支持使用基于 Java 的
@Configuration类或用于 ES 客户端实例的 XML 命名空间。 -
ElasticsearchTemplate帮助程序类,可提高执行常见 ES 操作的生产力。包括文档和 POJO 之间的集成对象映射。
-
功能丰富的对象映射与 Spring 的转换服务集成
-
基于注释的映射元数据但可扩展以支持其他元数据格式
-
Repository接口的自动实现,包括对自定义查找器方法的支持。
-
对存储库的 CDI 支持
二、Demo工程的搭建(创建索引)
我们新建一个demo,学习Elasticsearch
在这之前你需要在Linux上安装Elasticsearch:
如果有则不需要安装,入门没有请看我的这篇文章:
https://blog.csdn.net/qq_44757034/article/details/119717907
1、创建一个新的工程


2、引入依赖
(1)pom.xml

<?xml version="1.0" encoding="UTF-8"?>
<project xmlns="http://maven.apache.org/POM/4.0.0"xmlns:xsi="http://www.w3.org/2001/XMLSchema-instance"xsi:schemaLocation="http://maven.apache.org/POM/4.0.0 http://maven.apache.org/xsd/maven-4.0.0.xsd"><modelVersion>4.0.0</modelVersion><groupId>com.itzheng.demo</groupId><artifactId>es-demo</artifactId><version>1.0.0-SNAPSHOT</version><name>elasticsearch</name><description>Demo project for Spring Boot</description><parent><groupId>org.springframework.boot</groupId><artifactId>spring-boot-starter-parent</artifactId><version>2.2.5.RELEASE</version><relativePath/> <!-- lookup parent from repository --></parent><properties><project.build.sourceEncoding>UTF-8</project.build.sourceEncoding><project.reporting.outputEncoding>UTF-8</project.reporting.outputEncoding><java.version>1.8</java.version></properties><dependencies><dependency><groupId>org.springframework.boot</groupId><artifactId>spring-boot-starter-data-elasticsearch</artifactId></dependency><dependency><groupId>org.springframework.boot</groupId><artifactId>spring-boot-starter-test</artifactId><scope>test</scope></dependency></dependencies><build><plugins><plugin><groupId>org.springframework.boot</groupId><artifactId>spring-boot-maven-plugin</artifactId></plugin></plugins></build></project>
(2)application.yml


其中192.168.56.10为你虚拟机或者服务器的ip地址
spring:data:elasticsearch:cluster-name: elasticsearchcluster-nodes: 192.168.56.101:9300
3、设置启动类


package com.itzheng;
import org.springframework.boot.SpringApplication;
import org.springframework.boot.autoconfigure.SpringBootApplication;@SpringBootApplication
public class EsApplication {public static void main(String[] args) {SpringApplication.run(EsApplication.class);}
}
4、创建实体类


package com.itzheng.es.pojo;public class Item {private Long id;private String title; //标题private String category;//分类private String brand;//品牌private Double price;//价格private String images;//图片地址}添加依赖

<dependency><groupId>org.projectlombok</groupId><artifactId>lombok</artifactId></dependency>
完善实体类

package com.itzheng.es.pojo;import lombok.Data;@Data
public class Item {private Long id;private String title;   //标题private String category;//分类private String brand;//品牌private Double price;//价格private String images;//图片地址
}
5、创建测试类
(1)创建索引库


package com.itzheng.es.demo;import com.itzheng.es.pojo.Item;
import org.junit.Test;
import org.junit.runner.RunWith;
import org.springframework.beans.factory.annotation.Autowired;
import org.springframework.boot.test.context.SpringBootTest;
import org.springframework.data.elasticsearch.core.ElasticsearchTemplate;
import org.springframework.test.context.junit4.SpringRunner;
/*
Springboot的@RunWith(SpringRunner.class)
注解的意义在于Test测试类要使用注入的类,比如@Autowired注入的类,
有了@RunWith(SpringRunner.class)这些类才能实例化到spring容器中,自动注入才能生效,
不然直接一个NullPointerExecption*/
@RunWith(SpringRunner.class)
@SpringBootTest
public class EsTest {@AutowiredElasticsearchTemplate template;@Testpublic void testCreate(){template.createIndex(Item.class);//创建索引}
}
完善实体类Item,设置在提交到Elasticsearch的时候的索引名称,类型,以及分片

package com.itzheng.es.pojo;import lombok.Data;
import org.springframework.data.elasticsearch.annotations.Document;@Data
@Document(indexName = "itzhengitem",type = "item",shards = 1)
public class Item {private Long id;private String title;   //标题private String category;//分类private String brand;//品牌private Double price;//价格private String images;//图片地址
}
(2)指定映射关系
1)添加字段映射(继续完善Item实体类)设置类型和主键
映射
Spring Data通过注解来声明字段的映射属性,有下面的三个注解:
@Document作用在类,标记实体类为文档对象,一般有四个属性- indexName:对应索引库名称
- type:对应在索引库中的类型
- shards:分片数量,默认5
- replicas:副本数量,默认1
@Id作用在成员变量,标记一个字段作为id主键@Field作用在成员变量,标记为文档的字段,并指定字段映射属性:- type:字段类型,取值是枚举:FieldType
- index:是否索引,布尔类型,默认是true
- store:是否存储,布尔类型,默认是false
- analyzer:分词器名称
示例:

package com.itzheng.es.pojo;
import lombok.Data;
import org.springframework.data.annotation.Id;
import org.springframework.data.elasticsearch.annotations.Document;
import org.springframework.data.elasticsearch.annotations.Field;
import org.springframework.data.elasticsearch.annotations.FieldType;
@Data
@Document(indexName = "itzhengitem",type = "item",shards = 1)
@AllArgsConstructor
@NoArgsConstructor
public class Item {@Field(type = FieldType.Long)@Idprivate Long id;@Field(type = FieldType.Text , analyzer = "ik_smart")//设置类型是文本,并指定分词方式为ik_smartprivate String title;   //标题@Field(type = FieldType.Keyword)  //Keyword设置当前也是文本类型,但是不设置分词private String category;//分类@Field(type = FieldType.Keyword)private String brand;//品牌@Field(type = FieldType.Double)private Double price;//价格@Field(type = FieldType.Keyword,index = false)//index = false设置当前字段不需要被索引,index = 默认是trueprivate String images;//图片地址
}
2)完善测试类,使用映射规则

package com.itzheng.es.demo;import com.itzheng.es.pojo.Item;
import org.junit.Test;
import org.junit.runner.RunWith;
import org.springframework.beans.factory.annotation.Autowired;
import org.springframework.boot.test.context.SpringBootTest;
import org.springframework.data.elasticsearch.core.ElasticsearchTemplate;
import org.springframework.test.context.junit4.SpringRunner;
/*
Springboot的@RunWith(SpringRunner.class)
注解的意义在于Test测试类要使用注入的类,比如@Autowired注入的类,
有了@RunWith(SpringRunner.class)这些类才能实例化到spring容器中,自动注入才能生效,
不然直接一个NullPointerExecption*/
@RunWith(SpringRunner.class)
@SpringBootTest
public class EsTest {@AutowiredElasticsearchTemplate template;@Testpublic void testCreate(){//创建索引库template.createIndex(Item.class);//创建索引//指定映射关系template.putMapping(Item.class);}
}
6、运行测试类
(1)运行测试


运行成功

(2)通过Kabina查看

GET itzhengitem
返回结果
{"itzhengitem" : {"aliases" : { },"mappings" : {"properties" : {"brand" : {"type" : "keyword"},"category" : {"type" : "keyword"},"id" : {"type" : "keyword"},"images" : {"type" : "keyword","index" : false},"price" : {"type" : "double"},"title" : {"type" : "text","analyzer" : "ik_smart"}}},"settings" : {"index" : {"routing" : {"allocation" : {"include" : {"_tier_preference" : "data_content"}}},"refresh_interval" : "1s","number_of_shards" : "1","provided_name" : "itzhengitem","creation_date" : "1629355397115","store" : {"type" : "fs"},"number_of_replicas" : "1","uuid" : "2cUsvBtgQ4uOARwTuQoHAA","version" : {"created" : "7140099"}}}}
}
只查看映射
GET itzhengitem/_mapping
{"itzhengitem" : {"mappings" : {"properties" : {"brand" : {"type" : "keyword"},"category" : {"type" : "keyword"},"id" : {"type" : "keyword"},"images" : {"type" : "keyword","index" : false},"price" : {"type" : "double"},"title" : {"type" : "text","analyzer" : "ik_smart"}}}}
}
三、删除索引
1、编写测试方法

package com.itzheng.es.demo;import com.itzheng.es.pojo.Item;
import org.junit.Test;
import org.junit.runner.RunWith;
import org.springframework.beans.factory.annotation.Autowired;
import org.springframework.boot.test.context.SpringBootTest;
import org.springframework.data.elasticsearch.core.ElasticsearchTemplate;
import org.springframework.test.context.junit4.SpringRunner;
/*
Springboot的@RunWith(SpringRunner.class)
注解的意义在于Test测试类要使用注入的类,比如@Autowired注入的类,
有了@RunWith(SpringRunner.class)这些类才能实例化到spring容器中,自动注入才能生效,
不然直接一个NullPointerExecption*/
@RunWith(SpringRunner.class)
@SpringBootTest
public class EsTest {@AutowiredElasticsearchTemplate template;@Testpublic void testCreate(){//创建索引库template.createIndex(Item.class);//创建索引//指定映射关系template.putMapping(Item.class);}@Testpublic void testDelete(){template.deleteIndex("itzhengitem");}
}
运行成功

2、通过Kabina查看
GET itzhengitem
返回结果
{"error" : {"root_cause" : [{"type" : "index_not_found_exception","reason" : "no such index [itzhengitem]","resource.type" : "index_or_alias","resource.id" : "itzhengitem","index_uuid" : "_na_","index" : "itzhengitem"}],"type" : "index_not_found_exception","reason" : "no such index [itzhengitem]","resource.type" : "index_or_alias","resource.id" : "itzhengitem","index_uuid" : "_na_","index" : "itzhengitem"},"status" : 404
}
为了方便我们需要再次创建刚刚的索引

四、Repository文档操作
Spring Data 的强大之处,就在于你不用写任何DAO处理,自动根据方法名或类的信息进行CRUD操作。
只要你定义一个接口,然后继承Repository提供的一些子接口,就能具备各种基本的CRUD功能。
我们只需要定义接口,然后继承它就OK了。
定义一个接口

package com.itzheng.es.repository;import com.itzheng.es.pojo.Item;
import org.springframework.data.elasticsearch.repository.ElasticsearchRepository;public interface ItemRepository extends ElasticsearchRepository<Item,Long> {
//上述泛型的第一个参数的实体类类型,第二个是主键ID类型}
1、新增文档
(1)首先注入

@Autowiredprivate ItemRepository repository;(2)编写测试方法

@Testpublic void insertIndex(){Item item = new Item(1L, "小米手机7", " 手机", "小米", 3499.00, "http://image.leyou.com/13123.jpg");repository.save(item);}(3)运行测试方法


(4)通过Kabina查看
GET itzhengitem/_search
{"took" : 0,"timed_out" : false,"_shards" : {"total" : 1,"successful" : 1,"skipped" : 0,"failed" : 0},"hits" : {"total" : {"value" : 1,"relation" : "eq"},"max_score" : 1.0,"hits" : [{"_index" : "itzhengitem","_type" : "item","_id" : "1","_score" : 1.0,"_source" : {"id" : 1,"title" : "小米手机7","category" : " 手机","brand" : "小米","price" : 3499.0,"images" : "http://image.leyou.com/13123.jpg"}}]}
}
2、批量新增

@Testpublic void indexList(){List<Item> list = new ArrayList<>();list.add(new Item(2L, "坚果手机R1", " 手机", "锤子", 3699.00, "http://image.leyou.com/123.jpg"));list.add(new Item(3L, "华为META10", " 手机", "华为", 4499.00, "http://image.leyou.com/3.jpg"));repository.saveAll(list);}运行测试

运行成功

通过Kabina查看
GET itzhengitem/_search
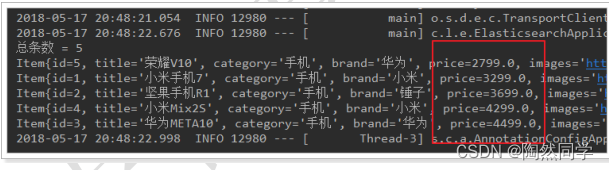
{"took" : 0,"timed_out" : false,"_shards" : {"total" : 1,"successful" : 1,"skipped" : 0,"failed" : 0},"hits" : {"total" : {"value" : 3,"relation" : "eq"},"max_score" : 1.0,"hits" : [{"_index" : "itzhengitem","_type" : "item","_id" : "1","_score" : 1.0,"_source" : {"id" : 1,"title" : "小米手机7","category" : " 手机","brand" : "小米","price" : 3499.0,"images" : "http://image.leyou.com/13123.jpg"}},{"_index" : "itzhengitem","_type" : "item","_id" : "2","_score" : 1.0,"_source" : {"id" : 2,"title" : "坚果手机R1","category" : " 手机","brand" : "锤子","price" : 3699.0,"images" : "http://image.leyou.com/123.jpg"}},{"_index" : "itzhengitem","_type" : "item","_id" : "3","_score" : 1.0,"_source" : {"id" : 3,"title" : "华为META10","category" : " 手机","brand" : "华为","price" : 4499.0,"images" : "http://image.leyou.com/3.jpg"}}]}
}
多新增几条数据
@Testpublic void indexList(){List<Item> list = new ArrayList<>();list.add(new Item(4L, "小米手机7", "手机", "小米", 3299.00, "http://image.leyou.com/13123.jpg"));list.add(new Item(5L, "坚果手机R1", "手机", "锤子", 3699.00, "http://image.leyou.com/13123.jpg"));list.add(new Item(6L, "华为META10", "手机", "华为", 4499.00, "http://image.leyou.com/13123.jpg"));list.add(new Item(7L, "小米Mix2S", "手机", "小米", 4299.00, "http://image.leyou.com/13123.jpg"));list.add(new Item(8L, "荣耀V10", "手机", "华为", 2799.00, "http://image.leyou.com/13123.jpg"));repository.saveAll(list);}3、修改文档
修改和新增是同一个接口,区分的依据就是id
这一点跟我们在页面发起PUT请求是类似的。
修改id为1 的数据

@Testpublic void updateIndex(){Item item = new Item(1L, "大米手机7", " 手机", "小米", 3499.00, "http://image.leyou.com/13123.jpg");repository.save(item);}
通过Kabina查看
GET itzhengitem/_search

4、基本查询
ElasticsearchRepository提供了一些基本的查询方法:
(1)通过id查询

@Testpublic void testQuery(){Optional<Item> optional = this.repository.findById(1L);System.out.println(optional.get());}

(2)查询所有

@Testpublic void testFind(){Iterable<Item> items = repository.findAll();for (Item item : items) {System.out.println(item);}}
运行结果

(3) 自定义方法
Spring Data 的另一个强大功能,是根据方法名称自动实现功能。
比如:你的方法名叫做:findByTitle,那么它就知道你是根据title查询,然后自动帮你完成,无需写实现类。
当然,方法名称要符合一定的约定:
| Keyword | Sample | Elasticsearch Query String |
|---|---|---|
And | findByNameAndPrice | {"bool" : {"must" : [ {"field" : {"name" : "?"}}, {"field" : {"price" : "?"}} ]}} |
Or | findByNameOrPrice | {"bool" : {"should" : [ {"field" : {"name" : "?"}}, {"field" : {"price" : "?"}} ]}} |
Is | findByName | {"bool" : {"must" : {"field" : {"name" : "?"}}}} |
Not | findByNameNot | {"bool" : {"must_not" : {"field" : {"name" : "?"}}}} |
Between | findByPriceBetween | {"bool" : {"must" : {"range" : {"price" : {"from" : ?,"to" : ?,"include_lower" : true,"include_upper" : true}}}}} |
LessThanEqual | findByPriceLessThan | {"bool" : {"must" : {"range" : {"price" : {"from" : null,"to" : ?,"include_lower" : true,"include_upper" : true}}}}} |
GreaterThanEqual | findByPriceGreaterThan | {"bool" : {"must" : {"range" : {"price" : {"from" : ?,"to" : null,"include_lower" : true,"include_upper" : true}}}}} |
Before | findByPriceBefore | {"bool" : {"must" : {"range" : {"price" : {"from" : null,"to" : ?,"include_lower" : true,"include_upper" : true}}}}} |
After | findByPriceAfter | {"bool" : {"must" : {"range" : {"price" : {"from" : ?,"to" : null,"include_lower" : true,"include_upper" : true}}}}} |
Like | findByNameLike | {"bool" : {"must" : {"field" : {"name" : {"query" : "?*","analyze_wildcard" : true}}}}} |
StartingWith | findByNameStartingWith | {"bool" : {"must" : {"field" : {"name" : {"query" : "?*","analyze_wildcard" : true}}}}} |
EndingWith | findByNameEndingWith | {"bool" : {"must" : {"field" : {"name" : {"query" : "*?","analyze_wildcard" : true}}}}} |
Contains/Containing | findByNameContaining | {"bool" : {"must" : {"field" : {"name" : {"query" : "**?**","analyze_wildcard" : true}}}}} |
In | findByNameIn(Collection<String>names) | {"bool" : {"must" : {"bool" : {"should" : [ {"field" : {"name" : "?"}}, {"field" : {"name" : "?"}} ]}}}} |
NotIn | findByNameNotIn(Collection<String>names) | {"bool" : {"must_not" : {"bool" : {"should" : {"field" : {"name" : "?"}}}}}} |
Near | findByStoreNear | Not Supported Yet ! |
True | findByAvailableTrue | {"bool" : {"must" : {"field" : {"available" : true}}}} |
False | findByAvailableFalse | {"bool" : {"must" : {"field" : {"available" : false}}}} |
OrderBy | findByAvailableTrueOrderByNameDesc | {"sort" : [{ "name" : {"order" : "desc"} }],"bool" : {"must" : {"field" : {"available" : true}}}} |
例如,我们来按照价格区间查询,定义这样的一个方法:
1)在接口当中定义

package com.itzheng.es.repository;import com.itzheng.es.pojo.Item;
import org.springframework.data.elasticsearch.repository.ElasticsearchRepository;import java.util.List;public interface ItemRepository extends ElasticsearchRepository<Item,Long> {
//上述泛型的第一个参数的实体类类型,第二个是主键ID类型List<Item> findByPriceBetween(double price1, double price2);}
2)在EsTest编写queryByPriceBetween方法(通过价格的范围查询)
不需要写实现类,然后我们直接去运行:

@Testpublic void queryByPriceBetween(){List<Item> items = repository.findByPriceBetween(2000, 4000);for (Item item : items) {System.out.println(item);}}


5、高级查询
(1)基本查询
先看看基本玩法

@Testpublic void testQueryCustom(){//词条查询MatchQueryBuilder queryBuilder = QueryBuilders.matchQuery("title", "小米");Iterable<Item> items = repository.search(queryBuilder);items.forEach(System.out::println);}QueryBuilders提供了大量的静态方法,用于生成各种不同类型的查询对象,例如:词条、模糊、通配符等QueryBuilder对象。
结果:

(2)自定义查询
先来看最基本的match query:

@Testpublic void testNativeQuery(){NativeSearchQueryBuilder queryBuilder = new NativeSearchQueryBuilder();//结果过滤//添加查询条件queryBuilder.withQuery(QueryBuilders.matchQuery("title","小米"));NativeSearchQuery searchQuery = queryBuilder.build();//执行搜索,获取结果Page<Item> result = repository.search(searchQuery);//打印总条数System.out.println(result.getTotalElements());//打印总页数System.out.println(result.getTotalPages());result.forEach(System.out::println);}
NativeSearchQueryBuilder:Spring提供的一个查询条件构建器,帮助构建json格式的请求体
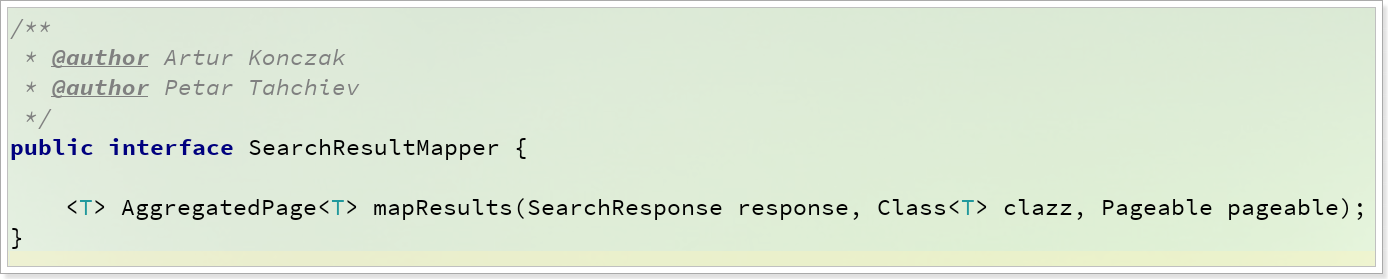
Page<item>:默认是分页查询,因此返回的是一个分页的结果对象,包含属性:
- totalElements:总条数
- totalPages:总页数
- Iterator:迭代器,本身实现了Iterator接口,因此可直接迭代得到当前页的数据
返回结果

(3)分页查询和排序
利用NativeSearchQueryBuilder可以方便的实现分页:
需要再添加一些数据方便测试
@Testpublic void indexList(){List<Item> list = new ArrayList<>();list.add(new Item(9L, "小米手机7", "手机", "小米", 3299.00, "http://image.leyou.com/13123.jpg"));list.add(new Item(10L, "坚果手机R1", "手机", "锤子", 3699.00, "http://image.leyou.com/13123.jpg"));list.add(new Item(11L, "华为META10", "手机", "华为", 4499.00, "http://image.leyou.com/13123.jpg"));list.add(new Item(12L, "小米Mix2S", "手机", "小米", 4299.00, "http://image.leyou.com/13123.jpg"));list.add(new Item(13L, "荣耀V10", "手机", "华为", 2799.00, "http://image.leyou.com/13123.jpg"));repository.saveAll(list);}
再次测试

@Testpublic void testNativeQuery(){// 构建查询条件NativeSearchQueryBuilder queryBuilder = new NativeSearchQueryBuilder();// 添加基本的分词查询queryBuilder.withQuery(QueryBuilders.termQuery("title", "手机"));// 初始化分页参数int page = 0;int size = 3;// 设置分页参数queryBuilder.withPageable(PageRequest.of(page, size));// 执行搜索,获取结果Page<Item> items = this.repository.search(queryBuilder.build());// 打印总条数System.out.println(items.getTotalElements());// 打印总页数System.out.println(items.getTotalPages());// 每页大小System.out.println(items.getSize());// 当前页System.out.println(items.getNumber());items.forEach(System.out::println);}
修改起始页

@Testpublic void testNativeQuery(){// 构建查询条件NativeSearchQueryBuilder queryBuilder = new NativeSearchQueryBuilder();// 添加基本的分词查询queryBuilder.withQuery(QueryBuilders.termQuery("title", "手机"));// 初始化分页参数int page = 1;int size = 3;// 设置分页参数queryBuilder.withPageable(PageRequest.of(page, size));// 执行搜索,获取结果Page<Item> items = this.repository.search(queryBuilder.build());// 打印总条数System.out.println("总条数"+items.getTotalElements());// 打印总页数System.out.println("总页数"+items.getTotalPages());// 每页大小System.out.println("每页大小"+items.getSize());// 当前页System.out.println(items.getNumber());items.forEach(System.out::println);}
1是当前页
6、聚合
(1)聚合为桶
桶就是分组,比如这里我们按照品牌brand进行分组:

@Testpublic void testAgg(){NativeSearchQueryBuilder queryBuilder = new NativeSearchQueryBuilder();String aggName = "popularBrand";//聚合// AggregationBuilders.terms("popularBrand").field("brand")// terms聚合类型(查询关键字) popularBrand聚合名称 brand聚合字段queryBuilder.addAggregation(AggregationBuilders.terms(aggName).field("brand"));//查询并返回带聚合结果AggregatedPage<Item> result = template.queryForPage(queryBuilder.build(), Item.class);//解析聚合Aggregations aggs = result.getAggregations();//得到了当前查询的JSON集合//获取指定名称的聚合StringTerms terms = aggs.get(aggName);//获取桶List<StringTerms.Bucket> buckets = terms.getBuckets();for (StringTerms.Bucket bucket : buckets) {System.out.println("bucket.getKeyAsString() = "+bucket.getKeyAsString());System.out.println("bucket.getDocCount() = "+bucket.getDocCount());}}
结果


(2)嵌套聚合,求平均值

@Testpublic void testSubAgg(){NativeSearchQueryBuilder queryBuilder = new NativeSearchQueryBuilder();// 不查询任何结果queryBuilder.withSourceFilter(new FetchSourceFilter(new String[]{""}, null));// 1、添加一个新的聚合,聚合类型为terms,聚合名称为brands,聚合字段为brandqueryBuilder.addAggregation(AggregationBuilders.terms("brands").field("brand").subAggregation(AggregationBuilders.avg("priceAvg").field("price")) // 在品牌聚合桶内进行嵌套聚合,求平均值);// 2、查询,需要把结果强转为AggregatedPage类型AggregatedPage<Item> aggPage = (AggregatedPage<Item>) this.repository.search(queryBuilder.build());// 3、解析// 3.1、从结果中取出名为brands的那个聚合,// 因为是利用String类型字段来进行的term聚合,所以结果要强转为StringTerm类型StringTerms agg = (StringTerms) aggPage.getAggregation("brands");// 3.2、获取桶List<StringTerms.Bucket> buckets = agg.getBuckets();// 3.3、遍历for (StringTerms.Bucket bucket : buckets) {// 3.4、获取桶中的key,即品牌名称 3.5、获取桶中的文档数量System.out.println(bucket.getKeyAsString() + ",共" + bucket.getDocCount() + "台");// 3.6.获取子聚合结果:InternalAvg avg = (InternalAvg) bucket.getAggregations().asMap().get("priceAvg");System.out.println("平均售价:" + avg.getValue());}}