目录
1.网络结构
2.OHEM 前向传播
3 .reference
1.网络结构
##########################
## Readonly RoI Network ##
######### Start ##########
layer {name: "roi_pool5_readonly"type: "ROIPooling"bottom: "conv5_3"bottom: "rois"top: "pool5_readonly"propagate_down: falsepropagate_down: falseroi_pooling_param {pooled_w: 7pooled_h: 7spatial_scale: 0.0625 # 1/16}
}
layer {name: "fc6_readonly"type: "InnerProduct"bottom: "pool5_readonly"top: "fc6_readonly"propagate_down: falseparam {name: "fc6_w"}param {name: "fc6_b"}inner_product_param {num_output: 4096}
}
layer {name: "relu6_readonly"type: "ReLU"bottom: "fc6_readonly"top: "fc6_readonly"propagate_down: false
}
layer {name: "drop6_readonly"type: "Dropout"bottom: "fc6_readonly"top: "fc6_readonly"propagate_down: falsedropout_param {dropout_ratio: 0.5}
}
layer {name: "fc7_readonly"type: "InnerProduct"bottom: "fc6_readonly"top: "fc7_readonly"propagate_down: falseparam {name: "fc7_w"}param {name: "fc7_b"}inner_product_param {num_output: 4096}
}
layer {name: "relu7_readonly"type: "ReLU"bottom: "fc7_readonly"top: "fc7_readonly"propagate_down: false
}
layer {name: "drop7_readonly"type: "Dropout"bottom: "fc7_readonly"top: "fc7_readonly"propagate_down: falsedropout_param {dropout_ratio: 0.5}
}
layer {name: "cls_score_readonly"type: "InnerProduct"bottom: "fc7_readonly"top: "cls_score_readonly"propagate_down: falseparam {name: "cls_score_w"}param {name: "cls_score_b"}inner_product_param {num_output: 21weight_filler {type: "gaussian"std: 0.01}bias_filler {type: "constant"value: 0}}
}
layer {name: "bbox_pred_readonly"type: "InnerProduct"bottom: "fc7_readonly"top: "bbox_pred_readonly"propagate_down: falseparam {name: "bbox_pred_w"}param {name: "bbox_pred_b"}inner_product_param {num_output: 84weight_filler {type: "gaussian"std: 0.001}bias_filler {type: "constant"value: 0}}
}
layer {name: "cls_prob_readonly"type: "Softmax"bottom: "cls_score_readonly"top: "cls_prob_readonly"propagate_down: false
}
layer {name: "hard_roi_mining"type: "Python"bottom: "cls_prob_readonly"bottom: "bbox_pred_readonly"bottom: "rois"bottom: "labels"bottom: "bbox_targets"bottom: "bbox_inside_weights"bottom: "bbox_outside_weights"top: "rois_hard"top: "labels_hard"top: "bbox_targets_hard"top: "bbox_inside_weights_hard"top: "bbox_outside_weights_hard"propagate_down: falsepropagate_down: falsepropagate_down: falsepropagate_down: falsepropagate_down: falsepropagate_down: falsepropagate_down: falsepython_param {module: "roi_data_layer.layer"layer: "OHEMDataLayer"param_str: "'num_classes': 21"}
}
########## End ###########
## Readonly RoI Network ##
##########################
layer {name: "roi_pool5"type: "ROIPooling"bottom: "conv5_3"bottom: "rois_hard"top: "pool5"propagate_down: truepropagate_down: falseroi_pooling_param {pooled_w: 7pooled_h: 7spatial_scale: 0.0625 # 1/16}
}
layer {name: "fc6"type: "InnerProduct"bottom: "pool5"top: "fc6"param {name: "fc6_w"lr_mult: 1decay_mult: 1}param {name: "fc6_b"lr_mult: 2decay_mult: 0}inner_product_param {num_output: 4096}
}
layer {name: "relu6"type: "ReLU"bottom: "fc6"top: "fc6"
}
layer {name: "drop6"type: "Dropout"bottom: "fc6"top: "fc6"dropout_param {dropout_ratio: 0.5}
}
layer {name: "fc7"type: "InnerProduct"bottom: "fc6"top: "fc7"param {name: "fc7_w"lr_mult: 1decay_mult: 1}param {name: "fc7_b"lr_mult: 2decay_mult: 0}inner_product_param {num_output: 4096}
}
layer {name: "relu7"type: "ReLU"bottom: "fc7"top: "fc7"
}
layer {name: "drop7"type: "Dropout"bottom: "fc7"top: "fc7"dropout_param {dropout_ratio: 0.5}
}
layer {name: "cls_score"type: "InnerProduct"bottom: "fc7"top: "cls_score"param {name: "cls_score_w"lr_mult: 1decay_mult: 1}param {name: "cls_score_b"lr_mult: 2decay_mult: 0}inner_product_param {num_output: 21weight_filler {type: "gaussian"std: 0.01}bias_filler {type: "constant"value: 0}}
}
layer {name: "bbox_pred"type: "InnerProduct"bottom: "fc7"top: "bbox_pred"param {name: "bbox_pred_w"lr_mult: 1decay_mult: 1}param {name: "bbox_pred_b"lr_mult: 2decay_mult: 0}inner_product_param {num_output: 84weight_filler {type: "gaussian"std: 0.001}bias_filler {type: "constant"value: 0}}
}
layer {name: "loss_cls"type: "SoftmaxWithLoss"bottom: "cls_score"bottom: "labels_hard"top: "loss_cls"propagate_down: truepropagate_down: falseloss_weight: 1
}
layer {name: "loss_bbox"type: "SmoothL1Loss"bottom: "bbox_pred"bottom: "bbox_targets_hard"bottom: "bbox_inside_weights_hard"bottom: "bbox_outside_weights_hard"top: "loss_bbox"propagate_down: truepropagate_down: falsepropagate_down: falsepropagate_down: falseloss_weight: 1
可视化结果如下:

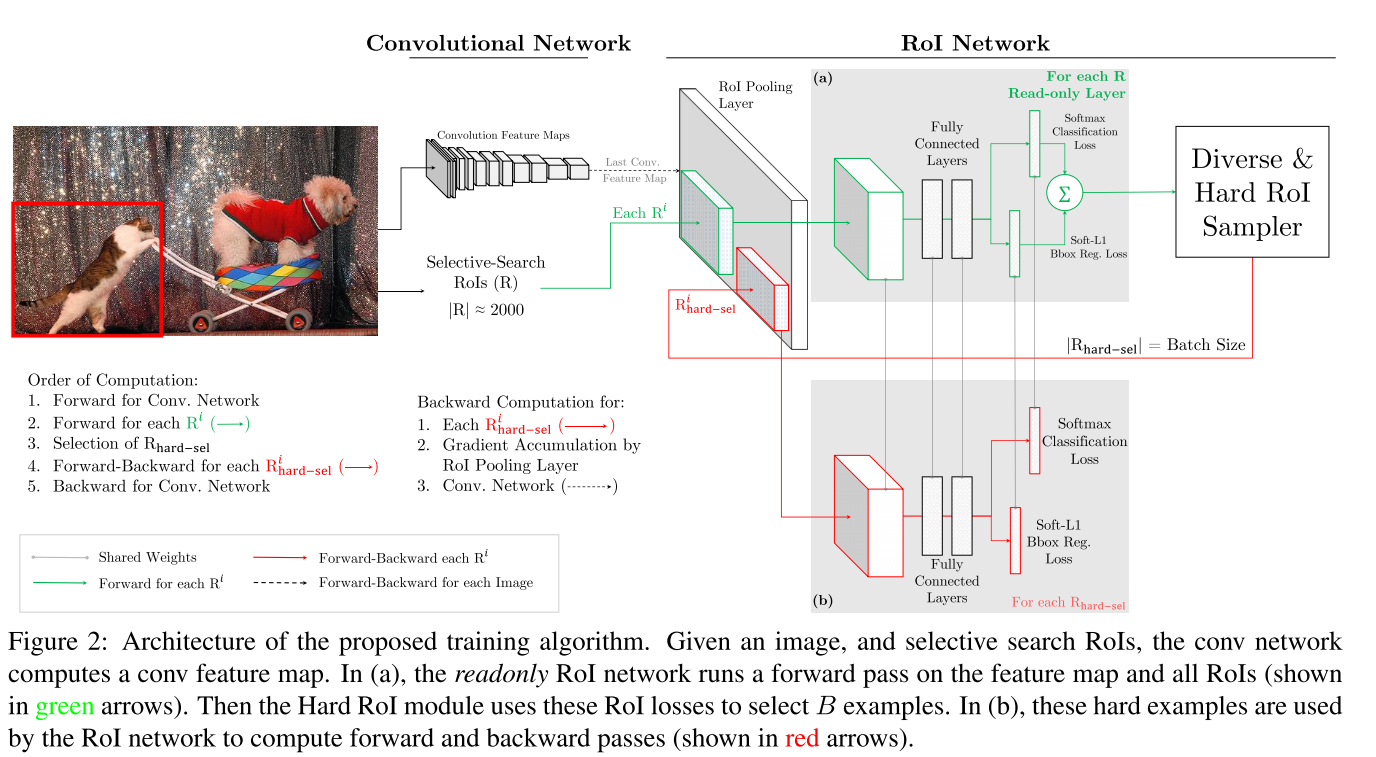
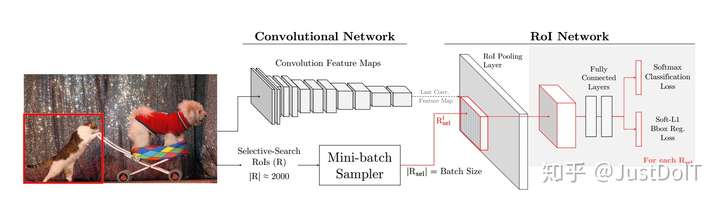
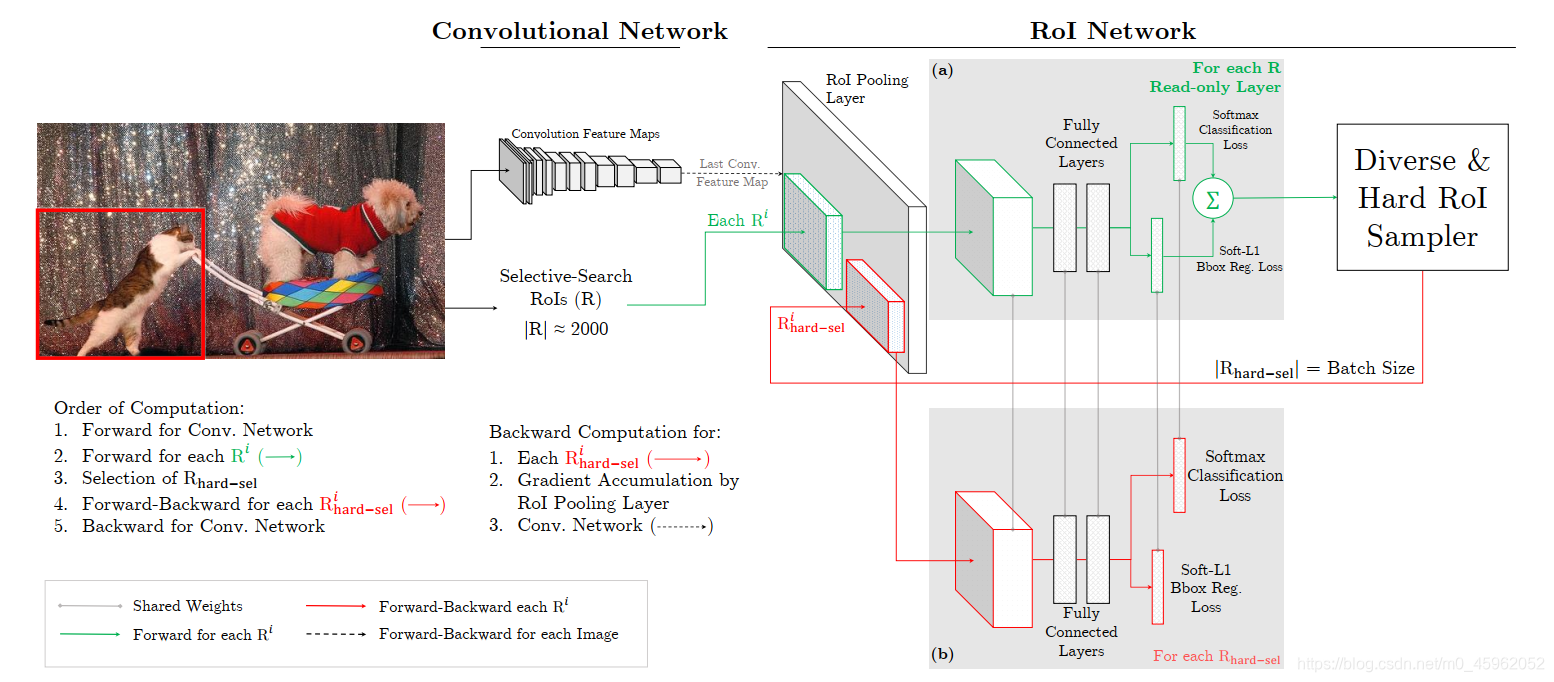
特征从relu5_3出来后分成2两路,一路是roi_pooling5_readonly,另外一路是roi_pooling5. 其中roi_pooling5_readonly 只进行前向传播和计算损失,并不反向传播梯度(在prototxt 中 propagate_down: false 也可以看得出来). 比较两路的prototxt, 可以看到fc6,fc7,cls_score, bbox_pred 中指定了相同的参数名,如:
param {name: "fc6_w"}caffe中如果某两层参数名字是一样的,说明这两层共享权值.
roi_pooling5_readonly 这一层的主要功能就是计算样本的损失(包含分类损失和边框回归损失),然后把损失降序排列(损失越大说明是困难样本), 然后采样或者直接取排列里前batch个样本送入到roi_pooling5层计算困难样本的损失并反传梯度.
2.OHEM 前向传播
def forward(self, bottom, top):"""Compute loss, select RoIs using OHEM. Use RoIs to get blobs and copy them into this layer's top blob vector."""cls_prob = bottom[0].data # 分类预测值bbox_pred = bottom[1].data # 回归预测值rois = bottom[2].datalabels = bottom[3].dataif cfg.TRAIN.BBOX_REG:bbox_target = bottom[4].databbox_inside_weights = bottom[5].databbox_outside_weights = bottom[6].dataelse:bbox_target = Nonebbox_inside_weights = Nonebbox_outside_weights = Noneflt_min = np.finfo(float).eps# classification loss 分类损失 softmaxwithlossloss = [ -1 * np.log(max(x, flt_min)) \for x in [cls_prob[i,label] for i, label in enumerate(labels)]]if cfg.TRAIN.BBOX_REG: # 回归损失, smoothL1 loss# bounding-box regression loss# d := w * (b0 - b1)# smoothL1(x) = 0.5 * x^2 if |x| < 1# |x| - 0.5 otherwisedef smoothL1(x):if abs(x) < 1:return 0.5 * x * xelse:return abs(x) - 0.5bbox_loss = np.zeros(labels.shape[0])for i in np.where(labels > 0 )[0]:indices = np.where(bbox_inside_weights[i,:] != 0)[0]bbox_loss[i] = sum(bbox_outside_weights[i,indices] * [smoothL1(x) \for x in bbox_inside_weights[i,indices] * (bbox_pred[i,indices] - bbox_target[i,indices])])loss += bbox_loss # 选择OHEM的时候的损失是分类和回归损失的和# 获取一个blob的困难样本blobs = get_ohem_minibatch(loss, rois, labels, bbox_target, \bbox_inside_weights, bbox_outside_weights)# 前向传播困难样本.for blob_name, blob in blobs.iteritems():top_ind = self._name_to_top_map[blob_name]# Reshape net's input blobstop[top_ind].reshape(*(blob.shape))# Copy data into net's input blobstop[top_ind].data[...] = blob.astype(np.float32, copy=False)def get_ohem_minibatch(loss, rois, labels, bbox_targets=None,bbox_inside_weights=None, bbox_outside_weights=None):"""Given rois and their loss, construct a minibatch using OHEM."""loss = np.array(loss)if cfg.TRAIN.OHEM_USE_NMS:# 非极大值抑制去重复, 作者使用了一张图片中所有的正样本和负样本,没有使用原来fast-rcnn# 的采样策略,这样可以增加样本的复杂性# 选择策略在minibatch.py中的 _all_rois()中可以看到# Do NMS using loss for de-dup and diversitykeep_inds = []nms_thresh = cfg.TRAIN.OHEM_NMS_THRESH # OHEM_NMS_THRESH=0.7source_img_ids = [roi[0] for roi in rois]for img_id in np.unique(source_img_ids):for label in np.unique(labels):sel_indx = np.where(np.logical_and(labels == label, \source_img_ids == img_id))[0]if not len(sel_indx):continueboxes = np.concatenate((rois[sel_indx, 1:],loss[sel_indx][:,np.newaxis]), axis=1).astype(np.float32)keep_inds.extend(sel_indx[nms(boxes, nms_thresh)])# NMS 之后选择困难样本hard_keep_inds = select_hard_examples(loss[keep_inds])hard_inds = np.array(keep_inds)[hard_keep_inds]else:hard_inds = select_hard_examples(loss)blobs = {'rois_hard': rois[hard_inds, :].copy(),'labels_hard': labels[hard_inds].copy()}if bbox_targets is not None:assert cfg.TRAIN.BBOX_REGblobs['bbox_targets_hard'] = bbox_targets[hard_inds, :].copy()blobs['bbox_inside_weights_hard'] = bbox_inside_weights[hard_inds, :].copy()blobs['bbox_outside_weights_hard'] = bbox_outside_weights[hard_inds, :].copy()return blobsdef select_hard_examples(loss):"""Select hard rois."""# Sort and select top hard examples.# 对样本进行降序排列sorted_indices = np.argsort(loss)[::-1]# np.minimum(len(loss), cfg.TRAIN.BATCH_SIZE)至多选择TRAIN.BATCH_SIZE=128个困难样本.hard_keep_inds = sorted_indices[0:np.minimum(len(loss), cfg.TRAIN.BATCH_SIZE)]# (explore more ways of selecting examples in this function; e.g., sampling)return hard_keep_inds3 .reference
1.https://github.com/abhi2610/ohem


![VMware安装虚拟机操作步骤[史上最详细]](https://img-blog.csdnimg.cn/1795b06cf4254965a81ff0a6f3059b88.png)