Spring Boot Actuator 使用介绍
- 初识 Actuator
- 原生端点
- 应用配置类
- 度量指标类
- 操作控制类
近期在看《Spring Cloud 微服务实战》,由于时间过去几年,对于Actuator监控端点的介绍过时,故作此文更新一下。
Spring Boot 版本:2.5.3
初识 Actuator
在现有的Spring Boot应用中引入该模块非常简单,只需要在pom.xml的dependencies节点中,新增spring-boot-starter-actuator的依赖即可,具体如下:
<dependency><groupId>org.springframework.boot</groupId><artifactId>spring-boot-starter-actuator</artifactId>
</dependency>
通过增加该依赖之后,重新启动应用。此时,我们可以在控制台中看到如下图所示的输出:

上图显示在路径/actuator暴露了一个端点,端点并非我们自己在程序中创建,而是由spring-boot-starter-actuator模块根据应用依赖和配置自动创建出来的监控和管理端点。通过这些端点,我们可以实时的获取应用的各项监控指标,比如:访问/actuator/health端点,我们可以获得如下返回的应用健康信息:
{status: "UP"
}
原文中列出的大量的端点哪去了呢?经查找是因为在web情景下为了安全没有暴露出来,因此我们需要在application.properties文件中设置:
management.endpoints.web.exposure.include=*
再次启动应用,可有如下输出:

通过访问 http://localhost:8080/actuator,可能看到所有端点:
{_links: {self: {href: "http://localhost:8080/actuator",templated: false},beans: {href: "http://localhost:8080/actuator/beans",templated: false},caches-cache: {href: "http://localhost:8080/actuator/caches/{cache}",templated: true},caches: {href: "http://localhost:8080/actuator/caches",templated: false},health: {href: "http://localhost:8080/actuator/health",templated: false},health-path: {href: "http://localhost:8080/actuator/health/{*path}",templated: true},info: {href: "http://localhost:8080/actuator/info",templated: false},conditions: {href: "http://localhost:8080/actuator/conditions",templated: false},configprops: {href: "http://localhost:8080/actuator/configprops",templated: false},configprops-prefix: {href: "http://localhost:8080/actuator/configprops/{prefix}",templated: true},env: {href: "http://localhost:8080/actuator/env",templated: false},env-toMatch: {href: "http://localhost:8080/actuator/env/{toMatch}",templated: true},loggers-name: {href: "http://localhost:8080/actuator/loggers/{name}",templated: true},loggers: {href: "http://localhost:8080/actuator/loggers",templated: false},heapdump: {href: "http://localhost:8080/actuator/heapdump",templated: false},threaddump: {href: "http://localhost:8080/actuator/threaddump",templated: false},metrics-requiredMetricName: {href: "http://localhost:8080/actuator/metrics/{requiredMetricName}",templated: true},metrics: {href: "http://localhost:8080/actuator/metrics",templated: false},scheduledtasks: {href: "http://localhost:8080/actuator/scheduledtasks",templated: false},mappings: {href: "http://localhost:8080/actuator/mappings",templated: false}}
}
通过点击具体的链接,获取更详细的描述。
原生端点
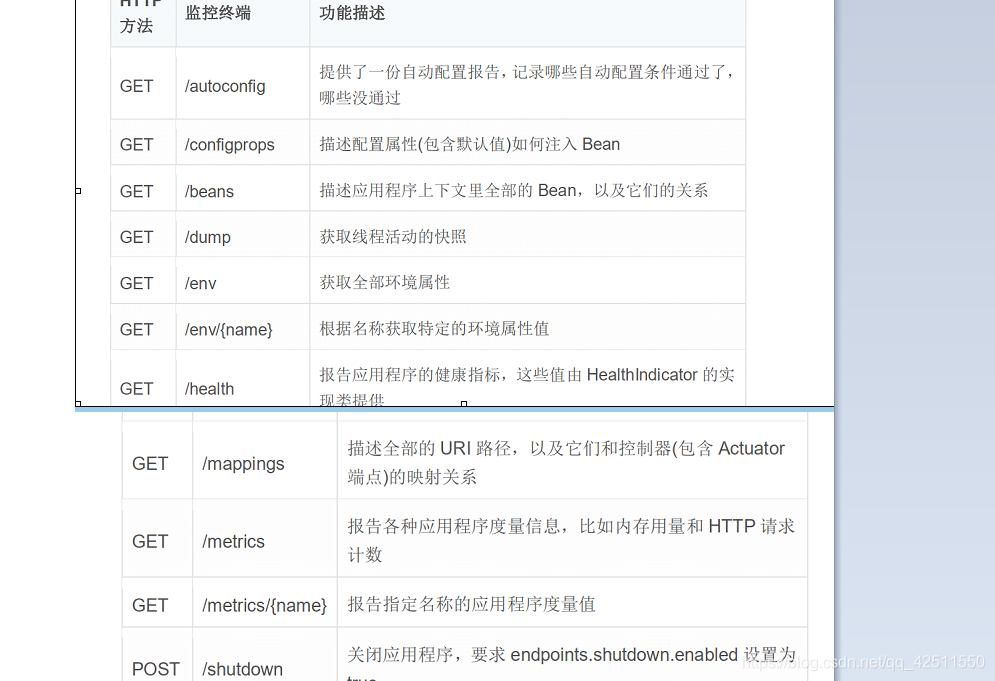
通过在前一节中添加 spring-boot-starter-actuator模块,我们已经对它有了一个初步的认识。接下来,我们详细介绍一下spring-boot-starter-actuator模块中已经实现的一些原生端点。如果根据端点的作用来说,我们可以原生端点分为三大类:
- 应用配置类:获取应用程序中加载的应用配置、环境变量、自动化配置报告等与Spring Boot应用密切相关的配置类信息。
- 度量指标类:获取应用程序运行过程中用于监控的度量指标,比如:内存信息、线程池信息、HTTP请求统计等。
- 操作控制类:提供了对应用的关闭等操作类功能。
下面我们来详细了解一下这三类端点都分别可以为我们提供怎么样的有用信息和强大功能,以及我们如何去扩展和配置它们。
应用配置类
由于Spring Boot为了改善传统Spring应用繁杂的配置内容,采用了包扫描和自动化配置的机制来加载原本集中于xml文件中的各项内容。虽然这样的做法,让我们的代码变得非常简洁,但是整个应用的实例创建和依赖关系等信息都被离散到了各个配置类的注解上,这使得我们分析整个应用中资源和实例的各种关系变得非常的困难。而这类端点就可以帮助我们轻松的获取一系列关于Spring 应用配置内容的详细报告,比如:自动化配置的报告、Bean创建的报告、环境属性的报告等。
- /conditions(原/autoconfig):该端点用来获取应用的自动化配置报告,其中包括所有自动化配置的候选项。同时还列出了每个候选项自动化配置的各个先决条件是否满足。所以,该端点可以帮助我们方便的找到一些自动化配置为什么没有生效的具体原因。该报告内容将自动化配置内容分为两部分:
positiveMatches中返回的是条件匹配成功的自动化配置negativeMatches中返回的是条件匹配不成功的自动化配置unconditionalClasse未设置条件的自动化配置
{contexts: {application: {positiveMatches: {AuditEventsEndpointAutoConfiguration: [{condition: "OnAvailableEndpointCondition",message: "@ConditionalOnAvailableEndpoint no property management.endpoint.auditevents.enabled found so using endpoint default; @ConditionalOnAvailableEndpoint marked as exposed by a 'management.endpoints.web.exposure' property"},...],...},negativeMatches: {RabbitHealthContributorAutoConfiguration: {notMatched: [{condition: "OnClassCondition",message: "@ConditionalOnClass did not find required class 'org.springframework.amqp.rabbit.core.RabbitTemplate'"}],...},unconditionalClasses: ["org.springframework.boot.autoconfigure.context.ConfigurationPropertiesAutoConfiguration","org.springframework.boot.actuate.autoconfigure.availability.AvailabilityHealthContributorAutoConfiguration","org.springframework.boot.actuate.autoconfigure.info.InfoContributorAutoConfiguration","org.springframework.boot.autoconfigure.context.PropertyPlaceholderAutoConfiguration","org.springframework.boot.autoconfigure.context.LifecycleAutoConfiguration","org.springframework.boot.actuate.autoconfigure.health.HealthContributorAutoConfiguration","org.springframework.boot.actuate.autoconfigure.metrics.integration.IntegrationMetricsAutoConfiguration","org.springframework.boot.actuate.autoconfigure.endpoint.EndpointAutoConfiguration","org.springframework.boot.autoconfigure.availability.ApplicationAvailabilityAutoConfiguration","org.springframework.boot.autoconfigure.info.ProjectInfoAutoConfiguration","org.springframework.boot.actuate.autoconfigure.web.server.ManagementContextAutoConfiguration"]],
从如上示例中我们可以看到,每个自动化配置候选项中都有一系列的条件,比如上面没有成功匹配的RabbitHealthContributorAutoConfiguration配置,它的先决条件就是需要在工程中包含org.springframework.amqp.rabbit.core.RabbitTemplate类,由于我们没有引入相关的依赖,它就不会执行自动化配置内容。所以,当我们发现有一些期望的配置没有生效时,就可以通过该端点来查看没有生效的具体原因。
- /beans:该端点用来获取应用上下文中创建的所有Bean。
{contexts: {application: {beans: {endpointCachingOperationInvokerAdvisor: {aliases: [ ],scope: "singleton",type: "org.springframework.boot.actuate.endpoint.invoker.cache.CachingOperationInvokerAdvisor",resource: "class path resource [org/springframework/boot/actuate/autoconfigure/endpoint/EndpointAutoConfiguration.class]",dependencies: ["org.springframework.boot.actuate.autoconfigure.endpoint.EndpointAutoConfiguration","environment"]},...},parentId: null}}
}
如上示例中,我们可以看到在每个bean都以键值对出现,key为Bean的名称,value是个集合,都包含了下面这几个信息:
- scope:Bean的作用域
- type:Bean的Java类型
- reource:class文件的具体路径
- dependencies:依赖的Bean名称
- /configprops:该端点用来获取应用中配置的属性信息报告。从下面该端点返回示例的片段中,我们看到返回了关于该短信的配置信息,
prefix属性代表了属性的配置前缀,properties代表了各个属性的名称和值。所以,我们可以通过该报告来看到各个属性的配置路径,比如我们要关闭该端点,就可以通过使用endpoints.configprops.enabled=false来完成设置。 - /env:该端点与
/configprops不同,它用来获取应用所有可用的环境属性报告。包括:环境变量、JVM属性、应用的配置配置、命令行中的参数。从下面该端点返回的示例片段中,我们可以看到它不仅返回了应用的配置属性,还返回了系统属性、环境变量等丰富的配置信息,其中也包括了应用还没有没有使用的配置。所以它可以帮助我们方便地看到当前应用可以加载的配置信息,并配合@ConfigurationProperties注解将它们引入到我们的应用程序中来进行使用。另外,为了配置属性的安全,对于一些类似密码等敏感信息,该端点都会进行隐私保护,但是我们需要让属性名中包含:password、secret、key这些关键词,这样该端点在返回它们的时候会使用*来替代实际的属性值。 - /mappings:该端点用来返回所有Spring MVC的控制器映射关系报告。从下面的示例片段中,我们可以看该报告的信息与我们在启用Spring MVC的Web应用时输出的日志信息类似,其中
bean属性标识了该映射关系的请求处理器,method属性标识了该映射关系的具体处理类和处理函数。 - /info:该端点用来返回一些应用自定义的信息。默认情况下,该端点只会返回一个空的json内容。我们可以在
application.properties配置文件中通过info前缀来设置一些属性
度量指标类
- /metrics:该端点用来返回当前应用的各类重要度量指标,比如:内存信息、线程信息、垃圾回收信息等。
{names: ["http.server.requests","jvm.buffer.count","jvm.buffer.memory.used","jvm.buffer.total.capacity","jvm.classes.loaded","jvm.classes.unloaded","jvm.gc.live.data.size","jvm.gc.max.data.size","jvm.gc.memory.allocated","jvm.gc.memory.promoted","jvm.gc.pause","jvm.memory.committed","jvm.memory.max","jvm.memory.used","jvm.threads.daemon","jvm.threads.live","jvm.threads.peak","jvm.threads.states","logback.events","process.cpu.usage","process.files.max","process.files.open","process.start.time","process.uptime","system.cpu.count","system.cpu.usage","system.load.average.1m","tomcat.sessions.active.current","tomcat.sessions.active.max","tomcat.sessions.alive.max","tomcat.sessions.created","tomcat.sessions.expired","tomcat.sessions.rejected"]
}
以上列出了key,通过将key加在链接后面,即可查看详情数据,例如想了解jvm内存使用,访问http://localhost:8080/actuator/metrics/jvm.memory.used,结果如下:
{name: "jvm.memory.used",description: "The amount of used memory",baseUnit: "bytes",measurements: [{statistic: "VALUE",value: 108388088}],availableTags: [{tag: "area",values: ["heap","nonheap"]},{tag: "id",values: ["Compressed Class Space","PS Survivor Space","PS Old Gen","Metaspace","PS Eden Space","Code Cache"]}]
}
在自定义标量值时,Springboot1.5.x支持的org.springframework.boot.actuate.metrics.CounterService和org.springframework.boot.actuate.metrics.GaugeService已不再支持,改用注解。即:
@Endpoint、@WebEndpoint 或 @EndpointWebExtension 上的操作将使用 Jersey、Spring MVC 或 Spring WebFlux 通过 HTTP 自动暴露。
写代码如下:
import org.springframework.boot.actuate.endpoint.annotation.ReadOperation;
import org.springframework.boot.actuate.endpoint.web.annotation.WebEndpoint;
import org.springframework.context.annotation.Configuration;import java.util.HashMap;@Configuration
@WebEndpoint(id = "testEndpoint")
public class HelloController {@ReadOperationpublic HashMap<String, Object> index() {HashMap<String, Object> hashMap = new HashMap<>();hashMap.put("name", "sky");hashMap.put("age", 24);return hashMap;}
}
就可以访问http://localhost:8080/actuator/testEndpoint,得出结果如下:
{name: "sky",age: 24
}
- /health:该端点在一开始的示例中我们已经使用过了,它用来获取应用的各类健康指标信息。在
spring-boot-starter-actuator模块中自带实现了一些常用资源的健康指标检测器。
操作控制类
在原生端点中,只提供了一个用来关闭应用的端点:/shutdown。我们可以通过如下配置开启它:
management.endpoint.shutdown.enabled=true
在配置了上述属性之后,只需要访问该应用的/shutdown端点就能实现关闭该应用的远程操作。由于开放关闭应用的操作本身是一件非常危险的事,所以真正在线上使用的时候,我们需要对其加入一定的保护机制。

