目录
目标
实验
主函数:加噪声,扭曲原始图片,使用滤波器修复图片
子函数1:中心化图片
子函数2:加高斯噪声
子函数3:维纳反卷积滤波器
子函数4:逆滤波器
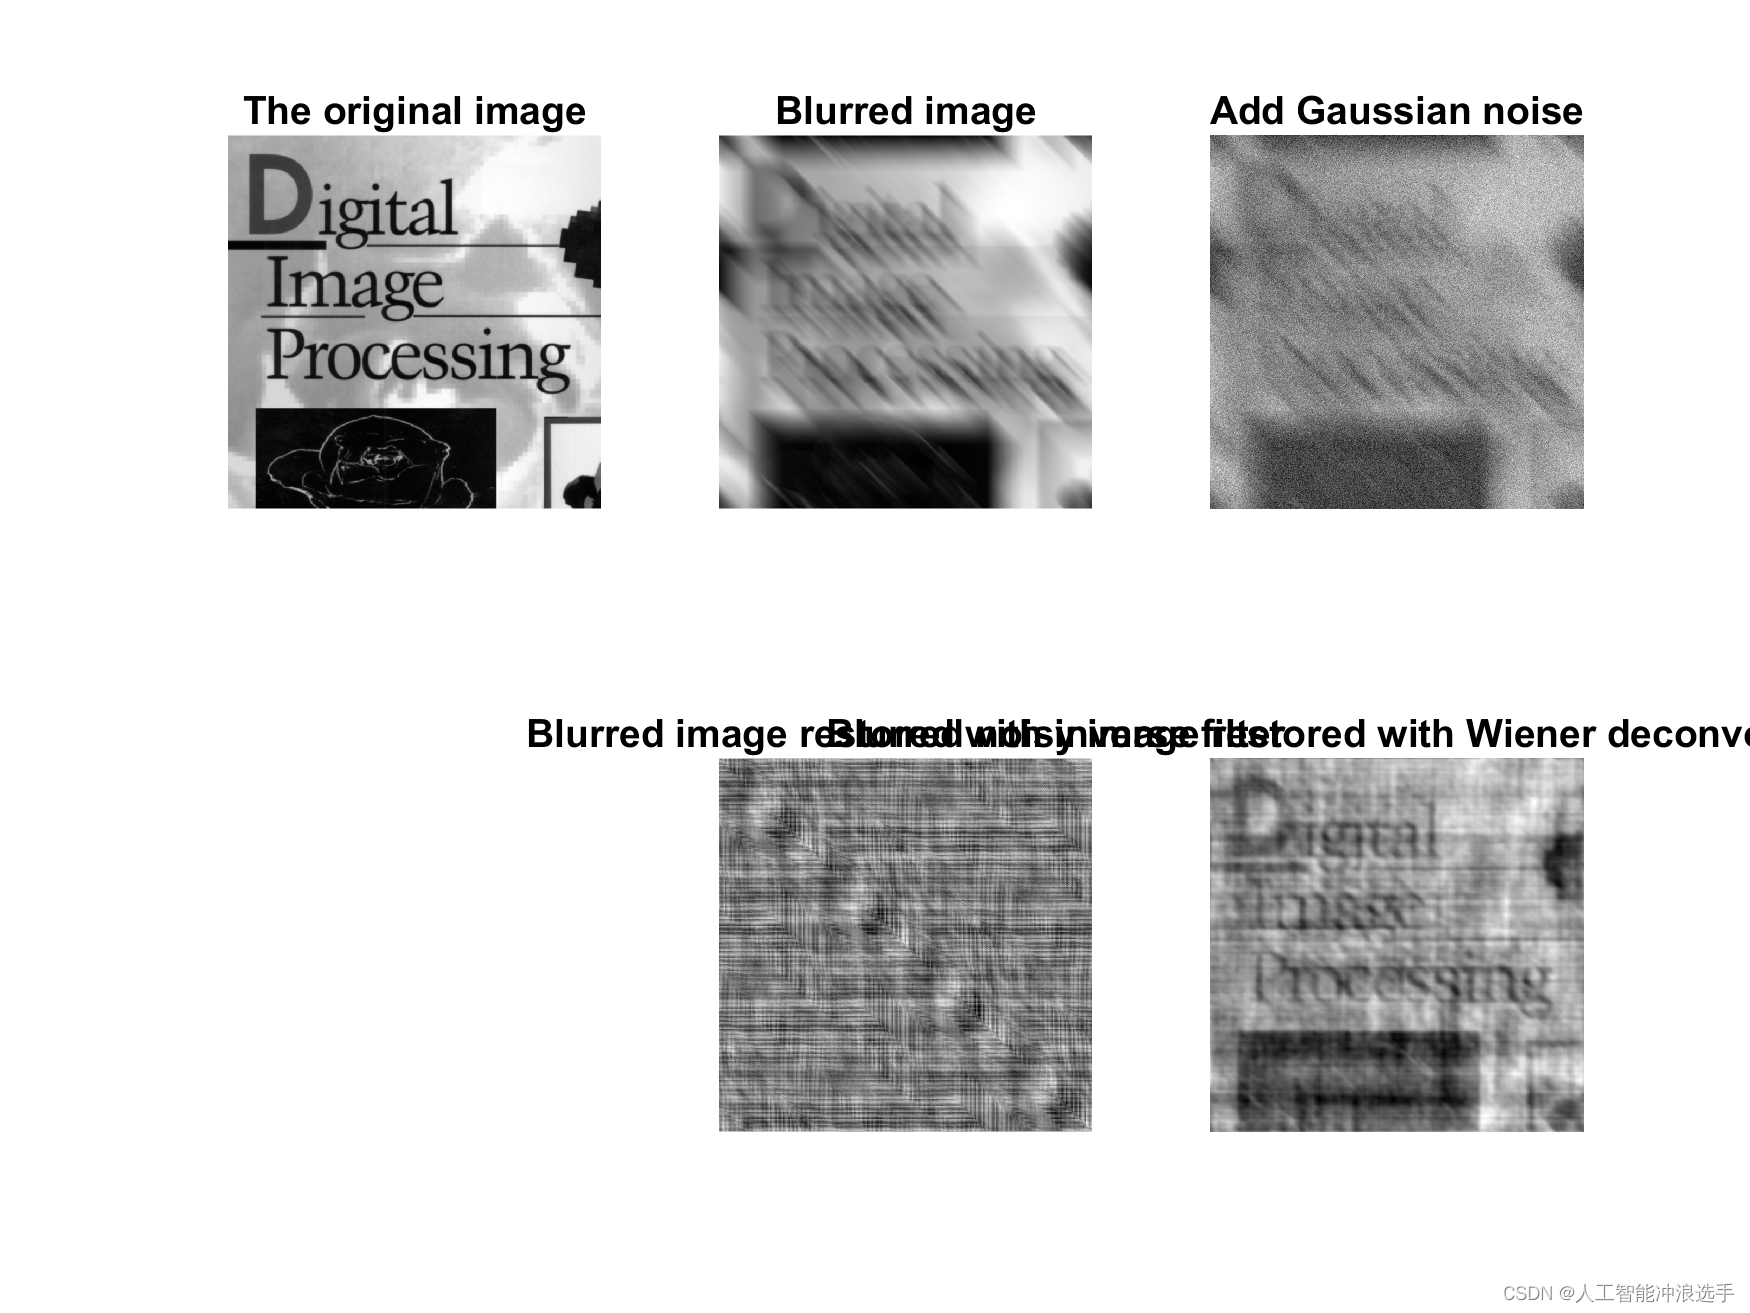
实验结果
原始图片,退化图片,加噪图片,逆滤波修复图片,维纳反卷积滤波修复图片
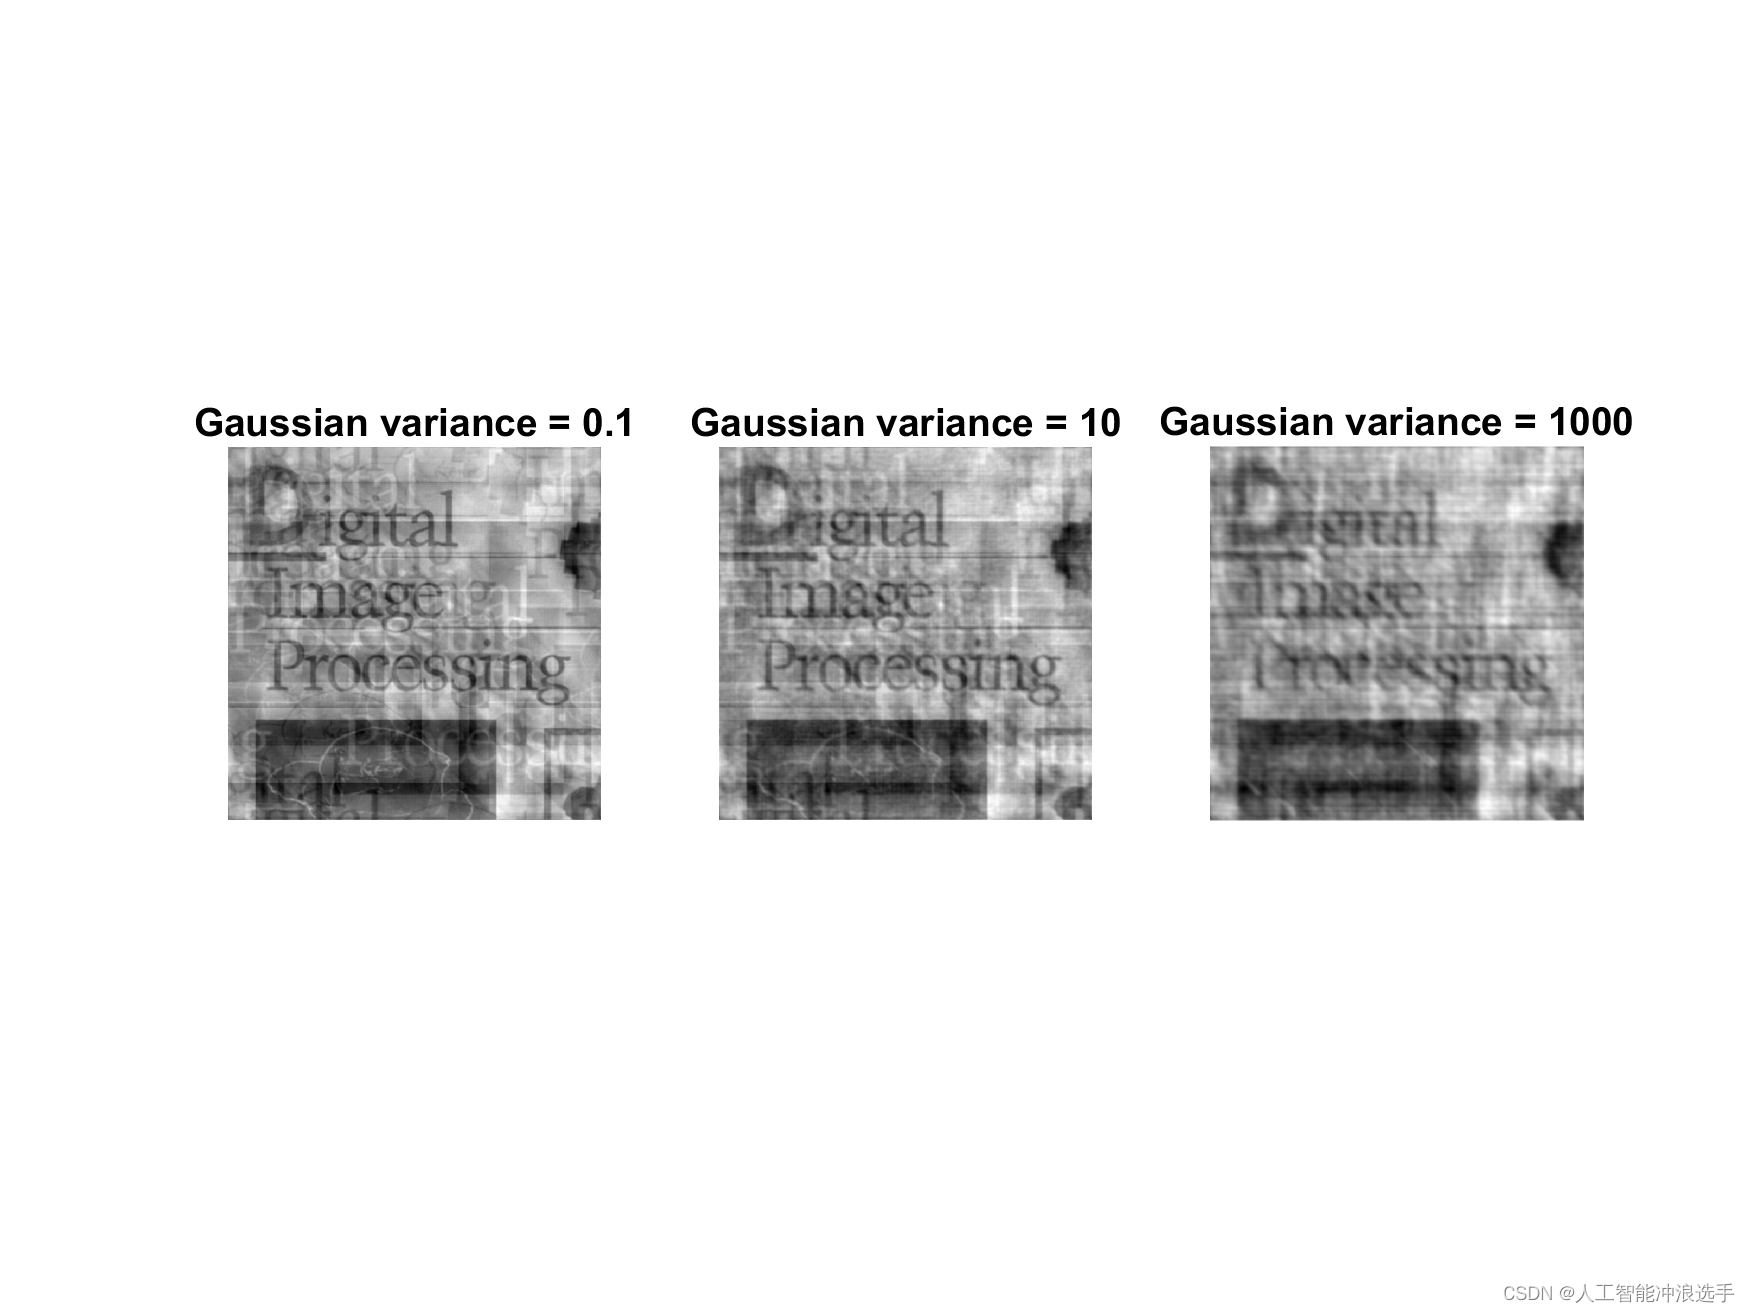
维纳反卷积滤波器对高斯噪声variance的响应探究
目标
本实验使用自定义退化函数,对原始图片进行扭曲退化。然后使用逆滤波器和维纳反卷积滤波器来对退化图像处理,获得原始图片。
逆滤波是从系统的输出中接收输入的过程。一旦已知退化函数,这是恢复原始图像的最简单方法。
维纳反卷积滤波器定义
实验
主函数:加噪声,扭曲原始图片,使用滤波器修复图片
clc; clear;
%% Read the original image
fig_original = double(imread('data/book_cover.jpg')) / 255;
[Height, Width] =size(fig_original);
% Discrete Fourier Transformation
F = fft2(center_transform(fig_original));%% Blurring Degradation and Restoration
figure('Name', 'Blurring Degradation');
% Display the original image
subplot(2, 3, 1);
imshow(fig_original, []);
title('The original image');% Blur the image using paramaters a=b=0.1 and T = 1
subplot(2, 3, 2);
H = filter_H(Height, Width, 0.1, 0.1, 1);
blurred_image = center_transform(real(ifft2(H .* F)));
imshow(blurred_image, []);
imwrite(blurred_image, 'data/blurred_image.png');
title('Blurred image');% Add Gaussian noise of 0 mean and variance of 650 to the blurred image
subplot(2, 3, 3);
noise = gaussian_noise(Height, Width, sqrt(650), 0) / 255;
blurred_noisy_image = blurred_image + noise;
imshow(blurred_noisy_image, []);
imwrite(blurred_noisy_image, 'data/blurred_noisy_image.png');
title('Add Gaussian noise');% Restore the blurred image using the inverse filter
subplot(2, 3, 5);
F_blurred = fft2(center_transform(blurred_image));
blurred_restored = center_transform(real(ifft2(F_blurred ./ H)));
imshow(blurred_restored, []);
imwrite(blurred_restored, 'data/blurred_restored.png');
title('Blurred image restored with inverse filter');% Restore the blurred noisy image using Wiener deconvolution filter
subplot(2, 3, 6);
F_blurred_noisy = fft2(center_transform(blurred_noisy_image));
blurred_noisy_restored = center_transform(real(ifft2(wiener_filter(noise, F, H) .* F_blurred_noisy)));
imshow(blurred_noisy_restored, []);
imwrite(blurred_noisy_restored, 'data/blurred_noisy_restored.png');
title('Blurred noisy image restored with Wiener deconvolution filter');%% Investigate the performance of the Wiener deconvolution filter using Gaussian noise of 0 and different variances
figure('Name', 'Investigate Wiener deconvolution filter');% Add Gaussian noise of 0 mean and variance of 0.1 to the blurred image
subplot(1, 3, 1);
noise = gaussian_noise(Height, Width, sqrt(0.1), 0) / 255;
F_blurred_noisy = fft2(center_transform(blurred_image + noise));
blurred_noisy_restored = center_transform(real(ifft2(wiener_filter(noise, F, H) .* F_blurred_noisy)));
imshow(blurred_noisy_restored, []);
imwrite(blurred_noisy_restored, 'data/gvar0_1.png');
title('Gaussian variance = 0.1');% Add Gaussian noise of 0 mean and variance of 10 to the blurred image
subplot(1, 3, 2);
noise = gaussian_noise(Height, Width, sqrt(10), 0) / 255;
F_blurred_noisy = fft2(center_transform(blurred_image + noise));
blurred_noisy_restored = center_transform(real(ifft2(wiener_filter(noise, F, H) .* F_blurred_noisy)));
imshow(blurred_noisy_restored, []);
imwrite(blurred_noisy_restored, 'data/gvar10.png');
title('Gaussian variance = 10');% Add Gaussian noise of 0 mean and variance of 1000 to the blurred image
subplot(1, 3, 3);
noise = gaussian_noise(Height, Width, sqrt(1000), 0) / 255;
F_blurred_noisy = fft2(center_transform(blurred_image + noise));
blurred_noisy_restored = center_transform(real(ifft2(wiener_filter(noise, F, H) .* F_blurred_noisy)));
imshow(blurred_noisy_restored, []);
imwrite(blurred_noisy_restored, 'data/gvar1000.png');
title('Gaussian variance = 1000');
子函数1:中心化图片
function [ output ] = center_transform( input )
% CENTER_TRANSFORM centerize an image by applying
%   f(x, y) = f(x, y) * (-1)^{x+y}[h, w] = size(input);u = 1:h;v = 1:w;[V, U] = meshgrid(v, u);D = V + U;output = input .* power(-1, D);
end
子函数2:加高斯噪声
function [ output ] = gaussian_noise( M, N, sigma, zbar )
%GAUSSIAN_NOISE of size M * N
%   p(z) = 1 / sqrt(2 * pi)sigma * e^(-(z - zbar)^2 / 2sigma^2)output = zbar + randn(M, N) * sigma;
end
子函数3:维纳反卷积滤波器
function [ output ] = wiener_filter( N, F, H)
% WIENER_FILTER generates a typical Wiener filter by definitionH2 = abs(H) .^ 2;Sn = abs(fft2(center_transform(N))) .^ 2;Sf = abs(F) .^ 2;output = (H2 ./ H ./ (H2 + Sn ./ Sf));
end
子函数4:逆滤波器
function [ output ] = filter_H( M, N, a, b, T )
% FILTER_H generates a filter of size h * w
%   where H(u, v) = T / \pi(ua+vb) sin[\pi(ua+vb)] e^{-j\pi(ua+vb)}u = [1:M] - M / 2;v = [1:N] - N / 2;[V, U] = meshgrid(v, u);D = (V .* b + U .* a) .* pi;output = ones(M, N) .* T ./ D .* sin(D) .* exp(-j * D);output(D == 0) = 1;
end
实验结果
原始图片,退化图片,加噪图片,逆滤波修复图片,维纳反卷积滤波修复图片
维纳反卷积滤波器对高斯噪声variance的响应探究