目录
局部卷积(PConv)图像修复
Pconv torch 实现:
局部卷积(PConv)图像修复
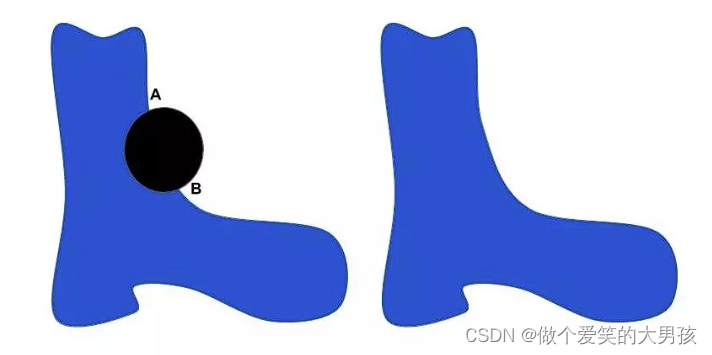
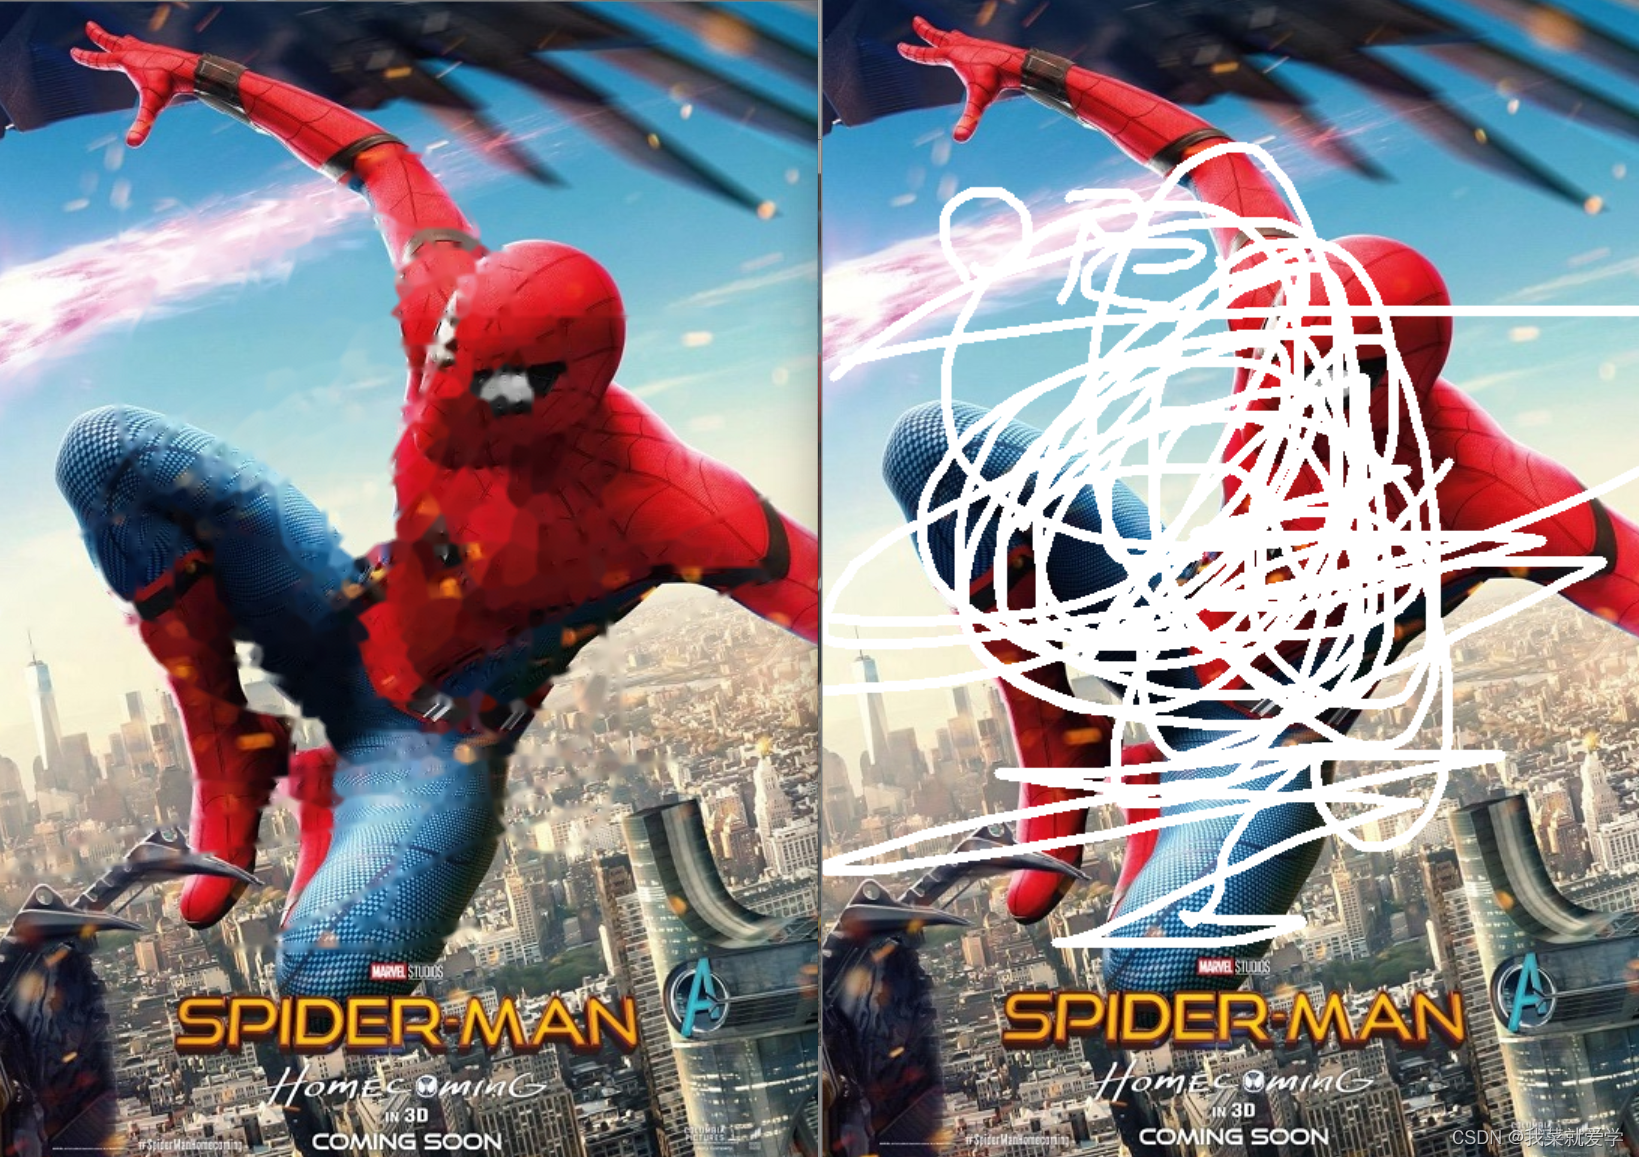
本文提出了局部卷积(PConv)层来处理不规则孔。图1显示了使用建议的PConv的一些修复结果。看样子还不错,那么 让我们一起了解PConv的主要思想!
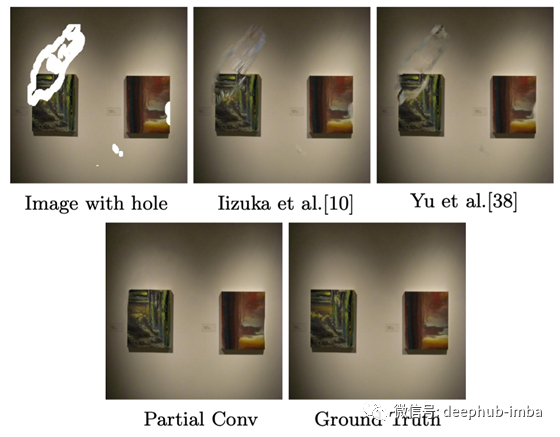
使用常规蒙版图像和局部转换训练深层修复方法的视觉比较。
本文采用了一种具有跳跃连接的U-Net网络,其中所有标准卷积层都被提出的局部卷积层所替代。如果你对他们的网络架构感兴趣,你可以参考论文(https://arxiv.org/pdf/1804.07723.pdf),他们提供了详细的模型表。
有趣的是,在这项工作中没有使用鉴别器。除了标准L1损失和Total variation loss(TV损失)外,作者还采用了两种高水平的特征损失来完成纹理较好的掩码图像。稍后我会详细介绍这两个损失。
解决方案
如在上面提到的,关键思想是在卷积过程中将缺失的像素从有效像素中分离出来,这样卷积的结果只依赖于有效像素。这就是我们将这种卷积称为局部卷积的原因。卷积部分基于可自动更新的二进制掩码图像在输入端进行。
局部卷积层
让我们定义W和b为卷积滤波器的权值和偏置。X表示卷积的像素值(或特征激活值),M为对应的二进制掩码,表示每个像素/特征值的有效性(缺失像素为0,有效像素为1)。计算提出的局部卷积,
其中⦿表示逐元素相乘,1是与M形状相同的单位矩阵。从该等式,您可以看到局部卷积的结果仅取决于有效输入值(如X⦿M)。sum(1)/ sum(M)是一个缩放因子,用于随着每个卷积的有效输入值数量的变化来调整结果。
在每个局部卷积层之后更新二进制掩码。提议的更新二进制掩码的规则非常容易。如果当前卷积的结果以至少一个有效输入值为条件,则相应位置将被视为对下一个局部卷积层有效。
正如您在上面看到的,更新规则很容易理解。
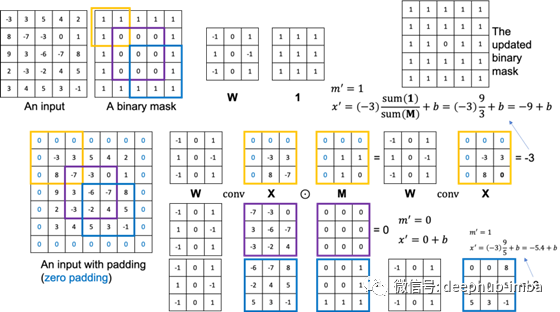
局部卷积的可视化说明
上图显示了一个简单的例子来说明所提出的局部卷积。我们考虑一个简单的5×5输入及其对应的5×5二值掩码图像(有效像素为1,孔像素为0)和一个固定权重的3×3 W。假设我们想要保持输入大小5×5相同的输出大小,因此我们在做卷积之前进行零划片。让我们首先考虑左上角(橙色边界)。这个卷积的X和M如图所示,有效输入值的个数为3。因此,这个位置的输出是-9+b。另外,更新后的二进制掩码中对应位置的值为1,因为有3个有效的输入值。
考虑到中间(紫色边界)框,这次卷积没有有效的输入值,所以结果是0+b,更新后的掩码值也是0。右下(蓝色边界)框是显示缩放因子作用的另一个卷积示例。通过比例因子,网络可以将由3个有效输入值计算得到的-3和由5个有效输入值计算得到的-3区分开来。
为了方便参考,上图右上角显示了经过此局部卷积层后更新的二进制掩码。您可以看到更新后的二进制掩码中0减少了。当我们执行越来越多的局部卷积时,二进制掩码最终将被更新为全为1。这意味着无论缺失区域的大小和形状如何,我们都可以控制要在网络内部传递的信息。
损失函数
在它们最终的损失函数中总共有4个损失项,分别是L1损失、感知损失、风格损失和TV损失。
L1损失(逐像素的)

这种损失是为了确保像素级重建的准确性。
其中I_out和I_gt分别是网络的输出和真实值。M是二进制掩码,0表示孔,1表示有效像素。N_I_gt是图像中像素值的总数,等于C×H×W,C是通道大小(对于RGB图像为3),H和W是图像I_gt的高度和宽度。您可以看到L_hole和L_valid分别是空像素和有效像素的L1损失。
感知损失(VGG损失)

感知损失由Gatys等人提出。[2] 简而言之,我们希望填充图像和背景真实图像具有类似的特征表示,这些特征表示是由像VGG-16这样的预训练网络计算得出的。具体来说,我们将地面真实图像和填充图像输入到经过预先训练的VGG-16中以提取特征。然后,我们计算它们在所有或几层的特征值之间的L1距离。
对于上面的公式,I_comp与I_out相同,除了有效像素直接由背景真实像素替换。II_p是在给定输入I的情况下由预训练的VGG-16计算的第p层的特征图。N_ΨI_p是ΨI_p中的元素数。当完成的图像在语义上接近其地面真实图像时,这种感觉很小。可能是因为更深的层次(更高的层次)提供了更多的图像语义信息,类似的高级特征表示表示更好的完成语义正确性。为了便于理解,使用VGG-16 pool1、pool2和pool3层来计算感知损失。
风格损失

除了感知缺失,作者还采用了上面所示的风格损失。风格损失也是使用预先训练过的vgg16提供的特征图计算的。这次我们首先计算每个feature map的自相关性,在[2]中称为Gram matrix。根据[2],Gram矩阵包含图像的风格信息,如纹理和颜色。这也是这种损失被称为样式损失的原因。因此,我们计算完成图像的Gram矩阵与ground truth图像之间的L1距离。请注意,Ψ^ I_p的大小(H_p×W_p)×C_p及其与形状的Gram矩阵是C_p×C_p。K_p是一个归一化因子,它依赖于第p层特征图的空间大小。
TV损失(Total Variation loss)
最后损失函数的最后损失项是TV损失。简单来说,采用这种损失是为了保证完成图像的平滑性。这也是许多图像处理任务中的常见损失。

其中,N_I_comp是I_comp中像素值的总数。
作者做了实验以显示不同损失项的影响。结果显示在上面的图中。首先,(b)显示了不使用样式损失的修复结果。他们发现在模型中使用样式风格对于生成精细的局部纹理是必要的。但是,必须谨慎选择风格丢失的超参数。如您在图(f)中所见,与使用完全损失的结果相比,较小的样式损失权重会导致一些明显的假象(图(g))。除了风格上的损失外,感知损失也很重要。他们还发现,使用感知损失可以减少网格状伪影。请参见图(j)和(k)了解使用感知损失的效果。
事实上,高层特征丢失的使用还没有得到充分的研究。我们不能100%地说感知丢失或样式丢失一定对图像inpainting有用。因此,我们必须自己做实验来检查不同损失对于我们期望的应用的有效性。
实验
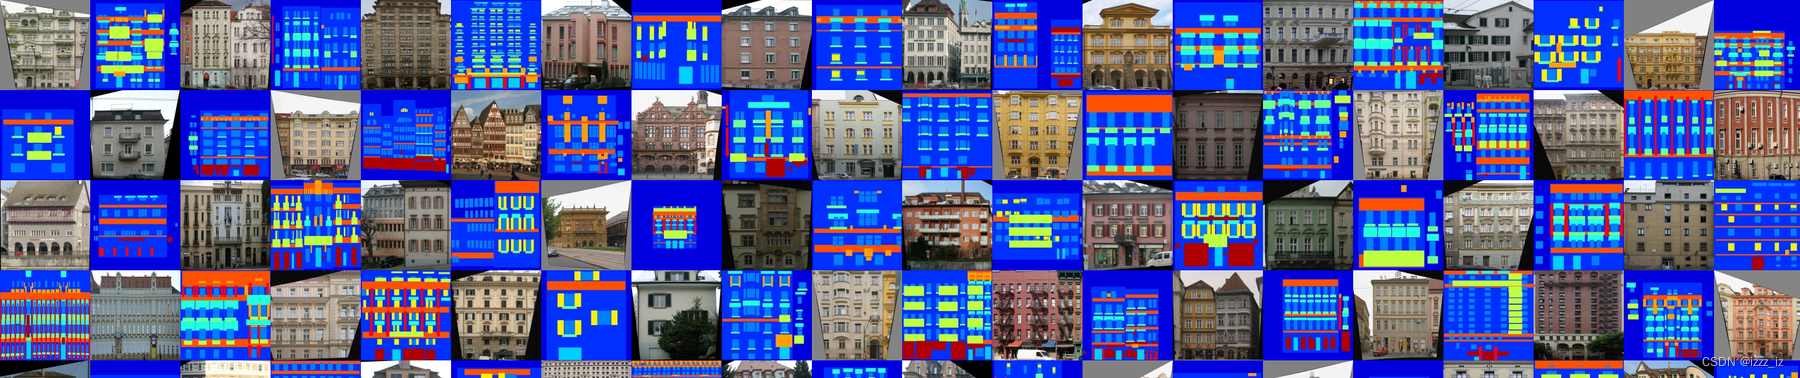
一些遮罩图像的例子。1,3,5有边界约束,2,4,6无边界约束。
在他们的实验中,所有的掩码、训练和测试图像的尺寸都是512×512。作者将测试图像分为两组,一组是边界附近带孔的掩码,边界附近无孔的掩码。第二组为将所有小孔与边界的距离均不小于50像素的图像。上图显示了这两组掩码的一些示例。此外,根据孔与图像的面积比,生成6种遮罩:(0.01,0.1],(0.1,0.2],(0.2,0.3],(0.3,0.4],(0.4,0.5],(0.5,0.6]。这意味着最大的遮罩可以遮掉60%的原始图像内容。
训练数据。与之前的工作相似,作者在3个公开的数据集上评估了他们的模型,即ImageNet, Places2和celepa - hq数据集。
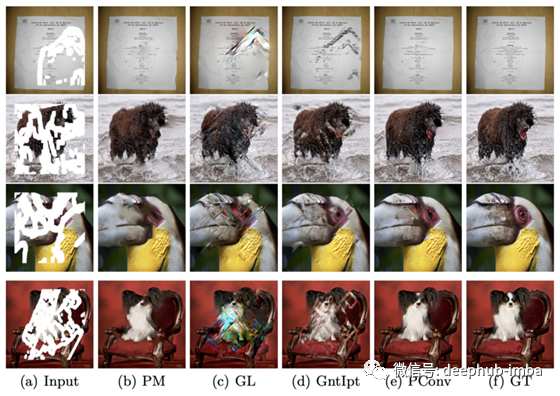
在ImageNet上对不同方法进行可视化比较。(a)输入图像(b) PatchMatch (c) GLCIC (d) context Attention (e) PConv (f) 真实图像
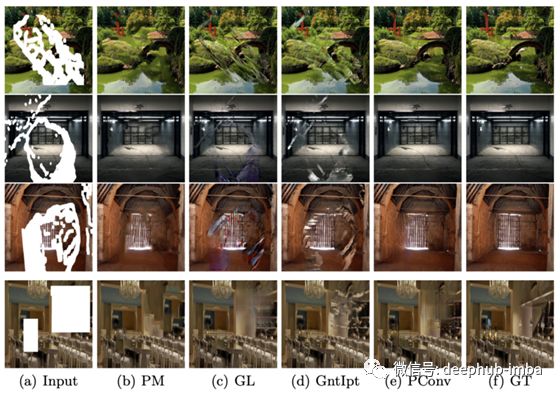
不同地点的视觉比较2。(a)输入图像(b) PatchMatch (c) GLCIC (d) context Attention (e) PConv (f) 真实图像
上面两张分别显示了ImageNet和Places2上不同方法的可视化比较。PatchMatch是最先进的传统方法。GLCIC和context Attention是两种最先进的深度学习方法。GLCIC (c)和context Attention(d)不能提供具有良好视觉质量的inpainting结果。这可能是因为之前的两种深度学习方法训练的是常规掩蔽图像,而不是不规则掩蔽图像。如果您感兴趣,请放大以更好地查看inpainting结果。
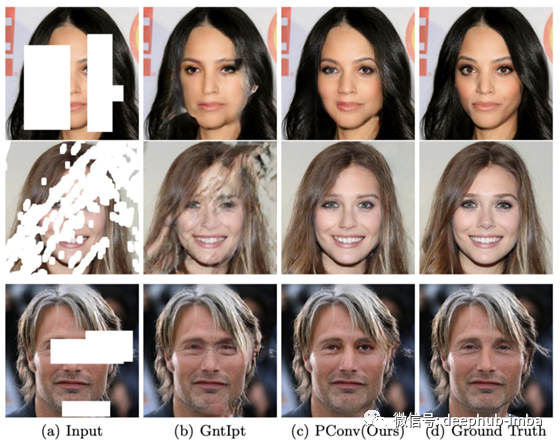
在CelebA-HQ数据集上显示inpaint结果。你可以放大以更清楚地看到结果。
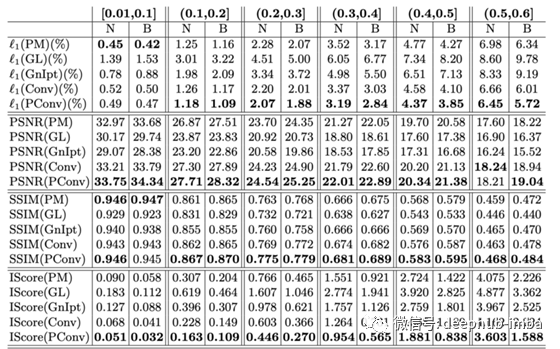
各种方法的定量比较。6列代表6种不同的掩模比例。N表示无边界(即洞可以靠近边界),B表示有边界(即洞不能靠近边界)。
上表列出了几个客观的评价指标,供参考。显然,提议的PConv在几乎所有情况下都提供了最好的数字。请注意,IScore是用于估计视觉质量的初始分数,分数越低,估计的视觉质量就越好。
除了定性和定量的比较,作者还进行了一项人类主观研究,以评估不同方法的视觉质量。感兴趣的读者可以参考研究论文。
一些局限性
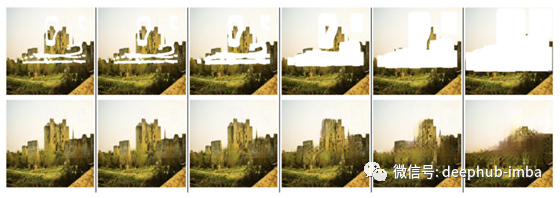
当漏孔越来越大时,用PConv进行补绘
一些失败的案例,特别是当场景更加复杂的时候
在本文的最后,作者还指出了当前深图像补绘方法的局限性。首先,如上图所示,缺少大面积区域的图像很难完成。其次,当图像结构复杂时,也很难完成视觉质量良好的图像,如上图所示。目前还没有一种综合的方法来处理超大遮盖和复杂的图像。因此,您可以尝试提出一个很好的解决这个极端的图像内画问题。:)
结论
显然,局部卷积是本文的主要思想。我希望我的简单例子可以清楚地向你解释局部卷积是如何执行的,以及在每个局部卷积层之后二进制掩码是如何更新的。通过使用局部卷积,卷积的结果只会取决于有效像素,因此我们可以控制内部的信息传递网络,这可能是有用的图像修复的任务(至少作者提供的证据表明,局部卷积是有用的在他们的情况下)。除了图像修复外,由于局部卷积与图像修复具有相似之处,作者还尝试将其推广到超分辨率中去。强烈建议感兴趣的读者参考他们的论文。
ObjectRemovalAndRestore/model.py at ffc70630263e93a6369465f11a252ac2a5656833 · Albert-learner/ObjectRemovalAndRestore · GitHub
Pconv torch 实现:
###############################################################################
# BSD 3-Clause License
#
# Copyright (c) 2021, DesignStripe. All rights reserved.
#
# Author & Contact: Samuel Prevost (samuel@designstripe.com)
###############################################################################from tensor_type import Tensor4d, Tensor3d, Tensor
import math
from typing import Tuple, Union
import torch
from torch import nnTupleInt = Union[int, Tuple[int, int]]class PConv2d(nn.Module):def __init__(self,in_channels: int,out_channels: int,kernel_size: TupleInt = 1,stride: TupleInt = 1,padding: TupleInt = 0,dilation: TupleInt = 1,bias: bool = False,legacy_behaviour: bool = False,):"""Partial Convolution on 2D input.:param in_channels:     see torch.nn.Conv2d:param out_channels:    see torch.nn.Conv2d:param kernel_size:     see torch.nn.Conv2d:param stride:          see torch.nn.Conv2d:param padding:         see torch.nn.Conv2d:param dilation:        see torch.nn.Conv2d:param bias:            see torch.nn.Conv2d:param legacy_behaviour: Tries to replicate Guilin's implementation's numerical error when handling the bias,but in doing so, it does extraneous operations that could be avoided and still result in *almost* the sameresult, at a tolerance of 0.00000458 % on the cuDNN 11.4 backend. Can safely be False for real lifeapplications."""super().__init__()# Set this to True, and the output is guaranteed to be exactly the same as PConvGuilin and PConvRFR# Set this to False, and the output will be very very close, but with some numerical errors removed/added,# even though formally the maths are equivalent.self.legacy_behaviour = legacy_behaviourself.in_channels = in_channelsself.out_channels = out_channelsself.kernel_size = self._to_int_tuple(kernel_size)self.stride = self._to_int_tuple(stride)self.padding = self._to_int_tuple(padding)self.dilation = self._to_int_tuple(dilation)self.use_bias = biasconv_kwargs = dict(kernel_size=self.kernel_size,stride=self.stride,padding=self.padding,dilation=self.dilation,groups=1,bias=False,)# Don't use a bias here, we handle the bias manually to speed up computationself.regular_conv = nn.Conv2d(in_channels=self.in_channels, out_channels=self.out_channels, **conv_kwargs)# I found a way to avoid doing a in_channels --> out_channels conv and instead just do a# 1 channel in --> 1 channel out conv and then just scale the output of the conv by the number# of input channels, and repeat the resulting tensor to have "out channels"# This saves 1) a lot of memory because no need to pad before the conv#            2) a lot of computation because the convolution is way smaller (in_c * out_c times less operations)# It's also possible to avoid repeating the tensor to have "out channels", and instead use broadcasting# when doing operations. This further reduces the number of operations to do and is equivalent,# and especially the amount of memory used.self.mask_conv = nn.Conv2d(in_channels=1, out_channels=1, **conv_kwargs)# Initsself.regular_conv.apply(lambda m: nn.init.kaiming_normal_(m.weight, a=0, mode="fan_in"))# the mask convolution should be a constant operationtorch.nn.init.constant_(self.mask_conv.weight, 1.0)for param in self.mask_conv.parameters():param.requires_grad = Falseif self.use_bias:self.bias = nn.Parameter(torch.empty(1, self.out_channels, 1, 1))else:self.register_parameter("bias", None)with torch.no_grad():# This is how nn._ConvNd initialises its weightsnn.init.kaiming_uniform_(self.regular_conv.weight, a=math.sqrt(5))if self.bias is not None:fan_in, _ = nn.init._calculate_fan_in_and_fan_out(self.regular_conv.weight)bound = 1 / math.sqrt(fan_in)nn.init.uniform_(self.bias.view(self.out_channels), -bound, bound)def forward(self, x: Tensor4d, mask: Tensor3d) -> Tuple[Tensor4d, Tensor3d]:"""Performs the 2D partial convolution.About the mask:- its dtype should be torch.float32- its values should be EITHER 0.0 OR 1.0, not in between- it should not have a channel dimensions. Just (batch, height, width).The returned mask is guaranteed to also match these criteria.This returns a tuple containing:- the result of the partial convolution on the input x.- the "updated mask", which is slightly "closed off". It is a "binary" mask of dtype float,containing values of either 0.0 or 1.0 (nothing in between).:param x: The input image batch, a 4d tensor of traditional batch, channel, height, width.:param mask: This takes as input a 3d binary (0.0 OR 1.0) mask of dtype=float:return: a tuple (output, updated_mask)"""Tensor4d.check(x)batch, channels, h, w = x.shapeTensor[batch, h, w].check(mask)if mask.dtype != torch.float32:raise TypeError("mask should have dtype=torch.float32 with values being either 0.0 or 1.0")if x.dtype != torch.float32:raise TypeError("x should have dtype=torch.float32")# Create singleton channel dimension for broadcastingmask = mask.unsqueeze(1)output = self.regular_conv(x * mask)_, _, conv_h, conv_w = output.shapeupdate_mask: Tensor[batch, 1, conv_h, conv_w]mask_ratio: Tensor[batch, 1, conv_h, conv_w]with torch.no_grad():mask_ratio, update_mask = self.compute_masks(mask)if self.use_bias:if self.legacy_behaviour:# Doing this is entirely pointless. However, the legacy Guilin's implementation does it and# if I don't do it, I get a relative numerical error of about 0.00000458 %output += self.biasoutput -= self.biasoutput *= mask_ratio  # Multiply by the sum(1)/sum(mask) ratiosoutput += self.bias  # Add the bias *after* mask_ratio, not before !output *= update_mask  # Nullify pixels outside the valid maskelse:output *= mask_ratioreturn output, update_mask[:, 0]def compute_masks(self, mask: Tensor3d) -> Tuple[Tensor4d, Tensor4d]:"""This computes two masks:- the update_mask is a binary mask that has 1 if the pixel was used in the convolution, and 0 otherwise- the mask_ratio which has value sum(1)/sum(mask) if the pixel was used in the convolution, and 0 otherwise* sum(1) means the sum of a kernel full of ones of equivalent size as the self.regular_conv's kernel.It is usually calculated as self.in_channels * self.kernel_size ** 2, assuming a square kernel.* sum(mask) means the sum of ones and zeros of the mask in a particular region.If the region is entirely valid, then sum(mask) = sum(1) but if the region is only partially within the mask,then 0 < sum(mask) < sum(1).sum(mask) is calculated specifically in the vicinity of the pixel, and is pixel dependant.* mask_ratio is Tensor4d with the channel dimension as a singleton, and is NOT binary.It has values between 0 and sum(1) (included).* update_mask is a Tensor4d with the channel dimension as a singleton, and is "binary" (either 0.0 or 1.0).:param mask: the input "binary" mask. It has to be a dtype=float32, but containing only values 0.0 or 1.0.:return: mask_ratio, update_mask"""update_mask = self.mask_conv(mask) * self.in_channels# Make values where update_mask==0 be super high# and otherwise computes the sum(ones)/sum(mask) value for other entries# noinspection PyTypeCheckermask_ratio = self.in_channels * self.kernel_size[0] * self.kernel_size[1] / (update_mask + 1e-8)# Once we've normalised the values in update_mask and saved them elsewhere, we can now ignore their value# and return update_mask to a binary maskupdate_mask = torch.clamp(update_mask, 0, 1)# Then multiplies those super high values by zero so we cancel them outmask_ratio *= update_mask# We can discard the extra channel dimension what was just there to help with broadcastingreturn mask_ratio, update_mask@staticmethoddef _to_int_tuple(v: TupleInt) -> Tuple[int, int]:if not isinstance(v, tuple):return v, velse:return vdef set_weight(self, w):with torch.no_grad():self.regular_conv.weight.copy_(w)return selfdef set_bias(self, b):with torch.no_grad():self.bias.copy_(b.view(1, self.out_channels, 1, 1))return selfdef get_weight(self):return self.regular_conv.weightdef get_bias(self):return self.bias