【0】README
![]()
![]()
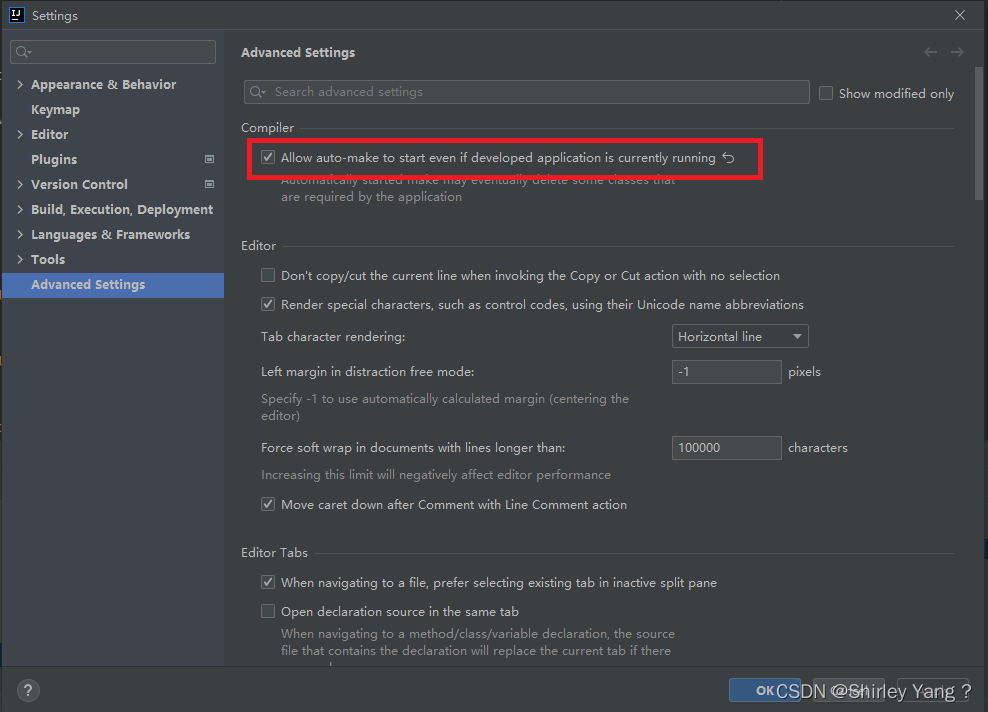
【3.3】在Windows 平台上启动tomcat(startup.bat 文件调用catalina.bat 文件时,会传入参数 start)
1)本文部分文字描述转自“how tomcat works”,旨在学习“tomcat(17)启动tomcat”的相关知识;
2)本文重点关注启动Tomcat时会用到的两个类,分别是Catalina类和 Bootstrap类;(干货——引入tomcat启动时用到了两个类,分别是Catalina类和 Bootstrap类)
2.1)org.apache.catalina.startup.Catalina类:用于启动和关闭Server对象,并负责解析Tomcat 配置文件 server.xml;2.2)org.apache.catalina.startup.Bootstrap类:是一个入口点,负责创建 Catalina实例,并调用其 process()方法;
3)理论上,这两个类可以合二为一,但为了支持tomcat的多种运行模式,故提供了多种启动类;
4)用户只需要运行相应的批处理文件或shell 脚本即可启动或关闭tomcat;
5)本文会intro 如何在Windows平台 和 UNIX/Linux 平台上运行tomcat;
6)本文总结了 tomcat启动的调用过程,非常干货,不得不感慨本篇博文产自于收获的季节.
【1】Catalina类(org.apache.catalina.startup.Catalina)
1)intro:它包含一个Digester类,用于解析位于 %CATALINA_HOME%/conf 目录下的server.xml 文件;理解到tomcat(15)中 向Digester对象添加规则的原理后,就可以自行配置tomcat了;(干货——理解到tomcat(15)中 向Digester对象添加规则的原理后,就可以自行配置tomct了,tomcat(15)Digester库)
1.1)该类还封装了一个Server对象(服务器组件,你是否有印象):该对象有一个Service对象(服务组件,你是否有印象);(干货——服务器组件+服务组件,参见tomcat(14)服务器组件和服务组件)1.2)Service对象包含有一个Servlet容器和一个或多个连接器。所以可以使用Catalina类来启动或关闭Server对象;
2)可以通过实例化Catalina类,并调用其process()方法来运行tomcat;
3)universe case,即使Catalina类提供了main()方法作为程序的入口点,也需要使用Bootstrap类来实例化process()方法;如下所示:
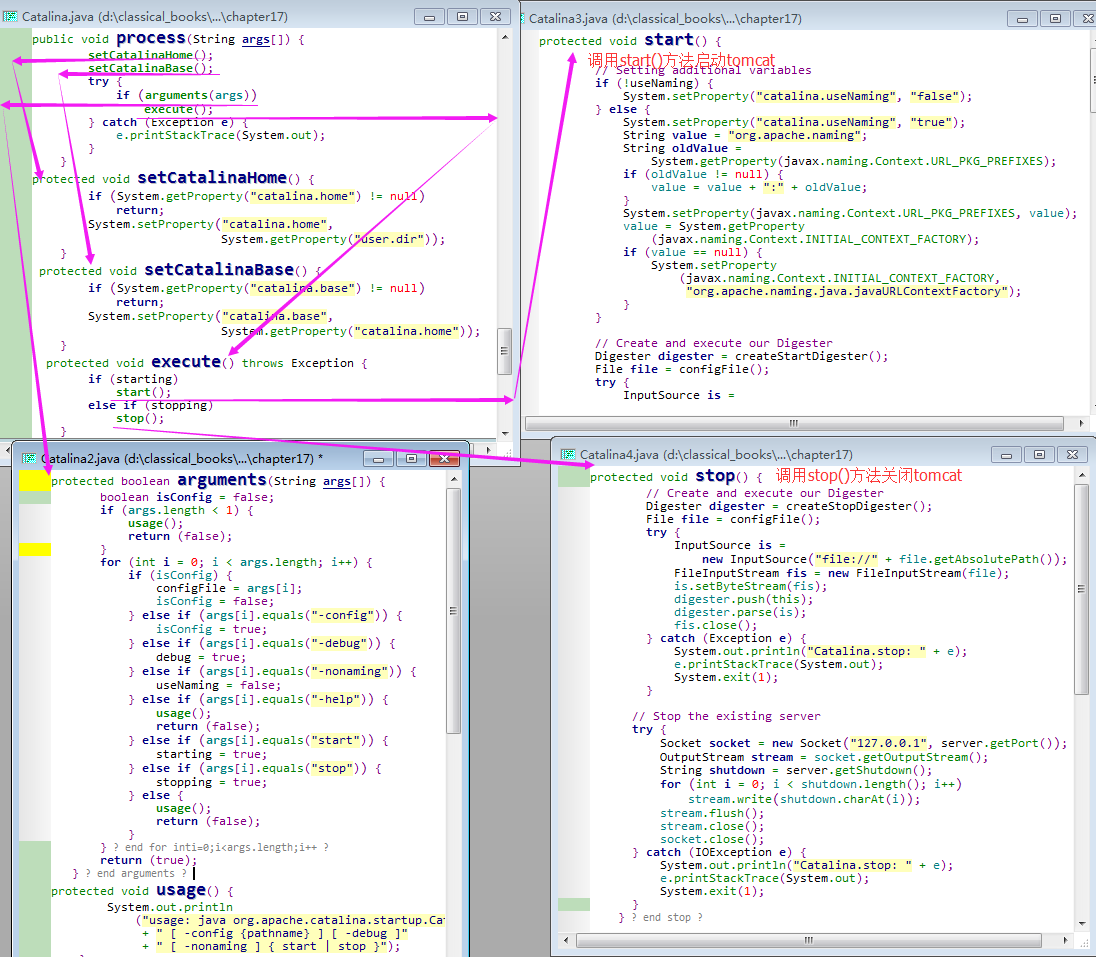
public static void main(String args[]) { // org.apache.catalina.startup.Catalina.main().(new Catalina()).process(args);}public void process(String args[]) { // org.apache.catalina.startup.Catalina.process().setCatalinaHome();setCatalinaBase();try {if (arguments(args)) //highlight line.execute();} catch (Exception e) {e.printStackTrace(System.out);}}
protected void setCatalinaHome() {if (System.getProperty("catalina.home") != null)return;System.setProperty("catalina.home",System.getProperty("user.dir"));}protected void setCatalinaBase() {if (System.getProperty("catalina.base") != null)return;System.setProperty("catalina.base",System.getProperty("catalina.home"));} 对以上代码的分析(Analysis):
step1)process()方法设置了两个系统属性:catalina.home and catalina.base.catalina.home,默认值均为user.dir 属性的值;step2)catalina.base == catalina.home ,所以,他们都与 user.dir 属性的值相同;step3)随后,process()方法会调用 arguments()方法(highlight line),并传入参数列表;step4)intro to arguments()方法:arguments()方法处理命令行参数,如果Catalina对象能够继续处理的话,arguments()方法返回true;protected boolean arguments(String args[]) {boolean isConfig = false;if (args.length < 1) {usage();return (false);}for (int i = 0; i < args.length; i++) {if (isConfig) {configFile = args[i];isConfig = false;} else if (args[i].equals("-config")) {isConfig = true;} else if (args[i].equals("-debug")) {debug = true;} else if (args[i].equals("-nonaming")) {useNaming = false;} else if (args[i].equals("-help")) {usage();return (false);} else if (args[i].equals("start")) {starting = true;} else if (args[i].equals("stop")) {stopping = true;} else {usage();return (false);}}return (true);} protected void usage() {System.out.println("usage: java org.apache.catalina.startup.Catalina"+ " [ -config {pathname} ] [ -debug ]"+ " [ -nonaming ] { start | stop }");}
step5)process()方法会检查arguments()的返回值是否为true,若为true,则调用execute()方法;该方法会调用start()方法来启动tomcat, 或调用stop()方法来关闭 tomcat;protected void execute() throws Exception {if (starting)start();else if (stopping)stop();}
Attention)以上的分析结果都是基于tomcat4的,在tomcat5中, 会在 process()方法中调用start()方法和 stop()方法;
Supplement)本文习惯性的总结了上述调用过程:
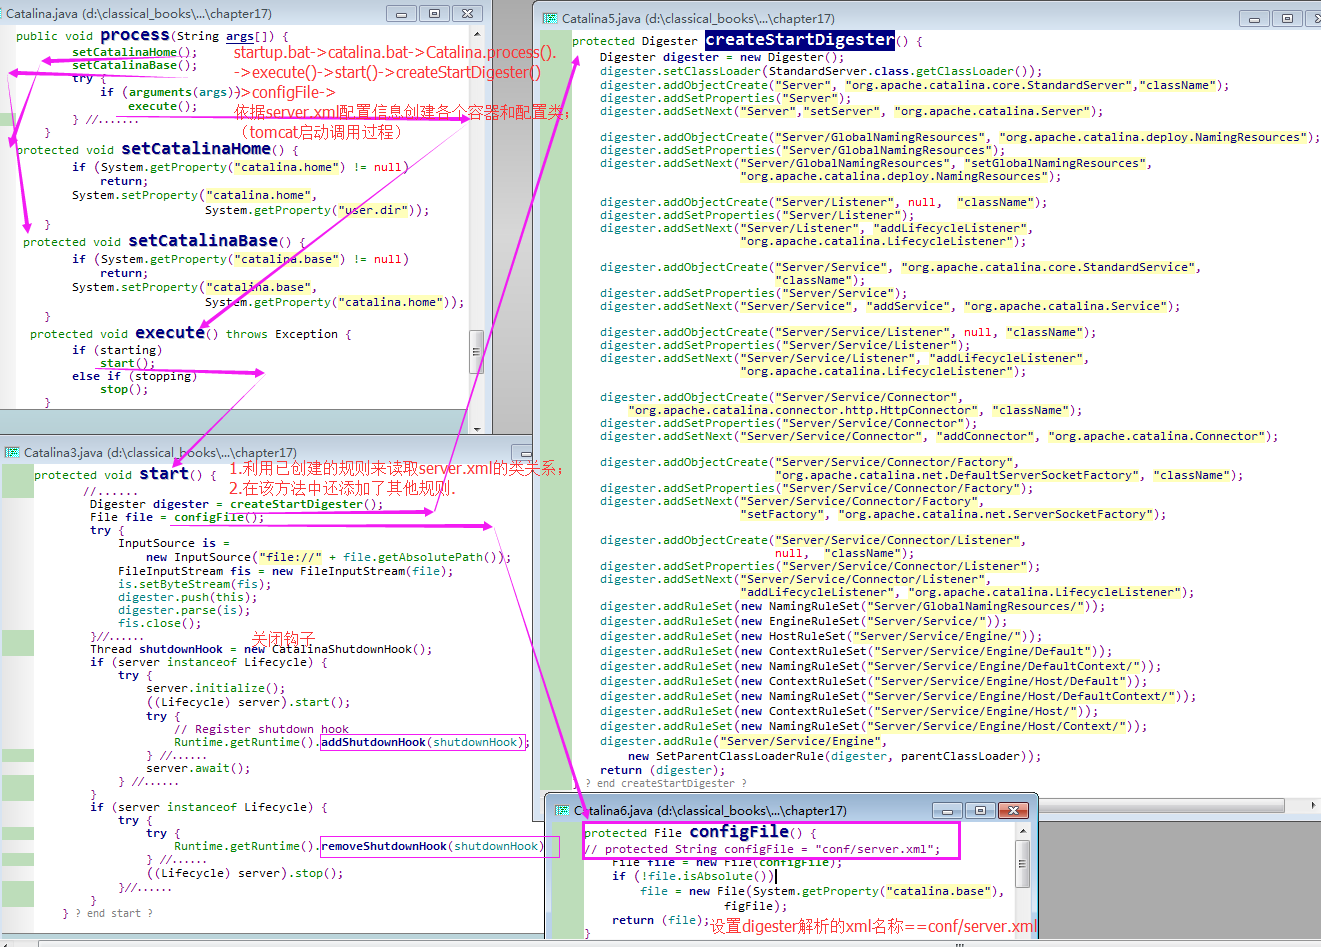
【1.1】start()方法
1)源代码如下:
protected void start() { // org.apache.catalina.startup.Catalina.start().// Setting additional variablesif (!useNaming) {System.setProperty("catalina.useNaming", "false");} else {System.setProperty("catalina.useNaming", "true");String value = "org.apache.naming";String oldValue =System.getProperty(javax.naming.Context.URL_PKG_PREFIXES);if (oldValue != null) {value = value + ":" + oldValue;} // String URL_PKG_PREFIXES = "java.naming.factory.url.pkgs";System.setProperty(javax.naming.Context.URL_PKG_PREFIXES, value);value = System.getProperty(javax.naming.Context.INITIAL_CONTEXT_FACTORY);if (value == null) {System.setProperty(javax.naming.Context.INITIAL_CONTEXT_FACTORY,"org.apache.naming.java.javaURLContextFactory");}}// Create and execute our DigesterDigester digester = createStartDigester();File file = configFile();try {InputSource is =new InputSource("file://" + file.getAbsolutePath());FileInputStream fis = new FileInputStream(file);is.setByteStream(fis);digester.push(this);digester.parse(is);fis.close();} catch (Exception e) {System.out.println("Catalina.start using "+ configFile() + ": " + e);e.printStackTrace(System.out);System.exit(1);}// If a SecurityManager is being used, set properties for// checkPackageAccess() and checkPackageDefinitionif( System.getSecurityManager() != null ) {String access = Security.getProperty("package.access");if( access != null && access.length() > 0 )access += ",";elseaccess = "sun.,";Security.setProperty("package.access",access + "org.apache.catalina.,org.apache.jasper.");String definition = Security.getProperty("package.definition");if( definition != null && definition.length() > 0 )definition += ",";elsedefinition = "sun.,";Security.setProperty("package.definition",// FIX ME package "javax." was removed to prevent HotSpot// fatal internal errorsdefinition + "java.,org.apache.catalina.,org.apache.jasper.,org.apache.coyote.");}// Replace System.out and System.err with a custom PrintStreamSystemLogHandler log = new SystemLogHandler(System.out);System.setOut(log);System.setErr(log);Thread shutdownHook = new CatalinaShutdownHook();// Start the new serverif (server instanceof Lifecycle) {try {server.initialize();((Lifecycle) server).start();try {// Register shutdown hookRuntime.getRuntime().addShutdownHook(shutdownHook);} catch (Throwable t) {// This will fail on JDK 1.2. Ignoring, as Tomcat can run// fine without the shutdown hook.}// Wait for the server to be told to shut downserver.await();} catch (LifecycleException e) {System.out.println("Catalina.start: " + e);e.printStackTrace(System.out);if (e.getThrowable() != null) {System.out.println("----- Root Cause -----");e.getThrowable().printStackTrace(System.out);}}}// Shut down the serverif (server instanceof Lifecycle) {try {try {// Remove the ShutdownHook first so that server.stop() // doesn't get invoked twiceRuntime.getRuntime().removeShutdownHook(shutdownHook);} catch (Throwable t) {// This will fail on JDK 1.2. Ignoring, as Tomcat can run// fine without the shutdown hook.}((Lifecycle) server).stop();} catch (LifecycleException e) {System.out.println("Catalina.stop: " + e);e.printStackTrace(System.out);if (e.getThrowable() != null) {System.out.println("----- Root Cause -----");e.getThrowable().printStackTrace(System.out);}}}} 对以上代码的分析(Analysis):
step1)该方法会创建一个Digester实例来解析server.xml(tomcat配置文件);在解析server.xml文件之前,该方法会调用 Digester.push()方法,传入当前的Catalina对象,这样,Catalina对象就成了Digester对象的内部栈中的第一个对象;step2)解析server.xml文件后,会使变量Server引用一个Server对象,默认是 org.apache.catalina.core.StandardServer类型的对象;step3)然后,start()方法会调用Server.initialize()方法 和 start()方法;step4)接着,Catalina.start()方法会调用server对象的await()方法,Server对象会使用一个专用的线程来等待关闭命令;await()方法会一直等待直到接收到正确的关闭命令;step5)当await()方法返回时,Catalina.start()方法会调用Server.stop()方法,从而关闭Server对象和其它的组件;
Attention)
A1)此外,start()方法还会利用关闭钩子,确保用户突然退出应用程序时会执行Server.stop()方法;A2)start()方法会调用了createStartDigester 方法创建Digester对象,createStartDigester()方法的源码如下:
protected Digester createStartDigester() {// Initialize the digesterDigester digester = new Digester();digester.setClassLoader(StandardServer.class.getClassLoader());if (debug)digester.setDebug(999);digester.setValidating(false);// Configure the actions we will be usingdigester.addObjectCreate("Server","org.apache.catalina.core.StandardServer","className");digester.addSetProperties("Server");digester.addSetNext("Server","setServer","org.apache.catalina.Server");digester.addObjectCreate("Server/GlobalNamingResources","org.apache.catalina.deploy.NamingResources");digester.addSetProperties("Server/GlobalNamingResources");digester.addSetNext("Server/GlobalNamingResources","setGlobalNamingResources","org.apache.catalina.deploy.NamingResources");digester.addObjectCreate("Server/Listener",null, // MUST be specified in the element"className");digester.addSetProperties("Server/Listener");digester.addSetNext("Server/Listener","addLifecycleListener","org.apache.catalina.LifecycleListener");digester.addObjectCreate("Server/Service","org.apache.catalina.core.StandardService","className");digester.addSetProperties("Server/Service");digester.addSetNext("Server/Service","addService","org.apache.catalina.Service");digester.addObjectCreate("Server/Service/Listener",null, // MUST be specified in the element"className");digester.addSetProperties("Server/Service/Listener");digester.addSetNext("Server/Service/Listener","addLifecycleListener","org.apache.catalina.LifecycleListener");digester.addObjectCreate("Server/Service/Connector","org.apache.catalina.connector.http.HttpConnector","className");digester.addSetProperties("Server/Service/Connector");digester.addSetNext("Server/Service/Connector","addConnector","org.apache.catalina.Connector");digester.addObjectCreate("Server/Service/Connector/Factory","org.apache.catalina.net.DefaultServerSocketFactory","className");digester.addSetProperties("Server/Service/Connector/Factory");digester.addSetNext("Server/Service/Connector/Factory","setFactory","org.apache.catalina.net.ServerSocketFactory");digester.addObjectCreate("Server/Service/Connector/Listener",null, // MUST be specified in the element"className");digester.addSetProperties("Server/Service/Connector/Listener");digester.addSetNext("Server/Service/Connector/Listener","addLifecycleListener","org.apache.catalina.LifecycleListener");// Add RuleSets for nested elementsdigester.addRuleSet(new NamingRuleSet("Server/GlobalNamingResources/"));digester.addRuleSet(new EngineRuleSet("Server/Service/"));digester.addRuleSet(new HostRuleSet("Server/Service/Engine/"));digester.addRuleSet(new ContextRuleSet("Server/Service/Engine/Default"));digester.addRuleSet(new NamingRuleSet("Server/Service/Engine/DefaultContext/"));digester.addRuleSet(new ContextRuleSet("Server/Service/Engine/Host/Default"));digester.addRuleSet(new NamingRuleSet("Server/Service/Engine/Host/DefaultContext/"));digester.addRuleSet(new ContextRuleSet("Server/Service/Engine/Host/"));digester.addRuleSet(new NamingRuleSet("Server/Service/Engine/Host/Context/"));digester.addRule("Server/Service/Engine",new SetParentClassLoaderRule(digester,parentClassLoader));return (digester);}
【1.2】stop()方法
1)intro:stop()方法用来关闭Catalina和Server对象;
2)源代码:
protected void stop() { //org.apache.catalina.startup.Catalina.stop().// Create and execute our DigesterDigester digester = createStopDigester();File file = configFile();try {InputSource is =new InputSource("file://" + file.getAbsolutePath());FileInputStream fis = new FileInputStream(file);is.setByteStream(fis);digester.push(this);digester.parse(is);fis.close();} catch (Exception e) {System.out.println("Catalina.stop: " + e);e.printStackTrace(System.out);System.exit(1);}// Stop the existing servertry {Socket socket = new Socket("127.0.0.1", server.getPort());OutputStream stream = socket.getOutputStream();String shutdown = server.getShutdown();for (int i = 0; i < shutdown.length(); i++)stream.write(shutdown.charAt(i));stream.flush();stream.close();socket.close();} catch (IOException e) {System.out.println("Catalina.stop: " + e);e.printStackTrace(System.out);System.exit(1);}}
protected Digester createStopDigester() {// Initialize the digesterDigester digester = new Digester();if (debug)digester.setDebug(999);// Configure the rules we need for shutting downdigester.addObjectCreate("Server","org.apache.catalina.core.StandardServer","className");digester.addSetProperties("Server");digester.addSetNext("Server","setServer","org.apache.catalina.Server");return (digester);
}
Attention)
A1)stop()方法:调用createStopDigester()方法来创建一个 Digester实例,并调用该实例的push()方法,并将当前Catalina对象压入到 Digester对象的内部栈中,使用Digester对象解析tomcat 的配置文件;A2)然后,stop()方法会向正在运行的Server对象发送关闭命令,以关闭Server对象;
【1.3】启动Digester对象
1)intro:Catalina.createStartDigester()方法创建了一个 Digester实例,然后为其添加规则,以解析server.xml文件;server.xml文件用来配置 tomcat,位于 %CATALINA_HOME%/conf目录下。添加到Digester对象中的规则是理解tomcat配置的关键;(不能再干货——添加到Digester对象中的关泽是理解tomcat配置的关键)
2)org.apache.catalina.startup.Catalina.createStartDigester()的源代码如上所示: 因为该方法在start()方法中调用,我们在分析start方法的时候,已经分析过了;
对createStartDigester方法源代码的分析(Analysis):
step1)该方法会创建org.apache.commons.digester.Digestser类的实例,并为其添加规则(rules);step2)前3条规则用于解析 server.xml 文件的server元素。下面是为 server 模式添加的规则(因为server元素是跟元素,故又称为模式):// Configure the actions we will be usingdigester.addObjectCreate("Server","org.apache.catalina.core.StandardServer","className");digester.addSetProperties("Server");digester.addSetNext("Server","setServer","org.apache.catalina.Server");
rule1)第1条规则表明:在遇到server元素时,Digester要创建 StandardServer 类的一个实例;rule2)第2条规则表明:要对 Server对象的指定属性名设置同名的属性值;rule3)第3条规则表明:将Server对象压入到 Digester对象的内部栈中,并与栈中的下一个对象相关联。
3)下一个对象是Catalina实例,调用其setServer()方法与 Server对象相关联。那Catalina实例是如何防盗Digester 对象的内部栈中的呢? 在start()方法的开始部分,在解析 server.xml文件之前,会调用 Digester.push()方法将Catalina对象压入栈:
digester.push(this); 【1.4】 关闭Digetster对象
1)intro to createStopDigester()方法:该方法会返回一个 Digester对象来关闭 Server对象;
protected Digester createStopDigester() { //org.apache.catalina.startup.createStopDigester().// Initialize the digesterDigester digester = new Digester();if (debug)digester.setDebug(999);// Configure the rules we need for shutting downdigester.addObjectCreate("Server","org.apache.catalina.core.StandardServer","className");digester.addSetProperties("Server");digester.addSetNext("Server","setServer","org.apache.catalina.Server");return (digester);} Attention)与启动Digester对象不同,关闭Digester对象只对XML 文档的根元素感兴趣;
【2】 Bootstrap类(org.apache.catalina.startup.Bootstrap)
1)intro:该类提供了启动tomcat的入口点;
2)当运行startup.bat 文件或 startup.sh 文件时,实际上是调用了该类的main()方法。main方法会创建3个类载入器,并实例化Catalina类;然后它调用Catalina.process()方法;
3)Bootstrap类的定义如下:
public final class Bootstrap {    private static int debug = 0;  public static void main(String args[]) {// Set the debug flag appropriatelyfor (int i = 0; i < args.length; i++)  {if ("-debug".equals(args[i]))debug = 1;}// Configure catalina.base from catalina.home if not yet setif (System.getProperty("catalina.base") == null)System.setProperty("catalina.base", getCatalinaHome());// Construct the class loaders we will needClassLoader commonLoader = null;ClassLoader catalinaLoader = null;ClassLoader sharedLoader = null;try {File unpacked[] = new File[1];File packed[] = new File[1];File packed2[] = new File[2];ClassLoaderFactory.setDebug(debug);unpacked[0] = new File(getCatalinaHome(),"common" + File.separator + "classes");packed2[0] = new File(getCatalinaHome(),"common" + File.separator + "endorsed");packed2[1] = new File(getCatalinaHome(),"common" + File.separator + "lib");commonLoader =ClassLoaderFactory.createClassLoader(unpacked, packed2, null);unpacked[0] = new File(getCatalinaHome(),"server" + File.separator + "classes");packed[0] = new File(getCatalinaHome(),"server" + File.separator + "lib");catalinaLoader =ClassLoaderFactory.createClassLoader(unpacked, packed,commonLoader);unpacked[0] = new File(getCatalinaBase(),"shared" + File.separator + "classes");packed[0] = new File(getCatalinaBase(),"shared" + File.separator + "lib");sharedLoader =ClassLoaderFactory.createClassLoader(unpacked, packed,commonLoader);} catch (Throwable t) {log("Class loader creation threw exception", t);System.exit(1);}Thread.currentThread().setContextClassLoader(catalinaLoader);// Load our startup class and call its process() methodtry {SecurityClassLoad.securityClassLoad(catalinaLoader);// Instantiate a startup class instanceif (debug >= 1)log("Loading startup class");Class startupClass =catalinaLoader.loadClass("org.apache.catalina.startup.Catalina"); //highlight line.Object startupInstance = startupClass.newInstance();// Set the shared extensions class loaderif (debug >= 1)log("Setting startup class properties");String methodName = "setParentClassLoader";Class paramTypes[] = new Class[1];paramTypes[0] = Class.forName("java.lang.ClassLoader");Object paramValues[] = new Object[1];paramValues[0] = sharedLoader;Method method =startupInstance.getClass().getMethod(methodName, paramTypes);method.invoke(startupInstance, paramValues);// Call the process() method //highlight line.if (debug >= 1)log("Calling startup class process() method");methodName = "process"; //highlight line.paramTypes = new Class[1];paramTypes[0] = args.getClass();paramValues = new Object[1];paramValues[0] = args;method =startupInstance.getClass().getMethod(methodName, paramTypes);method.invoke(startupInstance, paramValues);} catch (Exception e) {System.out.println("Exception during startup processing");e.printStackTrace(System.out);System.exit(2);}}     private static String getCatalinaHome() {return System.getProperty("catalina.home",System.getProperty("user.dir"));}      private static String getCatalinaBase() {return System.getProperty("catalina.base", getCatalinaHome());}     private static void log(String message) {System.out.print("Bootstrap: ");System.out.println(message);}    private static void log(String message, Throwable exception) {log(message);exception.printStackTrace(System.out);}
}
对以上代码的分析(Analysis):
A1)Bootstrap类有4个静态方法:两个log()方法,getCatalinaHome()方法 和 getCatalinaBase()方法;A2)getCatalinaHome()方法:其基本含义是,如果先前没有设置过catalina.home 属性的值,它就返回 user.dir属性的值;A3) getCatalinaBase()方法:基本含义是,如果catalina.base属性的值为空,则返回 catalina.home属性的值;A4)Bootstrap.main()方法中还会为不同目的而创建3个类载入器;使用多个类载入器的目的是为了防止应用程序中的类(包括servlet类和web 应用程序中的其他辅助类)使用 WEB-INF/classes目录 和 WEB-INF/lib 目录之外的类。部署到 %CATALINA_HOME%/common/lib 目录下的那个 JAR 文件的类文件是可以使用的;(干货——Bootstrap.main()方法中还会为不同目的而创建3个类载入器)
4)对3个类载入器进行详细说明
4.0)三个类载入器的定义如下:
 // Construct the class loaders we will need
ClassLoader commonLoader = null;
ClassLoader catalinaLoader = null;
ClassLoader sharedLoader = null; Attention)对于每个类载入器都会指定一条可以访问的路径;
4.1)commonLoader类载入器可以载入: %CATALINA_HOME%/common/classes 目录, %CATALINA_HOME%/common/endorsed 目录 和 %CATALINA_HOME%/common/lib 目录下的java类;
try {File unpacked[] = new File[1];File packed[] = new File[1];File packed2[] = new File[2];ClassLoaderFactory.setDebug(debug);unpacked[0] = new File(getCatalinaHome(),"common" + File.separator + "classes");packed2[0] = new File(getCatalinaHome(),"common" + File.separator + "endorsed");packed2[1] = new File(getCatalinaHome(),"common" + File.separator + "lib");commonLoader =ClassLoaderFactory.createClassLoader(unpacked, packed2, null); 4.2)catalinaLoader类加载器负责载入运行 Catalina servlet 容器所需要的类。它可以载入: %CATALINA_HOME%/server/classes 目录, %CATALINA_HOME%/server/lib 目录, 以及commonLoader 类载入器可以访问的所有目录中的java类;
unpacked[0] = new File(getCatalinaHome(),"server" + File.separator + "classes");packed[0] = new File(getCatalinaHome(),"server" + File.separator + "lib");catalinaLoader =ClassLoaderFactory.createClassLoader(unpacked, packed,commonLoader); 4.3)sharedLoader类可以载入: %CATALINA_HOME%/shared/classes 目录 和 %CATALINA_HOME%/share/lib 目录以及commonLoader 类载入器可以访问的所有目录中的java类;
unpacked[0] = new File(getCatalinaBase(),"shared" + File.separator + "classes");packed[0] = new File(getCatalinaBase(),"shared" + File.separator + "lib");sharedLoader =ClassLoaderFactory.createClassLoader(unpacked, packed,commonLoader);} catch (Throwable t) {log("Class loader creation threw exception", t);System.exit(1);}public static ClassLoader createClassLoader(File unpacked[],File packed[],ClassLoader parent)throws Exception { //org.apache.catalina.startup.ClassLoaderFactory.createClassLoader().if (debug >= 1)log("Creating new class loader");// Construct the "class path" for this class loaderArrayList list = new ArrayList();// Add unpacked directoriesif (unpacked != null) {for (int i = 0; i < unpacked.length; i++) {File file = unpacked[i];if (!file.isDirectory() || !file.exists() || !file.canRead())continue;if (debug >= 1)log(" Including directory " + file.getAbsolutePath());URL url = new URL("file", null,file.getCanonicalPath() + File.separator);list.add(url.toString());}}// Add packed directory JAR filesif (packed != null) {for (int i = 0; i < packed.length; i++) {File directory = packed[i];if (!directory.isDirectory() || !directory.exists() ||!directory.canRead())continue;String filenames[] = directory.list();for (int j = 0; j < filenames.length; j++) {String filename = filenames[j].toLowerCase();if (!filename.endsWith(".jar"))continue;File file = new File(directory, filenames[j]);if (debug >= 1)log(" Including jar file " + file.getAbsolutePath());URL url = new URL("file", null,file.getCanonicalPath());list.add(url.toString());}}}// Construct the class loader itselfString array[] = (String[]) list.toArray(new String[list.size()]);StandardClassLoader classLoader = null;if (parent == null)classLoader = new StandardClassLoader(array);elseclassLoader = new StandardClassLoader(array, parent);classLoader.setDelegate(true);return (classLoader);} Attention)
A1)在tomcat中,每个 web 应用程序中与 Context容器相关联的每个类载入器的父类载入器都是sharedLoader 类载入器;A2)sharedLoader类载入器并不能访问 Catalina的内部类,或 CLASSPATH 环境变量指定的类路径中的类;
5)在创建了3个类载入器之后,main()方法会载入Catalina类并创建它的一个实例,然后再将其赋值给 startupInstance 变量:
Class startupClass =catalinaLoader.loadClass("org.apache.catalina.startup.Catalina");Object startupInstance = startupClass.newInstance(); 6)然后,它调用setParentClassLoader()方法,并将 sharedLoader类载入器作为参数传入:
// Set the shared extensions class loaderif (debug >= 1)log("Setting startup class properties");String methodName = "setParentClassLoader";Class paramTypes[] = new Class[1];paramTypes[0] = Class.forName("java.lang.ClassLoader");Object paramValues[] = new Object[1];paramValues[0] = sharedLoader;Method method =startupInstance.getClass().getMethod(methodName, paramTypes);method.invoke(startupInstance, paramValues); 7)最后,main()方法会调用 Catalina.process()方法;(for spec info of Catalina.process(), please refer to the supplement of chapter [1])
// Call the process() methodif (debug >= 1)log("Calling startup class process() method");methodName = "process";paramTypes = new Class[1];paramTypes[0] = args.getClass();paramValues = new Object[1];paramValues[0] = args;method =startupInstance.getClass().getMethod(methodName, paramTypes);method.invoke(startupInstance, paramValues); 【3】在Windows 平台上运行tomcat
1)可以调用 startup.bat或shutdown.bat 批处理文件来 启动或关闭 tomcat;
【3.1】如何编写批处理文件
Attention)
A1)首先,批处理文件的后缀名必须是 “.bat”;A2)DOS 目录及环境变量是区分大小写的;
0)对批处理命令进行intro(commands):
c1)rem: 该命令用于注释。解释器将不会执行以rem 命令开始的行;c2)pause:该命令用于暂停正在执行的批处理文件,并提示用户按某个键,然后程序会继续运行;c3)echo:该命令用于在dos 控制台上显示一段文本。例如,下面的命令将在控制台上输出“hello world”,然后暂停程序。之所以暂停程序是为了能够使控制台将输出的文本显示出来;echo hello world pause
c3.1)如果想要显示环境变量的值,需要在其的前后添加 %%;如,下面的目录将输出变量myVar的值: echo %myVar%c3.2)如果想要输出操作系统的名字,可以使用如下的命令: echo %OS%
看个荔枝)下面的set命令创建了一个名为 “usernmae”的环境变量,其值为“tang”,并输出到console:c4)echo off:使用echo off 命令可以防止将批处理文件中的具体命令输出,而只会输出执行结果。但是,“echo off”命令本身还是会显示出来。如果想要将 “echo off”也隐藏起来,需要使用 @echo off 命令;c5)@echo off:该命令与 echo off 命令类似,但是他会连 echo off 命令也隐藏起来;c6)set:用来设置用户定义或命名的环境变量。在批处理文件中设置的环境变量是临时存储在内存中的,在批处理文件执行完成后就会销毁;
set username=tang
echo %username%
pause
Attention)为了获取变量的值,需要在变量前后添加“%”符号。如 “echo %username%”在字符串中就可以取到 username的值;
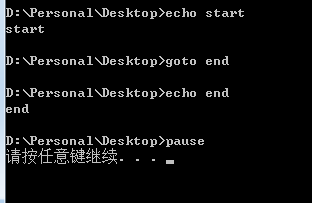
c7)label:使用冒号设置一个标签。然后可以将标签传递给goto命令,这样程序就会跳转到标签指定的位置。下面的语句定义了一个end的标签:":end";c8)goto:goto命令强制批处理文件跳转到指定标签所在的位置继续执行
看个荔枝)
echo start
goto end
echo i am a student;
:end
echo end
pause 对以上脚本的分析(Analysis):在第1行输出start后,批处理文件会执行 goto命令,跳转到end标签处;
c9)if:if用来测试条件测试,有3种用法(func):(干货——if命令用来测试条件测试,有3种用法)if variable==value nextCommandfunc1)测试变量的值;set myVar=3if %myVar%==3 echo Correctfunc2)测试文件是否存在;if exist c:\temp\myFile.txt goto start;func3)测试错误值;set myVar=3if not %myVar%==3 echo Correct
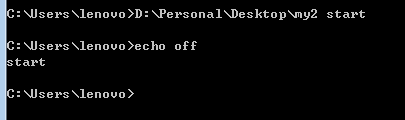
c10)not:not关键字用来对一条语句取反;c11)exist:当测试文件是否存在时,会使用到 if 和 exist命令;c12)接收参数:可以给批处理文件传递参数,并使用%1 引用第1个参数,%2 引用第2个参数,以此类推;
c12.1)echo %1:将在console 输出 第1个参数的值;(如果批处理文件的名字是 test.bat,并使用 “test hello” 命令来调用它,那么将会在console中输出 “hello”);
看个荔枝)下面的文件会对第1个参数进行检查。如果是start,输出“start”;如果是stop,输出stop;否则,输出invalid;
echo off
if %1==start goto start
if %1==stop goto stop
go invalid
:start
echo start
go end
:stop
echo stop
goto end
:invalid
echo invalide
:end Attention)若要检查运行批处理文件时,是否带有参数,可以将 %1 与 空字符串进行比较。如,对于下面的批处理文件,如果运行时没有使用参数,就会在控制台上输出“no parameter”;
if "%1"=="" echo no parameter
orif ""%1""=="""" echo no parameterc13)shift:shift命令用来将参数向后移动一位,即将%2的值复制给%1,%3的值复制给%2,以此类推;例如,下面的代码使用一条shift命令:echo off shift echo %1 echo %2如果在运行批处理文件时,附加了3个参数a,b和c,那么上面的命令会有如下输出: b c 移动之后,要使用 %0 来应用第1个参数,而现在最后一个参数已经失效了;c14)call:该命令用来调用另一条命令;c15)setLocal:在批处理文件中使用 setLocal对环境变量的修改只在当前批处理脚本中有效。当遇到endLocal 命令后,在批处理文件的末尾修改的环境变量的值会恢复成原来的值;c16)start:打开一个新的Windows控制台,并可以为这个新的控制台指定一个名字,如: start "title" ;此外,在 title后面,还有传入一条将要在新的控制台中执行的目录,如下所示: start "title" commandName;
【3.2】 catalina.bat 批处理文件
1)catalina.bat 批处理文件用来启动或关闭tomcat。另外两个文件(startup.bat 和 shutdown.bat)提供了更简单地启动和关闭tomcat的方法。实际上,startup.bat 和 shutdown.bat 都会调用catalina.bar 文件,并传入相应的参数;
2)在%CATALINA_HOME%/bin 目录下,需要以下面的语法格式调用 catalina.bar 脚本:
catalina
或 会使用下面的语法 从 %CATALINA_HOME%/bin 目录下调用该脚本: bin\catalina
3)在两种case下,参数command 的可选值包括:
c1)debug:在调试器中启动 Catalina;c2)debug -security;在使用安全管理器的case下调试 Catalina;c3)embedded:以嵌入模式启动Catalina;c4)jpda start:在 JPDA调试器下启动 Catalina;c5)run:在当前窗口中启动 Catalina;r6)run -security:在当前窗口中,通过安全管理器启动 Catalina;r7)start:在新窗口中启动 Catalina;r8)start -security:在新窗口中通过安全管理器启动 Catalina;r9)stop:关闭Catalina;
看个荔枝)想在新窗口中启动 Catalina,可以使用如下命令:catalina start;
4)catalina.bat 批处理文件的内容: https://github.com/pacosonTang/HowTomcatWorks/blob/master/chapter17/catalina.bat
对catalina.bat 文件的分析(Analysis):暂时省略
Supplement)
Supplement1)catalina.bat 文件中,通过设置MAINCLASS==org.apache.catalina.startup.Bootstrap,然后在该bat文件末尾会运行该类(Bootstrap)
set MAINCLASS=org.apache.catalina.startup.Bootstrap // line 203rem Execute Java with the applicable properties //line 307.
if not "%JPDA%" == "" goto doJpda
if not "%SECURITY_POLICY_FILE%" == "" goto doSecurity
%_EXECJAVA% %JAVA_OPTS% %CATALINA_OPTS% %DEBUG_OPTS% -Djava.endorsed.dirs="%JAVA_ENDORSED_DIRS%" -classpath "%CLASSPATH%" -Dcatalina.base="%CATALINA_BASE%" -Dcatalina.home="%CATALINA_HOME%" -Djava.io.tmpdir="%CATALINA_TMPDIR%" %MAINCLASS% %CMD_LINE_ARGS% %ACTION%
goto end
:doSecurity
%_EXECJAVA% %JAVA_OPTS% %CATALINA_OPTS% %DEBUG_OPTS% -Djava.endorsed.dirs="%JAVA_ENDORSED_DIRS%" -classpath "%CLASSPATH%" -Djava.security.manager -Djava.security.policy=="%SECURITY_POLICY_FILE%" -Dcatalina.base="%CATALINA_BASE%" -Dcatalina.home="%CATALINA_HOME%" -Djava.io.tmpdir="%CATALINA_TMPDIR%" %MAINCLASS% %CMD_LINE_ARGS% %ACTION%
goto end
:doJpda
if not "%SECURITY_POLICY_FILE%" == "" goto doSecurityJpda
%_EXECJAVA% %JAVA_OPTS% %CATALINA_OPTS% %JPDA_OPTS% %DEBUG_OPTS% -Djava.endorsed.dirs="%JAVA_ENDORSED_DIRS%" -classpath "%CLASSPATH%" -Dcatalina.base="%CATALINA_BASE%" -Dcatalina.home="%CATALINA_HOME%" -Djava.io.tmpdir="%CATALINA_TMPDIR%" %MAINCLASS% %CMD_LINE_ARGS% %ACTION%
goto end
:doSecurityJpda
%_EXECJAVA% %JAVA_OPTS% %CATALINA_OPTS% %JPDA_OPTS% %DEBUG_OPTS% -Djava.endorsed.dirs="%JAVA_ENDORSED_DIRS%" -classpath "%CLASSPATH%" -Djava.security.manager -Djava.security.policy=="%SECURITY_POLICY_FILE%" -Dcatalina.base="%CATALINA_BASE%" -Dcatalina.home="%CATALINA_HOME%" -Djava.io.tmpdir="%CATALINA_TMPDIR%" %MAINCLASS% %CMD_LINE_ARGS% %ACTION%
goto end // line 321step1)startup.bat 批处理文件会调用 catalina.bat 文件,而catalina.bat批处理会运行org.apache.catalina.startup.Bootstrap 类(main方法);step2)Bootstrap.main()方法会调用 Catalina.process()方法;
public final class Bootstrap { //org.apache.catalina.startup.Bootstrapprivate static int debug = 0;  public static void main(String args[]) {// Set the debug flag appropriatelyfor (int i = 0; i < args.length; i++)  {if ("-debug".equals(args[i]))debug = 1;}// Configure catalina.base from catalina.home if not yet setif (System.getProperty("catalina.base") == null)System.setProperty("catalina.base", getCatalinaHome());// Construct the class loaders we will needClassLoader commonLoader = null;ClassLoader catalinaLoader = null;ClassLoader sharedLoader = null;try {File unpacked[] = new File[1];File packed[] = new File[1];File packed2[] = new File[2];ClassLoaderFactory.setDebug(debug);unpacked[0] = new File(getCatalinaHome(),"common" + File.separator + "classes");packed2[0] = new File(getCatalinaHome(),"common" + File.separator + "endorsed");packed2[1] = new File(getCatalinaHome(),"common" + File.separator + "lib");commonLoader =ClassLoaderFactory.createClassLoader(unpacked, packed2, null);unpacked[0] = new File(getCatalinaHome(),"server" + File.separator + "classes");packed[0] = new File(getCatalinaHome(),"server" + File.separator + "lib");catalinaLoader =ClassLoaderFactory.createClassLoader(unpacked, packed,commonLoader);unpacked[0] = new File(getCatalinaBase(),"shared" + File.separator + "classes");packed[0] = new File(getCatalinaBase(),"shared" + File.separator + "lib");sharedLoader =ClassLoaderFactory.createClassLoader(unpacked, packed,commonLoader);} catch (Throwable t) {log("Class loader creation threw exception", t);System.exit(1);}Thread.currentThread().setContextClassLoader(catalinaLoader);// Load our startup class and call its process() methodtry {SecurityClassLoad.securityClassLoad(catalinaLoader);// Instantiate a startup class instanceif (debug >= 1)log("Loading startup class");Class startupClass =catalinaLoader.loadClass("org.apache.catalina.startup.Catalina"); //highlight line.Object startupInstance = startupClass.newInstance(); // 创建Catalina类的实例.// Set the shared extensions class loaderif (debug >= 1)log("Setting startup class properties");String methodName = "setParentClassLoader";Class paramTypes[] = new Class[1];paramTypes[0] = Class.forName("java.lang.ClassLoader");Object paramValues[] = new Object[1];paramValues[0] = sharedLoader;Method method =startupInstance.getClass().getMethod(methodName, paramTypes);method.invoke(startupInstance, paramValues);// Call the process() method //highlight line.if (debug >= 1)log("Calling startup class process() method");methodName = "process"; //highlight line.paramTypes = new Class[1];paramTypes[0] = args.getClass();paramValues = new Object[1];paramValues[0] = args;method =startupInstance.getClass().getMethod(methodName, paramTypes); // 调用Catalina.process()方法.method.invoke(startupInstance, paramValues);} catch (Exception e) {System.out.println("Exception during startup processing");e.printStackTrace(System.out);System.exit(2);}}     private static String getCatalinaHome() {return System.getProperty("catalina.home",System.getProperty("user.dir"));}      private static String getCatalinaBase() {return System.getProperty("catalina.base", getCatalinaHome());}     private static void log(String message) {System.out.print("Bootstrap: ");System.out.println(message);}    private static void log(String message, Throwable exception) {log(message);exception.printStackTrace(System.out);}
}
Attention)文末会对createStateDigester()方法的调用过程进一步总结;(限于篇幅)
<?xml version='1.0' encoding='utf-8'?> <!--conf/server.xml源码如下 -->
<!--Licensed to the Apache Software Foundation (ASF) under one or morecontributor license agreements.  See the NOTICE file distributed withthis work for additional information regarding copyright ownership.The ASF licenses this file to You under the Apache License, Version 2.0(the "License"); you may not use this file except in compliance withthe License.  You may obtain a copy of the License athttp://www.apache.org/licenses/LICENSE-2.0Unless required by applicable law or agreed to in writing, softwaredistributed under the License is distributed on an "AS IS" BASIS,WITHOUT WARRANTIES OR CONDITIONS OF ANY KIND, either express or implied.See the License for the specific language governing permissions andlimitations under the License.
-->
<!-- Note:  A "Server" is not itself a "Container", so you may notdefine subcomponents such as "Valves" at this level.Documentation at /docs/config/server.html-->
<Server port="8005" shutdown="SHUTDOWN"><!-- Security listener. Documentation at /docs/config/listeners.html<Listener className="org.apache.catalina.security.SecurityListener" />--><!--APR library loader. Documentation at /docs/apr.html --><Listener className="org.apache.catalina.core.AprLifecycleListener" SSLEngine="on" /><!--Initialize Jasper prior to webapps are loaded. Documentation at /docs/jasper-howto.html --><Listener className="org.apache.catalina.core.JasperListener" /><!-- Prevent memory leaks due to use of particular java/javax APIs--><Listener className="org.apache.catalina.core.JreMemoryLeakPreventionListener" /><Listener className="org.apache.catalina.mbeans.GlobalResourcesLifecycleListener" /><Listener className="org.apache.catalina.core.ThreadLocalLeakPreventionListener" /><!-- Global JNDI resourcesDocumentation at /docs/jndi-resources-howto.html--><GlobalNamingResources><!-- Editable user database that can also be used byUserDatabaseRealm to authenticate users--><Resource name="UserDatabase" auth="Container"type="org.apache.catalina.UserDatabase"description="User database that can be updated and saved"factory="org.apache.catalina.users.MemoryUserDatabaseFactory"pathname="conf/tomcat-users.xml" /></GlobalNamingResources><!-- A "Service" is a collection of one or more "Connectors" that sharea single "Container" Note:  A "Service" is not itself a "Container",so you may not define subcomponents such as "Valves" at this level.Documentation at /docs/config/service.html--><Service name="Catalina"><!--The connectors can use a shared executor, you can define one or more named thread pools--><!--<Executor name="tomcatThreadPool" namePrefix="catalina-exec-"maxThreads="150" minSpareThreads="4"/>--><!-- A "Connector" represents an endpoint by which requests are receivedand responses are returned. Documentation at :Java HTTP Connector: /docs/config/http.html (blocking & non-blocking)Java AJP  Connector: /docs/config/ajp.htmlAPR (HTTP/AJP) Connector: /docs/apr.htmlDefine a non-SSL HTTP/1.1 Connector on port 8080--><Connector port="8888" protocol="HTTP/1.1"connectionTimeout="20000"redirectPort="8443" /><!-- A "Connector" using the shared thread pool--><!--<Connector executor="tomcatThreadPool"port="8080" protocol="HTTP/1.1"connectionTimeout="20000"redirectPort="8443" />--><!-- Define a SSL HTTP/1.1 Connector on port 8443This connector uses the JSSE configuration, when using APR, theconnector should be using the OpenSSL style configurationdescribed in the APR documentation --><!--<Connector port="8443" protocol="HTTP/1.1" SSLEnabled="true"maxThreads="150" scheme="https" secure="true"clientAuth="false" sslProtocol="TLS" />--><!-- Define an AJP 1.3 Connector on port 8009 --><Connector port="8009" protocol="AJP/1.3" redirectPort="8443" /><!-- An Engine represents the entry point (within Catalina) that processesevery request.  The Engine implementation for Tomcat stand aloneanalyzes the HTTP headers included with the request, and passes themon to the appropriate Host (virtual host).Documentation at /docs/config/engine.html --><!-- You should set jvmRoute to support load-balancing via AJP ie :<Engine name="Catalina" defaultHost="localhost" jvmRoute="jvm1">--><Engine name="Catalina" defaultHost="localhost"><!--For clustering, please take a look at documentation at:/docs/cluster-howto.html  (simple how to)/docs/config/cluster.html (reference documentation) --><!--<Cluster className="org.apache.catalina.ha.tcp.SimpleTcpCluster"/>--><!-- Use the LockOutRealm to prevent attempts to guess user passwordsvia a brute-force attack --><Realm className="org.apache.catalina.realm.LockOutRealm"><!-- This Realm uses the UserDatabase configured in the global JNDIresources under the key "UserDatabase".  Any editsthat are performed against this UserDatabase are immediatelyavailable for use by the Realm.  --><Realm className="org.apache.catalina.realm.UserDatabaseRealm"resourceName="UserDatabase"/></Realm><Host name="localhost"  appBase="webapps"unpackWARs="true" autoDeploy="true"><!-- SingleSignOn valve, share authentication between web applicationsDocumentation at: /docs/config/valve.html --><!--<Valve className="org.apache.catalina.authenticator.SingleSignOn" />--><!-- Access log processes all example.Documentation at: /docs/config/valve.htmlNote: The pattern used is equivalent to using pattern="common" --><Valve className="org.apache.catalina.valves.AccessLogValve" directory="logs"prefix="localhost_access_log." suffix=".txt"pattern="%h %l %u %t "%r" %s %b" /></Host></Engine></Service>
</Server>
A1)创建一个服务器组件;
A1.1)服务器组件里面注入多个监听器,资源(GlobalNamingResources)
A1.2)创建一个服务组件;
A1.2.1)创建两个Connector;
A1.2.2)创建一个Engine,Engine中注入两个领域对象(Realm);还注入了一个Host容器;和一个阀;
Attention)
A1)服务器组件和服务组件,参见 tomcat(14)服务器组件和服务组件;A2)Digester用于将 XML 文档中的元素转换成 java 对象,参见 tomcat(15)Digester库
Conclusion)(不能再干货——tomcat的启动调用过程review)
C1)自此,tomcat的启动调用过程我们已经分析完毕,再review 一下: startup.bat -> catalina.bat -> Bootstrap.main() -> Catalina.process() -> createStartDigester() ->configFile() ;
C2)启动createStartDigester方法会创建Digester类,用于将server.xml 中的元素转换为java对象;而configFile方法就是用于设定 将要解析的xml的文件路径的.
【3.3】在Windows 平台上启动tomcat(startup.bat 文件调用catalina.bat 文件时,会传入参数 start)
https://github.com/pacosonTang/HowTomcatWorks/blob/master/chapter17/startup.bat
【3.4】在Windows 平台上关闭tomcat(shutdown.bat 文件调用 catalina.bat文件时,传入参数 stop)
https://github.com/pacosonTang/HowTomcatWorks/blob/master/chapter17/shutdown.bat
【4】在Linux平台上启动Tomcat
1)在linux平台上,tomcat使用shell 脚本来启动和关闭。shell脚本的后缀名可以是 “.sh”,位于 $CATALINA_HOME/bin 目录下;
2)intro:本章节将intro 4 个脚本:catalina.sh, statup.sh, shutdown.sh, setclasspath.sh;
【4.1】如何编写UNIX/Linux Shell脚本
1)intro:shell脚本是由解释器逐行执行的,shell 脚本的扩展名可有可无,但最常用的扩展名是 .sh;
2)下面简单介绍下 shell 命令(command):
c1)注释:shell脚本使用 # 符号来表示注释内容;c2)clear:使用该命令来清空屏幕;c3)exit:该命令可以用来退出当前shell 脚本的执行;一般case下,exit后面都会附加一个退出状态,其中0 表示shell脚本正常执行完成,非0值表示shell异常退出;如果因为程序运行中的某种异常而想退出,使用如下命令:exit 1;(干货——exit后面都会附加一个退出状态,其中0 表示shell脚本正常执行完成,非0值表示shell异常退出)c4)echo:该命令可以向屏幕输出一个字符串:echo hello world;c5)调用函数:可以使用句点(.)来调用一个函数,或执行另一个shell 脚本;c6)系统变量与用于自定义变量:变量名必须以字母,数字或下划线开头,使用等号就可以定义一个变量;如下面的命令定义了一个名为 myVar 的变量,其值为 Tootsie:myVar=Toosie;
Attention)
A1)等号的前后一定不能有空格。此外,shell 脚本对变量名是区分大小写的 ;A2)若想定义一个值为NULL的变量,可使用空字符串为其赋值,或在等号右边留空即可:myVar= myVar=""A3)若想要获取变量的值,需要在变量前面加上美元符号($):echo $myVarA4)Unix/Linux 提供了一些系统变量供用户使用;如,变量HOME 保存了当前用户的主目录,变量PWD 保存了用户当前所在的目录,变量PATH 保存了将会在哪些地方查找要执行的命令等;
c7)expr: 可以使用该命令来计算一个表达式的值。表达式必须以反引号引用;如下面的shell 脚本计算一个数学表达式:sum=`expr 100+200` echo $sum
c7.1)脚本:echo `expr 200+300` 会输出500;c7.2)特殊表达式`uname`会得到操作系统的名称:echo `uname` 会输出操作系统名称(Linux或Unix);c7.3)特殊表达式 `dirname filePath` 会返回指定文件所在的目录。如,命令 `dirname /home/user1/test.sh` 会返回“home/user1”;
c8)访问参数:如同向函数中传入参数一样,也可以向shell脚本传入参数,并使用 $1 来引用第1个参数,$2引用第2个参数,以此类推;$# 会返回参数的格式,$@会返回所有的参数;c9)shift:这条命令会将参数向后移动一位,$1的值改为 $2, $2的值改为$3, 以此类推;
看个荔枝)如下面的shell脚本,若传入的第1个参数是 “start”,运行下面的脚本,会输出“start”;如果传入的第1个参数是 “stop”,则输出“stop”;c10)if...then...[else...] fi:if 语句用来测试条件,并执行相应的命令列表。它的语法格式如下:if condition thenlist of commands [elselist of commands ] fiAttention)也可以使用 “elif”来代替“else if”;
Attention)if [ "$1" = "start" ]; thenecho start fi if [ "$1" = "end" ]; thenecho end fi
看个荔枝)A1)判断条件在 “[” 后面必须有一个空格, 在“]”前面也必须有一个空格;A2)将 $1 用双引号引起来可以防止解释器在发现调用脚本时没有使用参数而抛出异常;A3)$0:表示的是用来调用该脚本的命令。如,使用下面的命令来调用一个名为 test.sh 的脚本:./test.sh;那么,$0 返回 “./test.sh”;下面是一些用来进行条件判断的测试选项:-f file:当存在文件file时,为true; -r file:当文件file可读时,为true; -z string:如果string 是空字符串,为 true; -n string:如果string 不为空字符串,为true; string1 = string2:如果string1 等于string2,为true; string1 != string2:如果string1 不等于 string2,为true;c11)for循环:使用for循环来重复执行一些命令:for {var} in {list} dolist of commands done
看个荔枝)for i in 1 2 3 doecho i=$i done output: i1 i2 i3c12)while循环:while [condition] dolist of commands done
n=1
while [$n -lt 3]
doecho i $n
done
output:
i1
i2
Attention)其中 [$n -lt 3];中 -lt 的意思是小于3,(lt == less than)
c13)case:case结构表示可以在程序中执行一些选择过程。其语法格式如下所示:case $variable-name in pattern1)list of commands;; pattern2)list of commands;; *)list of commands;; esac
Attention)“;;”表示命令列表执行完成,如果上面的模式都不匹配时,“*)”表示所要执行的命令;
看个荔枝)
case "`uname`" inCYGWIN*)echo cygwin;;OS400*)echo os400;;LINUX*)echo linux;;*)echo os not recognized;;
esacc14)输出重定向(review):使用 “>”将输出重定向到一个文件;(echo hello > myFile.txt);这会创建一个 myFile.txt的文件,并将 hello 写入到其中,不会向屏幕上输出文字;
Supplement)
S1)"1>&2":会把标准输出上的错误消息重定向到标准错误中;S1)"2>&1":会把标准错误中的信息重新向到 标准输出中;
c15)条件执行:可以使用命令或条件来决定是否执行另一条命令。在这种 case下, 可以使用 && 或 || ,如下所示:
c15.1)command1 && command2:如果command1返回的退出状态是0,那么会执行command2;(0表true,非0表false)c15.2)command1 || command2:如果command1返回的退出状态是非0,那么会执行command2;(0表true,非0表false)c15.3)command1 && command2 || command3:如果command1返回的退出状态是非0,那么会执行command2;否则,执行command3;(0表true,非0表false);
【4.2】catalina.sh 脚本
1)intro: 该文件用来在 UNIX/Linux 平台上启动或关闭tomcat。若要启动tomcat,需要将 start作为第1个参数传递给 catalina.sh 脚本。若要关闭 tomcat,需要将stop 作为第1个参数传递给 catalina.sh脚本。下面是有效的 参数列表(parameters):
p1)debug:在调试器中启动catalina;(在OS400系统上不可用)p2)debug -security:通过安全管理器调试catalina;(在OS400系统上不可用)p3)embedded:以嵌入模式启动 Catalina;p4)jpda start:在JPDA 调试器下启动 Catalina;p5)run:在当前窗口中启动 Catalina;p6)run -security:在安全管理器下,使用当前窗口启动 catalina;p7)start:使用一个新窗口启动 catalina;p8)start -security:在安全管理器下,使用一个新窗口启动 catalina;p9)stop:关闭 catalina;
2)catalina.sh 的源代码,参见: https://github.com/pacosonTang/HowTomcatWorks/blob/master/chapter17/catalina.sh
【4.3】在 unix/linux 平台上启动 tomcat
1)使用 startup.sh 脚本可以方便地启动 tomcat。startup.sh 脚本会设置正确的环境变量,然后调用 catalina.sh脚本,并传入参数 start: https://github.com/pacosonTang/HowTomcatWorks/blob/master/chapter17/startup.sh
【4.4】在 unix/linux 平台上关闭 tomcat
1)使用 shutdown.sh 脚本可以方便地启动 tomcat。shutdown.sh 脚本会设置正确的环境变量,然后调用 catalina.sh脚本,并传入参数 stop: https://github.com/pacosonTang/HowTomcatWorks/blob/master/chapter17/shutdown.sh
------------------------------------------------------------------------------------------------------
Supplement)文末继续对 Catatalina.createStateDigester()方法的调用过程进一步总结
protected Digester createStartDigester() { //org.apache.catalina.startup.Catalina.createStartDigester().// Initialize the digesterDigester digester = new Digester();digester.setClassLoader(StandardServer.class.getClassLoader());if (debug)digester.setDebug(999);digester.setValidating(false);// Configure the actions we will be usingdigester.addObjectCreate("Server","org.apache.catalina.core.StandardServer","className");digester.addSetProperties("Server");digester.addSetNext("Server","setServer","org.apache.catalina.Server");digester.addObjectCreate("Server/GlobalNamingResources","org.apache.catalina.deploy.NamingResources");digester.addSetProperties("Server/GlobalNamingResources");digester.addSetNext("Server/GlobalNamingResources","setGlobalNamingResources","org.apache.catalina.deploy.NamingResources");digester.addObjectCreate("Server/Listener",null, // MUST be specified in the element"className");digester.addSetProperties("Server/Listener");digester.addSetNext("Server/Listener","addLifecycleListener","org.apache.catalina.LifecycleListener");digester.addObjectCreate("Server/Service","org.apache.catalina.core.StandardService","className");digester.addSetProperties("Server/Service");digester.addSetNext("Server/Service","addService","org.apache.catalina.Service");digester.addObjectCreate("Server/Service/Listener",null, // MUST be specified in the element"className");digester.addSetProperties("Server/Service/Listener");digester.addSetNext("Server/Service/Listener","addLifecycleListener","org.apache.catalina.LifecycleListener");digester.addObjectCreate("Server/Service/Connector","org.apache.catalina.connector.http.HttpConnector","className");digester.addSetProperties("Server/Service/Connector");digester.addSetNext("Server/Service/Connector","addConnector","org.apache.catalina.Connector");digester.addObjectCreate("Server/Service/Connector/Factory","org.apache.catalina.net.DefaultServerSocketFactory","className");digester.addSetProperties("Server/Service/Connector/Factory");digester.addSetNext("Server/Service/Connector/Factory","setFactory","org.apache.catalina.net.ServerSocketFactory");digester.addObjectCreate("Server/Service/Connector/Listener",null, // MUST be specified in the element"className");digester.addSetProperties("Server/Service/Connector/Listener");digester.addSetNext("Server/Service/Connector/Listener","addLifecycleListener","org.apache.catalina.LifecycleListener");// Add RuleSets for nested elementsdigester.addRuleSet(new NamingRuleSet("Server/GlobalNamingResources/"));digester.addRuleSet(new EngineRuleSet("Server/Service/")); //highlight line.digester.addRuleSet(new HostRuleSet("Server/Service/Engine/")); //highlight line.digester.addRuleSet(new ContextRuleSet("Server/Service/Engine/Default")); //highlight line.digester.addRuleSet(new NamingRuleSet("Server/Service/Engine/DefaultContext/"));digester.addRuleSet(new ContextRuleSet("Server/Service/Engine/Host/Default"));digester.addRuleSet(new NamingRuleSet("Server/Service/Engine/Host/DefaultContext/"));digester.addRuleSet(new ContextRuleSet("Server/Service/Engine/Host/"));digester.addRuleSet(new NamingRuleSet("Server/Service/Engine/Host/Context/"));digester.addRule("Server/Service/Engine",new SetParentClassLoaderRule(digester,parentClassLoader));return (digester);} public void addRuleInstances(Digester digester) { //org.apache.catalina.startup.EngineRuleSet.addRuleInstances().digester.addObjectCreate(prefix + "Engine","org.apache.catalina.core.StandardEngine","className");digester.addSetProperties(prefix + "Engine");digester.addRule(prefix + "Engine",new LifecycleListenerRule(digester,"org.apache.catalina.startup.EngineConfig","engineConfigClass"));digester.addSetNext(prefix + "Engine","setContainer","org.apache.catalina.Container");digester.addObjectCreate(prefix + "Engine/Listener",null, // MUST be specified in the element"className");digester.addSetProperties(prefix + "Engine/Listener");digester.addSetNext(prefix + "Engine/Listener","addLifecycleListener","org.apache.catalina.LifecycleListener");digester.addObjectCreate(prefix + "Engine/Logger",null, // MUST be specified in the element"className");digester.addSetProperties(prefix + "Engine/Logger");digester.addSetNext(prefix + "Engine/Logger","setLogger","org.apache.catalina.Logger");digester.addObjectCreate(prefix + "Engine/Realm",null, // MUST be specified in the element"className");digester.addSetProperties(prefix + "Engine/Realm");digester.addSetNext(prefix + "Engine/Realm","setRealm","org.apache.catalina.Realm");digester.addObjectCreate(prefix + "Engine/Valve",null, // MUST be specified in the element"className");digester.addSetProperties(prefix + "Engine/Valve");digester.addSetNext(prefix + "Engine/Valve","addValve","org.apache.catalina.Valve");}public void addRuleInstances(Digester digester) { //org.apache.catalina.startup.HostRuleSet.addRuleInstances().digester.addObjectCreate(prefix + "Host","org.apache.catalina.core.StandardHost","className");digester.addSetProperties(prefix + "Host");digester.addRule(prefix + "Host",new CopyParentClassLoaderRule(digester));digester.addRule(prefix + "Host",new LifecycleListenerRule(digester,"org.apache.catalina.startup.HostConfig","hostConfigClass"));digester.addSetNext(prefix + "Host","addChild","org.apache.catalina.Container");digester.addCallMethod(prefix + "Host/Alias","addAlias", 0);digester.addObjectCreate(prefix + "Host/Cluster",null, // MUST be specified in the element"className");digester.addSetProperties(prefix + "Host/Cluster");digester.addSetNext(prefix + "Host/Cluster","addCluster","org.apache.catalina.Cluster");digester.addObjectCreate(prefix + "Host/Listener",null, // MUST be specified in the element"className");digester.addSetProperties(prefix + "Host/Listener");digester.addSetNext(prefix + "Host/Listener","addLifecycleListener","org.apache.catalina.LifecycleListener");digester.addObjectCreate(prefix + "Host/Logger",null, // MUST be specified in the element"className");digester.addSetProperties(prefix + "Host/Logger");digester.addSetNext(prefix + "Host/Logger","setLogger","org.apache.catalina.Logger");digester.addObjectCreate(prefix + "Host/Realm",null, // MUST be specified in the element"className");digester.addSetProperties(prefix + "Host/Realm");digester.addSetNext(prefix + "Host/Realm","setRealm","org.apache.catalina.Realm");digester.addObjectCreate(prefix + "Host/Valve",null, // MUST be specified in the element"className");digester.addSetProperties(prefix + "Host/Valve");digester.addSetNext(prefix + "Host/Valve","addValve","org.apache.catalina.Valve");}public void addRuleInstances(Digester digester) { //<span style="font-family:Arial, Helvetica, sans-serif;"> org.apache.catalina.ContextRuleSet.addRuleInstances().</span>
if (!isDefaultContext()) {digester.addObjectCreate(prefix + "Context","org.apache.catalina.core.StandardContext","className");} else {digester.addObjectCreate(prefix + "Context","org.apache.catalina.core.StandardDefaultContext","className");}digester.addSetProperties(prefix + "Context");if (!isDefaultContext()) {digester.addRule(prefix + "Context",new CopyParentClassLoaderRule(digester));digester.addRule(prefix + "Context",new LifecycleListenerRule(digester,"org.apache.catalina.startup.ContextConfig","configClass"));digester.addSetNext(prefix + "Context","addChild","org.apache.catalina.Container");digester.addRule(prefix + "Context",new ContextValidatorRule(digester));} else {digester.addSetNext(prefix + "Context","addDefaultContext","org.apache.catalina.DefaultContext");}digester.addCallMethod(prefix + "Context/InstanceListener","addInstanceListener", 0);digester.addObjectCreate(prefix + "Context/Listener",null, // MUST be specified in the element"className");digester.addSetProperties(prefix + "Context/Listener");digester.addSetNext(prefix + "Context/Listener","addLifecycleListener","org.apache.catalina.LifecycleListener");digester.addRule(prefix + "Context/Loader",new CreateLoaderRule(digester,"org.apache.catalina.loader.WebappLoader","className"));digester.addSetProperties(prefix + "Context/Loader");digester.addSetNext(prefix + "Context/Loader","setLoader","org.apache.catalina.Loader");digester.addObjectCreate(prefix + "Context/Logger",null, // MUST be specified in the element"className");digester.addSetProperties(prefix + "Context/Logger");digester.addSetNext(prefix + "Context/Logger","setLogger","org.apache.catalina.Logger");digester.addObjectCreate(prefix + "Context/Manager","org.apache.catalina.session.StandardManager","className");digester.addSetProperties(prefix + "Context/Manager");digester.addSetNext(prefix + "Context/Manager","setManager","org.apache.catalina.Manager");digester.addObjectCreate(prefix + "Context/Manager/Store",null, // MUST be specified in the element"className");digester.addSetProperties(prefix + "Context/Manager/Store");digester.addSetNext(prefix + "Context/Manager/Store","setStore","org.apache.catalina.Store");digester.addObjectCreate(prefix + "Context/Parameter","org.apache.catalina.deploy.ApplicationParameter");digester.addSetProperties(prefix + "Context/Parameter");digester.addSetNext(prefix + "Context/Parameter","addApplicationParameter","org.apache.catalina.deploy.ApplicationParameter");digester.addObjectCreate(prefix + "Context/Realm",null, // MUST be specified in the element"className");digester.addSetProperties(prefix + "Context/Realm");digester.addSetNext(prefix + "Context/Realm","setRealm","org.apache.catalina.Realm");digester.addObjectCreate(prefix + "Context/ResourceLink","org.apache.catalina.deploy.ContextResourceLink");digester.addSetProperties(prefix + "Context/ResourceLink");digester.addSetNext(prefix + "Context/ResourceLink","addResourceLink","org.apache.catalina.deploy.ContextResourceLink");digester.addObjectCreate(prefix + "Context/Resources","org.apache.naming.resources.FileDirContext","className");digester.addSetProperties(prefix + "Context/Resources");digester.addSetNext(prefix + "Context/Resources","setResources","javax.naming.directory.DirContext");digester.addObjectCreate(prefix + "Context/Valve",null, // MUST be specified in the element"className");digester.addSetProperties(prefix + "Context/Valve");digester.addSetNext(prefix + "Context/Valve","addValve","org.apache.catalina.Valve");digester.addCallMethod(prefix + "Context/WrapperLifecycle","addWrapperLifecycle", 0);digester.addCallMethod(prefix + "Context/WrapperListener","addWrapperListener", 0);}A1)EngineRuleSet.addRuleInstances()方法:创建Engine容器StandardEngine,Engine监听器EngineConfig, 声明周期监听器 LifecycleListener, 日志Logger, 领域对象Realm, 管道阀对象 Valve;A2)HostRuleSet.addRuleInstances()方法:创建Host容器StandardHost, Host监听器HostConfig, 集群Cluster, 生命周期监听器LifecycleListener, 日志Logger, 领域对象Realm, 管道阀对象 Valve;A3)ContextRuleSet.addRuleInstances()方法:创建Context容器 StandardContext, Context监听器ContextConfig, 生命周期监听器LifecycleListener,Web加载器WebappLoader, 管理器Manager, Store, 领域对象Realm, ContextResourceLink, 管道阀对象Valve,