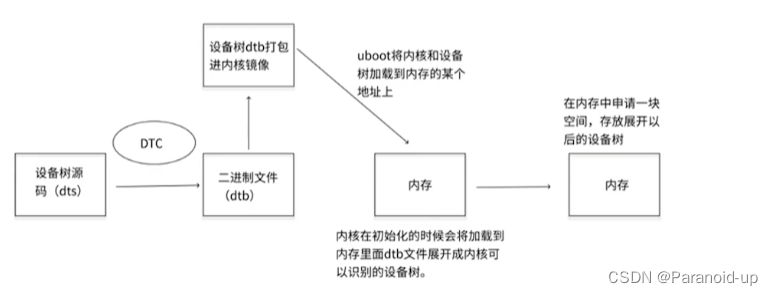
dtb展开成device_node
文章目录
- dtb展开成device_node
- 设备树是如何传递给内核的?
- 设备树相关结构体
- 举例
- of操作函数
- 与查找节点有关的 OF 函数
- 1、of_find_node_by_name 函数
- 2、of_find_node_by_type 函数
- 3、of_find_compatible_node 函数
- 4、of_find_matching_node_and_match 函数
- 5、of_find_node_by_path 函数
- 查找父/子节点的 OF 函数
- 1、of_get_parent 函数
- 2、of_get_next_child 函数
- 提取属性值的 OF 函数
- 1、of_find_property 函数
- 2、of_property_count_elems_of_size 函数
- 3、of_property_read_u32_index 函数
- 4、 of_property_read_u8_array 函数
- 5、of_property_read_u8 函数 of_property_read_u16 函数 of_property_read_u32 函数 of_property_read_u64 函数
- 6、 of_property_read_string 函数
- 7、of_n_addr_cells 函数
- 8、of_n_size_cells 函数
- 其他常用的 OF 函数
- 1、of_device_is_compatible 函数
- 2、of_get_address 函数
- 3、of_translate_address 函数
- 4、 of_address_to_resource 函数
- 5、of_iomap 函数
- IMX6ULL内核是如何展开设备树为内核可以识别的device_node
- setup_arch(&command_line);
- boot_command_line
- setup_machine_fdt
- early_fixmap_init
- unflatten_device_tree
设备树是如何传递给内核的?
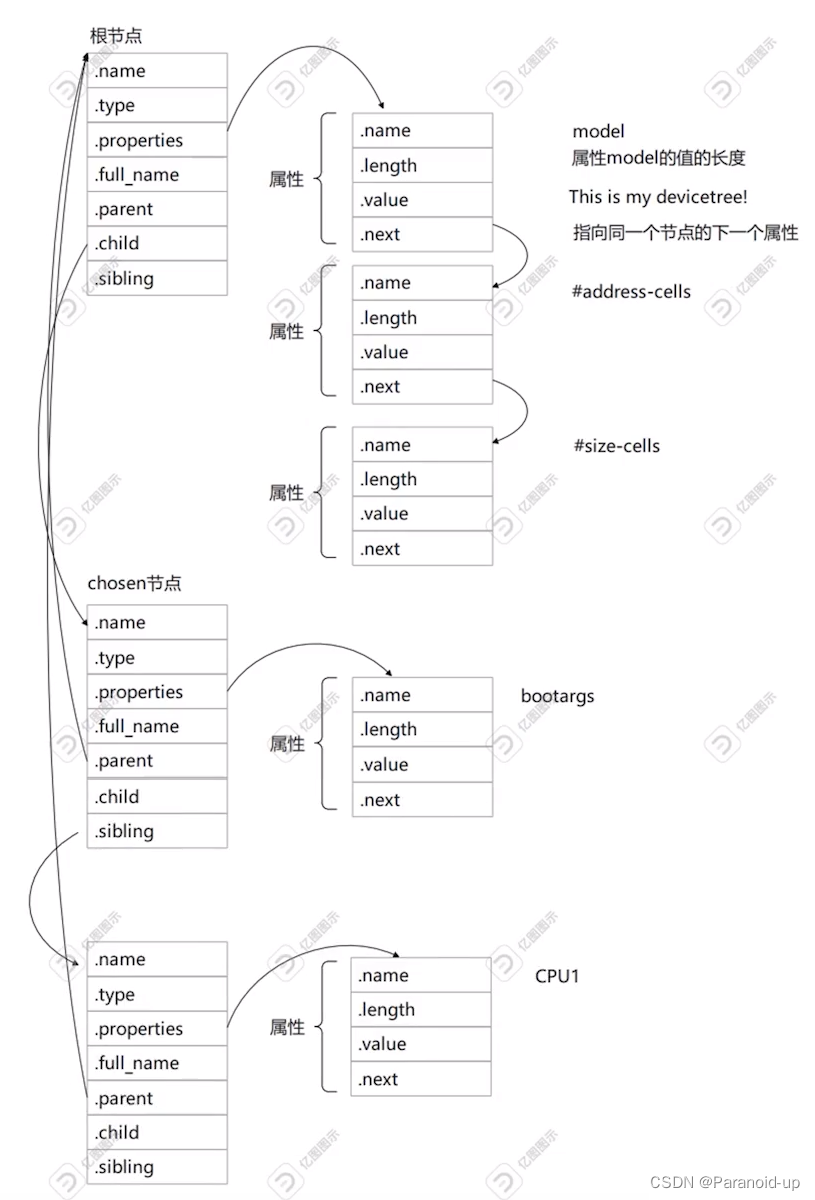
设备树相关结构体
device_node结构体
device_node结构体定义在include/linux/of.h头文件当中。
struct device_node {const char *name; // 节点名称const char *type; // 节点类型phandle phandle; // 节点句柄const char *full_name; // 节点全名struct fwnode_handle fwnode;struct    property *properties; // 属性struct    property *deadprops;    /* removed properties */struct    device_node *parent; // 父节点struct    device_node *child; // 子节点struct    device_node *sibling; // 兄弟节点struct    kobject kobj; // 内核对象unsigned long _flags; // 节点标志void    *data; // 数据
#if defined(CONFIG_SPARC)const char *path_component_name; // 路径组件名称unsigned int unique_id; // 唯一IDstruct of_irq_controller *irq_trans; // 中断控制器
#endif
};
property结构体
property结构体定义在include/linux/of.h头文件当中。
struct property {char    *name; // 属性名称int    length; // 属性长度void    *value; // 属性值struct property *next; // 下一个属性unsigned long _flags; // 属性标志unsigned int unique_id; // 属性唯一IDstruct bin_attribute attr; // 二进制属性
};
举例
下面设备树内置展开后如下
/ {model = "this is my devicethree!";#address-cells = <1>;#size-cells = <1>;chosen {bootargs = "root=/dev/nfs rw nfsroot=192.168.1.1 console=ttyS0,115200";};cpu: cpu@1 {device_type = "cpu";compatible = "arm,cortex-a35","arm,armv8";reg = <0x0 0x1>;};
of操作函数
与查找节点有关的 OF 函数
1、of_find_node_by_name 函数
struct device_node *of_find_node_by_name(struct device_node         *from,
const char                        *name);
函数参数和返回值含义如下:
of_find_node_by_name 函数通过节点名字查找指定的节点,函数原型如下:
from:开始查找的节点,如果为 NULL 表示从根节点开始查找整个设备树。
name:要查找的节点名字。
返回值:找到的节点,如果为NULL 表示查找失败。
2、of_find_node_by_type 函数
of_find_node_by_type 函数通过 device_type 属性查找指定的节点,函数原型如下:
struct device_node *of_find_node_by_type(struct device_node *from, const char *type)
函数参数和返回值含义如下:
from:开始查找的节点,如果为 NULL 表示从根节点开始查找整个设备树。
type:要查找的节点对应的 type 字符串,也就是 device_type 属性值。
返回值:找到的节点,如果为NULL 表示查找失败。
3、of_find_compatible_node 函数
of_find_compatible_node 函数根据 device_type 和 compatible 这两个属性查找指定的节点,
函数原型如下:
struct device_node *of_find_compatible_node(struct device_node      *from,
const char                      *type,
const char                      *compatible)
函数参数和返回值含义如下:
from:开始查找的节点,如果为 NULL 表示从根节点开始查找整个设备树。
type:要查找的节点对应的 type 字符串,也就是 device_type 属性值,可以为NULL,表示
忽略掉 device_type 属性。
compatible:要查找的节点所对应的 compatible 属性列表。
返回值:找到的节点,如果为NULL 表示查找失败
4、of_find_matching_node_and_match 函数
of_find_matching_node_and_match 函数通过 of_device_id 匹配表来查找指定的节点,函数原
型如下:
struct device_node *of_find_matching_node_and_match(struct device_node             *from,
const struct of_device_id    *matches, const struct of_device_id    **match)
函数参数和返回值含义如下:
from:开始查找的节点,如果为 NULL 表示从根节点开始查找整个设备树。
matches:of_device_id 匹配表,也就是在此匹配表里面查找节点。
match:找到的匹配的 of_device_id。
返回值:找到的节点,如果为NULL 表示查找失败
5、of_find_node_by_path 函数
of_find_node_by_path 函数通过路径来查找指定的节点,函数原型如下:
inline struct device_node *of_find_node_by_path(const char *path)
函数参数和返回值含义如下:
path:带有全路径的节点名,可以使用节点的别名,比如“/backlight”就是 backlight 这个节点的全路径。
返回值:找到的节点,如果为NULL 表示查找失败
查找父/子节点的 OF 函数
1、of_get_parent 函数
of_get_parent 函数用于获取指定节点的父节点(如果有父节点的话),函数原型如下:
struct device_node *of_get_parent(const struct device_node *node)
函数参数和返回值含义如下:
node:父节点。
返回值:找到的父节点。
2、of_get_next_child 函数
of_get_next_child 函数用迭代的方式查找子节点,函数原型如下:
struct device_node *of_get_next_child(const struct device_node         *node,
struct device_node                    *prev)
函数参数和返回值含义如下:
node:要查找的父节点的节点。
prev:前一个子节点,也就是从哪一个子节点开始迭代的查找下一个子节点。可以设置为
NULL,表示从第一个子节点开始。
返回值:找到的下一个子节点。
提取属性值的 OF 函数
1、of_find_property 函数
of_find_property 函数用于查找指定的属性,函数原型如下:
property *of_find_property(const struct device_node   *np,
const char                            *name,
int                                        *lenp)
函数参数和返回值含义如下:
np:设备节点。
name: 属性名字。
lenp:属性值的字节数
返回值:找到的属性。
2、of_property_count_elems_of_size 函数
of_property_count_elems_of_size 函数用于获取属性中元素的数量,比如 reg 属性值是一个
数组,那么使用此函数可以获取到这个数组的大小,此函数原型如下:
int of_property_count_elems_of_size(const struct device_node   *np,
const char                            *propname,
int elem_size)
函数参数和返回值含义如下:
np:设备节点。
proname: 需要统计元素数量的属性名字。
elem_size:元素长度。
返回值:得到的属性元素数量。
3、of_property_read_u32_index 函数
of_property_read_u32_index 函数用于从属性中获取指定标号的 u32 类型数据值(无符号 32
位),比如某个属性有多个 u32 类型的值,那么就可以使用此函数来获取指定标号的数据值,此
函数原型如下:
int of_property_read_u32_index(const struct device_node   *np,
const char                            *propname,
u32                                      index,
u32                                      *out_value)
函数参数和返回值含义如下:
np:设备节点。
proname: 要读取的属性名字。
index:要读取的值标号。
out_value:读取到的值
返回值:0 读取成功,负值,读取失败,-EINVAL 表示属性不存在,-ENODATA 表示没有
要读取的数据,-EOVERFLOW 表示属性值列表太小。
4、 of_property_read_u8_array 函数
of_property_read_u16_array 函数
of_property_read_u32_array 函数
of_property_read_u64_array 函数
这 4 个函数分别是读取属性中 u8、u16、u32 和 u64 类型的数组数据,比如大多数的 reg 属
性都是数组数据,可以使用这 4 个函数一次读取出 reg 属性中的所有数据。这四个函数的原型
如下:
int of_property_read_u8_array(const struct device_node      *np,
const char                              *propname,
u8                                          *out_values,
size_t                                     sz)
int of_property_read_u16_array(const struct device_node    *np,
const char                            *propname,
u16                                      *out_values,
size_t                                   sz)
int of_property_read_u32_array(const struct device_node    *np,
const char                            *propname,
u32                                      *out_values,
size_t                                   sz)
int of_property_read_u64_array(const struct device_node    *np,
const char                            *propname,
u64                                      *out_values,
size_t                                   sz)
函数参数和返回值含义如下:
np:设备节点。
proname: 要读取的属性名字。
out_value:读取到的数组值,分别为 u8、u16、u32 和 u64。
sz:要读取的数组元素数量。
返回值:0,读取成功,负值,读取失败,-EINVAL 表示属性不存在,-ENODATA 表示没
有要读取的数据,-EOVERFLOW 表示属性值列表太小。
5、of_property_read_u8 函数 of_property_read_u16 函数 of_property_read_u32 函数 of_property_read_u64 函数
有些属性只有一个整形值,这四个函数就是用于读取这种只有一个整形值的属性,分别用
于读取 u8、u16、u32 和u64 类型属性值,函数原型如下:
int of_property_read_u8(const struct device_node        *np,
const char                              *propname,
u8                                          *out_value)
int of_property_read_u16(const struct device_node      *np,
const char                              *propname,
u16                                        *out_value)
int of_property_read_u32(const struct device_node      *np,
const char                              *propname,
u32                                        *out_value)
int of_property_read_u64(const struct device_node      *np,
const char                              *propname,
u64                                        *out_value)
函数参数和返回值含义如下:
np:设备节点。
proname: 要读取的属性名字。
out_value:读取到的数组值。
返回值:0,读取成功,负值,读取失败,-EINVAL 表示属性不存在,-ENODATA 表示没
有要读取的数据,-EOVERFLOW 表示属性值列表太小。
6、 of_property_read_string 函数
of_property_read_string 函数用于读取属性中字符串值,函数原型如下:
int of_property_read_string(struct device_node    *np,
const char                    *propname,
const char                    **out_string)
函数参数和返回值含义如下:
np:设备节点。
proname: 要读取的属性名字。
out_string:读取到的字符串值。
返回值:0,读取成功,负值,读取失败。
7、of_n_addr_cells 函数
of_n_addr_cells 函数用于获取#address-cells 属性值,函数原型如下:
int of_n_addr_cells(struct device_node *np)
函数参数和返回值含义如下:
np:设备节点。
返回值:获取到的#address-cells 属性值。
8、of_n_size_cells 函数
of_size_cells 函数用于获取#size-cells 属性值,函数原型如下:
int of_n_size_cells(struct device_node *np)
函数参数和返回值含义如下:
np:设备节点。
返回值:获取到的#size-cells 属性值。
其他常用的 OF 函数
1、of_device_is_compatible 函数
of_device_is_compatible 函数用于查看节点的 compatible 属性是否有包含 compat 指定的字
符串,也就是检查设备节点的兼容性,函数原型如下:
int of_device_is_compatible(const struct device_node          *device,
const char                                    *compat)
函数参数和返回值含义如下:
device:设备节点。
compat:要查看的字符串。
返回值:0,节点的 compatible 属性中不包含 compat 指定的字符串;正数,节点的 compatible
属性中包含compat 指定的字符串。
2、of_get_address 函数
of_get_address 函数用于获取地址相关属性,主要是“reg”或者“assigned-addresses”属性
值,函数原型如下:
const     be32 *of_get_address(struct device_node        *dev,
int                                  index,
u64                                *size,
unsigned int                  *flags)
函数参数和返回值含义如下:
dev:设备节点。
index:要读取的地址标号。
size:地址长度。
flags:参数,比如 IORESOURCE_IO、IORESOURCE_MEM 等
返回值:读取到的地址数据首地址,为NULL 的话表示读取失败。
3、of_translate_address 函数
of_translate_address 函数负责将从设备树读取到的地址转换为物理地址,函数原型如下:
u64 of_translate_address(struct device_node         *dev,
const     be32                   *in_addr)
函数参数和返回值含义如下:
dev:设备节点。
in_addr:要转换的地址。
返回值:得到的物理地址,如果为OF_BAD_ADDR 的话表示转换失败。
4、 of_address_to_resource 函数
函数看名字像是从设备树里面提取资源值,但是本质上就是将 reg 属性值,然后将其转换为 resource 结构体类型,函数原型如下所示
int of_address_to_resource(struct device_node     *dev,
int                                index,
struct resource             *r)
函数参数和返回值含义如下:
dev:设备节点。
index:地址资源标号。
r:得到的 resource 类型的资源值。
返回值:0,成功;负值,失败。
5、of_iomap 函数
of_iomap 函数用于直接内存映射,以前我们会通过 ioremap 函数来完成物理地址到虚拟地
址的映射,采用设备树以后就可以直接通过 of_iomap 函数来获取内存地址所对应的虚拟地址,
不需要使用 ioremap 函数了。当然了,你也可以使用 ioremap 函数来完成物理地址到虚拟地址
的内存映射,只是在采用设备树以后,大部分的驱动都使用 of_iomap 函数了。of_iomap 函数本
质上也是将reg 属性中地址信息转换为虚拟地址,如果 reg 属性有多段的话,可以通过 index 参
数指定要完成内存映射的是哪一段,of_iomap 函数原型如下:
void     iomem *of_iomap(struct device_node       *np,
int                                  index)
函数参数和返回值含义如下:
np:设备节点。
index:reg 属性中要完成内存映射的段,如果 reg 属性只有一段的话index 就设置为 0。
返回值:经过内存映射后的虚拟内存首地址,如果为 NULL 的话表示内存映射失败。
IMX6ULL内核是如何展开设备树为内核可以识别的device_node
打开内核源码init/main.c,找到start_kernel函数
asmlinkage __visible void __init start_kernel(void)
{char *command_line;char *after_dashes;/** Need to run as early as possible, to initialize the* lockdep hash:*/
/** 初始化锁定机制* 设置初始任务的栈结束标志* 设置处理器ID* 初始化调试对象* 设置初始栈金丝雀* 初始化cgroup* 禁用中断* 启动CPU* 初始化页地址* 打印内核版本信息* 设置内核命令行* 设置CPU掩码* 设置每个CPU的区域* 准备启动CPU* 构建所有可用的空闲页列表* 初始化页分配器*/
lockdep_init();
set_task_stack_end_magic(&init_task);
smp_setup_processor_id();
debug_objects_early_init();/** Set up the the initial canary ASAP:*/
boot_init_stack_canary();cgroup_init_early();local_irq_disable();
early_boot_irqs_disabled = true;/** Interrupts are still disabled. Do necessary setups, then* enable them*/
boot_cpu_init();
page_address_init();
pr_notice("%s", linux_banner);
setup_arch(&command_line);
mm_init_cpumask(&init_mm);
setup_command_line(command_line);
setup_nr_cpu_ids();
setup_per_cpu_areas();
smp_prepare_boot_cpu();    /* arch-specific boot-cpu hooks */build_all_zonelists(NULL, NULL);
page_alloc_init();

为什么要从start_kernel函数入手?
start_kernel函数是内核启动阶段的入囗,类似于main函数。
在start_kernel函数里面有非常多的子函数,这些子函数都是完成Linux内核初始化的函数,这里我们只关心和dtb展开有关的函数。
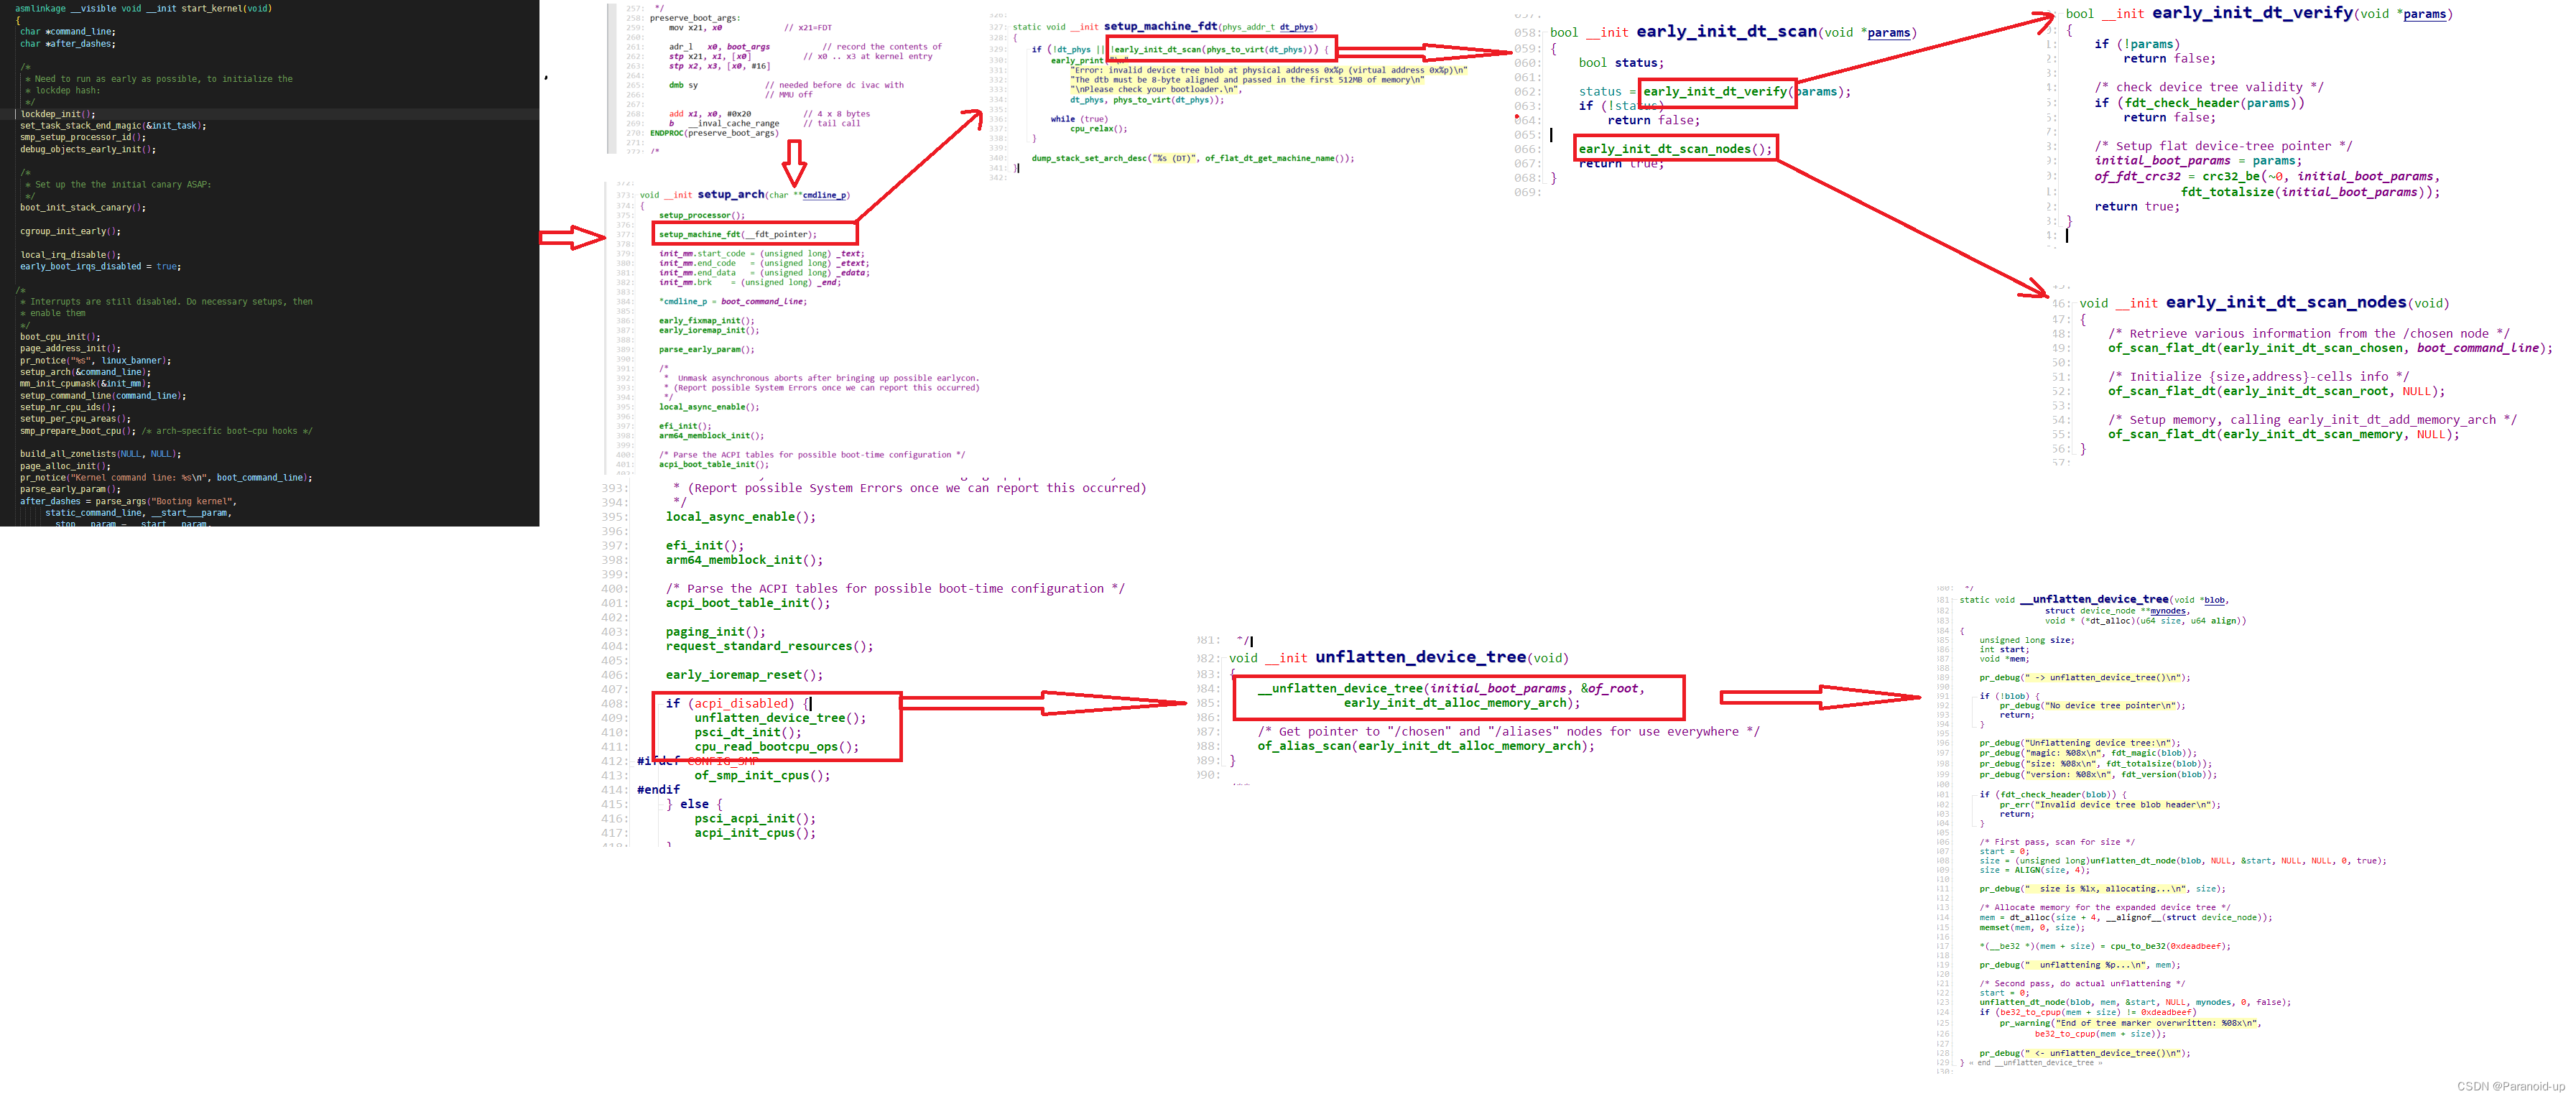
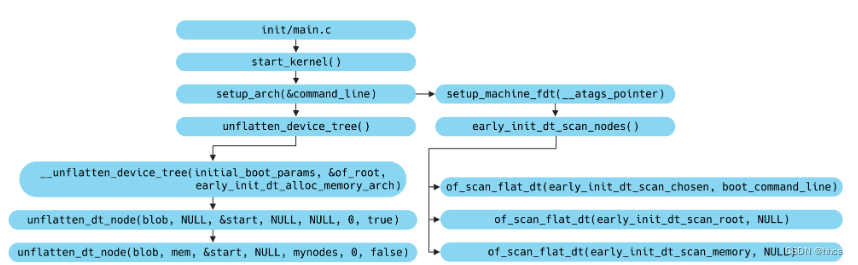
setup_arch(&command_line);
/arch/arm64/kernel/setup.c
start_kernel
setup_arch
void __init setup_arch(char **cmdline_p)
{setup_processor();setup_machine_fdt(__fdt_pointer);init_mm.start_code = (unsigned long) _text;init_mm.end_code   = (unsigned long) _etext;init_mm.end_data   = (unsigned long) _edata;init_mm.brk       = (unsigned long) _end;*cmdline_p = boot_command_line;early_fixmap_init();early_ioremap_init();parse_early_param();/**  Unmask asynchronous aborts after bringing up possible earlycon.* (Report possible System Errors once we can report this occurred)*/local_async_enable();efi_init();arm64_memblock_init();/* Parse the ACPI tables for possible boot-time configuration */acpi_boot_table_init();paging_init();request_standard_resources();early_ioremap_reset();if (acpi_disabled) {unflatten_device_tree();psci_dt_init();cpu_read_bootcpu_ops();
#ifdef CONFIG_SMPof_smp_init_cpus();
#endif} else {psci_acpi_init();acpi_init_cpus();}#ifdef CONFIG_SMPsmp_build_mpidr_hash();
#endif#ifdef CONFIG_VT
#if defined(CONFIG_VGA_CONSOLE)conswitchp = &vga_con;
#elif defined(CONFIG_DUMMY_CONSOLE)conswitchp = &dummy_con;
#endif
#endifif (boot_args[1] || boot_args[2] || boot_args[3]) {pr_err("WARNING: x1-x3 nonzero in violation of boot protocol:\n""\tx1: %016llx\n\tx2: %016llx\n\tx3: %016llx\n""This indicates a broken bootloader or old kernel\n",boot_args[1], boot_args[2], boot_args[3]);}
}
boot_command_line
*cmdline_p = boot_command_line;
char __initdata boot_command_line[COMMAND_LINE_SIZE];
#define COMMAND_LINE_SIZE 1024
记录了uboot传递给内核的boot_command_line,大小是4096.。如果uboot传递给boot_command_line的大小超过4096,就要修改这个数组的大小。
setup_machine_fdt
setup_machine_fdt(__fdt_pointer);
参数__fdt_pointer是dtb位于内存的地址
打开arch/arm64/head.S,找到下列内容
/** Preserve the arguments passed by the bootloader in x0 .. x3*/
preserve_boot_args:mov    x21, x0                // x21=FDTadr_l    x0, boot_args            // record the contents ofstp    x21, x1, [x0]            // x0 .. x3 at kernel entrystp    x2, x3, [x0, #16]dmb    sy                // needed before dc ivac with// MMU offadd    x1, x0, #0x20            // 4 x 8 bytesb    __inval_cache_range        // tail call
ENDPROC(preserve_boot_args)
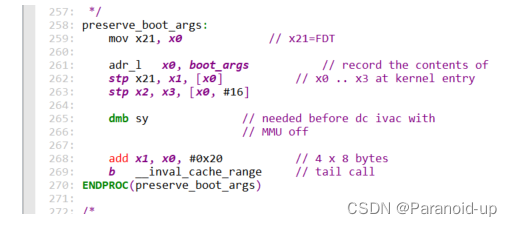
可以看到dtb位于内存的地址是x0传递过来的,x0里面存放的地址是规定的。
1:    cmp    x6, x7b.hs    2fstr    xzr, [x6], #8            // Clear BSSb    1b
2:adr_l    sp, initial_sp, x4str_l    x21, __fdt_pointer, x5        // Save FDT pointerstr_l    x24, memstart_addr, x6        // Save PHYS_OFFSETmov    x29, #0b    start_kernel
ENDPROC(__mmap_switched)

str_l x21, __fdt_pointer, x5将设备位于内存的地址保存到__fdt_pointer。
setup_machine_fdt函数
此时mmu已经开启,需要将dtb位于内存物理地址映射成虚拟地址
start_kernel
setup_arch
setup_machine_fdt
static void __init setup_machine_fdt(phys_addr_t dt_phys)
{if (!dt_phys || !early_init_dt_scan(phys_to_virt(dt_phys))) {early_print("\n""Error: invalid device tree blob at physical address 0x%p (virtual address 0x%p)\n""The dtb must be 8-byte aligned and passed in the first 512MB of memory\n""\nPlease check your bootloader.\n",dt_phys, phys_to_virt(dt_phys));while (true)cpu_relax();}dump_stack_set_arch_desc("%s (DT)", of_flat_dt_get_machine_name());
}
phys_to_virt(dt_phys)将dtb位于内存物理地址映射成虚拟地址
of_flat_dt_get_machine_name获取model和compatible属性的值
early_init_dt_scan函数中调用early_init_dt_scan(phys_to_virt(dt_phys)),用于扫描设备树(Device Tree)
start_kernel
setup_arch
setup_machine_fdt
early_init_dt_scan
bool __init early_init_dt_scan(void *params)
{bool status;status = early_init_dt_verify(params);if (!status)return false;early_init_dt_scan_nodes();return true;}
early_init_dt_scan调用early_init_dt_verify(params);检查设备树头部是否满足要求。将内存中dtb的虚拟地址保存到了initial_boot_params
start_kernel
setup_arch
setup_machine_fdt
early_init_dt_scan
early_init_dt_verify
bool __init early_init_dt_verify(void *params)
{if (!params)return false;/* check device tree validity */if (fdt_check_header(params))return false;/* Setup flat device-tree pointer */initial_boot_params = params;of_fdt_crc32 = crc32_be(~0, initial_boot_params,fdt_totalsize(initial_boot_params));return true;
}
start_kernel
setup_arch
setup_machine_fdt
early_init_dt_scan
early_init_dt_scan_nodes
	void __init early_init_dt_scan_nodes(void)
{/* Retrieve various information from the /chosen node */of_scan_flat_dt(early_init_dt_scan_chosen, boot_command_line);/* Initialize {size,address}-cells info */of_scan_flat_dt(early_init_dt_scan_root, NULL);/* Setup memory, calling early_init_dt_add_memory_arch */of_scan_flat_dt(early_init_dt_scan_memory, NULL);
}
early_init_dt_scan
early_init_dt_verify(params);
initial_boot_params //将内存中dtb的虚拟地址保存到了initial_boot_params
early_init_dt_scan_nodes
early_fixmap_init
start_kernel
setup_arch
early_fixmap_init //保存dtb位于内存的地址,并设置为只读,不可修改
void __init early_fixmap_init(void)
{
pgd_t *pgd;
pud_t *pud;
pmd_t *pmd;
unsigned long addr = FIXADDR_START;
pgd = pgd_offset_k(addr);
pgd_populate(&init_mm, pgd, bm_pud);
pud = pud_offset(pgd, addr);
pud_populate(&init_mm, pud, bm_pmd);
pmd = pmd_offset(pud, addr);
pmd_populate_kernel(&init_mm, pmd, bm_pte);/** The boot-ioremap range spans multiple pmds, for which* we are not preparted:*/
BUILD_BUG_ON((__fix_to_virt(FIX_BTMAP_BEGIN) >> PMD_SHIFT)!= (__fix_to_virt(FIX_BTMAP_END) >> PMD_SHIFT));if ((pmd != fixmap_pmd(fix_to_virt(FIX_BTMAP_BEGIN)))|| pmd != fixmap_pmd(fix_to_virt(FIX_BTMAP_END))) {WARN_ON(1);pr_warn("pmd %p != %p, %p\n",pmd, fixmap_pmd(fix_to_virt(FIX_BTMAP_BEGIN)),fixmap_pmd(fix_to_virt(FIX_BTMAP_END)));pr_warn("fix_to_virt(FIX_BTMAP_BEGIN): %08lx\n",fix_to_virt(FIX_BTMAP_BEGIN));pr_warn("fix_to_virt(FIX_BTMAP_END):   %08lx\n",fix_to_virt(FIX_BTMAP_END));pr_warn("FIX_BTMAP_END:       %d\n", FIX_BTMAP_END);pr_warn("FIX_BTMAP_BEGIN:     %d\n", FIX_BTMAP_BEGIN);
}}
unflatten_device_tree
unflatten_device_tree是dtb转换为device的核心函数
void __init unflatten_device_tree(void)
{__unflatten_device_tree(initial_boot_params, &of_root,early_init_dt_alloc_memory_arch);/* Get pointer to "/chosen" and "/aliases" nodes for use everywhere */of_alias_scan(early_init_dt_alloc_memory_arch);
}
start_kernel
setup_arch
unflatten_device_tree
__unflatten_device_tree
static void __unflatten_device_tree(void *blob,struct device_node **mynodes,void * (*dt_alloc)(u64 size, u64 align))
{unsigned long size;int start;void *mem;pr_debug(" -> unflatten_device_tree()\n");if (!blob) {pr_debug("No device tree pointer\n");return;}pr_debug("Unflattening device tree:\n");pr_debug("magic: %08x\n", fdt_magic(blob));pr_debug("size: %08x\n", fdt_totalsize(blob));pr_debug("version: %08x\n", fdt_version(blob));if (fdt_check_header(blob)) {pr_err("Invalid device tree blob header\n");return;}/* First pass, scan for size */start = 0;size = (unsigned long)unflatten_dt_node(blob, NULL, &start, NULL, NULL, 0, true);size = ALIGN(size, 4);pr_debug("  size is %lx, allocating...\n", size);/* Allocate memory for the expanded device tree */mem = dt_alloc(size + 4, __alignof__(struct device_node));memset(mem, 0, size);*(__be32 *)(mem + size) = cpu_to_be32(0xdeadbeef);pr_debug("  unflattening %p...\n", mem);/* Second pass, do actual unflattening */start = 0;unflatten_dt_node(blob, mem, &start, NULL, mynodes, 0, false);if (be32_to_cpup(mem + size) != 0xdeadbeef)pr_warning("End of tree marker overwritten: %08x\n",be32_to_cpup(mem + size));pr_debug(" <- unflatten_device_tree()\n");
}
size = (unsigned long)unflatten_dt_node(blob, NULL, &start, NULL, NULL, 0, true);
第一次扫描,统计设备树需要的内存大小,第二个参数是NULL,说明只统计大小,不做其他的事。
mem = dt_alloc(size + 4, __alignof__(struct device_node));
一次就把需要的空间分配出来
unflatten_dt_node(blob, mem, &start, NULL, mynodes, 0, false);
第二次扫描,应为第二个参数不是NULL,所以会执行核心函数中的某几个函数构造device_node树
start_kernel
setup_arch
unflatten_device_tree
__unflatten_device_tree
unflatten_dt_node //解析dtb文件中的各个节点
static void * unflatten_dt_node(void *blob,void *mem,int *poffset,struct device_node *dad,struct device_node **nodepp,unsigned long fpsize,bool dryrun)
{const __be32 *p;struct device_node *np;struct property *pp, **prev_pp = NULL;const char *pathp;unsigned int l, allocl;static int depth = 0;int old_depth;int offset;int has_name = 0;int new_format = 0;pathp = fdt_get_name(blob, *poffset, &l);if (!pathp)return mem;allocl = ++l;/* version 0x10 has a more compact unit name here instead of the full* path. we accumulate the full path size using "fpsize", we'll rebuild* it later. We detect this because the first character of the name is* not '/'.*/if ((*pathp) != '/') {new_format = 1;if (fpsize == 0) {/* root node: special case. fpsize accounts for path* plus terminating zero. root node only has '/', so* fpsize should be 2, but we want to avoid the first* level nodes to have two '/' so we use fpsize 1 here*/fpsize = 1;allocl = 2;l = 1;pathp = "";} else {/* account for '/' and path size minus terminal 0* already in 'l'*/fpsize += l;allocl = fpsize;}}np = unflatten_dt_alloc(&mem, sizeof(struct device_node) + allocl,__alignof__(struct device_node));if (!dryrun) {char *fn;of_node_init(np);np->full_name = fn = ((char *)np) + sizeof(*np);if (new_format) {/* rebuild full path for new format */if (dad && dad->parent) {strcpy(fn, dad->full_name);
#ifdef DEBUGif ((strlen(fn) + l + 1) != allocl) {pr_debug("%s: p: %d, l: %d, a: %d\n",pathp, (int)strlen(fn),l, allocl);}
#endiffn += strlen(fn);}*(fn++) = '/';}memcpy(fn, pathp, l);prev_pp = &np->properties;if (dad != NULL) {np->parent = dad;np->sibling = dad->child;dad->child = np;}}/* process properties */for (offset = fdt_first_property_offset(blob, *poffset);(offset >= 0);(offset = fdt_next_property_offset(blob, offset))) {const char *pname;u32 sz;if (!(p = fdt_getprop_by_offset(blob, offset, &pname, &sz))) {offset = -FDT_ERR_INTERNAL;break;}if (pname == NULL) {pr_info("Can't find property name in list !\n");break;}if (strcmp(pname, "name") == 0)has_name = 1;pp = unflatten_dt_alloc(&mem, sizeof(struct property),__alignof__(struct property));if (!dryrun) {/* We accept flattened tree phandles either in* ePAPR-style "phandle" properties, or the* legacy "linux,phandle" properties.  If both* appear and have different values, things* will get weird.  Don't do that. */if ((strcmp(pname, "phandle") == 0) ||(strcmp(pname, "linux,phandle") == 0)) {if (np->phandle == 0)np->phandle = be32_to_cpup(p);}/* And we process the "ibm,phandle" property* used in pSeries dynamic device tree* stuff */if (strcmp(pname, "ibm,phandle") == 0)np->phandle = be32_to_cpup(p);pp->name = (char *)pname;pp->length = sz;pp->value = (__be32 *)p;*prev_pp = pp;prev_pp = &pp->next;}}/* with version 0x10 we may not have the name property, recreate* it here from the unit name if absent*/if (!has_name) {const char *p1 = pathp, *ps = pathp, *pa = NULL;int sz;while (*p1) {if ((*p1) == '@')pa = p1;if ((*p1) == '/')ps = p1 + 1;p1++;}if (pa < ps)pa = p1;sz = (pa - ps) + 1;pp = unflatten_dt_alloc(&mem, sizeof(struct property) + sz,__alignof__(struct property));if (!dryrun) {pp->name = "name";pp->length = sz;pp->value = pp + 1;*prev_pp = pp;prev_pp = &pp->next;memcpy(pp->value, ps, sz - 1);((char *)pp->value)[sz - 1] = 0;pr_debug("fixed up name for %s -> %s\n", pathp,(char *)pp->value);}}if (!dryrun) {*prev_pp = NULL;np->name = of_get_property(np, "name", NULL);np->type = of_get_property(np, "device_type", NULL);if (!np->name)np->name = "<NULL>";if (!np->type)np->type = "<NULL>";}old_depth = depth;*poffset = fdt_next_node(blob, *poffset, &depth);if (depth < 0)depth = 0;while (*poffset > 0 && depth > old_depth)mem = unflatten_dt_node(blob, mem, poffset, np, NULL,fpsize, dryrun);if (*poffset < 0 && *poffset != -FDT_ERR_NOTFOUND)pr_err("unflatten: error %d processing FDT\n", *poffset);/** Reverse the child list. Some drivers assumes node order matches .dts* node order*/if (!dryrun && np->child) {struct device_node *child = np->child;np->child = NULL;while (child) {struct device_node *next = child->sibling;child->sibling = np->child;np->child = child;child = next;}}if (nodepp)*nodepp = np;return mem;
}