形态学操作就是基于形状的一系列图像处理操作。OpenCV为进行图像的形态学变换提供了快捷、方便的函数。最基本的形态学操作有二种,他们是:膨胀与腐蚀(Dilation与Erosion)。
膨胀与腐蚀能实现多种多样的功能,主要如下:
- 消除噪声
- 分割(isolate)出独立的图像元素,在图像中连接(join)相邻的元素。
- 寻找图像中的明显的极大值区域或极小值区域
- 求出图像的梯度
腐蚀和膨胀是针对白色部分(高亮部分)而言的。
- 膨胀就是对图像高亮部分进行“领域扩张”,效果图拥有比原图更大的高亮区域;
- 腐蚀是原图中的高亮区域被蚕食,效果图拥有比原图更小的高亮区域。
膨胀用来处理缺陷问题; 腐蚀用来处理毛刺问题。
膨胀dilate
膨胀就是求局部最大值的操作,从图像直观看来,就是将图像光亮部分放大,黑暗部分缩小。
按数学方面来说,膨胀或者腐蚀操作就是将图像(或图像的一部分区域,我们称之为A)与核(我们称之为B)进行卷积。假设有图像A和结构元素B,结构元素B在A上面移动,其中B定义其中心为锚点,以B覆盖下A的最大像素值(偏白)替换锚点的像素,其中B作为结构体可以是任意形状(与卷积不同之处,可以是线、矩阵、圆、十字等形状)。

二值图像与灰度图像上的膨胀操作:

腐蚀erode
腐蚀操作和膨胀操作相反,也就是将毛刺消除,腐蚀跟膨胀操作的过程类似,唯一不同的是以最小值(偏黑)替换锚点重叠下图像的像素值。


void cv::erode( InputArray src, OutputArraydst, InputArray kernel,Point anchor, int iterations,int borderType, constScalar& borderValue )
{
//调用morphOp函数,并设定标识符为MORPH_ERODEmorphOp( MORPH_ERODE, src, dst, kernel, anchor, iterations, borderType,borderValue );
}void cv::dilate( InputArray src,OutputArray dst, InputArray kernel,Point anchor, int iterations,int borderType, constScalar& borderValue )
{
//调用morphOp函数,并设定标识符为MORPH_DILATEmorphOp( MORPH_DILATE, src, dst, kernel, anchor, iterations, borderType,borderValue );
}
可以发现erode和dilate这两个函数内部就是调用了一下morphOp,只是他们调用morphOp时,第一个参数标识符不同,一个为MORPH_ERODE(腐蚀),一个为MORPH_DILATE(膨胀)。
形态学膨胀——dilate函数
函数原型:
void dilate(InputArray src,OutputArray dst,InputArray kernel,Point anchor=Point(-1,-1),int iterations=1,int borderType=BORDER_CONSTANT,const Scalar& borderValue=morphologyDefaultBorderValue()
);
/** @brief Dilates an image by using a specific structuring element.
The function dilates the source image using the specified structuring element that determines the
shape of a pixel neighborhood over which the maximum is taken:The function supports the in-place mode. Dilation can be applied several ( iterations ) times. In
case of multi-channel images, each channel is processed independently.@param src input image; the number of channels can be arbitrary, but the depth should be one of
CV_8U, CV_16U, CV_16S, CV_32F or CV_64F.
@param dst output image of the same size and type as src.
@param kernel structuring element used for dilation; if element=Mat(), a 3 x 3 rectangular structuring element is used. Kernel can be created using #getStructuringElement
@param anchor position of the anchor within the element; default value (-1, -1) means that the anchor is at the element center.
@param iterations number of times dilation is applied.
@param borderType pixel extrapolation method, see #BorderTypes. #BORDER_WRAP is not suported.
@param borderValue border value in case of a constant border参数详解:
- 第一个参数,InputArray类型的src,输入图像,即源图像,填Mat类的对象即可。图像通道的数量可以是任意的,但图像深度应为CV_8U,CV_16U,CV_16S,CV_32F或 CV_64F其中之一。
- 第二个参数,OutputArray类型的dst,即目标图像,需要和源图片有一样的尺寸和类型。
- 第三个参数,InputArray类型的kernel,膨胀操作的核。若为NULL时,表示的是使用参考点位于中心3x3的核。
我们一般使用函数 getStructuringElement配合这个参数的使用。getStructuringElement函数会返回指定形状和尺寸的结构元素(内核矩阵)。
其中,getStructuringElement函数的第一个参数表示内核的形状,我们可以选择如下三种形状之一:
- 矩形: MORPH_RECT
- 交叉形: MORPH_CROSS
- 椭圆形: MORPH_ELLIPSE
而getStructuringElement函数的第二和第三个参数分别是内核的尺寸以及锚点的位置。
我们一般在调用erode以及dilate函数之前,先定义一个Mat类型的变量来获得getStructuringElement函数的返回值。对于锚点的位置,有默认值Point(-1,-1),表示锚点位于中心。且需要注意,十字形的element形状唯一依赖于锚点的位置。而在其他情况下,锚点只是影响了形态学运算结果的偏移。
getStructuringElement函数相关的调用示例代码如下:
 int g_nStructElementSize = 3; //结构元素(内核矩阵)的尺寸//获取自定义核
Mat element = getStructuringElement(MORPH_RECT,Size(2*g_nStructElementSize+1,2*g_nStructElementSize+1),Point( g_nStructElementSize, g_nStructElementSize ));
调用这样之后,我们便可以在接下来调用erode或dilate函数时,第三个参数填保存了getStructuringElement返回值的Mat类型变量。对应于我们上面的示例,就是填element变量。
- 第四个参数,Point类型的anchor,锚的位置,其有默认值(-1,-1),表示锚位于中心。
- 第五个参数,int类型的iterations,迭代使用erode()函数的次数,默认值为1。
- 第六个参数,int类型的borderType,用于推断图像外部像素的某种边界模式。注意它有默认值BORDER_DEFAULT。
- 第七个参数,const Scalar&类型的borderValue,当边界为常数时的边界值,有默认值morphologyDefaultBorderValue(),一般我们不用去管他。需要用到它时,可以看官方文档中的createMorphologyFilter()函数得到更详细的解释。
使用erode函数,一般我们只需要填前面的三个参数,后面的四个参数都有默认值。而且往往结合getStructuringElement一起使用。
调用范例:
//载入原图 Mat image = imread("1.jpg");//获取自定义核Mat element = getStructuringElement(MORPH_RECT, Size(15, 15));Mat out;//进行膨胀操作dilate(image, out, element);//-----------------------------------【头文件包含部分】---------------------------------------
// 描述:包含程序所依赖的头文件
//----------------------------------------------------------------------------------------------
#include <opencv2/core/core.hpp>
#include<opencv2/highgui/highgui.hpp>
#include<opencv2/imgproc/imgproc.hpp>
#include <iostream>//-----------------------------------【命名空间声明部分】---------------------------------------
// 描述:包含程序所使用的命名空间
//-----------------------------------------------------------------------------------------------
using namespace std;
using namespace cv;//-----------------------------------【main( )函数】--------------------------------------------
// 描述:控制台应用程序的入口函数,我们的程序从这里开始
//-----------------------------------------------------------------------------------------------
int main()
{//载入原图 Mat image = imread("5.jpg");//显示原图imshow("【原图】膨胀操作", image);//获取自定义核Mat element1 = getStructuringElement(MORPH_RECT, Size(7, 7));Mat element2 = getStructuringElement(MORPH_RECT, Size(15, 15));Mat out1;Mat out2;//进行膨胀操作dilate(image, out1, element1);dilate(image, out2, element2);//显示效果图imshow("【效果图】膨胀操作(ksize=5)", out1);imshow("【效果图】膨胀操作(ksize=15)", out2);waitKey(0);return 0;
} 

可以看到白色的像素点(像素值高的像素点)越来越多,黑色的部分(像素值低的像素点)越来越少。
形态学腐蚀——erode函数
C++: void erode(InputArray src,OutputArray dst,InputArray kernel,Point anchor=Point(-1,-1),int iterations=1,int borderType=BORDER_CONSTANT,const Scalar& borderValue=morphologyDefaultBorderValue());/** @brief Erodes an image by using a specific structuring element.
The function erodes the source image using the specified structuring element that determines the
shape of a pixel neighborhood over which the minimum is taken:
The function supports the in-place mode. Erosion can be applied several ( iterations ) times. In
case of multi-channel images, each channel is processed independently.@param src input image; the number of channels can be arbitrary, but the depth should be one of
CV_8U, CV_16U, CV_16S, CV_32F or CV_64F.
@param dst output image of the same size and type as src.
@param kernel structuring element used for erosion; if `element=Mat()`, a `3 x 3` rectangular
structuring element is used. Kernel can be created using #getStructuringElement.
@param anchor position of the anchor within the element; default value (-1, -1) means that the
anchor is at the element center.
@param iterations number of times erosion is applied.
@param borderType pixel extrapolation method, see #BorderTypes. #BORDER_WRAP is not supported.
@param borderValue border value in case of a constant border参数详解:
- 第一个参数,InputArray类型的src,输入图像,即源图像,填Mat类的对象即可。图像通道的数量可以是任意的,但图像深度应为CV_8U,CV_16U,CV_16S,CV_32F或 CV_64F其中之一。
- 第二个参数,OutputArray类型的dst,即目标图像,需要和源图片有一样的尺寸和类型。
- 第三个参数,InputArray类型的kernel,腐蚀操作的内核。若为NULL时,表示的是使用参考点位于中心3x3的核。我们一般使用函数 getStructuringElement配合这个参数的使用。getStructuringElement函数会返回指定形状和尺寸的结构元素(内核矩阵)。
- 第四个参数,Point类型的anchor,锚的位置,其有默认值(-1,-1),表示锚位于单位(element)的中心,我们一般不用管它。
- 第五个参数,int类型的iterations,迭代使用erode()函数的次数,默认值为1。
- 第六个参数,int类型的borderType,用于推断图像外部像素的某种边界模式。注意它有默认值BORDER_DEFAULT。
- 第七个参数,const Scalar&类型的borderValue,当边界为常数时的边界值,有默认值morphologyDefaultBorderValue(),一般我们不用去管他。需要用到它时,可以看官方文档中的createMorphologyFilter()函数得到更详细的解释。
同样的,使用erode函数,一般我们只需要填前面的三个参数,后面的四个参数都有默认值。而且往往结合getStructuringElement一起使用。
//载入原图 Mat image = imread("1.jpg");//获取自定义核Mat element = getStructuringElement(MORPH_RECT, Size(15, 15));Mat out;//进行腐蚀操作erode(image,out, element);//-----------------------------------【头文件包含部分】---------------------------------------
// 描述:包含程序所依赖的头文件
//----------------------------------------------------------------------------------------------
#include <opencv2/core/core.hpp>
#include<opencv2/highgui/highgui.hpp>
#include<opencv2/imgproc/imgproc.hpp>
#include <iostream>//-----------------------------------【命名空间声明部分】---------------------------------------
// 描述:包含程序所使用的命名空间
//-----------------------------------------------------------------------------------------------
using namespace std;
using namespace cv;//-----------------------------------【main( )函数】--------------------------------------------
// 描述:控制台应用程序的入口函数,我们的程序从这里开始
//-----------------------------------------------------------------------------------------------
int main( )
{//载入原图 Matimage = imread("1.jpg");//创建窗口 namedWindow("【原图】腐蚀操作");namedWindow("【效果图】腐蚀操作");//显示原图imshow("【原图】腐蚀操作", image);//获取自定义核Mat element = getStructuringElement(MORPH_RECT, Size(15, 15));Mat out;//进行腐蚀操作erode(image,out, element);//显示效果图imshow("【效果图】腐蚀操作", out);waitKey(0);return 0;
} 

与膨胀相反,可以看到白色的像素点(像素值高的像素点)越来越少,黑色的部分(像素值低的像素点)越来越多。
腐蚀膨胀辅助函数getStructuringElement
函数原型:
CV_EXPORTS_W Mat getStructuringElement(int shape, Size ksize, Point anchor = Point(-1,-1));Returns a structuring element of the specified size and shape for morphological operations.返回指定形状和尺寸的结构元素。The function constructs and returns the structuring element that can be further passed to #erode, #dilate or #morphologyEx. But you can also construct an arbitrary binary mask yourself and use it as the structuring element.@param shape Element shape that could be one of #MorphShapes @param ksize Size of the structuring element. @param anchor Anchor position within the element. The default value means that the anchor is at the center. Note that only the shape of a cross-shaped element depends on the anchor position. In other cases the anchor just regulates how much the result of the morphological operation is shifted.第一个参数shape 表示内核的形状,有三种形状可以选择。
- 矩形:MORPH_RECT;
- 交叉形:MORPH_CROSS;
- 椭圆形:MORPH_ELLIPSE;
第二个参数ksize 是内核的尺寸
第三个参数anchor 是锚点的位置,默认值为
比如:
element = cv2.getStructuringElement(cv2.MORPH_CROSS,(5,5))
将会生成:
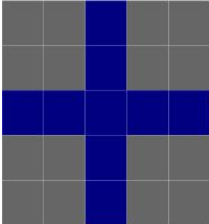
实际上这里是一个5 * 5的矩阵:
>>> import cv2
>>> element = cv2.getStructuringElement(cv2.MORPH_CROSS,(5,5))
>>> element
array([[0, 0, 1, 0, 0],
[0, 0, 1, 0, 0],
[1, 1, 1, 1, 1],
[0, 0, 1, 0, 0],
[0, 0, 1, 0, 0]], dtype=uint8)
参考文章:
形态学图像处理(一):膨胀与腐蚀