AE+ArcGIS二次开发课程设计(基于C#)
- 1.工作内容
- 2.程序功能介绍
- 3.功能模块介绍
- 3.1 实现【创建TIN】说明
- 3.1.1 功能说明
- 3.1.2 代码实现(包含了所有主要的代码,库引用自行导入)
- 3.2 实现【TIN坡度坡向分析】说明
- 3.2.1 功能说明
- 3.2.2 代码实现
- 3.3 实现【自然邻域插值+分级渲染分析】说明
- 3.3.1 功能说明
- 3.3.2 代码实现
1.工作内容
本系统开发需要进行系统环境的配置,在进行工作前安装好VS2010+ArcGIS Engine10.2,能够进行二次开发的环境。其次对给定数据进行研究分析,并查阅相关的资料,决定出自己想要实现的功能,在此基础上进行程序设计,构建整体实现思路,然后进行编程实现,利用**C#**语言和相关的引用完成功能,再进行相应的调试测试,对代码进行优化,反复测试增加程序的稳健性,然后完成功能与功能的使用说明。
2.程序功能介绍
本系统主要实现创建TIN、TIN坡向坡度分析、自然邻域插值分析三个功能模块,均使用C#语言进行实现,未连接其他数据库。
创建TIN:可以实现通过栅格或者矢量图层创建出相应的TIN模型,能够实现其他格式数据创建三角网的功能。
TIN坡度坡向分析:主要通过对TIN数据处理得到坡度坡向的栅格文件,并在MapControl中进行显示并保存到相应位置。能够实现对三角网数据的坡度坡向分析。
自然邻域插值分析:对点的Z值字段进行自然邻域插值分析,并对输出的栅格进行分级渲染显示。
3.功能模块介绍
3.1 实现【创建TIN】说明
3.1.1 功能说明
输入:本模块输入为窗体中利用选择控件选择相应的输入图层,点击后会显示文件路径选择窗口。
输入和输出路径未设置好或者未按要求输入会进行相应的报错(理论上,可能程序还有漏洞),请按照提示错误和操作说明进行。
请根据相应的数据选择矢量或者栅格两个选项,目前矢量图层的选择仅支持shp格式文件,栅格图层的选择仅支持img、tif、png格式。输出格式已经进行了限定,选择相应的文件存储路径即可。
输出:点击转换并显示即可将转换后的图层显示到窗口中,并且将转换后的文件存储到相应的输出位置。样式如下:


3.1.2 代码实现(包含了所有主要的代码,库引用自行导入)
creatTIN.cs
namespace CH_GISCurriculumDesign
{public partial class CreateTIN : Form{private IHookHelper m_hookhelper = null;public CreateTIN(object hook){InitializeComponent();if (m_hookhelper == null){m_hookhelper = new HookHelperClass();}m_hookhelper.Hook = hook;}public AxMapControl axMapControl1 { get; set; }private IFeatureLayer pFeatureLayer;private IFeatureClass pFeatureClass;//获取并加载矢量数据集private void btn_InputPath_Click(object sender, EventArgs e){OpenFileDialog openFileDialog = new OpenFileDialog();openFileDialog.Title = "打开Shp点图层文件";openFileDialog.Filter = "Shape文件(*.shp)|*.shp";openFileDialog.ShowDialog();txt_InputPath.Text = openFileDialog.FileName;string path;string filname;if (txt_InputPath.Text == "") {return;}FileInfo fileinfo = new FileInfo(txt_InputPath.Text);path = fileinfo.DirectoryName;filname = System.IO.Path.GetFileName(txt_InputPath.Text);try{IWorkspaceFactory pWSF = new ShapefileWorkspaceFactory();IWorkspace pWS = pWSF.OpenFromFile(path, 0);IFeatureWorkspace pFWS = pWS as IFeatureWorkspace;pFeatureClass = pFWS.OpenFeatureClass(filname);pFeatureLayer = new FeatureLayerClass();pFeatureLayer.FeatureClass = pFeatureClass;pFeatureLayer.Name = pFeatureClass.AliasName;ILayer layer = pFeatureLayer as ILayer;//axSceneControl.Scene.AddLayer(layer, false);//IMap pMap = axMapControl1.Map;//pMap.AddLayer(layer);//axMapControl1.ActiveView.Refresh();m_hookhelper.FocusMap.AddLayer(layer as ILayer);}catch{MessageBox.Show("图层显示出现错误,请查看使用说明!");}}//保存文件private void btn_OutputPath_Click(object sender, EventArgs e){SaveFileDialog saveTIN = new SaveFileDialog();saveTIN.Title = "选择TIN文件保存路径";saveTIN.Filter = "TIN(*.tin)|*.tin|All files (*.*)|*.*";saveTIN.RestoreDirectory = true;if (saveTIN.ShowDialog() == DialogResult.OK){txt_OutputPath.Text = saveTIN.FileName;}}//矢量数据转换并显示private void btn_FeatureTransferAndShow_Click(object sender, EventArgs e){try{string path = txt_OutputPath.Text.ToString();if (path == "" || path == null){MessageBox.Show("结果保存路径不能为空!!", "CH为你温馨提示", MessageBoxButtons.OKCancel, MessageBoxIcon.Exclamation);return;}CreateTinFromFeature(pFeatureClass, path);this.Close();}catch {MessageBox.Show("创建失败!", "CH为你温馨提示", MessageBoxButtons.OKCancel, MessageBoxIcon.Exclamation);}}//矢量数据创建TINprivate void CreateTinFromFeature(IFeatureClass featureclass, string savepath){IGeoDataset pGeodataset = featureclass as IGeoDataset;IEnvelope extent = pGeodataset.Extent;extent.SpatialReference = pGeodataset.SpatialReference;IFields fields = featureclass.Fields;int heightfieldnuber = fields.FindField("高程");IField heightfield = fields.get_Field(heightfieldnuber);ITinEdit tinedit = new TinClass();tinedit.InitNew(extent);try{tinedit.AddFromFeatureClass(featureclass, null, heightfield, null, esriTinSurfaceType.esriTinMassPoint);}catch{MessageBox.Show("创建TIN失败", "CH为你温馨提示", MessageBoxButtons.OKCancel, MessageBoxIcon.Exclamation);}tinedit.SaveAs(savepath);tinedit.StopEditing(false);AddTinData(savepath);}//添加并显示private void AddTinData(string path){IWorkspaceFactory pWSF = new TinWorkspaceFactory();ITinWorkspace TinWS;ITin tin;FileInfo fileinfo = new FileInfo(path);if (pWSF.IsWorkspace(fileinfo.DirectoryName)){TinWS = pWSF.OpenFromFile(fileinfo.DirectoryName, 0) as ITinWorkspace;tin = TinWS.OpenTin(fileinfo.Name);ITinLayer tinlayer = new TinLayerClass();tinlayer.Dataset = tin;tinlayer.Name = fileinfo.Name;      //给图层添上名字ILayer layer = tinlayer as ILayer;//axSceneControl.Scene.AddLayer(layer, true);//axSceneControl.SceneGraph.RefreshViewers();m_hookhelper.FocusMap.AddLayer(layer as ILayer);}}private void btn_Close_Click(object sender, EventArgs e){this.Close();}private void button1_Click(object sender, EventArgs e){this.Close();}private void btn_RasterInputPath_Click(object sender, EventArgs e){try{OpenFileDialog openFileDialog = new OpenFileDialog();openFileDialog.Title = "打开栅格文件";openFileDialog.Filter = "IMG(*.img)|*.img|.tif文件(*.tif)|*.tif|PNG(*.png)|*.png";openFileDialog.ShowDialog();txt_RasterInputPath.Text = openFileDialog.FileName;ILayer layer = GetDEMLayer(txt_RasterInputPath.Text);m_hookhelper.FocusMap.AddLayer(layer as ILayer);}catch{MessageBox.Show("请先选择有效的输入文件!", "CH为你温馨提示", MessageBoxButtons.OKCancel, MessageBoxIcon.Exclamation);return;}}private ILayer GetDEMLayer(string path){ILayer layer;IRasterLayer rasterLayer = null;IWorkspaceFactory rasterWorkspaceFactory = new RasterWorkspaceFactoryClass();IRasterWorkspace rasterWorkspace;FileInfo file = new FileInfo(path);if (rasterWorkspaceFactory.IsWorkspace(file.DirectoryName)){rasterWorkspace = rasterWorkspaceFactory.OpenFromFile(file.DirectoryName, 0) as IRasterWorkspace;IRasterDataset rasterDataset = rasterWorkspace.OpenRasterDataset(file.Name);rasterLayer = new RasterLayerClass();rasterLayer.CreateFromDataset(rasterDataset);}layer = rasterLayer as ILayer;return layer;}//由栅格数据创建TINpublic void CreateTinFromRaster(IRaster raster, string savepath){double m_zTolerance = 0.001;IGeoDataset pGeoData = raster as IGeoDataset;IEnvelope pExtent = pGeoData.Extent;IRasterBandCollection pRasBC = raster as IRasterBandCollection;IRasterBand pRasBand = pRasBC.Item(0);IRawPixels pRawPixels = pRasBand as IRawPixels;IRasterProps pProps = pRawPixels as IRasterProps;int iWid = pProps.Width;int iHei = pProps.Height;double w = iWid / 1000.0f;double h = iHei / 1000.0f;IPnt pBlockSize = new DblPntClass();bool IterationFlag;if (w < 1 && h < 1) //横纵都小于1000个像素{pBlockSize.X = iWid;pBlockSize.Y = iHei;IterationFlag = false;}else{pBlockSize.X = 1001.0f;pBlockSize.Y = 1001.0f;IterationFlag = true;}double cellsize = 0.0f;     //栅格大小IPnt pPnt1 = pProps.MeanCellSize(); //栅格平均大小cellsize = pPnt1.X;ITinEdit pTinEdit = new TinClass() as ITinEdit;pTinEdit.InitNew(pExtent);ISpatialReference pSpatial = pGeoData.SpatialReference;pExtent.SpatialReference = pSpatial;IPnt pOrigin = new DblPntClass();IPnt pPixelBlockOrigin = new DblPntClass();//栅格左上角像素中心坐标double bX = pBlockSize.X;double bY = pBlockSize.Y;pBlockSize.SetCoords(bX, bY);IPixelBlock pPixelBlock = pRawPixels.CreatePixelBlock(pBlockSize);object nodata = pProps.NoDataValue;     //无值标记ITinAdvanced2 pTinNodeCount = pTinEdit as ITinAdvanced2;int nodeCount = pTinNodeCount.NodeCount;object vtMissing = Type.Missing;object vPixels = null;      //格子if (IterationFlag)   //当为一个处理单元格子时{pPixelBlockOrigin.SetCoords(0.0f, 0.0f);pRawPixels.Read(pPixelBlockOrigin, pPixelBlock);vPixels = pPixelBlock.get_SafeArray(0);double xMin = pExtent.XMin;double yMax = pExtent.YMax;pOrigin.X = xMin + cellsize / 2;pOrigin.Y = yMax - cellsize / 2;bX = pOrigin.X;bY = pOrigin.Y;pTinEdit.AddFromPixelBlock(bX, bY, cellsize, cellsize, nodata, vPixels, m_zTolerance, ref vtMissing, out vtMissing);}else  //当有多个处理单元格时,依次循环处理每个单元格{int i = 0, j = 0, count = 0;int FirstGoNodeCount = 0;while (nodeCount != FirstGoNodeCount){count++;nodeCount = pTinNodeCount.NodeCount;//依次循环处理for (i = 0; i < h + 1; i++){for (j = 0; j < w + 1; j++){double bX1, bY1, xMin1, yMax1;bX1 = pBlockSize.X;bY1 = pBlockSize.Y;pPixelBlockOrigin.SetCoords(j * bX1, i * bY1);pRawPixels.Read(pPixelBlockOrigin, pPixelBlock);vPixels = pPixelBlock.get_SafeArray(0);xMin1 = pExtent.XMin;yMax1 = pExtent.YMax;bX1 = pBlockSize.X;bY1 = pBlockSize.Y;pOrigin.X = xMin1 + j * bX1 * cellsize + cellsize / 2.0f;pOrigin.Y = yMax1 + i * bY1 * cellsize - cellsize / 2.0f;bX1 = pOrigin.X;bY1 = pOrigin.Y;pTinEdit.AddFromPixelBlock(bX1, bY1, cellsize, cellsize, nodata, vPixels, m_zTolerance, ref vtMissing, out vtMissing);FirstGoNodeCount = pTinNodeCount.NodeCount;}}}}//保存TIN文件pTinEdit.SaveAs(savepath);pTinEdit.StopEditing(true);MessageBox.Show("转换完成","CH为你温馨提示", MessageBoxButtons.OKCancel, MessageBoxIcon.Exclamation);AddTinData(savepath);}//转换并显示private void btn_RasterTransferAndShow_Click(object sender, EventArgs e){string path = txt_RasterOutputPath.Text.ToString();if (path == "" || path == null){MessageBox.Show("结果保存路径不能为空!!", "CH为你温馨提示", MessageBoxButtons.OKCancel, MessageBoxIcon.Exclamation);return;}IRasterLayer pRasterLayer = new RasterLayerClass();pRasterLayer.CreateFromFilePath(txt_RasterInputPath.Text);IRaster raster = null;raster = pRasterLayer.Raster;CreateTinFromRaster(raster, path);this.Close();}private void btn_RasterOutputPath_Click(object sender, EventArgs e){SaveFileDialog saveTIN = new SaveFileDialog();saveTIN.Title = "选择TIN文件保存路径";saveTIN.Filter = "TIN(*.tin)|*.tin|All files (*.*)|*.*";saveTIN.RestoreDirectory = true;if (saveTIN.ShowDialog() == DialogResult.OK){txt_RasterOutputPath.Text = saveTIN.FileName;}}}
}
mainform.cs
private void creatTINToolStripMenuItem_Click(object sender, EventArgs e){CreateTIN tin = new CreateTIN(m_mapControl.Object);//tin.axSceneControl = axSceneControl;tin.Show();}
3.2 实现【TIN坡度坡向分析】说明
3.2.1 功能说明
输入:本模块输入的数据为上一个模块生成的TIN数据,因为已知的数据并没有TIN数据,我们需要在第一个模块生成的基础上进行坡度坡向分析的操作。需要注意的是,选择图层会先直接获取第一个图层,如果先创建TIN,不打开其他图层,就不用再进行选择了。
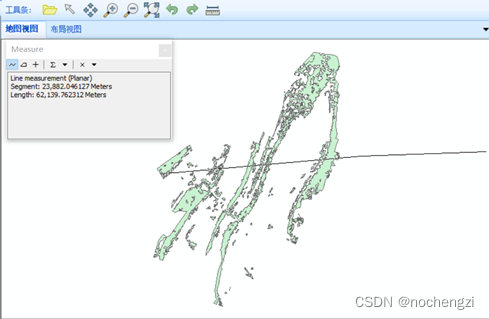
输出:选择保存路径,点击按钮弹出选择保存路径窗口,选择相应位置后点击坡度分析/坡向分析,即可在程序上显示生成的栅格图层,并保存到相应的路径。样式如下:


3.2.2 代码实现
SlopeAndAspect .cs
namespace CH_GISCurriculumDesign
{public partial class SlopeAndAspect : Form{private IHookHelper m_hookhelper = null;private IMap pMap;public AxMapControl axMapControl1 { get; set; }public SlopeAndAspect(object hook){InitializeComponent();if (m_hookhelper == null){m_hookhelper = new HookHelperClass();}m_hookhelper.Hook = hook;}private void SlopeAndAspect_Load(object sender, EventArgs e){try{cbx_layer.Items.Clear();pMap = m_hookhelper.FocusMap;if (pMap == null)return;for (int i = 0; i < pMap.LayerCount; i++){cbx_layer.Items.Add(pMap.Layer[i].Name);}cbx_layer.SelectedIndex = 0;}catch (Exception){MessageBox.Show("请先创建TIN!", "CH为你温馨提示", MessageBoxButtons.OKCancel, MessageBoxIcon.Exclamation);this.Close();}}private void btn_SlopeAnalysis_Click(object sender, EventArgs e){try{ILayer layer = GetLayerByName(pMap,cbx_layer.Text);string filepath = getLayerPath(layer);if (filepath == null || txt_Output.Text == null){return;}string outputPath = txt_Output.Text;ExecuteSlope(filepath, outputPath);ShowResult(outputPath);MessageBox.Show("生成成功!", "CH为你温馨提示", MessageBoxButtons.OKCancel, MessageBoxIcon.Exclamation);}catch (Exception){MessageBox.Show("ohno!生成失败了!", "CH为你温馨提示", MessageBoxButtons.OKCancel, MessageBoxIcon.Exclamation);}}private string getLayerPath(ILayer layer){IDatasetName pDatasetName = (layer as IDataLayer2).DataSourceName as IDatasetName;IWorkspaceName pWorkspaceName = pDatasetName.WorkspaceName;return pWorkspaceName.PathName + "\\" + layer.Name;}private ILayer GetLayerByName(IMap pMap, string layerName){ILayer layer = null;ILayer tempLayer = null;for (int i = 0; i < pMap.LayerCount; i++){tempLayer = pMap.Layer[i];if (tempLayer.Name.ToUpper() == layerName.ToUpper()){layer = tempLayer;break;}}return layer;}private void ExecuteSlope(string input, string output){Geoprocessor gp = new Geoprocessor();gp.OverwriteOutput = true;ESRI.ArcGIS.Analyst3DTools.SurfaceSlope Slope = new ESRI.ArcGIS.Analyst3DTools.SurfaceSlope(input, output);IGeoProcessorResult result = gp.Execute(Slope, null) as IGeoProcessorResult;if (result.Status != esriJobStatus.esriJobSucceeded){MessageBox.Show("Failed to Aspect layer","CH为你温馨提示", MessageBoxButtons.OKCancel, MessageBoxIcon.Exclamation);}}//显示结果private void ShowResult(string filepath){FileInfo fileinfo = new FileInfo(filepath);string path = fileinfo.DirectoryName;string filename = System.IO.Path.GetFileName(filepath);IWorkspaceFactory pWSF = new ESRI.ArcGIS.DataSourcesFile.ShapefileWorkspaceFactoryClass();IWorkspace pWS = pWSF.OpenFromFile(path, 0);IFeatureWorkspace pFWS = pWS as IFeatureWorkspace;IFeatureClass pFC = pFWS.OpenFeatureClass(filename);IFeatureLayer pFLayer = new FeatureLayerClass();pFLayer.FeatureClass = pFC;pFLayer.Name = pFC.AliasName;ILayer pLayer = pFLayer as ILayer;m_hookhelper.FocusMap.AddLayer(pLayer as ILayer);}private void btn_Save_Click(object sender, EventArgs e){SaveFileDialog saveDlg = new SaveFileDialog();saveDlg.CheckPathExists = true;saveDlg.Filter = "Shapefile (*.shp)|*.shp";saveDlg.OverwritePrompt = true;saveDlg.Title = "Output Layer";saveDlg.RestoreDirectory = true;DialogResult dr = saveDlg.ShowDialog();if (dr == DialogResult.OK){txt_Output.Text = saveDlg.FileName;}}private void btn_AspectAnalysis_Click(object sender, EventArgs e){try{ILayer layer = GetLayerByName(pMap, cbx_layer.Text);string filepath = getLayerPath(layer);if (filepath == null || txt_Output.Text == null){return;}string outputPath = txt_Output.Text;ExecuteAspect(filepath, outputPath);ShowResult(outputPath);MessageBox.Show("生成成功!","CH为你温馨提示", MessageBoxButtons.OKCancel, MessageBoxIcon.Exclamation);}catch (Exception ex){MessageBox.Show(ex.Message);}}//坡向分析private void ExecuteAspect(string input, string output){Geoprocessor gp = new Geoprocessor();gp.OverwriteOutput = true;ESRI.ArcGIS.Analyst3DTools.SurfaceAspect Aspect = new ESRI.ArcGIS.Analyst3DTools.SurfaceAspect(input, output);IGeoProcessorResult result = gp.Execute(Aspect, null) as IGeoProcessorResult;if (result.Status != esriJobStatus.esriJobSucceeded){MessageBox.Show("Failed to Aspect layer","CH为你温馨提示", MessageBoxButtons.OKCancel, MessageBoxIcon.Exclamation);}}private void btn_Close_Click(object sender, EventArgs e){this.Close();}}
}
mianform.cs
private void tIN坡度坡向分析ToolStripMenuItem_Click(object sender, EventArgs e){SlopeAndAspect frmSlopeAndAspect = new SlopeAndAspect(m_mapControl.Object);frmSlopeAndAspect.Show();}
3.3 实现【自然邻域插值+分级渲染分析】说明
3.3.1 功能说明
输入:本模块主要是实现一个对点数据的差值分析并对输出的栅格结果进行分级渲染的一个功能。输入的一个点的栅格图层,在已知的数据中主要是samples.shp,因为它包含的属性较多,也有足够多的采样点。
输入说明:本模块主要是对点数据的自然领域插值分析,打开.mxd文件后,图层只能选择samples,但Z值字段可以进行较多的选择,如各种元素或者高程。如果选择图层错误,在选择Z值字段后便会进行错误提示,此时进行更改即可。输出栅格越小处理的数据就越多,运行速度就会变慢。
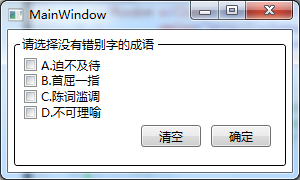
输出:输出路径选择完毕后点击确认按钮,便会生成相应的shp文件到指定路径,并且会显示在系统中。样式如下:


3.3.2 代码实现
FrmSpatialInterpolation.cs`
namespace CH_GISCurriculumDesign
{public partial class FrmSpatialInterpolation : Form{private IHookHelper m_hookhelper = null;public AxMapControl axMapControl { get; set; }private IMap pMap = null;IFeatureClass featureClass;private IRasterAnalysisEnvironment envi;    //创建栅格分析环境对象private IInterpolationOp2 interpolation;    //创建空间插值对象private IGeoDataset inputDataset;   //输入数据集private IGeoDataset outputDataset;   //输出数据集private double cellSize = 500;  //像元的大小private object cellSizeObj;private object Missing = Type.Missing;private object processExtent;   //处理范围private IFeatureClassDescriptor featClassDes;   //创建一个要素类描述器对象,用于控制要素类对象public FrmSpatialInterpolation(object hook){InitializeComponent();if (m_hookhelper == null){m_hookhelper = new HookHelperClass();}m_hookhelper.Hook = hook;}//窗体加载private void FrmSpatialInterpolation_Load(object sender, EventArgs e){try{envi = new RasterInterpolationOpClass();    //实例化栅格插值对象cbx_InputDataset.Items.Clear();pMap = m_hookhelper.FocusMap;if (pMap == null)return;for (int i = 0; i < pMap.LayerCount; i++){cbx_InputDataset.Items.Add(pMap.Layer[i].Name);}cbx_InputDataset.SelectedIndex = 0;}catch {MessageBox.Show("请先打开相应的地图文件!", "CH为你温馨提示", MessageBoxButtons.OKCancel, MessageBoxIcon.Exclamation);this.Close();}}//设置输入的要素类private void cbx_InputDataset_SelectedIndexChanged(object sender, EventArgs e){try{ILayer currentLayer = GetLayerByName(pMap, cbx_InputDataset.Text);IFeatureLayer featureLayer = currentLayer as IFeatureLayer;featureClass = featureLayer.FeatureClass;for (int i = 0; i < featureClass.Fields.FieldCount; i++){cbx_ZValue.Items.Add(featureClass.Fields.Field[i].Name);}processExtent = currentLayer;envi.SetExtent(esriRasterEnvSettingEnum.esriRasterEnvValue, processExtent, Missing);    //设置空间处理的范围}catch {MessageBox.Show("请检查输入要素类!", "CH为你温馨提示", MessageBoxButtons.OKCancel, MessageBoxIcon.Exclamation);}}//通过图层名获取图层private ILayer GetLayerByName(IMap pMap, string layerName){ILayer pLayer = null;ILayer tempLayer = null;for (int i = 0; i < pMap.LayerCount; i++){tempLayer = pMap.Layer[i];if (tempLayer.Name.ToUpper() == layerName.ToUpper()){pLayer = tempLayer;break;}}return pLayer;}private void cbx_ZValue_SelectedIndexChanged(object sender, EventArgs e){try{featClassDes = new FeatureClassDescriptorClass();featClassDes.Create(featureClass, null, cbx_ZValue.Text);  //创建一个要素类描述器inputDataset = featClassDes as IGeoDataset;}catch{MessageBox.Show("选择输入的图层有误!请检查!", "CH为你温馨提示", MessageBoxButtons.OKCancel, MessageBoxIcon.Exclamation);return;}}private void button2_Click(object sender, EventArgs e){SaveFileDialog flg = new SaveFileDialog();flg.Title = "保存文件";flg.Filter = "TIFF(.tif)|*.tif";flg.ShowDialog();txt_Output.Text = flg.FileName;}private void btnOK_Click(object sender, EventArgs e){try{//设置输出栅格大小cellSize = Convert.ToDouble(txt_CellSize.Text.Trim());cellSizeObj = cellSize;envi.SetCellSize(esriRasterEnvSettingEnum.esriRasterEnvValue, cellSizeObj);interpolation = envi as IInterpolationOp2;outputDataset = interpolation.NaturalNeighbor(inputDataset);SaveAndShowRasterDataset(txt_Output.Text);MessageBox.Show("执行成功!", "CH为你温馨提示", MessageBoxButtons.OKCancel, MessageBoxIcon.Exclamation);this.Close();}catch {MessageBox.Show("分析失败!请查看功能说明!", "CH为你温馨提示", MessageBoxButtons.OKCancel, MessageBoxIcon.Exclamation);}}//保存并显示栅格数据集private void SaveAndShowRasterDataset(string filePath){string directoryPath = System.IO.Path.GetDirectoryName(filePath);string fileName = System.IO.Path.GetFileName(filePath);IWorkspaceFactory wf = new RasterWorkspaceFactoryClass();IWorkspace ws = wf.OpenFromFile(directoryPath, 0) as IWorkspace;IConversionOp converop = new RasterConversionOpClass();converop.ToRasterDataset(outputDataset, "TIFF", ws, fileName);IRasterLayer rlayer = new RasterLayerClass();IRaster raster = new Raster();raster = outputDataset as IRaster;rlayer.CreateFromRaster(raster);       //使用raster对象创建一个rasterLayer对象rlayer.Name = fileName;    //设置图层名字funColorForRaster_Classify(rlayer);m_hookhelper.FocusMap.AddLayer(rlayer as ILayer);}//分10级进行分级渲染,使插值后的图层显示更加直观好看public void funColorForRaster_Classify(IRasterLayer pRasterLayer){IRasterClassifyColorRampRenderer pRClassRend = new RasterClassifyColorRampRenderer() as IRasterClassifyColorRampRenderer;IRasterRenderer pRRend = pRClassRend as IRasterRenderer;IRaster pRaster = pRasterLayer.Raster;IRasterBandCollection pRBandCol = pRaster as IRasterBandCollection;IRasterBand pRBand = pRBandCol.Item(0);if (pRBand.Histogram == null){pRBand.ComputeStatsAndHist();}pRRend.Raster = pRaster;pRClassRend.ClassCount = 10;pRRend.Update();IRgbColor pFromColor = new RgbColor() as IRgbColor;pFromColor.Red = 0;pFromColor.Green = 0;pFromColor.Blue = 255;IRgbColor pToColor = new RgbColor() as IRgbColor;pToColor.Red = 255;pToColor.Green = 0;pToColor.Blue = 0;IAlgorithmicColorRamp colorRamp = new AlgorithmicColorRamp() as IAlgorithmicColorRamp;colorRamp.Size = 10;colorRamp.FromColor = pFromColor;colorRamp.ToColor = pToColor;bool createColorRamp;colorRamp.CreateRamp(out createColorRamp);IFillSymbol fillSymbol = new SimpleFillSymbol() as IFillSymbol;for (int i = 0; i < pRClassRend.ClassCount; i++){fillSymbol.Color = colorRamp.get_Color(i);pRClassRend.set_Symbol(i, fillSymbol as ISymbol);pRClassRend.set_Label(i, pRClassRend.get_Break(i).ToString("0.00"));}pRasterLayer.Renderer = pRRend;}private void btnClose_Click(object sender, EventArgs e){this.Close();}}
}
mainform.cs
private void 自然邻域插值分析ToolStripMenuItem_Click(object sender, EventArgs e){FrmSpatialInterpolation frmSpatialInterpolation = new FrmSpatialInterpolation(m_mapControl.Object);frmSpatialInterpolation.Show();}