文章目录
- 一、概述
- 二、开始编排部署
- 1)部署包准备
- 1)构建镜像
- 2)创建livy chart模板
- 3)修改yaml编排
- 4)开始部署
- 5)测试验证
- 6)卸载
一、概述
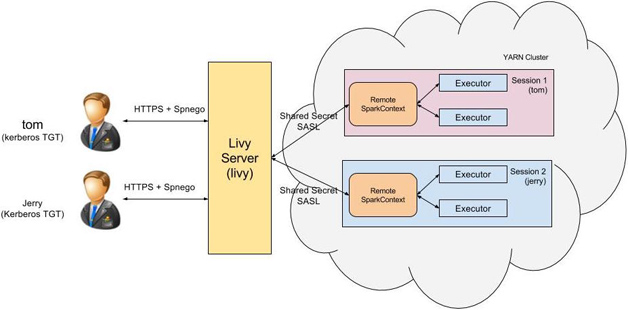
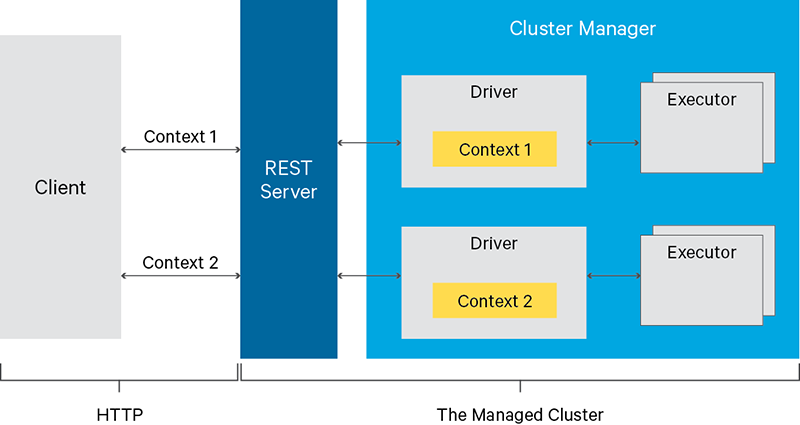
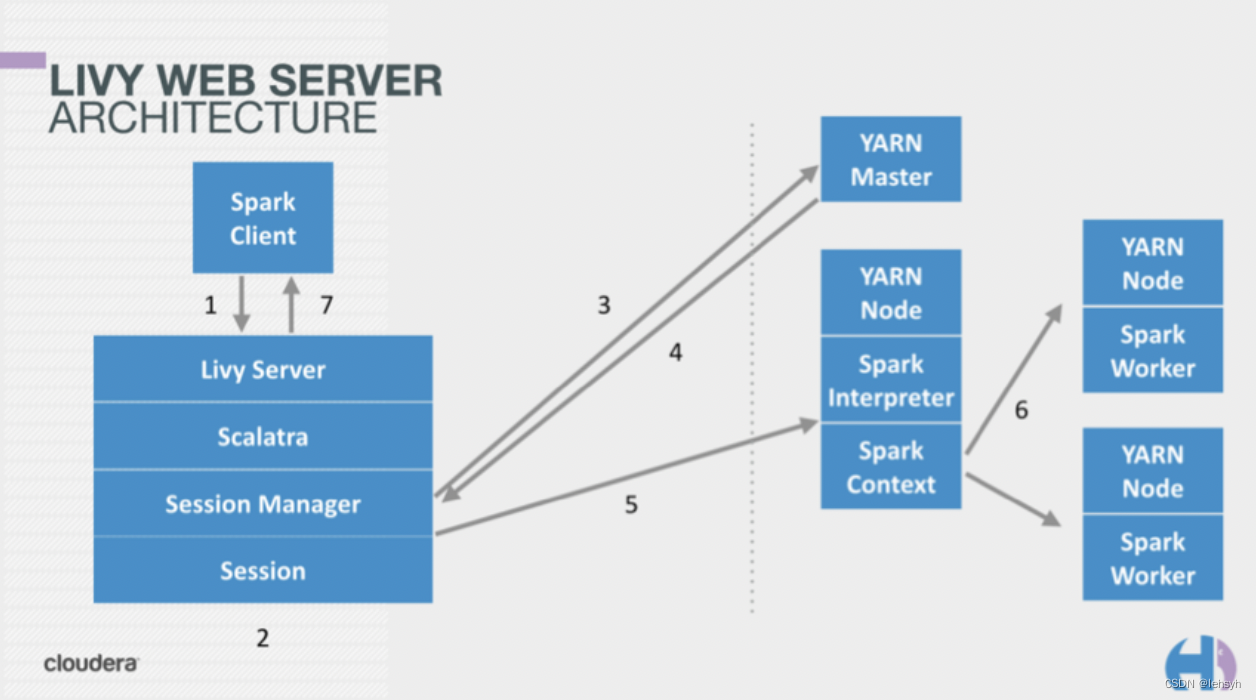
Livy是一个提供Rest接口和spark集群交互的服务。它可以提交Spark Job或者Spark一段代码,同步或者异步的返回结果;也提供Sparkcontext的管理,通过Restful接口或RPC客户端库。Livy也简化了与Spark与应用服务的交互,这允许通过web/mobile与Spark的使用交互。

官网:https://livy.incubator.apache.org/
GitHub地址:https://github.com/apache/incubator-livy
关于Apache Livy更多介绍也可以参考我这篇文章:Spark开源REST服务——Apache Livy(Spark 客户端)
二、开始编排部署
1)部署包准备
这里也提供上面编译好的livy部署包,有需要的小伙伴可以自行下载:
链接:https://pan.baidu.com/s/1pPCbe0lUJ6ji8rvQYsVw9A?pwd=qn7i
提取码:qn7i
1)构建镜像
Dockerfile
FROM myharbor.com/bigdata/centos:7.9.2009RUN rm -f /etc/localtime && ln -sv /usr/share/zoneinfo/Asia/Shanghai /etc/localtime && echo "Asia/Shanghai" > /etc/timezone
RUN export LANG=zh_CN.UTF-8### install tools
RUN yum install -y vim tar wget curl less telnet net-tools lsofRUN groupadd --system --gid=9999 admin && useradd --system -m /home/admin --uid=9999 --gid=admin adminRUN mkdir -p /opt/apacheADD apache-livy-0.8.0-incubating-SNAPSHOT-bin.zip /opt/apache/
ENV LIVY_HOME=/opt/apache/apache-livy
RUN ln -s /opt/apache/apache-livy-0.8.0-incubating-SNAPSHOT-bin $LIVY_HOMEADD hadoop-3.3.2.tar.gz /opt/apache/
ENV HADOOP_HOME=/opt/apache/hadoop
RUN ln -s /opt/apache/hadoop-3.3.2 $HADOOP_HOME
ENV HADOOP_CONFIG_DIR=${HADOOP_HOME}/etc/hadoopADD spark-3.3.0-bin-hadoop3.tar.gz /opt/apache/
ENV SPARK_HOME=/opt/apache/spark
RUN ln -s /opt/apache/spark-3.3.0-bin-hadoop3 $SPARK_HOMEENV PATH=${LIVY_HOME}/bin:${HADOOP_HOME}/bin:${SPARK_HOME}/bin:$PATHRUN chown -R admin:admin /opt/apacheWORKDIR $LIVY_HOMEENTRYPOINT ${LIVY_HOME}/bin/livy-server start;tail -f ${LIVY_HOME}/logs/livy-root-server.out
【注意】hadoop包里的
core-site.xml,hdfs-site.xml,yarn-site.xml
开始构建镜像
docker build -t myharbor.com/bigdata/livy:0.8.0 . --no-cache### 参数解释
# -t:指定镜像名称
# . :当前目录Dockerfile
# -f:指定Dockerfile路径
#  --no-cache:不缓存# 推送到harbor
docker push myharbor.com/bigdata/livy:0.8.0
2)创建livy chart模板
helm create livy
3)修改yaml编排
livy/values.yaml
replicaCount: 1image:repository: myharbor.com/bigdata/livypullPolicy: IfNotPresent# Overrides the image tag whose default is the chart appVersion.tag: "0.8.0"securityContext:runAsUser: 9999runAsGroup: 9999privileged: trueservice:type: NodePortport: 8998nodePort: 31998
livy/templates/configmap.yaml
apiVersion: v1
kind: ConfigMap
metadata:name: {{ include "livy.fullname" . }}labels:{{- include "livy.labels" . | nindent 4 }}
data:livy.conf: |-livy.spark.master = yarnlivy.spark.deploy-mode = clientlivy.environment = productionlivy.impersonation.enabled = truelivy.server.csrf_protection.enabled = falselivy.server.port = {{ .Values.service.port }}livy.server.session.timeout = 3600000livy.server.recovery.mode = recoverylivy.server.recovery.state-store = filesystemlivy.server.recovery.state-store.url = /tmp/livylivy.repl.enable-hive-context = truelivy-env.sh: |-export JAVA_HOME=/opt/apache/jdk1.8.0_212export HADOOP_HOME=/opt/apache/hadoopexport HADOOP_CONF_DIR=/opt/apache/hadoop/etc/hadoopexport SPARK_HOME=/opt/apache/sparkexport SPARK_CONF_DIR=/opt/apache/spark/confexport LIVY_LOG_DIR=/opt/apache/livy/logsexport LIVY_PID_DIR=/opt/apache/livy/pid-direxport LIVY_SERVER_JAVA_OPTS="-Xmx512m"spark-blacklist.conf: |-spark.masterspark.submit.deployMode# Disallow overriding the location of Spark cached jars.spark.yarn.jarspark.yarn.jarsspark.yarn.archive# Don't allow users to override the RSC timeout.livy.rsc.server.idle-timeout
livy/templates/deployment.yaml
apiVersion: apps/v1
kind: Deployment
metadata:name: {{ include "livy.fullname" . }}labels:{{- include "livy.labels" . | nindent 4 }}
spec:{{- if not .Values.autoscaling.enabled }}replicas: {{ .Values.replicaCount }}{{- end }}selector:matchLabels:{{- include "livy.selectorLabels" . | nindent 6 }}template:metadata:{{- with .Values.podAnnotations }}annotations:{{- toYaml . | nindent 8 }}{{- end }}labels:{{- include "livy.selectorLabels" . | nindent 8 }}spec:{{- with .Values.imagePullSecrets }}imagePullSecrets:{{- toYaml . | nindent 8 }}{{- end }}serviceAccountName: {{ include "livy.serviceAccountName" . }}securityContext:{{- toYaml .Values.podSecurityContext | nindent 8 }}containers:- name: {{ .Chart.Name }}securityContext:{{- toYaml .Values.securityContext | nindent 12 }}image: "{{ .Values.image.repository }}:{{ .Values.image.tag | default .Chart.AppVersion }}"imagePullPolicy: {{ .Values.image.pullPolicy }}ports:- name: httpcontainerPort: 8998protocol: TCPlivenessProbe:httpGet:path: /port: httpreadinessProbe:httpGet:path: /port: httpresources:{{- toYaml .Values.resources | nindent 12 }}{{- with .Values.securityContext }}securityContext:runAsUser: {{ .runAsUser }}runAsGroup: {{ .runAsGroup }}privileged: {{ .privileged }}{{- end }}volumeMounts:- name: {{ .Release.Name }}-livy-confmountPath: /opt/apache/livy/conf/livy.confsubPath: livy.conf- name: {{ .Release.Name }}-livy-envmountPath: /opt/apache/livy/conf/livy-env.shsubPath: livy-env.sh- name: {{ .Release.Name }}-spark-blacklist-confmountPath: /opt/apache/livy/conf/spark-blacklist.confsubPath: spark-blacklist.conf{{- with .Values.nodeSelector }}nodeSelector:{{- toYaml . | nindent 8 }}{{- end }}{{- with .Values.affinity }}affinity:{{- toYaml . | nindent 8 }}{{- end }}{{- with .Values.tolerations }}tolerations:{{- toYaml . | nindent 8 }}{{- end }}volumes:- name: {{ .Release.Name }}-livy-confconfigMap:name: {{ include "livy.fullname" . }}- name: {{ .Release.Name }}-livy-envconfigMap:name: {{ include "livy.fullname" . }}- name: {{ .Release.Name }}-spark-blacklist-confconfigMap:name: {{ include "livy.fullname" . }}
4)开始部署
helm install livy ./livy -n livy --create-namespace
NOTES
NOTES:
1. Get the application URL by running these commands:export NODE_PORT=$(kubectl get --namespace livy -o jsonpath="{.spec.ports[0].nodePort}" services livy)export NODE_IP=$(kubectl get nodes --namespace livy -o jsonpath="{.items[0].status.addresses[0].address}")echo http://$NODE_IP:$NODE_PORT

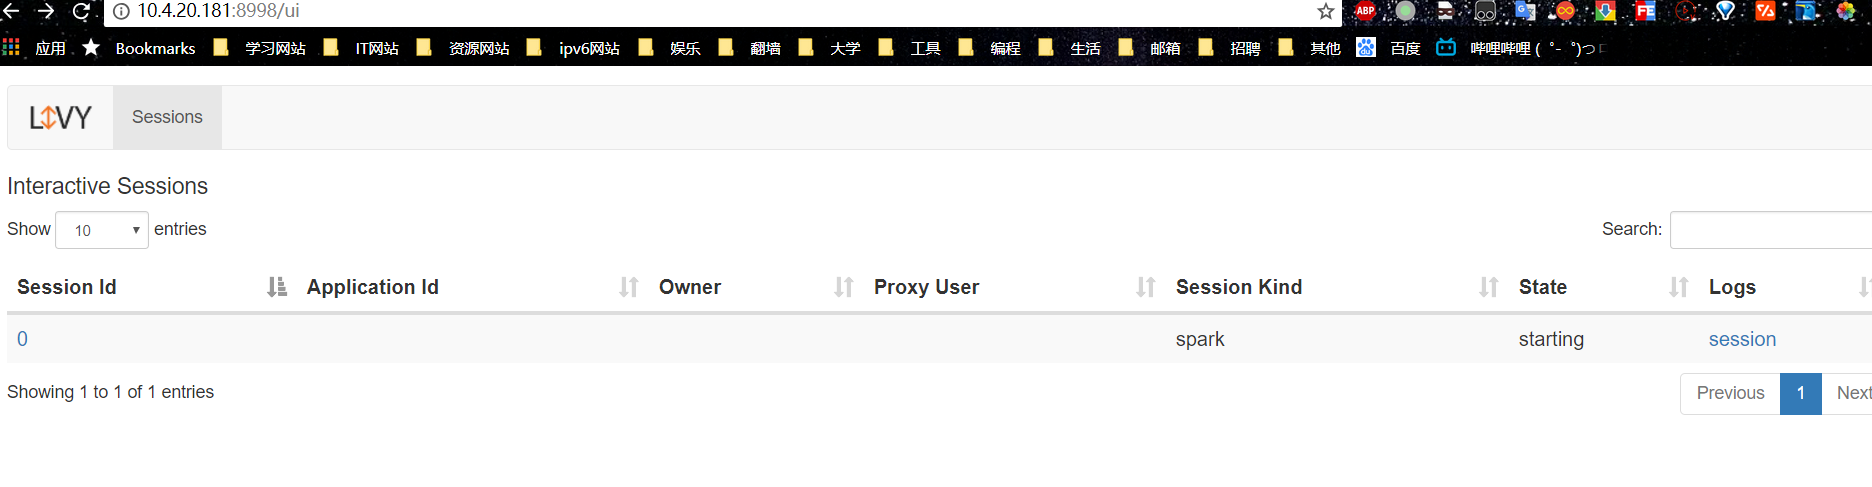
查看
kubectl get pods,svc -n livy -owide

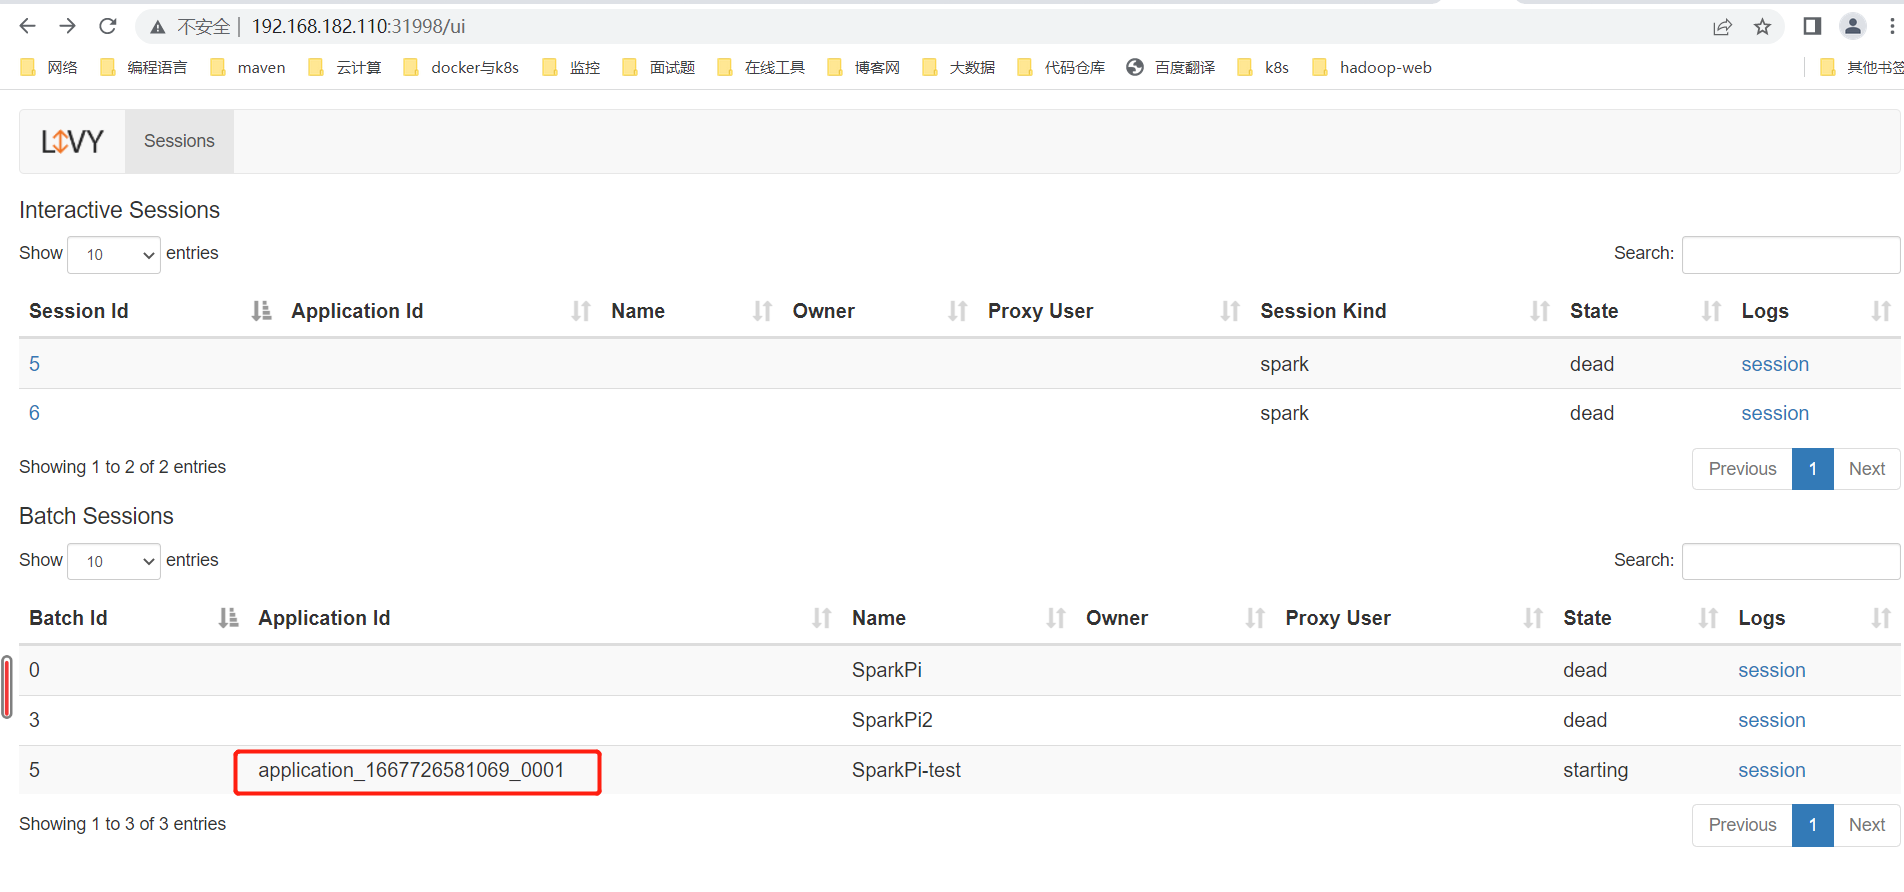
web地址:http://192.168.182.110:31998/ui

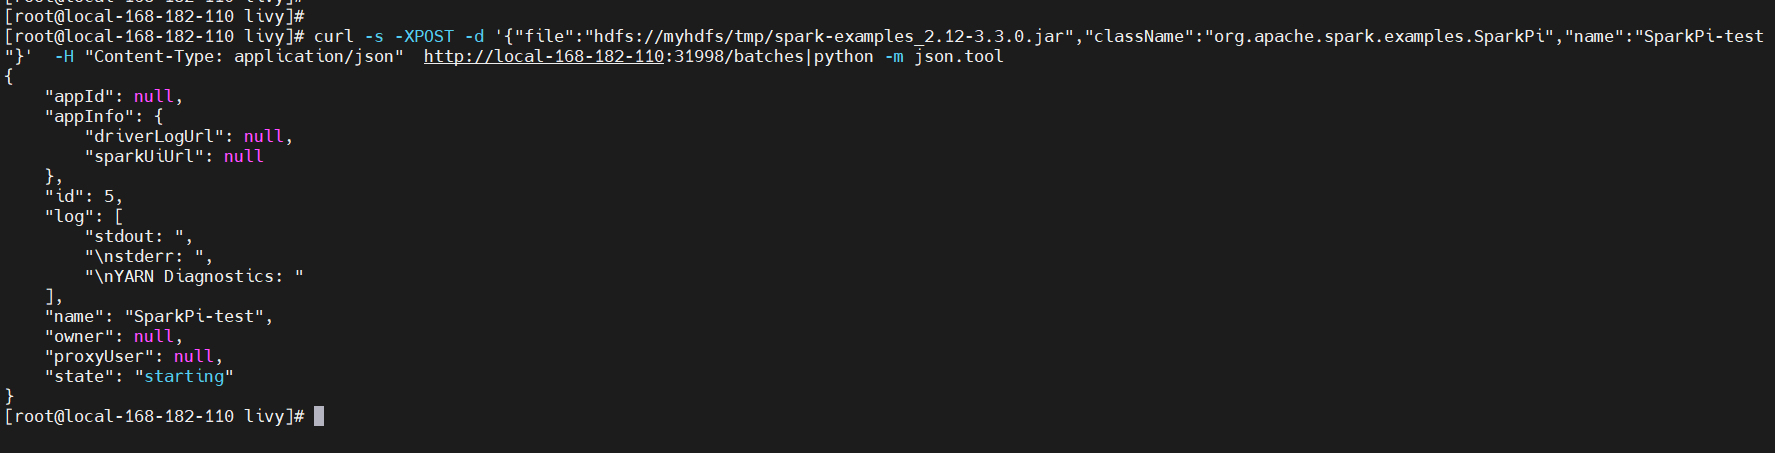
5)测试验证
curl -s -XPOST -d '{"file":"hdfs://myhdfs/tmp/spark-examples_2.12-3.3.0.jar","className":"org.apache.spark.examples.SparkPi","name":"SparkPi-test"}' -H "Content-Type: application/json" http://local-168-182-110:31998/batches|python -m json.tool
6)卸载
helm uninstall livy -n livy
git地址:https://gitee.com/hadoop-bigdata/livy-on-k8s
Apache Livy on k8s 编排部署讲解就先到这里了,有疑问的小伙伴欢迎给我留言,后续会持续更新【云原生+大数据】相关的文章,请小伙伴耐心等待~