UCF数据集下载地址:https://www.crcv.ucf.edu/data/UCF101.php
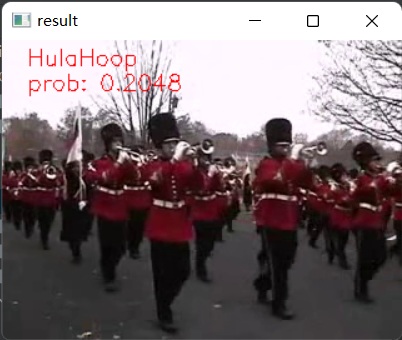
1.推理效果与项目配置
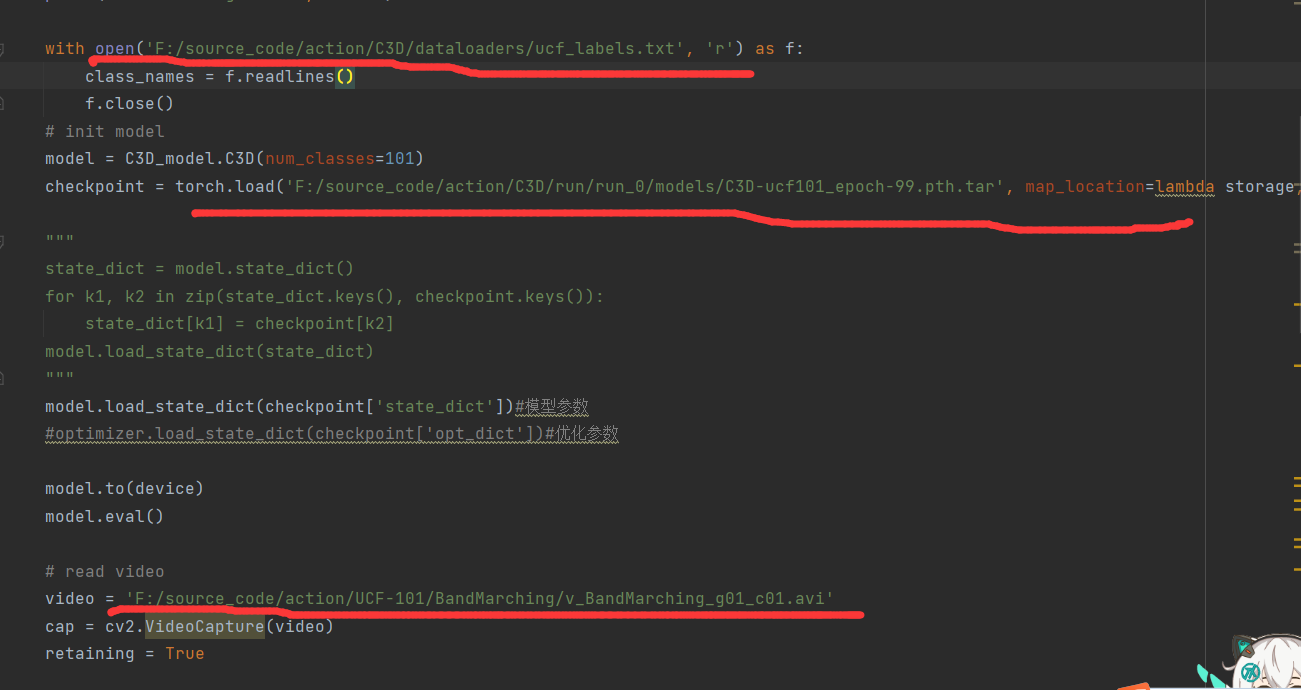
执行inference.py,需要指定3个参数,第一个是标签文件地址,存储了各个标签的含义,第二个是权重文件地址,第三个是要进行推理的视频文件地址
2.训练配置参数
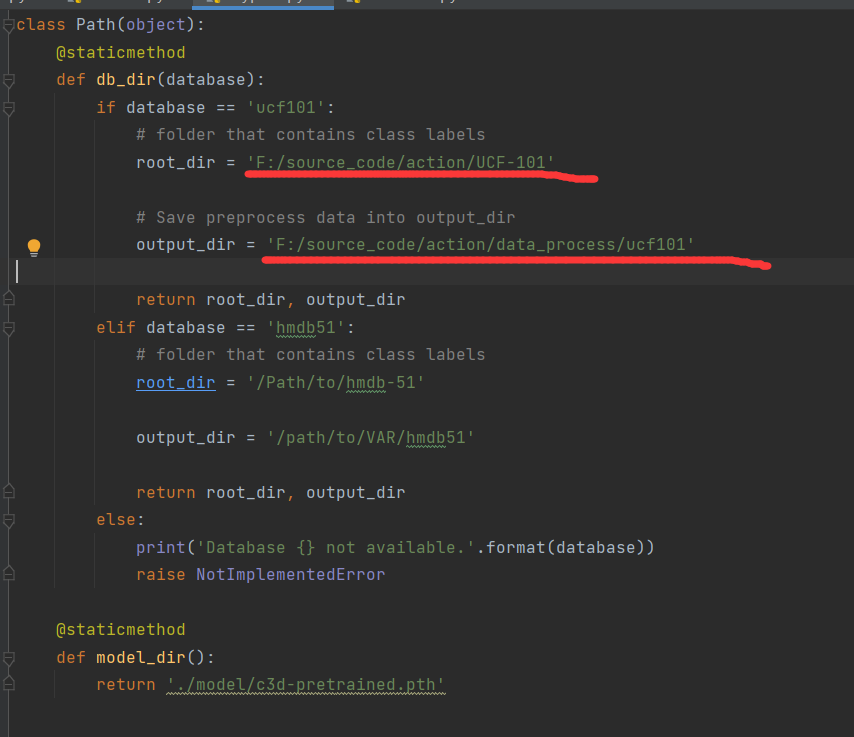
mypath.py 需要修改的参数,root_dir为UCF-101数据集存放的地址,output_dir为保存中间数据的地址,在数据预处理时,需要对视频截取为小片段,并进行数据增强,在时间和空间上进行抖动。
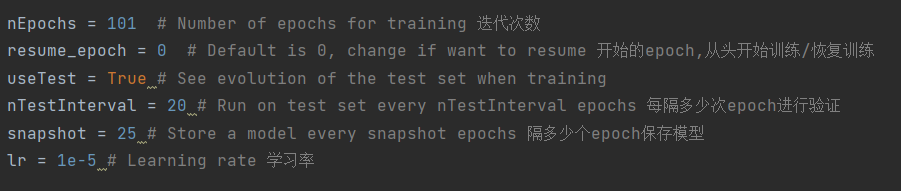
训练参数:
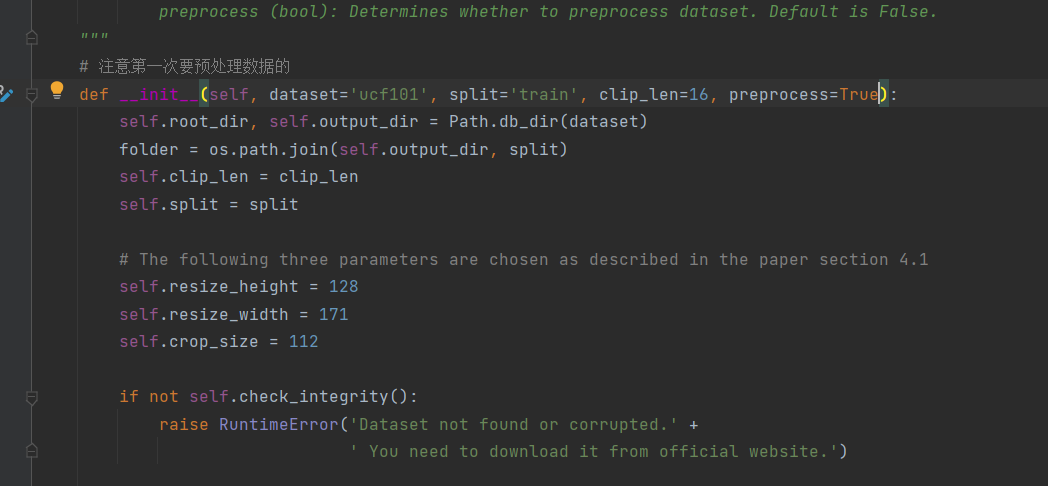
另外需要注意的是,在dataset.py文件中,第一次运行模型需要对数据进行预处理,因此第一次执行需要将preprocess=True,而在后续操作,保存了数据中间结果,可以将preprocess=False
3.视频数据读取
(1).视频数据预处理操作
首先,对于UCF数据集,每一个文件夹包含了一个类别行为的视频。因此,对于每一个类别的文件夹的视频,划分训练集、测试集与验证集,同时对视频进行切分。返回图像序列。具体切分方法为:
-
首先读取视频,并返回视频的帧数量、画面宽度和高度
-
相邻的帧比较相似,不是特征有必要,因此每隔4帧采样一帧,但是需要保证输入图片序列至少有16帧,对采样不满16帧的视频,降低间隔
-
将每一帧的图片resize到指定大小
(2)数据batch制作
首先,读取视频预处理生成的图像序列,并返回到缓存中,然后对图片和图片序列进行截取,最终图像序列由16帧图片组成,每张图片大小为112*112.最后,将图像序列数据进行正规化并转换为tensor格式,并得到标签。
整体代码如下:
class VideoDataset(Dataset):r"""A Dataset for a folder of videos. Expects the directory structure to bedirectory->[train/val/test]->[class labels]->[videos]. Initializes with a listof all file names, along with an array of labels, with label being automaticallyinferred from the respective folder names.Args:dataset (str): Name of dataset. Defaults to 'ucf101'.split (str): Determines which folder of the directory the dataset will read from. Defaults to 'train'.clip_len (int): Determines how many frames are there in each clip. Defaults to 16.preprocess (bool): Determines whether to preprocess dataset. Default is False."""# 注意第一次要预处理数据的def __init__(self, dataset='ucf101', split='train', clip_len=16, preprocess=True):# 数据路径/视频预处理结果存储路径self.root_dir, self.output_dir = Path.db_dir(dataset)# train/val/test 文件夹folder = os.path.join(self.output_dir, split)# 视频序列长度self.clip_len = clip_lenself.split = split # train/val/test# The following three parameters are chosen as described in the paper section 4.1self.resize_height = 128self.resize_width = 171self.crop_size = 112if not self.check_integrity():raise RuntimeError('Dataset not found or corrupted.' +' You need to download it from official website.')# 视频数据预处理if (not self.check_preprocess()) or preprocess:print('Preprocessing of {} dataset, this will take long, but it will be done only once.'.format(dataset))self.preprocess()# Obtain all the filenames of files inside all the class folders# Going through each class folder one at a timeself.fnames, labels = [], []for label in sorted(os.listdir(folder)):for fname in os.listdir(os.path.join(folder, label)):self.fnames.append(os.path.join(folder, label, fname))labels.append(label)assert len(labels) == len(self.fnames)print('Number of {} videos: {:d}'.format(split, len(self.fnames)))# Prepare a mapping between the label names (strings) and indices (ints)self.label2index = {label: index for index, label in enumerate(sorted(set(labels)))}# Convert the list of label names into an array of label indicesself.label_array = np.array([self.label2index[label] for label in labels], dtype=int)if dataset == "ucf101":if not os.path.exists('dataloaders/ucf_labels.txt'):with open('dataloaders/ucf_labels.txt', 'w') as f:for id, label in enumerate(sorted(self.label2index)):f.writelines(str(id+1) + ' ' + label + '\n')elif dataset == 'hmdb51':if not os.path.exists('dataloaders/hmdb_labels.txt'):with open('dataloaders/hmdb_labels.txt', 'w') as f:for id, label in enumerate(sorted(self.label2index)):f.writelines(str(id+1) + ' ' + label + '\n')def __len__(self):return len(self.fnames)#需要重写__getitem__方法def __getitem__(self, index):# Loading and preprocessing.# 读取图像,并返回到缓存中buffer = self.load_frames(self.fnames[index]) #一共有8460个文件夹# 对图片和图片序列进行截取,最终返回16,3,112,112的图片序列buffer = self.crop(buffer, self.clip_len, self.crop_size)# 标签文件labels = np.array(self.label_array[index])if self.split == 'test':# Perform data augmentationbuffer = self.randomflip(buffer)buffer = self.normalize(buffer) # 正规化buffer = self.to_tensor(buffer) # 转化为tensor格式return torch.from_numpy(buffer), torch.from_numpy(labels)def check_integrity(self):if not os.path.exists(self.root_dir):return Falseelse:return Truedef check_preprocess(self):# TODO: Check image size in output_dirif not os.path.exists(self.output_dir):return Falseelif not os.path.exists(os.path.join(self.output_dir, 'train')):return Falsefor ii, video_class in enumerate(os.listdir(os.path.join(self.output_dir, 'train'))):for video in os.listdir(os.path.join(self.output_dir, 'train', video_class)):video_name = os.path.join(os.path.join(self.output_dir, 'train', video_class, video),sorted(os.listdir(os.path.join(self.output_dir, 'train', video_class, video)))[0])image = cv2.imread(video_name)if np.shape(image)[0] != 128 or np.shape(image)[1] != 171:return Falseelse:breakif ii == 10:breakreturn True# 视频数据预处理def preprocess(self):# 文件夹不存在/创建文件夹if not os.path.exists(self.output_dir):os.mkdir(self.output_dir)os.mkdir(os.path.join(self.output_dir, 'train'))os.mkdir(os.path.join(self.output_dir, 'val'))os.mkdir(os.path.join(self.output_dir, 'test'))#-----------------------------------------------------------------------------------------------------## Split train/val/test sets# 对于每一个文件夹(类别)的视频,划分训练集、测试集、验证集、#-----------------------------------------------------------------------------------------------------#for file in os.listdir(self.root_dir):file_path = os.path.join(self.root_dir, file)video_files = [name for name in os.listdir(file_path)]train_and_valid, test = train_test_split(video_files, test_size=0.2, random_state=42)train, val = train_test_split(train_and_valid, test_size=0.2, random_state=42)train_dir = os.path.join(self.output_dir, 'train', file)val_dir = os.path.join(self.output_dir, 'val', file)test_dir = os.path.join(self.output_dir, 'test', file)if not os.path.exists(train_dir):os.mkdir(train_dir)if not os.path.exists(val_dir):os.mkdir(val_dir)if not os.path.exists(test_dir):os.mkdir(test_dir)#------------------------------------------------## 对训练集、测试集、验证集的视频进行切分,得到图像序列,一般# 每隔4帧采样1帧#------------------------------------------------#for video in train:self.process_video(video, file, train_dir)for video in val:self.process_video(video, file, val_dir)for video in test:self.process_video(video, file, test_dir)print('Preprocessing finished.')#------------------------------------------------------------## 将视频切分为图片序列#------------------------------------------------------------#def process_video(self, video, action_name, save_dir):# Initialize a VideoCapture object to read video data into a numpy arrayvideo_filename = video.split('.')[0]if not os.path.exists(os.path.join(save_dir, video_filename)):os.mkdir(os.path.join(save_dir, video_filename))# ------------------------------------------------------------## 读取视频,并返回视频的帧数量、画面宽度和高度# ------------------------------------------------------------#capture = cv2.VideoCapture(os.path.join(self.root_dir, action_name, video))frame_count = int(capture.get(cv2.CAP_PROP_FRAME_COUNT))frame_width = int(capture.get(cv2.CAP_PROP_FRAME_WIDTH))frame_height = int(capture.get(cv2.CAP_PROP_FRAME_HEIGHT))#------------------------------------------------------## Make sure splited video has at least 16 frames# 相邻的帧比较相似,不是特征有必要,因此每隔4帧采样一帧,但是需要# 保证输入图片序列至少有16帧,对采样不满16帧的视频,降低间隔#------------------------------------------------------#EXTRACT_FREQUENCY = 4if frame_count // EXTRACT_FREQUENCY <= 16:EXTRACT_FREQUENCY -= 1if frame_count // EXTRACT_FREQUENCY <= 16:EXTRACT_FREQUENCY -= 1if frame_count // EXTRACT_FREQUENCY <= 16:EXTRACT_FREQUENCY -= 1count = 0i = 0retaining = Truewhile (count < frame_count and retaining):retaining, frame = capture.read()if frame is None:continue# 将图片resize到指定大小if count % EXTRACT_FREQUENCY == 0:if (frame_height != self.resize_height) or (frame_width != self.resize_width):frame = cv2.resize(frame, (self.resize_width, self.resize_height))cv2.imwrite(filename=os.path.join(save_dir, video_filename, '0000{}.jpg'.format(str(i))), img=frame)i += 1count += 1# Release the VideoCapture once it is no longer neededcapture.release()def randomflip(self, buffer):"""Horizontally flip the given image and ground truth randomly with a probability of 0.5."""if np.random.random() < 0.5:for i, frame in enumerate(buffer):frame = cv2.flip(buffer[i], flipCode=1)buffer[i] = cv2.flip(frame, flipCode=1)return bufferdef normalize(self, buffer):for i, frame in enumerate(buffer):frame -= np.array([[[90.0, 98.0, 102.0]]])buffer[i] = framereturn bufferdef to_tensor(self, buffer):return buffer.transpose((3, 0, 1, 2))#----------------------------------------------------------## 读取每一帧的图像,并返回到缓存中#----------------------------------------------------------#def load_frames(self, file_dir):frames = sorted([os.path.join(file_dir, img) for img in os.listdir(file_dir)])frame_count = len(frames)buffer = np.empty((frame_count, self.resize_height, self.resize_width, 3), np.dtype('float32'))for i, frame_name in enumerate(frames):frame = np.array(cv2.imread(frame_name)).astype(np.float64)buffer[i] = framereturn buffer#---------------------------------------------------------------## 随机选取一个index值,截取16帧的图片序列作为输入,同时对图片进行截取,最终返回# 3,16,112,112的图片序列作为输入#---------------------------------------------------------------#def crop(self, buffer, clip_len, crop_size):# randomly select time index for temporal jitteringtime_index = np.random.randint(buffer.shape[0] - clip_len)# Randomly select start indices in order to crop the videoheight_index = np.random.randint(buffer.shape[1] - crop_size)width_index = np.random.randint(buffer.shape[2] - crop_size)# Crop and jitter the video using indexing. The spatial crop is performed on# the entire array, so each frame is cropped in the same location. The temporal# jitter takes place via the selection of consecutive framesbuffer = buffer[time_index:time_index + clip_len,height_index:height_index + crop_size,width_index:width_index + crop_size, :]return buffer4.网络结构
整个网络结构模型与论文描述一致,输入尺寸为3×16×128×171。在训练期间,使用3×16×112×112的随机裁剪进行抖动。网络有5个卷积层和5个池化层(每个卷积层紧是一个池化层),2个全连接层和一个softmax损失层来预测动作标签。从1层到5层的5个卷积层的滤波器数分别为64、128、256、256、256。所有卷积核的大小都为d,其中d是核的时间深度。所有这些卷积层都应用了适当的填充(空间和时间)和步幅1,因此从这些卷积层的输入到输出的大小没有变化。所有的池化层都是最大池化,内核大小为2×2×2(第一层除外),步幅为1,这意味着输出信号的大小比输入信号减少了8倍。第一个池化层的内核大小为1×2×2,目的是不过早合并时间信号,并满足16帧的序列长度
代码如下:
class C3D(nn.Module):"""The C3D network."""def __init__(self, num_classes, pretrained=False):super(C3D, self).__init__()self.conv1 = nn.Conv3d(3, 64, kernel_size=(3, 3, 3), padding=(1, 1, 1))self.pool1 = nn.MaxPool3d(kernel_size=(1, 2, 2), stride=(1, 2, 2))self.conv2 = nn.Conv3d(64, 128, kernel_size=(3, 3, 3), padding=(1, 1, 1))self.pool2 = nn.MaxPool3d(kernel_size=(2, 2, 2), stride=(2, 2, 2))self.conv3a = nn.Conv3d(128, 256, kernel_size=(3, 3, 3), padding=(1, 1, 1))self.conv3b = nn.Conv3d(256, 256, kernel_size=(3, 3, 3), padding=(1, 1, 1))self.pool3 = nn.MaxPool3d(kernel_size=(2, 2, 2), stride=(2, 2, 2))self.conv4a = nn.Conv3d(256, 512, kernel_size=(3, 3, 3), padding=(1, 1, 1))self.conv4b = nn.Conv3d(512, 512, kernel_size=(3, 3, 3), padding=(1, 1, 1))self.pool4 = nn.MaxPool3d(kernel_size=(2, 2, 2), stride=(2, 2, 2))self.conv5a = nn.Conv3d(512, 512, kernel_size=(3, 3, 3), padding=(1, 1, 1))self.conv5b = nn.Conv3d(512, 512, kernel_size=(3, 3, 3), padding=(1, 1, 1))self.pool5 = nn.MaxPool3d(kernel_size=(2, 2, 2), stride=(2, 2, 2), padding=(0, 1, 1))self.fc6 = nn.Linear(8192, 4096)self.fc7 = nn.Linear(4096, 4096)self.fc8 = nn.Linear(4096, num_classes)self.dropout = nn.Dropout(p=0.5)self.relu = nn.ReLU()self.__init_weight()if pretrained:self.__load_pretrained_weights()def forward(self, x):#print ('1:',x.size())x = self.relu(self.conv1(x))#print ('2:',x.size())x = self.pool1(x)#print ('3:',x.size())x = self.relu(self.conv2(x))#print ('4:',x.size())x = self.pool2(x)#print ('5:',x.size())x = self.relu(self.conv3a(x))#print ('6:',x.size())x = self.relu(self.conv3b(x))#print ('7:',x.size())x = self.pool3(x)#print ('8:',x.size())x = self.relu(self.conv4a(x))#print ('9:',x.size())x = self.relu(self.conv4b(x))#print ('10:',x.size())x = self.pool4(x)#print ('11:',x.size())x = self.relu(self.conv5a(x))#print ('12:',x.size())x = self.relu(self.conv5b(x))#print ('13:',x.size())x = self.pool5(x)#print ('14:',x.size())x = x.view(-1, 8192)#print ('15:',x.size())x = self.relu(self.fc6(x))#print ('16:',x.size())x = self.dropout(x)x = self.relu(self.fc7(x))x = self.dropout(x)logits = self.fc8(x)#print ('17:',logits.size())return logitsdef __load_pretrained_weights(self):"""Initialiaze network."""corresp_name = {# Conv1"features.0.weight": "conv1.weight","features.0.bias": "conv1.bias",# Conv2"features.3.weight": "conv2.weight","features.3.bias": "conv2.bias",# Conv3a"features.6.weight": "conv3a.weight","features.6.bias": "conv3a.bias",# Conv3b"features.8.weight": "conv3b.weight","features.8.bias": "conv3b.bias",# Conv4a"features.11.weight": "conv4a.weight","features.11.bias": "conv4a.bias",# Conv4b"features.13.weight": "conv4b.weight","features.13.bias": "conv4b.bias",# Conv5a"features.16.weight": "conv5a.weight","features.16.bias": "conv5a.bias",# Conv5b"features.18.weight": "conv5b.weight","features.18.bias": "conv5b.bias",# fc6"classifier.0.weight": "fc6.weight","classifier.0.bias": "fc6.bias",# fc7"classifier.3.weight": "fc7.weight","classifier.3.bias": "fc7.bias",}p_dict = torch.load(Path.model_dir())s_dict = self.state_dict()for name in p_dict:if name not in corresp_name:continues_dict[corresp_name[name]] = p_dict[name]self.load_state_dict(s_dict)def __init_weight(self):for m in self.modules():if isinstance(m, nn.Conv3d):# n = m.kernel_size[0] * m.kernel_size[1] * m.out_channels# m.weight.data.normal_(0, math.sqrt(2. / n))torch.nn.init.kaiming_normal_(m.weight)elif isinstance(m, nn.BatchNorm3d):m.weight.data.fill_(1)m.bias.data.zero_()