什么是LSTM?
LSTM(长短期记忆人工神经网络),是一种可以学习长期依赖特殊的RNN(循环神经网络)。
传统循环网络RNN虽然可以通过记忆体,实现短期记忆,进行连续数据的预测。但是当连续数据的序列变长时,会使展开时间步过长,反向传播更新参数时梯度要按时间步连续相乘,会导致梯度消失。故引入LSTM(长短期记忆人工神经网络)。
LSTM的核心理念
循环核

注:
i t i_t it:输入门(门限)
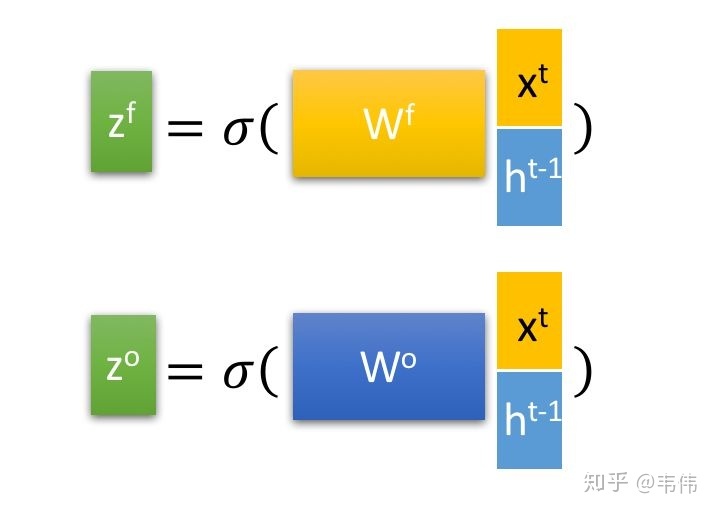
f t f_t ft:遗忘门(门限)
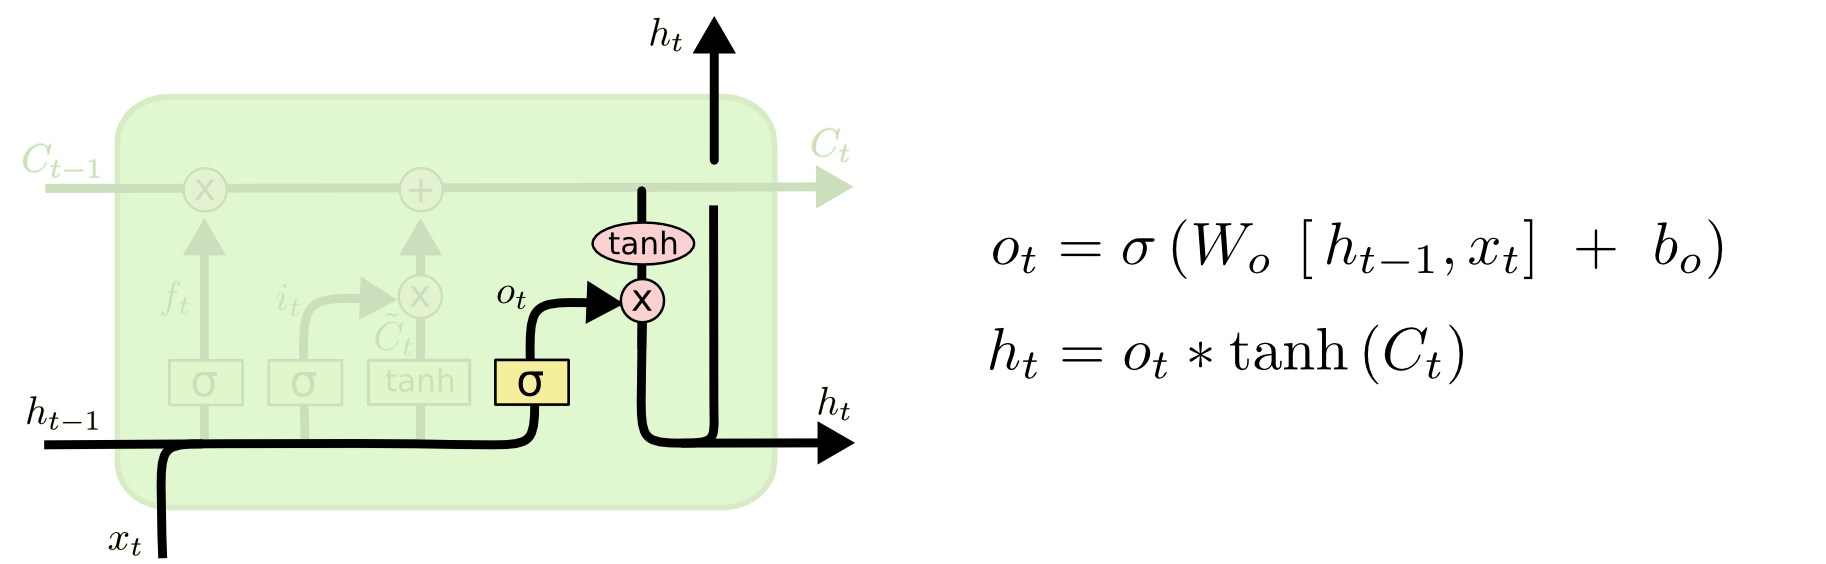
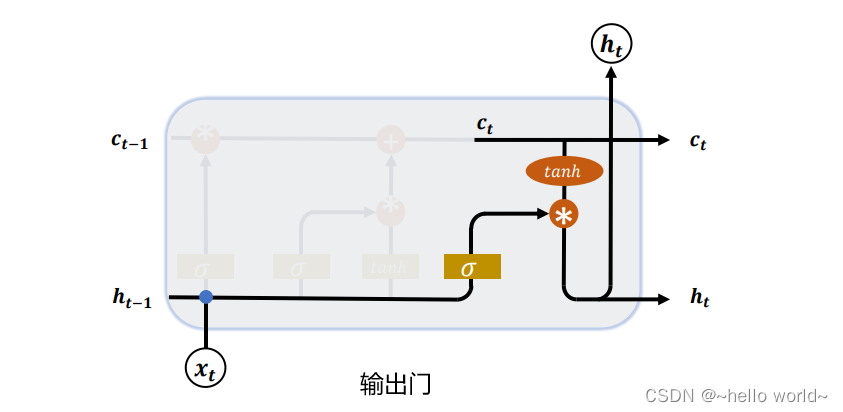
o t o_t ot:输出门(门限)
C t C_t Ct:细胞态(长期记忆)
h t h_t ht:记忆体(短期记忆)
C t ~ \tilde {C_t} Ct~:候选态(归纳出的新知识)
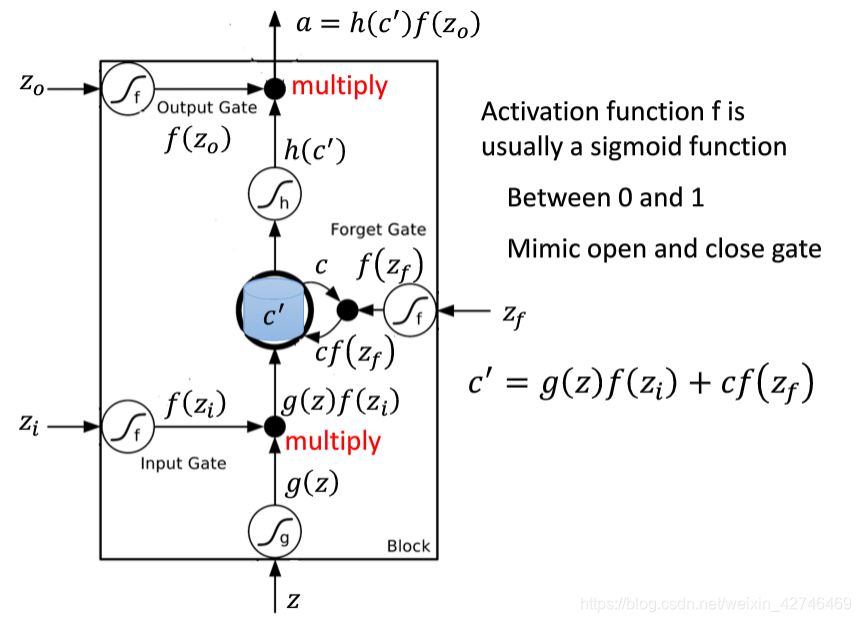
输入门、遗忘门、输出门
i t = σ ( W i ⋅ [ h t − 1 , x t ] + b i ) f t = σ ( W f ⋅ [ h t − 1 , x t ] + b f ) o t = σ ( W o ⋅ [ h t − 1 , x t ] + b o ) i_t = \sigma(W_i·[h_{t-1},x_t] + b_i) \\ f_t = \sigma(W_f·[h_{t-1},x_t] + b_f) \\ o_t = \sigma(W_o·[h_{t-1},x_t] + b_o) it=σ(Wi⋅[ht−1,xt]+bi)ft=σ(Wf⋅[ht−1,xt]+bf)ot=σ(Wo⋅[ht−1,xt]+bo)
注:
x t x_t xt:当前时刻输入特征
h t − 1 h_{t-1} ht−1:上一时刻的短期记忆
W i W_i Wi、 W f W_f Wf、 W o W_o Wo:待训练参数矩阵
b i b_i bi、 b f b_f bf、 b o b_o bo:待训练偏置项
Sigmoid激活函数:使门限的范围在0-1之间
细胞态
C t = f t ∗ C t − 1 + i t ∗ C t ~ C_t = f_t * C_{t-1} + i_t *\tilde {C_t} Ct=ft∗Ct−1+it∗Ct~
注:
C t − 1 C_{t-1} Ct−1:上一时刻长期记忆
f t f_t ft:遗忘门(门限)
C t ~ \tilde {C_t} Ct~:候选态(当前时刻归纳出的新知识)
i t i_t it:输入门(门限)
f t ∗ C t − 1 f_t * C_{t-1} ft∗Ct−1:留存在脑中的过去的记忆
记忆体
h t = o t ∗ t a n h ( C t ) h_t = o_t * tanh(C_t) ht=ot∗tanh(Ct)
注:
tanh()激活函数
o t o_t ot:输出门(门限)
C t C_t Ct:细胞态(长期记忆)
候选态
C t ~ = t a n h ( W c ⋅ [ h t − 1 , x t ] + b c ) \tilde {C_t} = tanh(W_c ·[h_{t-1},x_t] + b_c) Ct~=tanh(Wc⋅[ht−1,xt]+bc)
注:
W c W_c Wc:待训练参数矩阵
b c b_c bc:待训练偏置项
关于深入理解神经网络可以参考:理解神经网络
编程思路
- 导入相关模块
- 准备训练集和测试集数据
- 对数据集进行归一化处理,使送入神经网络的数据分布在0-1之间
- 制作训练集和测试集的输入特征和标签,并打乱训练集数据顺序
- 将数据装换为
RNN需要输入的维度 - 搭建神经网络,设置记忆体个数,循环计算层层数
- 配置训练方法
- 设置断点续训
- 执行训练过程
- 打印网络结构和参数统计,参数提取和loss可视化
代码实现
import math
import osimport numpy as np
from keras.layers import LSTM, Dropout, Dense
from sklearn.preprocessing import MinMaxScaler
from tensorflow import optimizers
from tensorflow.keras import Sequential, callbacks
import tensorflow as tf
from sklearn.metrics import mean_squared_error, mean_absolute_errorclass CgcpLSTM:def __init__(self, name):"""构造函数,初始化模型:param data_list: 真实数据列表"""# 神经网络名称self.name = name# 训练集占总样本的比例self.train_all_ratio = 0.875# 连续样本点数self.continuous_sample_point_num = 20# 定义归一化:归一化到(0,1)之间self.sc = MinMaxScaler(feature_range=(0, 1))# 每次喂入神经网络的样本数self.batch_size = 64# 数据集的迭代次数self.epochs = 1000000# 每多少次训练集迭代,验证一次测试集self.validation_freq = 1# 配置模型self.model = Sequential([# LSTM层(记忆体个数,是否返回输出(True:每个时间步输出ht,False:仅最后时间步输出ht))# 配置具有80个记忆体的LSTM层,每个时间步输出htLSTM(80, return_sequences=True),Dropout(0.2),# 配置具有100个记忆体的LSTM层,仅在最后一步返回htLSTM(100),Dropout(0.2),Dense(1)])# 配置训练方法# 该应用只观测loss数值,不观测准确率,所以删去metrics选项,一会在每个epoch迭代显示时只显示loss值self.model.compile(optimizer=optimizers.Adam(0.001),loss='mean_squared_error',  # 损失函数用均方误差)# 配置断点续训文件self.checkpoint_save_path = os.path.abspath(os.path.dirname(__file__)) + "\\checkpoint\\" + self.name + "_LSTM_stock.ckpt"if os.path.exists(self.checkpoint_save_path + '.index'):print('-' * 20 + "加载模型" + "-" * 20)self.model.load_weights(self.checkpoint_save_path)# 断点续训,存储最佳模型self.cp_callback = callbacks.ModelCheckpoint(filepath=self.checkpoint_save_path,save_weights_only=True,save_best_only=True,# monitor='val_accuracy',monitor='val_loss',)def make_set(self, data_list):"""使用历史数据制作训练集和测试集:param data_list: 历史数据列表:return: train_set, test_set 归一化处理后的训练集合测试集"""# 将历史数据装换为ndarrayif isinstance(data_list, list):data_array = np.array(data_list)elif isinstance(data_list, np.ndarray):data_array = data_listelse:raise Exception("数据源格式错误")# 对一维矩阵进行升维操作if len(data_array.shape) == 1:data_array = data_array.reshape(data_array.shape[0], 1)if data_array.shape[1] != 1:raise Exception("数据源形状有误")# 按照比例对数据进行分割index = int(data_array.shape[0] * self.train_all_ratio)train_set = data_array[:index, :]test_set = data_array[index:, :]print("train_set_shape:{}".format(train_set.shape))# 对训练集和测试集进行归一化处理train_set, test_set = self.gui_yi(train_set, test_set)print("训练集长度:{}".format(len(train_set)))print("测试集长度:{}".format(len(test_set)))return train_set, test_setdef gui_yi(self, train_set, test_set):"""对训练集合测试集进行归一化处理:param test_set: 未进行归一化的训练集数据:param train_set: 未进行归一化处理的测试集数据:return: train_set, test_set 归一化处理后的训练集合测试集"""# 求得训练集的最大值,最小值这些训练集固有的属性,并在训练集上进行归一化train_set_scaled = self.sc.fit_transform(train_set)# 利用训练集的属性对测试集进行归一化test_set = self.sc.transform(test_set)return train_set_scaled, test_setdef fan_gui_yi(self, data_set):"""逆归一化:param data_set: 需要还原的数据:return:"""# 对数据进行逆归一化还原data_set = self.sc.inverse_transform(data_set)return data_setdef train(self, x_train, y_train, x_test, y_test):"""训练模型:param x_train::param y_train::param x_test::param y_test::return:"""# 训练模型history = self.model.fit(x_train, y_train,# 每次喂入神经网络的样本数batch_size=self.batch_size,# 数据集的迭代次数epochs=self.epochs,validation_data=(x_test, y_test),# 每多少次训练集迭代,验证一次测试集validation_freq=self.validation_freq,callbacks=[self.cp_callback])# 输出模型各层的参数状况self.model.summary()# 参数提取self.save_args_to_file()# 获取模型当前loss值loss = history.history['loss']print("loss:{}".format(loss))try:val_loss = history.history['val_loss']print("val_loss:{}".format(val_loss))except:passdef save_args_to_file(self):"""参数提取,将参数保存至文件:return:"""# 指定参数存取目录file_path = os.path.abspath(os.path.dirname(__file__)) + "\\weights\\"# 目录不存在则创建if not os.path.exists(file_path):os.makedirs(file_path)# 打开文本文件file = open(file_path + self.name + "_weights.txt", 'w')# 将参数写入文件for v in self.model.trainable_variables:file.write(str(v.name) + '\n')file.write(str(v.shape) + '\n')file.write(str(v.numpy()) + '\n')file.close()def test(self, x_test, test_set):"""预测测试:param x_test::param test_set: 测试集:return:"""# 测试集输入模型进行预测predicted_stock_price = self.model.predict(x_test)# 对预测数据还原---从(0,1)反归一化到原始范围predicted_stock_price = self.fan_gui_yi(predicted_stock_price)# 对真实数据还原---从(0,1)反归一化到原始范围real_stock_price = self.fan_gui_yi(test_set[self.continuous_sample_point_num:])# ##########evaluate############### calculate MSE 均方误差 ---> E[(预测值-真实值)^2] (预测值减真实值求平方后求均值)mse = mean_squared_error(predicted_stock_price, real_stock_price)# calculate RMSE 均方根误差--->sqrt[MSE]    (对均方误差开方)rmse = math.sqrt(mean_squared_error(predicted_stock_price, real_stock_price))# calculate MAE 平均绝对误差----->E[|预测值-真实值|](预测值减真实值求绝对值后求均值)mae = mean_absolute_error(predicted_stock_price, real_stock_price)print('均方误差: %.6f' % mse)print('均方根误差: %.6f' % rmse)print('平均绝对误差: %.6f' % mae)def make_x_y_train_and_test(self, data_list):"""制作x_train(训练集输入特征), y_train(训练集标签), x_test(测试集输入特征), y_test(测试集标签):param data_list::return:"""# 获取归一化后的训练集合测试集train_set, test_set = self.make_set(data_list=data_list)# 初始化x_train(训练集输入特征), y_train(训练集标签), x_test(测试集输入特征), y_test(测试集标签)x_train, y_train, x_test, y_test = [], [], [], []# 利用for循环,遍历整个训练集,提取训练集中连续样本为训练集输入特征和标签for i in range(self.continuous_sample_point_num, len(train_set)):x_train.append(train_set[i - self.continuous_sample_point_num:i, 0])y_train.append(train_set[i, 0])# 对训练集进行打乱np.random.seed(7)np.random.shuffle(x_train)np.random.seed(7)np.random.shuffle(y_train)tf.random.set_seed(7)# 将训练集由list格式变为array格式x_train, y_train = np.array(x_train), np.array(y_train)# 使x_train符合RNN输入要求:[送入样本数, 循环核时间展开步数, 每个时间步输入特征个数]。x_train = self.change_data_to_rnn_input(x_train)# 测试集# 利用for循环,遍历整个测试集,提取训练集中连续样本为训练集输入特征和标签for i in range(self.continuous_sample_point_num, len(test_set)):x_test.append(test_set[i - self.continuous_sample_point_num:i, 0])y_test.append(test_set[i, 0])# 测试集变array并reshape为符合RNN输入要求:[送入样本数, 循环核时间展开步数, 每个时间步输入特征个数]x_test, y_test = np.array(x_test), np.array(y_test)print("x_test_shape:{}".format(x_test.shape))x_test = self.change_data_to_rnn_input(x_test)return train_set, test_set, x_train, y_train, x_test, y_testdef change_data_to_rnn_input(self, data_array):"""将数据转变为RNN输入要求的维度:param data_array::return:"""# 对输入类型进行转换if isinstance(data_array, list):data_array = np.array(data_array)elif isinstance(data_array, np.ndarray):passelse:raise Exception("数据格式错误")rnn_input = np.reshape(data_array, (data_array.shape[0], self.continuous_sample_point_num, 1))return rnn_inputdef predict(self, history_data):"""使用模型进行预测:param history_data: 历史数据list:return:预测值"""# 将列表或数组转换为数组并提取最后一组数据if isinstance(history_data, list):history_data_array = history_data[self.continuous_sample_point_num * -1:]history_data_array = np.array(history_data_array)elif isinstance(history_data, np.ndarray):history_data_array = history_data[self.continuous_sample_point_num * -1:]else:raise Exception("数据格式错误")# 对一维数据进行升维处理if len(history_data_array.shape) == 1:history_data_array = history_data_array.reshape(1, self.continuous_sample_point_num)# 对数据形状进行效验if history_data_array.shape[1] != self.continuous_sample_point_num:raise Exception("数据形状有误")# 对数据进行归一化处理history_data_array = history_data_array.Thistory_data_array = self.sc.transform(history_data_array)history_data_array = history_data_array.T# 转换为RNN需要的数据形状history_data_array = self.change_data_to_rnn_input(history_data_array)# 测试集输入模型进行预测predicted_stock_price = self.model.predict(history_data_array)# 对预测数据还原---从(0,1)反归一化到原始范围predicted_stock_price = self.fan_gui_yi(predicted_stock_price)# 预测值value = predicted_stock_price[-1][-1]print("预测值:{}".format(value))return valueif __name__ == '__main__':data_list = [x for x in range(1000)]# print(data_list)# 初始化模型model = CgcpLSTM(name="浓度预测")# 获取训练和测试的相关参数train_set, test_set, x_train, y_train, x_test, y_test = model.make_x_y_train_and_test(data_list=data_list)# 训练模型model.train(x_train, y_train, x_test, y_test)# 对模型进行测试model.test(x_test, test_set)# 利用模型进行预测history = [x for x in range(50)]model.predict(history)
参考文献
人工智能实践:Tensorflow笔记_中国大学MOOC(慕课):https://www.icourse163.org/learn/PKU-1002536002?tid=1462067447
理解 LSTM 网络:https://www.jianshu.com/p/9dc9f41f0b29


![[深入浅出] LSTM神经网络](https://img-blog.csdnimg.cn/img_convert/d9fa736dddf779de72df0c72172cf225.png)