目录
1.创建线程的四种方式
1.1继承Thread类
1.2实现Runnable接口
1.3匿名内部类
1.4lambda表达式
2.多线程的优势-增加运行速度
3.Thread类及常用方法
3.1构造方法
3.2常见属性
演示后台线程
演示线程是否存活
3.3线程中断
3.4线程等待-join()
3.5获取当前线程
3.6启动线程-start()
4.线程状态
1.创建线程的四种方式
Java使用Thread类代表线程,所有的线程对象都必须是Thread类或其子类的实例。这里有四种方式可以实现Java创建线程:
1.继承Thread类并重写run()方法
2.实现Runnable接口并重写run()方法
3.通过匿名内部类的方式创建Thread和实现Runnable
4.通过lambda表达式来实现一个线程
1.1继承Thread类
Thread类是JDK中提供的表示线程的类。
重写run()方法,让线程执行指定的任务。
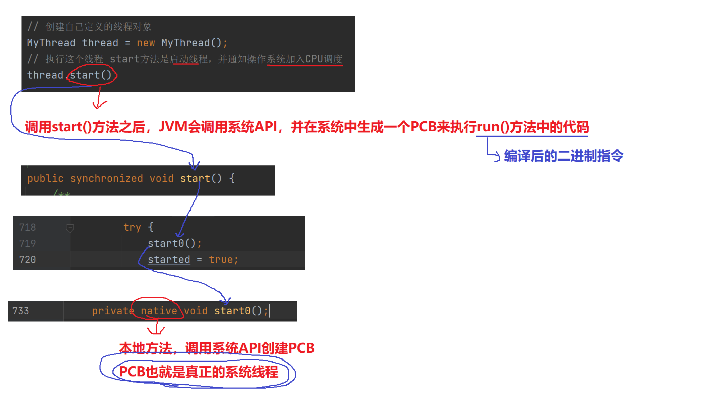
package lesson01;public class Demo01_Thread {public static void main(String[] args) {//创建自己定义的线程对象MyThread thread=new MyThread();//执行这个线程start方法是启动线程,并通知操作系统加入CPU调度thread.start();}
}
class MyThread extends Thread{//run方法中的代码,就表示线程要执行的任务@Overridepublic void run() {System.out.println("hello thread...");}
}
调用start()方法之后,JVM会调用系统API,并在系统中生成一个PCB来执行run()方法中的代码。
1.2实现Runnable接口
使用runnable接口定义任务的好处:
1.解耦(即 把不同的功能都给分开,如果要修改或查找相应的功能的时候可以直接指定的位置找),把定义线程,与定义任务分开。
2.把创建线程,与定义任务分开,以便修改代码时,可以统一修改。
package lesson01;public class Demo03_Runnable {public static void main(String[] args) {//创建Runnable对象MyRunnable runnable=new MyRunnable();//创建线程Thread thread=new Thread(runnable);//启动线程,参与CPU调度thread.start();}
}
//实现runnable接口
class MyRunnable implements Runnable{@Overridepublic void run() {while(true){System.out.println("生产皮包,金币+1...");try{Thread.sleep(1000);}catch (InterruptedException e){e.printStackTrace();}}}
}
1.3匿名内部类
通过匿名内部类的方式创建线程。
package lesson01;
//通过匿名内部类的方式创建线程
public class Demo05_Thread_Anon {public static void main(String[] args) {Thread thread=new Thread(){@Overridepublic void run() {while(true){System.out.println("hello thread");try{Thread.sleep(1000);}catch (InterruptedException e){e.printStackTrace();}}}};thread.start();}
}
通过匿名内部类的方式实现Runnable接口。
package lesson01;public class Demo06_Runnable_Anon {public static void main(String[] args) {Thread thread=new Thread(new Runnable() {@Overridepublic void run() {while(true){System.out.println("hello runnable");try{Thread.sleep(1000);}catch (InterruptedException e){e.printStackTrace();}}}});thread.start();}
}
1.4lambda表达式
要使用lambda表达式实现接口,接口必须是一个函数式接口(即接口定义中,只有一个方法)。
格式:()->{要执行的代码块}
package lesson01;public class Demo07_Lambda {public static void main(String[] args) {Thread thread=new Thread(()->{while(true){System.out.println("hello lambda...");try{Thread.sleep(1000);}catch (InterruptedException e){e.printStackTrace();}}});thread.start();}
}
2.多线程的优势-增加运行速度
使用多线程编程主要是为了充分利用CPU资源,提升程序效率。
示例:分别对两个变量进行10亿次的自增。
1.串行:单线程
2.并行:多线程
定义次数:
private static long COUNT=10_0000_0000L;串行操作,单线程:
private static void serial() {//记录开始时间long begin=System.currentTimeMillis();//第一个变量long a=0l;for(int i=0;i<COUNT;i++){a++;}long b=0l;for(int i=0;i<COUNT;i++){b++;}long end=System.currentTimeMillis();System.out.println("串行总耗时:"+(end-begin));}并行操作,多线程:
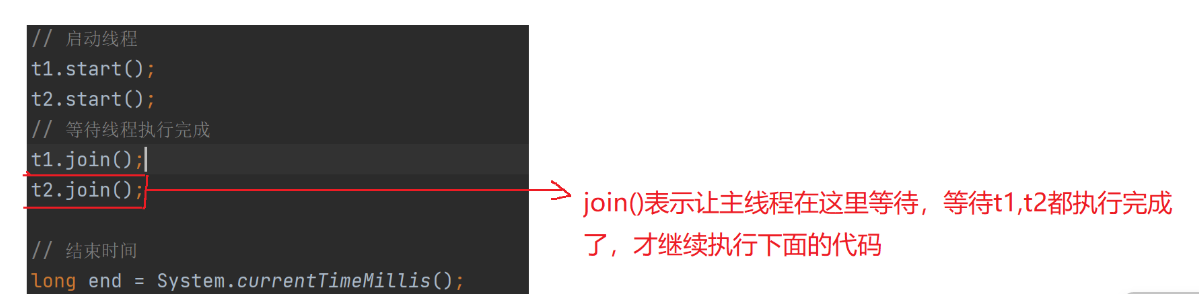
private static void concurrency() throws InterruptedException{//记录开始时间long begin=System.currentTimeMillis();//创建第一个线程Thread t1=new Thread(()->{long a=0l;for(int i=0;i<COUNT;i++){a++;}});//第二个线程Thread t2=new Thread(()->{long b=0l;for(int i=0;i<COUNT;i++){b++;}});//启动线程t1.start();t2.start();//等待线程执行完成t1.join();t2.join();//结束时间long end=System.currentTimeMillis();System.out.println("并行总耗时:"+(end-begin));}来看看结果吧:
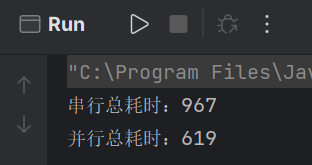
并行执行时间确实比串行执行时间短,可却不是串行的1/2,是因为每创建一个线程都是要消耗时间和资源的。
当把计算量改小一点:
private static long COUNT=10_000L;结果就变成了:
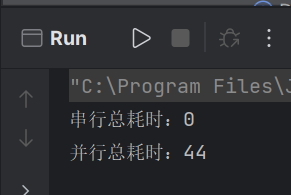
所以并不是所有场景都适合使用多线程,是否使用需根据计算量来确定。
3.Thread类及常用方法
3.1构造方法
| 方法 | 说明 |
| Thread() | 创建线程对象 |
| Thread(Runnable target) | 使用 Runnable 对象创建线程对象 |
| Thread(String name) | 创建线程对象,并命名 |
| Thread(Runnable target, String name) | 使用 Runnable 对象创建线程对象,并命名 |
| 【了解】 Thread(ThreadGroup group,Runnable target) | 线程可以被用来分组管理,分好的组即为线程组 |
Thread t1 = new Thread();
Thread t2 = new Thread(new MyRunnable());
Thread t3 = new Thread("这是我的名字");
Thread t4 = new Thread(new MyRunnable(), "这是我的名字");
想要获取当前线程的名字,可以用下面这个方法:
Thread.currentThread().getName()3.2常见属性
| 属性 | 获取方法 |
| ID | getId() |
| 名称 | getName() |
| 状态 | getState() |
| 优先级 | getPriority() |
| 是否后台线程 | isDaemon() |
| 是否存活 | isAlive() |
| 是否被中断 | isInterrupted() |
- ID是线程的唯一标识,不同线程不会重复。
- 名称是各种调试工具用的到
- 状态表示线程当前所处的一个情况
- 优先级高的线程理论上来说更容易被调度
- 后台线程,JVM会在一个进程的所有非后台线程结束后,才会结束运行
- 是否存活,简单理解,就是run()方法是否运行结束了
代码示例:创建一个名为”大圣“的线程,查看它的各种属性
package lesson02;public class Demo10 {public static void main(String[] args) {Thread thread=new Thread(()->{while(true){System.out.println("hello thread...");try{Thread.sleep(1000);}catch (InterruptedException e){e.printStackTrace();}}},"大圣");thread.start();//打印thread对象中的属性System.out.println("线程ID="+thread.getId());System.out.println("线程名="+thread.getName());System.out.println("线程状态"+thread.getState());System.out.println("线程优先级"+thread.getPriority());System.out.println("线程是否后台"+thread.isDaemon());System.out.println("线程是否存活"+thread.isAlive());System.out.println("线程是否中断"+thread.isInterrupted());}
}

演示后台线程
创建线程时,默认是前台线程。
这里在线程启动前传入true设置线程为后台线程。
//在线程启动之前设置线程是否为后台thread.setDaemon(true);代码示例:将线程设置为后台线程,main方法中是一个循环
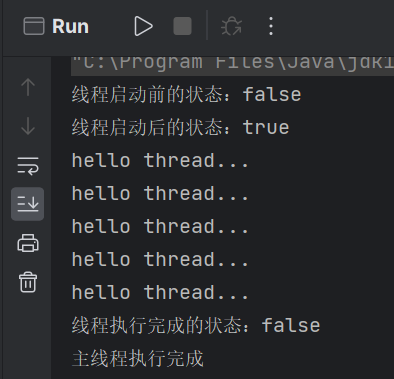
package lesson02;public class Demo11_Daemon {public static void main(String[] args) throws InterruptedException {Thread thread=new Thread(()->{while(true){System.out.println("hello thread...");//休眠一秒钟try{Thread.sleep(1000);}catch (InterruptedException e){e.printStackTrace();}}});//在线程启动之前设置线程是否为后台thread.setDaemon(true);System.out.println("是否存活"+thread.isAlive());//启动线程thread.start();//休眠一会儿,确保PCB被创建成功Thread.sleep(500);System.out.println("是否存活"+thread.isAlive());System.out.println("main线程执行完成");System.out.println("是否存活"+thread.isAlive());}
}
结果:
程序退出了,因为main方法运行完了,后台线程影响不了程序是否退出,前台线程可以影响。

演示线程是否存活
演示线程启动前后的状态。
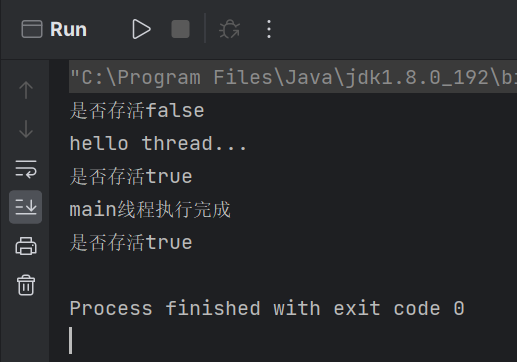
package lesson02;public class Demo12_Alive {public static void main(String[] args) {Thread thread=new Thread(()->{int count=0;while(true){System.out.println("hello thread...");try{Thread.sleep(1000);} catch (InterruptedException e) {e.printStackTrace();}//执行5次后退出线程count++;if(count==5){break;}}});System.out.println("线程启动前的状态:"+thread.isAlive());thread.start();System.out.println("线程启动后的状态:"+thread.isAlive());try{//等待子线程执行完成thread.join();}catch (InterruptedException e){e.printStackTrace();}System.out.println("线程执行完成的状态:"+thread.isAlive());System.out.println("主线程执行完成");}
}
看一看结果吧:
thread.isAlive()指的是系统的线程(PCB)是否存活,并不是我们new出来的Thread对象。
3.3线程中断
线程中断指的是停止或中断当前线程的任务。
1.通过是否中断的标志位
//定义一个中断标识private static boolean isQuit=false;子线程处理任务3秒后,将标志位改为true,线程停止。
package lesson02;public class Demo13_Interrupted01 {//定义一个中断标识private static boolean isQuit=false;public static void main(String[] args) throws InterruptedException {Thread thread=new Thread(()->{while(!isQuit){System.out.println("hello thread");try {Thread.sleep(1000);} catch (InterruptedException e) {e.printStackTrace();}}System.out.println("线程执行结束");});//启动线程thread.start();//主线程休眠3秒,模拟子线程正在处理任务Thread.sleep(3000);//设置中断标志位为trueisQuit=true;//让子线程先结束Thread.sleep(1000);System.out.println("主线程执行结束");}
}

2.通过调用Thread类提供的Interrupted方法来中断
System.out.println("是否中断:"+Thread.currentThread().isInterrupted());![]()
默认为false。
示例代码:
package lesson02;public class Demo14_Interrupted02 {public static void main(String[] args) throws InterruptedException {Thread thread=new Thread(()->{while(!Thread.currentThread().isInterrupted()){System.out.println("hello thread");try {Thread.sleep(1000);} catch (InterruptedException e) {e.printStackTrace();//异常处理中断线程//方式一:什么都不做//方式二:处理具体的逻辑//方式三:真正的中断break;}}System.out.println("是否中断:"+Thread.currentThread().isInterrupted());System.out.println("线程任务结束");});//启动线程thread.start();//主线程休眠3秒,模拟子线程正在处理任务Thread.sleep(3000);//中断线程,修改Thread中的中断标志thread.interrupt();//让子线程先结束Thread.sleep(1000);System.out.println("主线程执行结束");}
}
运行结果:
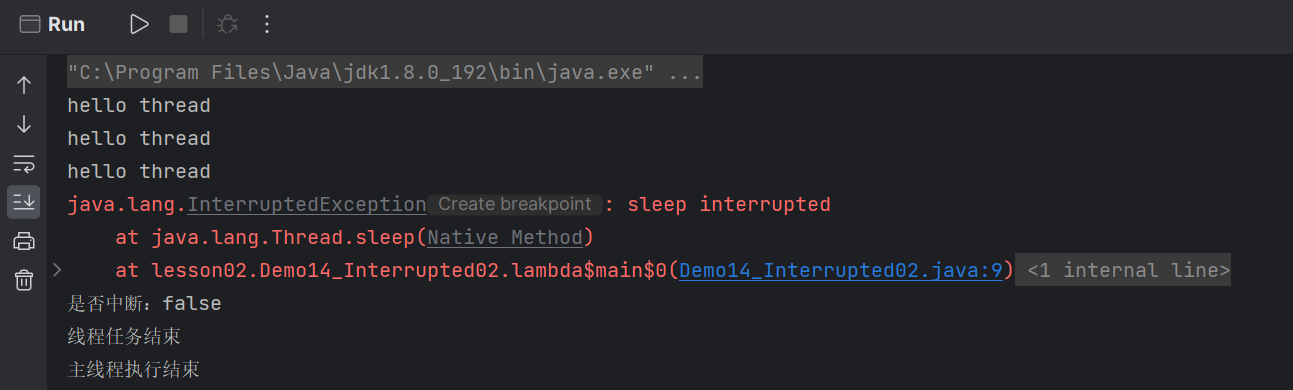
sleep interrupted报错原因:
当线程在sleep或是阻塞状态的时候,调用interrupted方法,会中断当前的sleep休眠状态,并抛出异常。只有当线程在运行状态时,才会真正结束线程。
3.4线程等待-join()
join方法:明确等待线程的结束
| 方法 | 说明 |
| public void join() | 等待线程结束 |
| public void join(long millis) | 等待线程结束,最多等 millis 毫秒 |
| public void join(long millis, int nanos) | 同理,但可以更高精度 |
代码示例:
package lesson02;public class Demo15_Join {public static void main(String[] args) {Thread thread=new Thread(()->{for(int i=0;i<5;i++){System.out.println("hello thread"+i);try {Thread.sleep(1000);} catch (InterruptedException e) {e.printStackTrace();}}System.out.println("线程执行结束");});//启动线程thread.start();System.out.println("join之前,线程状态:"+thread.getState());System.out.println("join之前,是否存活:"+thread.isAlive());//使用join等待thread线程结束try{thread.join();}catch (InterruptedException e){e.printStackTrace();}System.out.println("join之后,线程状态:"+thread.getState());System.out.println("join之后,是否存活:"+thread.isAlive());System.out.println("主线程执行完成");}
}
运行结果: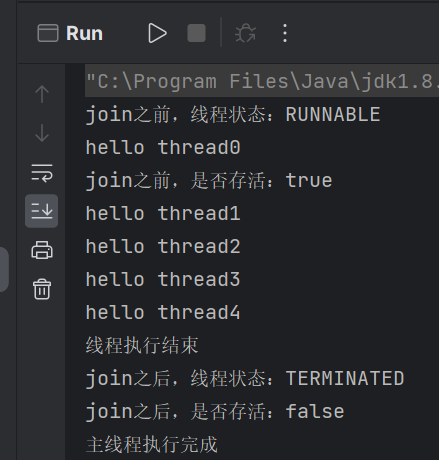
3.5获取当前线程
| 方法 | 说明 |
| public static Thread currentThread(); | 返回当前线程的引用 |
public class ThreadDemo {public static void main(String[] args) {Thread thread = Thread.currentThread();System.out.println(thread.getName());}
}
3.6启动线程-start()
run()方法和start()方法的区别:
run()方法:定义线程要执行的任务
start()方法:申请一个真正的系统线程(线程开始运行)
1.直接调用run()方法,并不会取申请一个真正的系统线程(PCB),只是单纯的调用对象的方法。
2.调用start()方法,JVM会调用本地方法取系统中真正的申请一个线程(PCB),并执行run()方法中的逻辑。
示例代码:
start()方法:
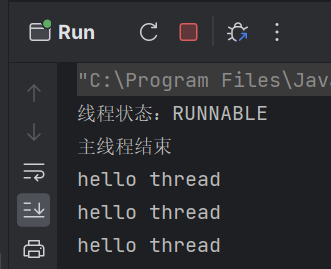
package lesson02;public class Demo16_StartRun {public static void main(String[] args) {Thread thread=new Thread(()->{while(true){System.out.println("hello thread");try {Thread.sleep(1000);} catch (InterruptedException e) {e.printStackTrace();}}});//启动线程thread.start();System.out.println("线程状态:"+thread.getState());System.out.println("主线程结束");}
}
结果:
run()方法:
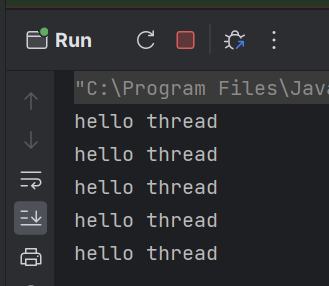
package lesson02;public class Demo16_StartRun {public static void main(String[] args) {Thread thread=new Thread(()->{while(true){System.out.println("hello thread");try {Thread.sleep(1000);} catch (InterruptedException e) {e.printStackTrace();}}});//启动线程thread.run();System.out.println("线程状态:"+thread.getState());System.out.println("主线程结束");}
}
结果:
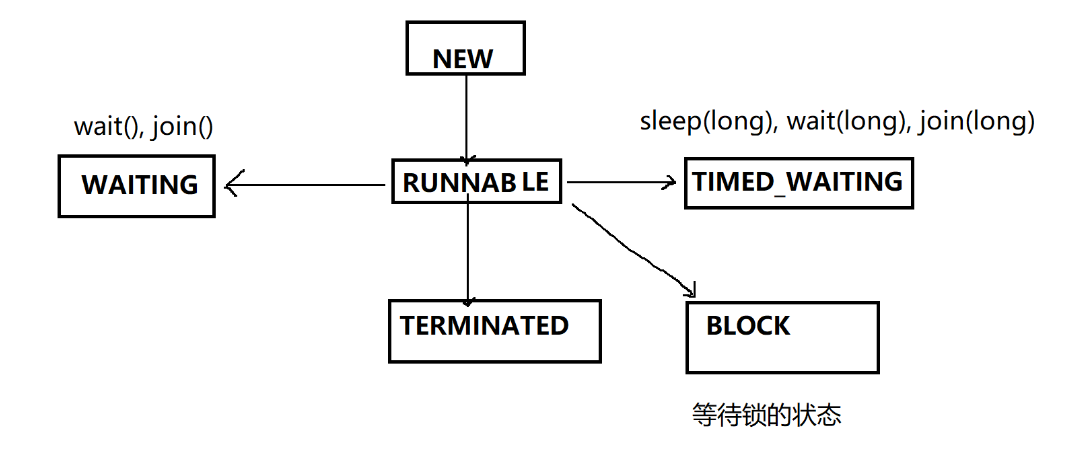
4.线程状态
线程状态指的是Thread对象的状态,不是PCB的状态。(Thread对象有自己的生命周期)
| 状态 | 解释 |
| NEW | 创建了一个Java线程,但还未调用start()方法 |
| RUNNABLE | 运行或在就绪队列中 |
| TERMINATED | 线程执行完成,PCB在操作系统中已销毁,但是Java对象还在 |
| TIMED_WATING | 等待一段时间(有时间限制) |
| WAITING | 没有时间限制的等待 |
| BLOCK | 等待锁的时候进入的阻塞状态 |
示例代码:
package lesson02;public class Demo17_State {public static void main(String[] args) throws InterruptedException {Thread t1=new Thread(()->{//第一种情况for(int i=0;i<1000_0000_00;i++){//啥也不干,等着让它结束}System.out.println("线程结束");});//启动之前打印一下线程状态//当前只是New出来了一个Thread类的对象System.out.println("启动之前的状态:"+t1.getState());//真正启动线程t1.start();System.out.println("启动之后的状态:"+t1.getState());//等待线程结束t1.join();System.out.println("PCB是否存活:"+t1.isAlive());System.out.println("线程执行完成后的状态:"+t1.getState());}
}
运行结果:
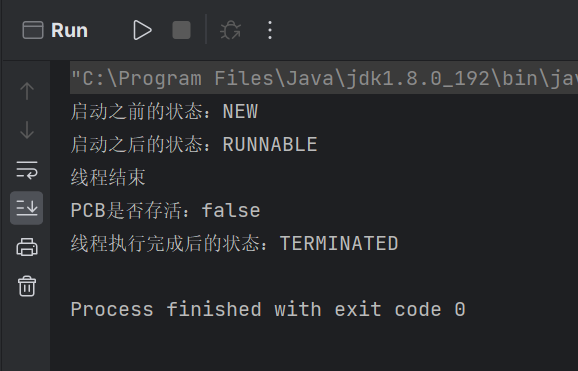
可以看到线程创建完成,但还没启动时状态为new,启动之后正在运行,状态为runnable,任务执行完成之后,PCB销毁,状态为terminated。
补充:
状态图