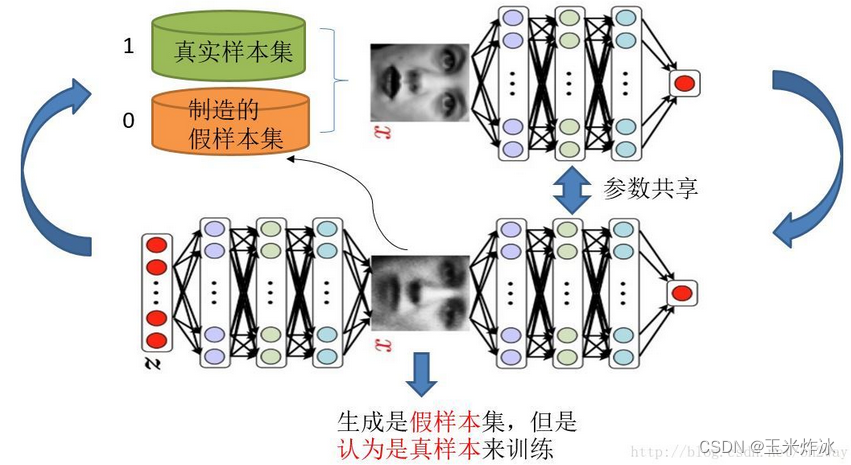
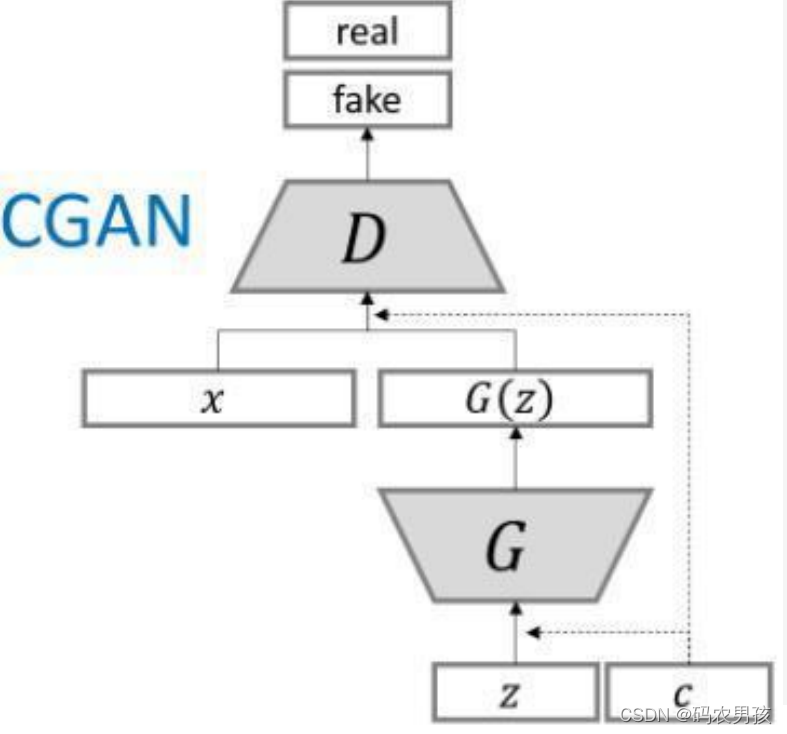
条件GAN就是在GAN的基础上加入了一个条件y,在生成器和判别器中加入条件参与训练,这样训练出来的模型可以根据设置的条件生成想到的图,一般条件可以为label。CGAN的论文为:《Conditional Generative Adversarial Nets》。CGAN的结构图如下:

CGAN的实现只需要在GAN的基础上稍作修改即可,代码如下:
#coding=utf-8
import pickle
import tensorflow as tf
import numpy as np
import matplotlib.gridspec as gridspec
import os
import shutil
from scipy.misc import imsave# 定义一个mnist数据集的类
class mnistReader(): def __init__(self,mnistPath,onehot=True): self.mnistPath=mnistPathself.onehot=onehot self.batch_index=0print ('read:',self.mnistPath)fo = open(self.mnistPath, 'rb')self.train_set,self.valid_set,self.test_set = pickle.load(fo,encoding='bytes')fo.close() self.data_label_train=list(zip(self.train_set[0],self.train_set[1]))np.random.shuffle(self.data_label_train) # 获取下一个训练集的batchdef next_train_batch(self,batch_size=100):if self.batch_index < int(len(self.data_label_train)/batch_size): # print ("batch_index:",self.batch_index )datum=self.data_label_train[self.batch_index*batch_size:(self.batch_index+1)*batch_size] self.batch_index+=1 return self._decode(datum,self.onehot) else: self.batch_index=0 np.random.shuffle(self.data_label_train) datum=self.data_label_train[self.batch_index*batch_size:(self.batch_index+1)*batch_size] self.batch_index+=1 return self._decode(datum,self.onehot) # 获取测试集的数据def test_data(self):tdata,tlabel=self.test_setdata_label_test=list(zip(tdata,tlabel))return self._decode(data_label_test,self.onehot) # 把一个batch的训练数据转换为可以放入模型训练的数据 def _decode(self,datum,onehot): rdata=list() # batch训练数据rlabel=list() if onehot: for d,l in datum: rdata.append(np.reshape(d,[784])) # 转变形状为:一维向量hot=np.zeros(10) hot[int(l)]=1 # label设为100维的one-hot向量rlabel.append(hot) else: for d,l in datum: rdata.append(np.reshape(d,[784])) rlabel.append(int(l)) return rdata,rlabel img_height = 28 # mnist图片高度
img_width = 28 # mnist图片宽度
img_size = img_height * img_width # mnist图像总的大小to_train = True
to_restore = False
output_path = "C-GAN" # 保存的文件的路径max_epoch = 500 # 最大迭代次数h1_size = 150 # 第一个隐层的单元数
h2_size = 300 # 第二个隐层的单元数
z_size = 100 # 噪声向量的维度
y_size=10 # 条件变量的维度
batch_size = 256 # batch块大小# 创建生成模型,输入为噪声张量,大小为 :batch_size * 100
def build_generator(z_prior,y): inputs = tf.concat(axis=1, values=[z_prior, y])# 第一个隐层层w1 = tf.Variable(tf.truncated_normal([z_size+y_size, h1_size], stddev=0.1), name="g_w1", dtype=tf.float32) b1 = tf.Variable(tf.zeros([h1_size]), name="g_b1", dtype=tf.float32) h1 = tf.nn.relu(tf.matmul(inputs, w1) + b1) # 第二个隐层w2 = tf.Variable(tf.truncated_normal([h1_size, h2_size], stddev=0.1), name="g_w2", dtype=tf.float32) b2 = tf.Variable(tf.zeros([h2_size]), name="g_b2", dtype=tf.float32) h2 = tf.nn.relu(tf.matmul(h1, w2) + b2) # 偏置是加载batch的每个元素上,也就是和tensor的每行相加# 输出层,输出一个 batch_size * 784 张量,每个元素值在(-1,1)之间w3 = tf.Variable(tf.truncated_normal([h2_size, img_size], stddev=0.1), name="g_w3", dtype=tf.float32) b3 = tf.Variable(tf.zeros([img_size]), name="g_b3", dtype=tf.float32) h3 = tf.matmul(h2, w3) + b3 x_generate = tf.nn.tanh(h3) # tanh函数输出(-1,1)之间的某个值 g_params = [w1, b1, w2, b2, w3, b3] return x_generate, g_params # 创建生成模型,输入为真实图片和生成的图片
def build_discriminator(x_data, x_generated,y, keep_prob): data_and_y = tf.concat(axis=1, values=[x_data, y]) #维度是[batch_size,784 + 10]gen_and_y = tf.concat(axis=1, values=[x_generated, y]) #维度是[batch_size,784 + 10]# 两个大小batch_size * 784的张量合并为一个 (batch_size*2) * 784的张量,每个tensor的每个元素是一行x_in = tf.concat([data_and_y, gen_and_y], 0) # 相当于把batch_size扩大为2倍 # 第一个隐层w1 = tf.Variable(tf.truncated_normal([img_size+y_size, h2_size], stddev=0.1), name="d_w1", dtype=tf.float32) b1 = tf.Variable(tf.zeros([h2_size]), name="d_b1", dtype=tf.float32) h1 = tf.nn.dropout(tf.nn.relu(tf.matmul(x_in, w1) + b1), keep_prob) # 第二个隐层w2 = tf.Variable(tf.truncated_normal([h2_size, h1_size], stddev=0.1), name="d_w2", dtype=tf.float32) b2 = tf.Variable(tf.zeros([h1_size]), name="d_b2", dtype=tf.float32) h2 = tf.nn.dropout(tf.nn.relu(tf.matmul(h1, w2) + b2), keep_prob) # 输出层,输出一个 (2*batch_size) * 1 的张量w3 = tf.Variable(tf.truncated_normal([h1_size, 1], stddev=0.1), name="d_w3", dtype=tf.float32) b3 = tf.Variable(tf.zeros([1]), name="d_b3", dtype=tf.float32) h3 = tf.matmul(h2, w3) + b3 # 计算原始图片和生成图片属于真实图片的概率,这里用sigmod函数来计算概率值,属于(0,1)之间y_data = tf.nn.sigmoid(tf.slice(h3, [0, 0], [batch_size, -1], name=None)) # 大小:batch_size*1 '''tf.slice(input_, begin, size, name = None)解释 :这个函数的作用是从输入数据input中提取出一块切片,切片的尺寸是size,切片的开始位置是begin。切片的尺寸size表示输出tensor的数据维度,其中size[i]表示在第i维度上面的元素个数。'''y_generated = tf.nn.sigmoid(tf.slice(h3, [batch_size, 0], [-1, -1], name=None)) # 大小:batch_size*1d_params = [w1, b1, w2, b2, w3, b3] return y_data, y_generated, d_params# 开始训练GAN
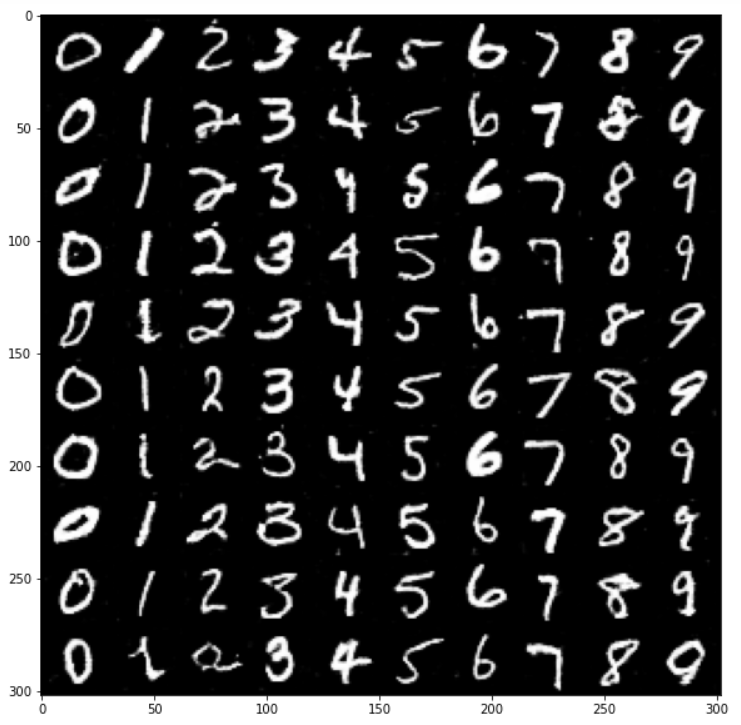
def train(): mnist=mnistReader(mnistPath="E:/testdata/mnist.pkl") x_data = tf.placeholder(tf.float32, [batch_size, img_size], name="x_data") y = tf.placeholder(tf.float32, shape=[batch_size, y_size],name='y') z_prior = tf.placeholder(tf.float32, [batch_size, z_size], name="z_prior") keep_prob = tf.placeholder(tf.float32, name="keep_prob") global_step = tf.Variable(0, name="global_step", trainable=False) x_generated, g_params = build_generator(z_prior,y) y_data, y_generated, d_params = build_discriminator(x_data, x_generated, y , keep_prob) d_loss = - (tf.log(y_data) + tf.log(1 - y_generated)) # d_loss大小为 batch_size * 1 g_loss = - tf.log(y_generated) # g_loss大小为 batch_size * 1optimizer = tf.train.AdamOptimizer(0.0001) # 定义优化器,学习率0.0001d_trainer = optimizer.minimize(d_loss, var_list=d_params) g_trainer = optimizer.minimize(g_loss, var_list=g_params) init = tf.global_variables_initializer() # saver = tf.train.Saver() sess = tf.Session() sess.run(init) if to_restore: chkpt_fname = tf.train.latest_checkpoint(output_path) saver.restore(sess, chkpt_fname) else: if os.path.exists(output_path): shutil.rmtree(output_path) # 删除目录树os.mkdir(output_path) # 重新创建目录树# 生成随机噪声z_sample_val = np.random.normal(0, 1, size=(batch_size, z_size)).astype(np.float32) # --------开始训练模型---------------------------------------------for i in range(sess.run(global_step), max_epoch): for j in range(int(50000/batch_size)): print ("epoch:%s, iter:%s" % (i, j) )x_value, y_label=mnist.next_train_batch(batch_size=batch_size) # 256 * 784x_value=np.array(x_value)x_value = 2 * x_value.astype(np.float32) - 1 z_value = np.random.normal(0, 1, size=(batch_size, z_size)).astype(np.float32) sess.run(d_trainer,feed_dict={x_data: x_value,y:y_label, z_prior: z_value, keep_prob: np.sum(0.7).astype(np.float32)}) if j % 1 == 0: sess.run(g_trainer,feed_dict={x_data: x_value,y:y_label ,z_prior: z_value, keep_prob: np.sum(0.7).astype(np.float32)}) y_sample = np.zeros(shape=[batch_size, y_size])y_sample[:, 7] = 1 #生成的假的标签# 生成一个样本图片x_gen_val = sess.run(x_generated, feed_dict={z_prior: z_sample_val,y:y_sample}) show_result(x_gen_val, os.path.join(output_path, "sample%s.jpg" % i)) # 再次生成一个样本图片z_random_sample_val = np.random.normal(0, 1, size=(batch_size, z_size)).astype(np.float32) x_gen_val = sess.run(x_generated, feed_dict={z_prior: z_random_sample_val,y:y_sample}) show_result(x_gen_val, os.path.join(output_path, "random_sample%s.jpg" % i)) # 每次迭代保存模型sess.run(tf.assign(global_step, i + 1))'''tf.assign(A, new_number): 这个函数的功能主要是把A的值变为new_number''' # saver.save(sess, os.path.join(output_path, "model"), global_step=global_step) # 保存生成的图片结果
def show_result(batch_res, fname, grid_size=(8, 8), grid_pad=5): # 由于生成器生成的tensor的每个元素值位于(-1,1)之间,这里先变成(0,1)之间的值,并把形状变为像素矩阵batch_res = 0.5*batch_res.reshape((batch_res.shape[0], img_height, img_width))+0.5img_h, img_w = batch_res.shape[1], batch_res.shape[2] grid_h = img_h * grid_size[0] + grid_pad * (grid_size[0] - 1) grid_w = img_w * grid_size[1] + grid_pad * (grid_size[1] - 1) img_grid = np.zeros((grid_h, grid_w), dtype=np.uint8) for i, res in enumerate(batch_res): if i >= grid_size[0] * grid_size[1]: break img = (res) * 255 # 生成器生成的是0-1的值,所以要乘以255变成像素值img = img.astype(np.uint8) row = (i // grid_size[0]) * (img_h + grid_pad) col = (i % grid_size[1]) * (img_w + grid_pad) img_grid[row:row + img_h, col:col + img_w] = img imsave(fname, img_grid) if __name__ == '__main__':train()