There are mainly two ways of moving a gameObject in Unity:
在Unity中移动游戏对象的方式主要有两种:
Changing Position Coordintes: By directly changing the position of a gameObject without much consideration to its physics or other such components. This is what we've been doing so far, by simply adding a value to the object's
Xposition every frame.更改位置坐标:通过直接更改游戏对象的位置而无需过多考虑其物理性质或其他类似组件。 这是到目前为止我们一直在做的事情,只需在每个帧的对象的
X位置添加一个值即可。Rigidbody Physics: When dealing with objects that follows physics rules, it makes more sense to apply forces on objects or change their velocity instead of a direct position update. Looks more real.
刚体物理:处理遵循物理规则的对象时,将力施加到对象上或更改其速度而不是直接更新位置更有意义。 看起来更真实。
In this tutorial we will cover an interesting example of using Rigidbody Physics for movement instead of Position change trick. We've worked with shooting bullets so far, right? But our bullets have only travelled using the position change regardless of what they are and how they move in real world.
在本教程中,我们将介绍一个有趣的示例,该示例使用刚体物理进行运动而不是位置更改技巧。 到目前为止,我们已经进行了子弹射击工作,对吗? 但是,无论子弹是什么,以及它们在现实世界中的移动方式如何,我们的子弹只能利用位置变化来移动。
Which also leads to issues like the one in which our bullet kept going even after it hit the target(Checkout our previous tutorials for the example).
这还会导致类似这样的问题:即使子弹击中目标,我们的子弹仍会继续运转(请查看示例的先前教程)。
It simply didn't know that it was supposed to stop, after hitting the target, since we programmed it to keep going to the right.
它根本不知道在击中目标后应该停止,因为我们对它进行了编程以使其继续向右移动。
Instead of doing that, what if we applied a very strong impulsive force to the bullet, much like the one in real life? Doing so will make the bullet move because of its momentum, and not because of a programmed position update.
而不是这样做,如果我们对子弹施加非常强的脉冲力 ,就像现实生活中的那种那样,该怎么办? 这样做会使子弹运动,因为它具有动力,而不是因为程序化了的位置更新。
Let's explore this option, and, we'll understand the AddForce() method provided by the class Rigidbody. Open up the script that defines our bullet/fireball's behaviour:
让我们探索这个选项,然后,我们将理解Rigidbody类提供的AddForce()方法。 打开定义我们的子弹/火球行为的脚本:
using System.Collections;
using System.Collections.Generic;
using UnityEngine;public class FireballBehaviour : MonoBehaviour
{private float fireballXValue;public float fireballSpeed;void Start(){// getting the initial position where prefab is createdfireballXValue = gameObject.transform.position.x;}// Update is called once per framevoid Update() {// adding speed value to the X axis position// valuefireballXValue += fireballSpeed;// setting new X value to positiongameObject.transform.position = new Vector2(fireballXValue, gameObject.transform.position.y);}}}
Since pretty much everything we've written in this script deals with movement by position change, let's clear everything up so we have a clean Start() and Update() methods again.
由于我们在此脚本中编写的几乎所有内容都通过位置变化来处理运动,因此让我们清除所有内容,以便再次获得干净的Start()和Update()方法。
using System.Collections;
using System.Collections.Generic;
using UnityEngine;public class FireballBehaviour : MonoBehaviour
{private float fireballXValue;public float fireballSpeed;void Start(){}// Update is called once per framevoid Update() {}}
使用组件控制GameObject (Controlling GameObjects using components)
Now we know that we can access a gameObject in the script attached to it by using the reference gameObject.
现在,我们知道可以使用参考gameObject在附加到其的脚本中访问gameObject 。
Also, we can access and Component(like RigidBody, Collider etc) attached to the gameObject using the GetComponent function.
另外,我们可以使用GetComponent函数访问和附加到gameObject的Component(例如RigidBody,Collider等)。
While earlier, we used to update any component's property using the Inspector view. Here, we will try to do that from within the script.
之前,我们曾经使用Inspector视图更新任何组件的属性。 在这里,我们将尝试在脚本中执行此操作。
First off, we still have to declare the Rigidbody2D variable, but instead of making it public, let's make it private instead.
首先,我们仍然必须声明Rigidbody2D变量,但与其将其设为public , Rigidbody2D将其设为private 。
private RigidBody2D fireballBody;Now, in the Start() method, we'll add the following line:
现在,在Start()方法中,我们将添加以下行:
void Start()
{fireballBody = GetComponent();
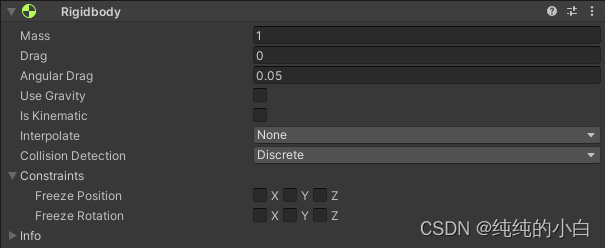
}So what does this line do? This line of code is, in a way, an automatic way of detecting and setting the variable. By calling the GetComponent method, we are simply telling Unity to go ahead and detect the type of component, specified in the angle brackets <> for our gameObject. In our case, we want the script to detect a Rigidbody2D component, so we'll put that within the angle brackets. This method doesn't have any overloads(variant).
那么这行是做什么的呢? 从某种意义上说,这行代码是检测和设置变量的自动方式。 通过调用GetComponent方法,我们只是简单地告诉Unity继续检测在游戏对象的尖括号<>指定的组件类型。 在我们的例子中,我们希望脚本检测Rigidbody2D组件,因此将其放在尖括号中。 此方法没有任何重载(变量)。
向RigidBody组件添加速度和力 (Adding Velocity and Force to a RigidBody component)
So now that we have control on our fireball's Rigidbody, what do we do with it? Well, we can either add a velocity to it, or add a force to it. Note that, both of these components are a part of the physics behind the gameObject, and not a direct change to the transform (and hence, its position) itself.
因此,既然我们已经控制了火球的刚体,我们将如何处理呢? 好吧,我们既可以为其添加速度 ,也可以为其添加力 。 请注意,这两个组件都是gameObject背后物理的一部分,而不是对变换本身(及其位置 )的直接更改。
What's the difference? If you add a velocity to your body, you're ignoring any mass that the body has. It simply sets it going without considering how heavy the body is. If you add a force however, you're taking the mass of the body into account.
有什么不同? 如果您为身体增加速度 ,则将忽略身体具有的质量。 它只是简单地进行设置,而无需考虑身体的重量。 但是,如果加力 ,则要考虑身体的质量。
That means adding even a small velocity to something heavy like a big car will make it move, but adding a small force on the same car will only budge it slightly. As far as we're concerned, we'll add a velocity to the fireball, since we can consider it to have pretty low weight in itself.
这意味着即使在大型汽车之类的重物上增加很小的速度也会使其移动,但是在同一辆汽车上施加较小的力只会使它稍微移动一点。 就我们而言,我们将为火球增加一个速度,因为我们可以认为它本身的重量很轻。
增加velocity属性 (Adding velocity property)
using System.Collections;
using System.Collections.Generic;
using UnityEngine;public class FireballBehaviour : MonoBehaviour
{private RigidBody2D fireballBody;public float speed;void Start(){fireballBody = GetComponent();// velocity is a property of RigidBody2DfireballBody.velocity = new Vector2(speed, 0);}// Update is called once per framevoid Update() {}}
Wait a second! You added the fireballBody.velocity code into the Start() method, not the Update() method. To understand this, let's take an example. Imagine your mom asks you to change the lightbulb in the kitchen. You say, "sure, I'll do it", and you do it later on (Or don't, as is the case with most of us). Now imagine your mom asking you to change the lightbulb, 60 times per second for the rest of your life whether you change the lightbulb or not. A bit terrifying, isn't it? We are doing quite the same thing here, in Unity. If we set the velocity in the Start() method, we are simply telling the game to change the velocity once and then move on.
等一会儿! 您将fireballBody.velocity代码添加到Start()方法中,而不是Update()方法中。 为了理解这一点,让我们举个例子。 想象一下,您的妈妈要您更换厨房的灯泡。 您说“确定,我会做”,然后您再做(或者不这样做,就像我们大多数人一样)。 现在想象一下,无论您是否更换灯泡,您的母亲在您余生中每秒要您更换灯泡60次 。 有点恐怖,不是吗? 在Unity中,我们在做相同的事情。 如果我们在Start()方法中设置速度,我们只是在告诉游戏先改变速度然后继续前进。
But If we write that same code in the Update() method, we'd simply be asking Unity to set the Rigidbody's speed to our defined values again and again. Since our values don't change for the time being, we're un-necessarily telling the script to assign the value to something it's already done.
但是,如果我们在Update()方法中编写相同的代码,我们只会要求Unity一次又一次将刚体的速度设置为我们定义的值。 由于我们的值暂时不会改变,因此我们不必要地告诉脚本将值分配给已经完成的事情。
使用AddForce() (Adding force using AddForce())
Now, let's explore the way of adding a force to the gameObject.
现在,让我们探讨向游戏对象添加力量的方法。
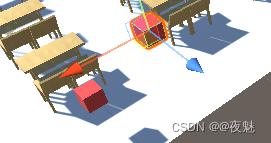
The first parameter for the method AddForce() asks for simply a Vector2 to know in which direction you want to apply the force in. For example, a force using new Vector2(4, 5) will apply a force of 4 units horizontally right and 5 units vertically upwards.
方法AddForce()的第一个参数仅要求Vector2知道您要向哪个方向施加力。例如,使用new Vector2(4, 5)的力将向右水平施加4个单位的力,垂直向上 5个单位。
The second parameter is a bit more interesting. You'll see that the additonal second parameter is an enum named ForceMode2D. ForceMode2D is a pair of modes for applying a force onto a gameObject. These modes are named Force and Impulse. Based on what kind of force you want to apply, you either input ForceMode2D.Force (for applying a constant, consistent force) or ForceMode2D.Impulse(for applying an instantaneous, striking force.)
第二个参数更有趣。 您将看到ForceMode2D第二个参数是一个名为ForceMode2D的枚举 。 ForceMode2D是用于在游戏对象上施加力的一对模式 。 这些模式分别称为Force和Impulse 。 根据要施加的力的类型,输入ForceMode2D.Force (用于施加恒定,一致的力)或ForceMode2D.Impulse (用于施加瞬时的打击力)。
For our scenario, we want to apply a sudden, massive force on our fireball so it shoots forward. Applying a constant force would make it accelerate up from a slow speed, which would seem kind of odd.
对于我们的场景,我们想在我们的火球上施加突然的巨大力量,使其向前射击。 施加恒定的力会使它从慢速加速,这似乎有些奇怪。
using System.Collections;
using System.Collections.Generic;
using UnityEngine;public class FireballBehaviour : MonoBehaviour
{private RigidBody2D fireballBody;public float speed;void Start(){fireballBody = GetComponent();// AddForce is a function of RigidBody2DfireballBody.AddForce(new Vector2(speed, 0), ForceMode2D.Impulse);}// Update is called once per framevoid Update() {}}
If you try out both these methods in Unity, your fireballs should move the same way still, but this time, without ever modifying its position directly and using physics instead. We let Unity handle that for us.
如果您在Unity中尝试了这两种方法,那么您的火球应该仍然以相同的方式移动,但是这一次,无需直接修改其位置并使用物理方法。 我们让Unity为我们处理。
翻译自: https://www.studytonight.com/game-development-in-2D/right-way-to-move