- Servlet 方法介绍
- Servlet urlPattern 配置
- IDEA 模板创建 Servlet
- 中文乱码问题
- POST 乱码
- GET 乱码
- 路径问题
- Response 响应字符数据
- Response 响应字节数据
- 用户登录案例
- 准备工作
- 流程
- 用户注册案例
- 代码优化
- 案例
- 准备工作
- 业务 - 查询所有
- 业务 - 添加
- 业务 - 修改(数据回显)
- 业务 - 修改(修改数据)
- 业务 - 删除
- 业务 - 用户登录
- 业务 - 记住用户
- 业务 - 注册
- 业务 - 注册验证码
- 业务 - 登录验证
Servlet 方法介绍
init():初始化方法- 调用时机:默认情况下,servlet 被第一次访问时,调用
- 可通过
loadOnStartup修改
- 可通过
- 调用次数:1次
- 调用时机:默认情况下,servlet 被第一次访问时,调用
service():提供服务- 调用时机:每一次Servlet被访问时,调用
- 调用次数:多次
destory():销毁方法- 调用时机:内存释放或者服务器关闭的时候,Servlet对象会被销毁,调用
- 调用次数:1次
getServletConfig():获取 ServletConfig 对象getServletInfo():获取 Servlet 信息(author、version、copyright)
Servlet urlPattern 配置
- 一个 Servlet 可以配置多个 urlPattern
@WebServlet(urlPatterns = {"/demo3", "/demo4"}) - urlPattern 配置规则
- 精确匹配
- 配置路径:
@WebServlet("/demo3") - 访问路径:
localhost:8080/web-demo/demo3
- 配置路径:
- 目录匹配
- 配置路径:
@WebServlet("/user/*") - 访问路径:
localhost:8080/web-demo/user/aaa、localhost:8080/web-demo/user/bbb
- 配置路径:
- 扩展名匹配
- 配置路径:
@WebServlet("*.do") - 访问路径:
localhost:8080/web-demo/aaa.do、localhost:8080/web-demo/bbb.do
- 配置路径:
- 任意匹配
- 配置路径:
@WebServlet("/")、@WebServlet("/*") - 访问路径:
localhost:8080/web-demo/hehe、localhost:8080/web-demo/haha
- 配置路径:
- 精确匹配
/和/*的区别
- 当我们的项目中的Servlet配置了
/,会覆盖掉 tomcat 中的 DefaultServlet,当其他的 url-pattern 都匹配不上时都会走这个Servlet- 当我们的项目中配置了
/*,意味着匹配任意访问路径
优先级:精确路径 > 目录路径 > 扩展名路径 > /* > /
IDEA 模板创建 Servlet

#if (${PACKAGE_NAME} && ${PACKAGE_NAME} != "")package ${PACKAGE_NAME};#end
#parse("File Header.java")#if ($JAVAEE_TYPE == "jakarta")
import jakarta.servlet.*;
import jakarta.servlet.http.*;
import jakarta.servlet.annotation.*;
#else
import javax.servlet.*;
import javax.servlet.http.*;
import javax.servlet.annotation.*;
#end
import java.io.IOException;@WebServlet("/${Entity_Name}")
public class ${Class_Name} extends HttpServlet {@Overrideprotected void doGet(HttpServletRequest request, HttpServletResponse response) throws ServletException, IOException {}@Overrideprotected void doPost(HttpServletRequest request, HttpServletResponse response) throws ServletException, IOException {this.doGet(request, response);}
}
中文乱码问题
POST 乱码
getReader()默认编码是iso-8859-1- 设置字符输入流的编码为
UTF-8:request.setCharacterEncoding("UTF-8");
GET 乱码
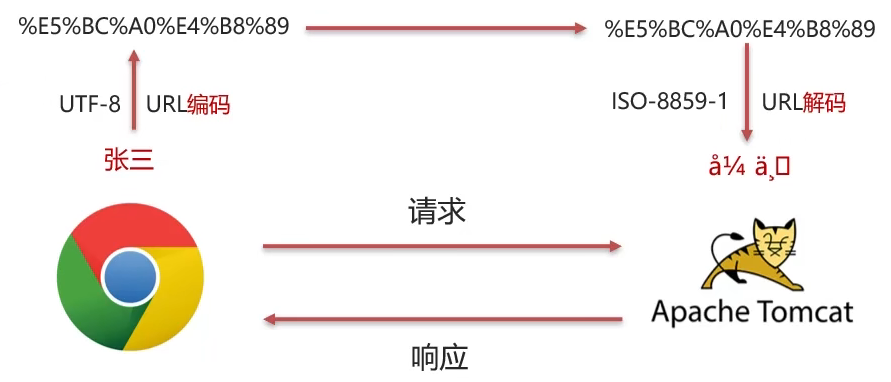
-
URL 编码
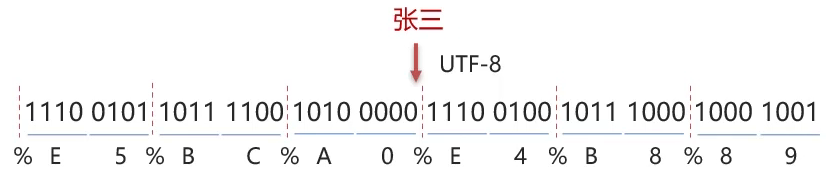
- 将字符串按照编码方式转为二进制
- 每个字节转为2个16进制并在前边加上%
-
URL编解码Demo
package com.ruochen.web;import java.io.UnsupportedEncodingException;
import java.net.URLDecoder;
import java.net.URLEncoder;public class URLDemo {public static void main(String[] args) throws UnsupportedEncodingException {String username = "张三";// 1. URL 编码String encode = URLEncoder.encode(username, "utf-8");System.out.println(encode);// 2. URL 解码String decode = URLDecoder.decode(encode, "ISO-8859-1");System.out.println(decode);}
}
%E5%BC%A0%E4%B8%89å¼ ä¸‰ -
tomcat ISO-8859-1 接码我们无法改变,但是我们可以发现 URL 编码数据和接收打的数据字节是一样的(二进制数据 10101xxxx),这就为我们提供了一种思路:我们可以将乱码的数据转换为字节数据(二进制数据),再将二进制字节数据转换为字符串,demo 如下
package com.ruochen.web;import java.io.UnsupportedEncodingException;
import java.net.URLDecoder;
import java.net.URLEncoder;public class URLDemo {public static void main(String[] args) throws UnsupportedEncodingException {String username = "张三";// 1. URL 编码String encode = URLEncoder.encode(username, "utf-8");System.out.println(encode);// 2. URL 解码String decode = URLDecoder.decode(encode, "ISO-8859-1");System.out.println(decode);// 3. 转换为字节数据,编码byte[] bytes = decode.getBytes("ISO-8859-1");for (byte b : bytes) {System.out.print(b + " ");}System.out.println();// 4. 将字节数组转换为字符串,解码String string = new String(bytes, "utf-8");System.out.println(string);}
}
%E5%BC%A0%E4%B8%89å¼ ä¸‰-27 -68 -96 -28 -72 -119 张三 -
servlet demo
@WebServlet("/req1")
public class RequestDemo1 extends HttpServlet {@Overrideprotected void doGet(HttpServletRequest request, HttpServletResponse response) throws ServletException, IOException {// 解决post乱码 getReader() 默认编码是 iso-8859-1request.setCharacterEncoding("UTF-8");  // 设置字符输入流的编码String username = request.getParameter("username");System.out.println("解决乱码前:" + username);// GET 获取参数的方式:getQueryString()// 乱码原因:tomcat 进行URL解码,默认的字符集ISO-8859-1// 1. 先对乱码进行编码,转为字节数组// byte[] bytes = username.getBytes(StandardCharsets.ISO_8859_1);// 2. 字节数组解码// username = new String(bytes, StandardCharsets.UTF_8);username = new String(username.getBytes(StandardCharsets.ISO_8859_1), StandardCharsets.UTF_8);System.out.println("解决乱码后:" + username);}@Overrideprotected void doPost(HttpServletRequest request, HttpServletResponse response) throws ServletException, IOException {this.doGet(request, response);}
}
Tomcat 8 之后,已将GET请求乱码问题解决,设置默认的解码方式为 UTF-8
路径问题
- 明确路径谁使用?
- 浏览器使用:需要加虚拟目录(项目访问路径)
- 服务端使用:不需要加虚拟目录
- 练习
- <a href = “路径”>:加虚拟目录
- <form action=“路径”>:加虚拟目录
- req.getRequestDispatcher(“路径”):不需要加虚拟目录
- resp.sendRedirect(“路径”):需要加虚拟目录

Response 响应字符数据
- 使用 Response 对象获取字符输出流:
PrintWriter writer = resp.getWriter(); - 写数据:
write.write("aaa"); - 可通过设置 header 指定类型:
resp.setHeader("content-type", "text/html"); - 流不需要关闭,resp 对象销毁的时候会自动关闭
- 中文乱码,设置流的编码:
resp.setContentType("text/html;charset=utf-8");
Response 响应字节数据
- 通过 Response 对象获取字节输出流:
ServletOutputStream outputStream = resp.getOutputStream(); - 写数据:
outputStream.write(字节数据); - 案例
package com.ruochen.web;import javax.servlet.*; import javax.servlet.http.*; import javax.servlet.annotation.*; import java.io.FileInputStream; import java.io.IOException;@WebServlet("/resp1") public class ResponseDemo1 extends HttpServlet {@Overrideprotected void doGet(HttpServletRequest request, HttpServletResponse response) throws ServletException, IOException {// 1. 读取文件FileInputStream fis = new FileInputStream("C:\\Users\\ruochen\\Desktop\\离雨.jpg");// 2. 获取 response 字节输出流ServletOutputStream os = response.getOutputStream();// 3. 完成流的 copybyte[] buff = new byte[1024];int len = 0;while((len = fis.read(buff)) != -1) {os.write(buff, 0, len);}fis.close();}@Overrideprotected void doPost(HttpServletRequest request, HttpServletResponse response) throws ServletException, IOException {this.doGet(request, response);} } - 我们可以使用
commons-io工具类简化上述操作 - 导入坐标:
pom.xml<dependency><groupId>commons-io</groupId><artifactId>commons-io</artifactId><version>2.6</version></dependency> - 上述循环遍历代码可简化为如下
IOUtils.copy(fis, os);
用户登录案例
准备工作
login.html放到 webapp 目录下<!DOCTYPE html> <html lang="en"><head><meta charset="UTF-8"><title>login</title><link href="css/login.css" rel="stylesheet"> </head><body> <div id="loginDiv"><form action="/web-demo/loginServlet" method="post" id="form"><h1 id="loginMsg">LOGIN IN</h1><p>Username:<input id="username" name="username" type="text"></p><p>Password:<input id="password" name="password" type="password"></p><div id="subDiv"><input type="submit" class="button" value="login up"><input type="reset" class="button" value="reset"> <a href="register.html">没有账号?点击注册</a></div></form> </div></body> </html>login.css* {margin: 0;padding: 0; }html {height: 100%;width: 100%;overflow: hidden;margin: 0;padding: 0;background: url(../imgs/Desert.jpg) no-repeat 0px 0px;background-repeat: no-repeat;background-size: 100% 100%;-moz-background-size: 100% 100%; }body {display: flex;align-items: center;justify-content: center;height: 100%; }#loginDiv {width: 37%;display: flex;justify-content: center;align-items: center;height: 300px;background-color: rgba(75, 81, 95, 0.3);box-shadow: 7px 7px 17px rgba(52, 56, 66, 0.5);border-radius: 5px; }#name_trip {margin-left: 50px;color: red; }p {margin-top: 30px;margin-left: 20px;color: azure; }input {margin-left: 15px;border-radius: 5px;border-style: hidden;height: 30px;width: 140px;background-color: rgba(216, 191, 216, 0.5);outline: none;color: #f0edf3;padding-left: 10px; } #username{width: 200px; } #password{width: 202px; } .button {border-color: cornsilk;background-color: rgba(100, 149, 237, .7);color: aliceblue;border-style: hidden;border-radius: 5px;width: 100px;height: 31px;font-size: 16px; }#subDiv {text-align: center;margin-top: 30px; } #loginMsg{text-align: center;color: aliceblue; }- 创建
db1数据库,创建tb_user表,创建User实体类-- 创建数据库 create database db1 character set utf8; use db1;-- 创建用户表 CREATE TABLE tb_user(id int primary key auto_increment,username varchar(20) unique,password varchar(32) );-- 添加数据 INSERT INTO tb_user(username,password) values('zhangsan','123'),('lisi','234');SELECT * FROM tb_user;package com.ruochen.pojo;public class User {private Integer id;private String username;private String password;public Integer getId() {return id;}public void setId(Integer id) {this.id = id;}public String getUsername() {return username;}public void setUsername(String username) {this.username = username;}public String getPassword() {return password;}public void setPassword(String password) {this.password = password;}@Overridepublic String toString() {return "User{" +"id=" + id +", username='" + username + '\'' +", password='" + password + '\'' +'}';} } - 导入MyBatis 坐标,MySQL 驱动坐标
<dependency><groupId>org.mybatis</groupId><artifactId>mybatis</artifactId><version>3.5.5</version></dependency><dependency><groupId>mysql</groupId><artifactId>mysql-connector-java</artifactId><version>5.1.34</version></dependency> - 创建
mybatis-config.xml核心配置文件,UserMapper.xml映射文件,UserMapper接口mybatis-config.xml
<?xml version="1.0" encoding="UTF-8" ?> <!DOCTYPE configurationPUBLIC "-//mybatis.org//DTD Config 3.0//EN""http://mybatis.org/dtd/mybatis-3-config.dtd"> <configuration><!--起别名--><typeAliases><package name="com.ruochen.pojo"/></typeAliases><environments default="development"><environment id="development"><transactionManager type="JDBC"/><dataSource type="POOLED"><property name="driver" value="com.mysql.jdbc.Driver"/><property name="url" value="jdbc:mysql:///db1?useSSL=false&useServerPrepStmts=true"/><property name="username" value="root"/><property name="password" value="ruochen666"/></dataSource></environment></environments><mappers><!--扫描mapper--><package name="com.ruochen.mapper"/></mappers> </configuration>UserMapper.xml
<?xml version="1.0" encoding="UTF-8" ?> <!DOCTYPE mapperPUBLIC "-//mybatis.org//DTD Mapper 3.0//EN""http://mybatis.org/dtd/mybatis-3-mapper.dtd"> <mapper namespace="com.ruochen.mapper.UserMapper"></mapper>UserMapper.java
package com.ruochen.mapper;public interface UserMapper {} - 目录树如下
流程
UserMapper.javapackage com.ruochen.mapper;import com.ruochen.pojo.User; import org.apache.ibatis.annotations.Param; import org.apache.ibatis.annotations.Select;public interface UserMapper {/*** 根据用户名和密码查询用户对象* @param username* @param password* @return*/@Select("select * from tb_user where username= #{username} and password = #{password}")User select(@Param("username") String username, @Param("password") String password); }UserServlet.javapackage com.ruochen.web;import com.ruochen.mapper.UserMapper; import com.ruochen.pojo.User; import org.apache.ibatis.io.Resources; import org.apache.ibatis.session.SqlSession; import org.apache.ibatis.session.SqlSessionFactory; import org.apache.ibatis.session.SqlSessionFactoryBuilder;import javax.servlet.*; import javax.servlet.http.*; import javax.servlet.annotation.*; import java.io.IOException; import java.io.InputStream; import java.io.PrintWriter;@WebServlet("/loginServlet") public class LoginServlet extends HttpServlet {@Overrideprotected void doGet(HttpServletRequest request, HttpServletResponse response) throws ServletException, IOException {// 1. 接收用户名和密码String username = request.getParameter("username");String password = request.getParameter("password");// 2. 调用 MyBatis 完成查询// 2.1 获取 SqlSessionFactory 对象String resource = "mybatis-config.xml";InputStream inputStream = Resources.getResourceAsStream(resource);SqlSessionFactory sqlSessionFactory = new SqlSessionFactoryBuilder().build(inputStream);// 2.2 获取 SqlSession 对象SqlSession sqlSession = sqlSessionFactory.openSession();// 2.3 获取 MapperUserMapper userMapper = sqlSession.getMapper(UserMapper.class);// 2.4 调用方法User user = userMapper.select(username, password);// 2.5 释放资源sqlSession.close();// 获取字符输出流,并设置 content-typeresponse.setContentType("text/html;charset=utf-8");PrintWriter writer = response.getWriter();// 3. 判断 User 是否为 nullif (user != null) {// 登录成功writer.write("登录成功");} else {// 登录失败writer.write("登录失败");}}@Overrideprotected void doPost(HttpServletRequest request, HttpServletResponse response) throws ServletException, IOException {this.doGet(request, response);} }
用户注册案例
register.html<!DOCTYPE html> <html lang="en"> <head><meta charset="UTF-8"><title>欢迎注册</title><link href="css/register.css" rel="stylesheet"> </head> <body><div class="form-div"><div class="reg-content"><h1>欢迎注册</h1><span>已有帐号?</span> <a href="login.html">登录</a></div><form id="reg-form" action="#" method="get"><table><tr><td>用户名</td><td class="inputs"><input name="username" type="text" id="username"><br><span id="username_err" class="err_msg" style="display: none">用户名不太受欢迎</span></td></tr><tr><td>密码</td><td class="inputs"><input name="password" type="password" id="password"><br><span id="password_err" class="err_msg" style="display: none">密码格式有误</span></td></tr></table><div class="buttons"><input value="注 册" type="submit" id="reg_btn"></div><br class="clear"></form></div> </body> </html>UserMapper.java/*** 根据用户名查询用户对象* @param username* @return*/@Select("select * from tb_user where username = #{username}")User selectByUserName(String username);/*** 添加用户* @param user*/@Insert("insert into tb_user values (null, #{username}, #{password});")void add(User user);- RegisterServlet
package com.ruochen.web;import com.ruochen.mapper.UserMapper; import com.ruochen.pojo.User; import org.apache.ibatis.io.Resources; import org.apache.ibatis.session.SqlSession; import org.apache.ibatis.session.SqlSessionFactory; import org.apache.ibatis.session.SqlSessionFactoryBuilder;import javax.servlet.*; import javax.servlet.http.*; import javax.servlet.annotation.*; import java.io.IOException; import java.io.InputStream;@WebServlet("/registerServlet") public class RegisterServlet extends HttpServlet {@Overrideprotected void doGet(HttpServletRequest request, HttpServletResponse response) throws ServletException, IOException {// 1. 接收用户数据String username = request.getParameter("username");String password = request.getParameter("password");// 封装用户对象User user = new User();user.setUsername(username);user.setPassword(password);// 2. 调用 Mapper 根据用户名查询用户对象// 2.1 获取 SqlSessionFactory 对象String resource = "mybatis-config.xml";InputStream inputStream = Resources.getResourceAsStream(resource);SqlSessionFactory sqlSessionFactory = new SqlSessionFactoryBuilder().build(inputStream);// 2.2 获取 SqlSession 对象SqlSession sqlSession = sqlSessionFactory.openSession();// 2.3 获取 MapperUserMapper userMapper = sqlSession.getMapper(UserMapper.class);// 2.4 调用方法User u = userMapper.selectByUserName(username);// 3. 判断用户对象是否为 nullif (u == null) {// 用户名不存在,添加用户userMapper.add(user);// 提交事务sqlSession.commit();} else {// 用户名存在,给出提示信息response.setContentType("text/html;charset=utf-8");response.getWriter().write("用户名已存在");}// 释放资源sqlSession.close();}@Overrideprotected void doPost(HttpServletRequest request, HttpServletResponse response) throws ServletException, IOException {this.doGet(request, response);} }
代码优化
- 创建 SqlSessionFactory 代码优化
- 代码重复:工具类
- SqlSessionFacroty 工厂只创建一次,不要重复创建:静态代码块
package com.ruochen.util;import org.apache.ibatis.io.Resources; import org.apache.ibatis.session.SqlSessionFactory; import org.apache.ibatis.session.SqlSessionFactoryBuilder;import java.io.IOException; import java.io.InputStream;public class SqlSessionFactoryUtils {private static SqlSessionFactory sqlSessionFactory;static {// 静态代码块会随着类的加载自动执行,且只执行一次try {String resource = "mybatis-config.xml";InputStream inputStream = Resources.getResourceAsStream(resource);sqlSessionFactory = new SqlSessionFactoryBuilder().build(inputStream);} catch (IOException e) {e.printStackTrace();}}public static SqlSessionFactory getSqlSessionFactory() {return sqlSessionFactory;} }
案例
准备工作
- 创建新的模块
brand_demo,引入坐标


pom.xml<?xml version="1.0" encoding="UTF-8"?> <project xmlns="http://maven.apache.org/POM/4.0.0"xmlns:xsi="http://www.w3.org/2001/XMLSchema-instance"xsi:schemaLocation="http://maven.apache.org/POM/4.0.0 http://maven.apache.org/xsd/maven-4.0.0.xsd"><modelVersion>4.0.0</modelVersion><groupId>com.ruochen</groupId><artifactId>brand-demo</artifactId><version>1.0-SNAPSHOT</version><packaging>war</packaging><properties><maven.compiler.source>8</maven.compiler.source><maven.compiler.target>8</maven.compiler.target></properties><dependencies><!--mybatis--><dependency><groupId>org.mybatis</groupId><artifactId>mybatis</artifactId><version>3.5.5</version></dependency><!--mysql--><dependency><groupId>mysql</groupId><artifactId>mysql-connector-java</artifactId><version>5.1.34</version></dependency><!--servlet--><dependency><groupId>javax.servlet</groupId><artifactId>javax.servlet-api</artifactId><version>3.1.0</version><scope>provided</scope></dependency><!--jsp--><dependency><groupId>javax.servlet.jsp</groupId><artifactId>jsp-api</artifactId><version>2.2</version><scope>provided</scope></dependency><!--jstl--><dependency><groupId>jstl</groupId><artifactId>jstl</artifactId><version>1.2</version></dependency><!--standard--><!--jstl 1.2 版本不需要此依赖--><!--<dependency><groupId>taglibs</groupId><artifactId>standard</artifactId><version>1.1.2</version></dependency>--></dependencies><build><plugins><plugin><groupId>org.apache.tomcat.maven</groupId><artifactId>tomcat7-maven-plugin</artifactId><version>2.1</version></plugin></plugins></build></project>- 创建三层架构的包结构

- 数据库表
tb_brand-- 创建数据库 create database db1 character set utf8; use db1;-- 删除tb_brand表 drop table if exists tb_brand; -- 创建tb_brand表 create table tb_brand (-- id 主键id int primary key auto_increment,-- 品牌名称brand_name varchar(20),-- 企业名称company_name varchar(20),-- 排序字段ordered int,-- 描述信息description varchar(100),-- 状态:0:禁用 1:启用status int ); -- 添加数据 insert into tb_brand (brand_name, company_name, ordered, description, status) values ('三只松鼠', '三只松鼠股份有限公司', 5, '好吃不上火', 0),('华为', '华为技术有限公司', 100, '华为致力于把数字世界带入每个人、每个家庭、每个组织,构建万物互联的智能世界', 1),('小米', '小米科技有限公司', 50, 'are you ok', 1);SELECT * FROM tb_brand; - 实体类
Brandpackage com.ruochen.pojo;/*** 品牌实体类*/public class Brand {// id 主键private Integer id;// 品牌名称private String brandName;// 企业名称private String companyName;// 排序字段private Integer ordered;// 描述信息private String description;// 状态:0:禁用 1:启用private Integer status;public Brand() {}public Brand(Integer id, String brandName, String companyName, String description) {this.id = id;this.brandName = brandName;this.companyName = companyName;this.description = description;}public Brand(Integer id, String brandName, String companyName, Integer ordered, String description, Integer status) {this.id = id;this.brandName = brandName;this.companyName = companyName;this.ordered = ordered;this.description = description;this.status = status;}public Integer getId() {return id;}public void setId(Integer id) {this.id = id;}public String getBrandName() {return brandName;}public void setBrandName(String brandName) {this.brandName = brandName;}public String getCompanyName() {return companyName;}public void setCompanyName(String companyName) {this.companyName = companyName;}public Integer getOrdered() {return ordered;}public void setOrdered(Integer ordered) {this.ordered = ordered;}public String getDescription() {return description;}public void setDescription(String description) {this.description = description;}public Integer getStatus() {return status;}public void setStatus(Integer status) {this.status = status;}@Overridepublic String toString() {return "Brand{" +"id=" + id +", brandName='" + brandName + '\'' +", companyName='" + companyName + '\'' +", ordered=" + ordered +", description='" + description + '\'' +", status=" + status +'}';} } - MyBatis 基础环境
MyBatis-config.xml
<?xml version="1.0" encoding="UTF-8" ?> <!DOCTYPE configurationPUBLIC "-//mybatis.org//DTD Config 3.0//EN""http://mybatis.org/dtd/mybatis-3-config.dtd"> <configuration><!--起别名--><typeAliases><package name="com.ruochen.pojo"/></typeAliases><environments default="development"><environment id="development"><transactionManager type="JDBC"/><dataSource type="POOLED"><property name="driver" value="com.mysql.jdbc.Driver"/><property name="url"value="jdbc:mysql:///db1?useSSL=false&useServerPrepStmts=true&useUnicode=true&characterEncoding=UTF-8"/><property name="username" value="root"/><property name="password" value="ruochen666"/></dataSource></environment></environments><mappers><!--扫描mapper--><package name="com.ruochen.mapper"/></mappers> </configuration>BrandMapper.xml
<?xml version="1.0" encoding="UTF-8" ?> <!DOCTYPE mapperPUBLIC "-//mybatis.org//DTD Mapper 3.0//EN""http://mybatis.org/dtd/mybatis-3-mapper.dtd"> <mapper namespace="com.ruochen.mapper.BrandMapper"></mapper>BrandMapper接口
package com.ruochen.mapper;public interface BrandMapper { } - 目录树如下
业务 - 查询所有
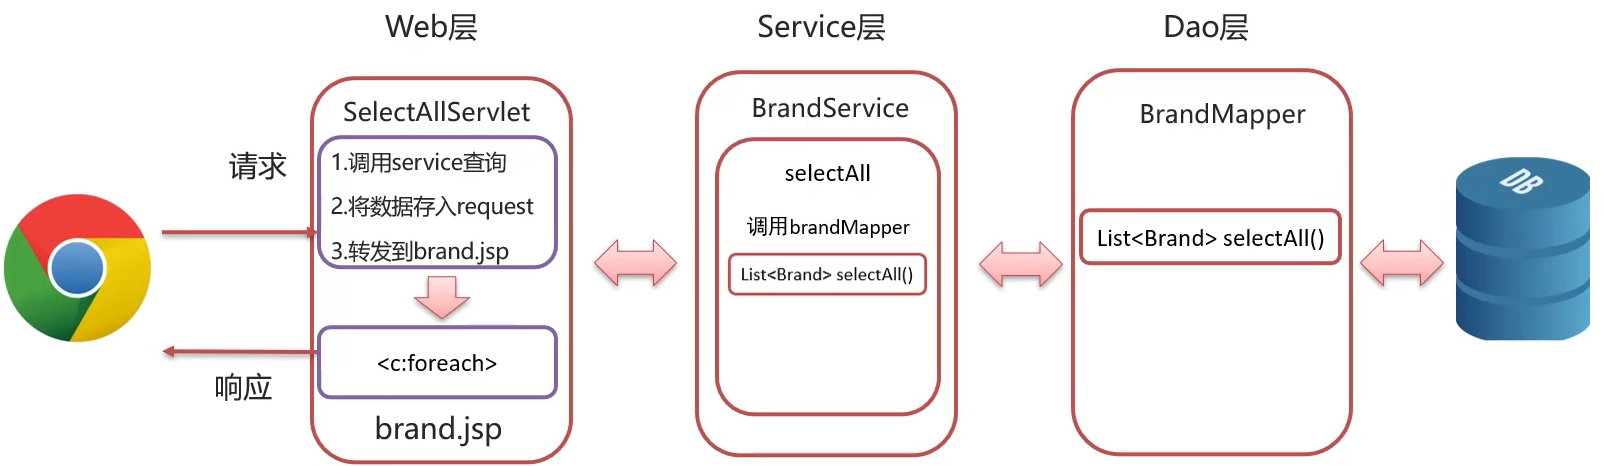
- Dao 层:
BrandMapper/*** 查询所有* @return*/@Select("select * from tb_brand")@ResultMap("brandResultMap")List<Brand> selectAll();BrandMapper.xml
<?xml version="1.0" encoding="UTF-8" ?> <!DOCTYPE mapperPUBLIC "-//mybatis.org//DTD Mapper 3.0//EN""http://mybatis.org/dtd/mybatis-3-mapper.dtd"> <mapper namespace="com.ruochen.mapper.BrandMapper"><resultMap id="brandResultMap" type="brand"><result column="brand_name" property="brandName"></result><result column="company_name" property="companyName"></result></resultMap> </mapper> - 工具类:
SqlSessionFactoryUtilspackage com.ruochen.utils;import org.apache.ibatis.io.Resources; import org.apache.ibatis.session.SqlSessionFactory; import org.apache.ibatis.session.SqlSessionFactoryBuilder;import java.io.IOException; import java.io.InputStream;public class SqlSessionFactoryUtils {private static SqlSessionFactory sqlSessionFactory;static {//静态代码块会随着类的加载而自动执行,且只执行一次try {String resource = "mybatis-config.xml";InputStream inputStream = Resources.getResourceAsStream(resource);sqlSessionFactory = new SqlSessionFactoryBuilder().build(inputStream);} catch (IOException e) {e.printStackTrace();}}public static SqlSessionFactory getSqlSessionFactory(){return sqlSessionFactory;} } - Service 层:
BrandServicepackage com.ruochen.service;import com.ruochen.mapper.BrandMapper; import com.ruochen.pojo.Brand; import com.ruochen.utils.SqlSessionFactoryUtils; import org.apache.ibatis.session.SqlSession; import org.apache.ibatis.session.SqlSessionFactory;import java.util.List;public class BrandService {// 1. 获取 sqlSessionFactorySqlSessionFactory factory = SqlSessionFactoryUtils.getSqlSessionFactory();/*** 查询所有功能* @return*/public List<Brand> selectAll() {// 调用BrandMapper.selectAll()// 2. 获取 SqlSessionSqlSession sqlSession = factory.openSession();// 3. 获取 BrandMapperBrandMapper mapper = sqlSession.getMapper(BrandMapper.class);// 4. 调用方法List<Brand> brands = mapper.selectAll();// 5. 释放资源sqlSession.close();return brands;} } - Web 层
index.html
<!DOCTYPE html> <html lang="en"><head><meta charset="UTF-8"><title>Title</title></head><body><a href="/brand-demo/selectAllServlet">查询所有</a></body> </html>SelectAllServlet
package com.ruochen.web;import com.ruochen.pojo.Brand; import com.ruochen.service.BrandService;import javax.servlet.ServletException; import javax.servlet.annotation.WebServlet; import javax.servlet.http.HttpServlet; import javax.servlet.http.HttpServletRequest; import javax.servlet.http.HttpServletResponse; import java.io.IOException; import java.util.List;@WebServlet("/selectAllServlet") public class SelectAllServlet extends HttpServlet {private BrandService brandService = new BrandService();@Overrideprotected void doGet(HttpServletRequest request, HttpServletResponse response) throws ServletException, IOException {// 1. 调用 BrandService 完成查询List<Brand> brands = brandService.selectAll();// 2. 存入request域中request.setAttribute("brand", brands);// 3. 转发到 brand.jsprequest.getRequestDispatcher("/brand.jsp").forward(request, response);}@Overrideprotected void doPost(HttpServletRequest request, HttpServletResponse response) throws ServletException, IOException {this.doGet(request, response);} }brand.jsp
<%--Created by IntelliJ IDEA.User: ruochenDate: 2022/2/27Time: 12:33To change this template use File | Settings | File Templates. --%> <%@ page contentType="text/html;charset=UTF-8" language="java" %> <%@taglib prefix="c" uri="http://java.sun.com/jsp/jstl/core" %> <html><head><title>Title</title></head><body><input type="button" value="新增"><br><hr><table border="1" cellspacing="0" width="80%"><tr><th>序号</th><th>品牌名称</th><th>企业名称</th><th>排序</th><th>品牌介绍</th><th>状态</th><th>操作</th></tr><c:forEach items="${brands}" var="brand" varStatus="status"><tr align="center"><td>${status.count}</td><td>${brand.brandName}</td><td>${brand.companyName}</td><td>${brand.ordered}</td><td>${brand.description}</td><c:if test="${brand.status == 1}"><td>启用</td></c:if><c:if test="${brand.status != 1}"><td>禁用</td></c:if><td><a href="#">修改</a> <a href="#">删除</a></td></tr></c:forEach></table></body> </html> - 测试

注意点:resultMap 的使用:属性名称和数据库字段名称不一致
业务 - 添加
- Dao 层:
BrandMapper@Insert("insert into tb_brand values (null, #{brandName}, #{companyName}, #{ordered}, #{description}, #{status});")void add(Brand brand); - Service 层:
BrandService/*** 添加* @param brand*/public void add(Brand brand) {// 2. 获取 SqlSessionSqlSession sqlSession = factory.openSession();// 3. 获取 BrandMapperBrandMapper mapper = sqlSession.getMapper(BrandMapper.class);// 4. 调用方法mapper.add(brand);// 提交事务sqlSession.commit();// 释放资源sqlSession.close();} - Web 层:
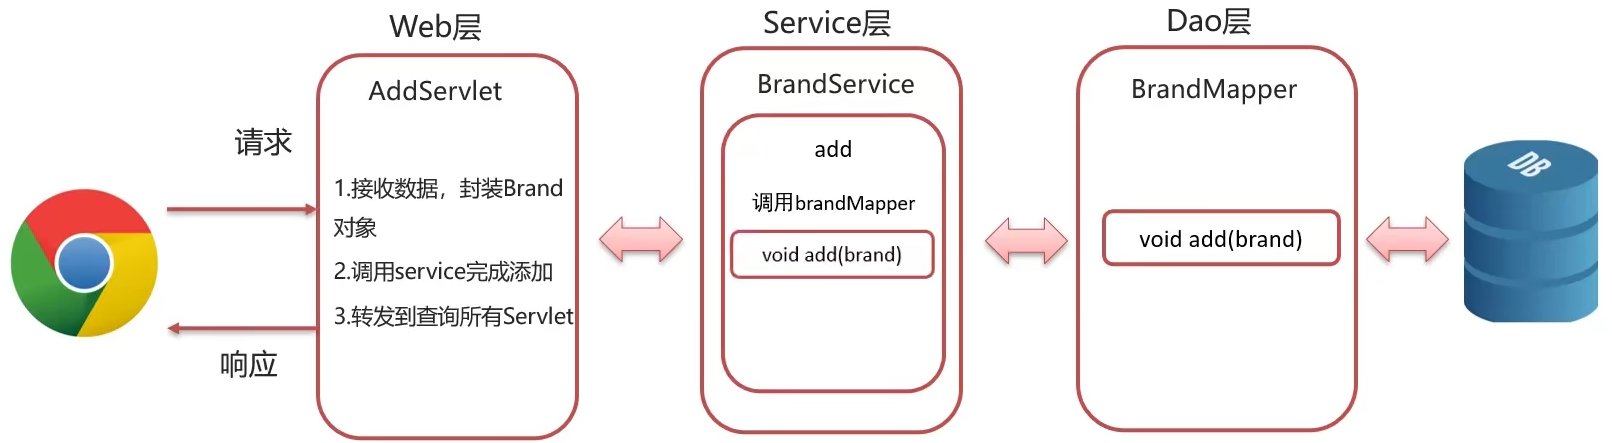
brand.jsp<%--Created by IntelliJ IDEA.User: ruochenDate: 2022/2/27Time: 12:33To change this template use File | Settings | File Templates. --%> <%@ page contentType="text/html;charset=UTF-8" language="java" %> <%@taglib prefix="c" uri="http://java.sun.com/jsp/jstl/core" %> <html><head><title>Title</title></head><body><input type="button" value="新增" id="add"><br><hr><table border="1" cellspacing="0" width="80%"><tr><th>序号</th><th>品牌名称</th><th>企业名称</th><th>排序</th><th>品牌介绍</th><th>状态</th><th>操作</th></tr><c:forEach items="${brands}" var="brand" varStatus="status"><tr align="center"><td>${status.count}</td><td>${brand.brandName}</td><td>${brand.companyName}</td><td>${brand.ordered}</td><td>${brand.description}</td><c:if test="${brand.status == 1}"><td>启用</td></c:if><c:if test="${brand.status != 1}"><td>禁用</td></c:if><td><a href="#">修改</a> <a href="#">删除</a></td></tr></c:forEach></table></body><script>document.getElementById("add").onclick = function () {location.href = "/brand-demo/addBrand.jsp";}</script> </html>addBrand.jsp
<%--Created by IntelliJ IDEA.User: ruochenDate: 2022/2/27Time: 13:32To change this template use File | Settings | File Templates. --%> <%@ page contentType="text/html;charset=UTF-8" language="java" %> <html><head><meta charset="UTF-8"><title>添加品牌</title></head><body><h3>添加品牌</h3><form action="/brand-demo/AddServlet" method="post">品牌名称:<input name="brandName"><br>企业名称:<input name="companyName"><br>排序:<input name="ordered"><br>描述信息:<textarea rows="5" cols="20" name="description"></textarea><br>状态:<input type="radio" name="status" value="0">禁用<input type="radio" name="status" value="1">启用<br><input type="submit" value="提交"></form></body> </html>AddBrandServlet
package com.ruochen.web;import com.ruochen.pojo.Brand; import com.ruochen.service.BrandService;import javax.servlet.*; import javax.servlet.http.*; import javax.servlet.annotation.*; import java.io.IOException;@WebServlet("/addServlet") public class AddServlet extends HttpServlet {private BrandService service = new BrandService();@Overrideprotected void doGet(HttpServletRequest request, HttpServletResponse response) throws ServletException, IOException {// 1. 接收表单提交的数据,封装为一个 Brand 对象String brandName = request.getParameter("brandName");String companyName = request.getParameter("companyName");String ordered = request.getParameter("ordered");String description = request.getParameter("description");String status = request.getParameter("status");Brand brand = new Brand();brand.setBrandName(brandName);brand.setCompanyName(companyName);brand.setOrdered(Integer.parseInt(ordered));brand.setDescription(description);brand.setStatus(Integer.parseInt(status));// 2. 调用 service 完成添加service.add(brand);// 3. 转发到查询所有 Servletrequest.getRequestDispatcher("/selectAllServlet").forward(request, response);}@Overrideprotected void doPost(HttpServletRequest request, HttpServletResponse response) throws ServletException, IOException {this.doGet(request, response);} } - 测试

业务 - 修改(数据回显)

- Dao 层:
BrandMapper/*** 根据 id 查询* @param id* @return*/@Select("select * from tb_brand where id = #{id}")@ResultMap("brandResultMap")Brand selectById(int id); - Service 层:
BrandService/*** 根据 id 查询* @param id* @return*/public Brand selectById(int id) {// 调用BrandMapper.selectAll()// 2. 获取 SqlSessionSqlSession sqlSession = factory.openSession();// 3. 获取 BrandMapperBrandMapper mapper = sqlSession.getMapper(BrandMapper.class);// 4. 调用方法Brand brand = mapper.selectById(id);// 5. 释放资源sqlSession.close();return brand;} - Web 层:
brand.jsp<td><a href="/brand-demo/selectByIdServlet?id=${brand.id}">修改</a> <a href="#">删除</a></td>SelectByIdServlet
package com.ruochen.web;import com.ruochen.pojo.Brand; import com.ruochen.service.BrandService;import javax.servlet.ServletException; import javax.servlet.annotation.WebServlet; import javax.servlet.http.HttpServlet; import javax.servlet.http.HttpServletRequest; import javax.servlet.http.HttpServletResponse; import java.io.IOException;@WebServlet("/selectByIdServlet") public class SelectByIdServlet extends HttpServlet {private BrandService brandService = new BrandService();@Overrideprotected void doGet(HttpServletRequest request, HttpServletResponse response) throws ServletException, IOException {// 1. 接收idString id = request.getParameter("id");// 2. 调用 serviceBrand brand = brandService.selectById(Integer.parseInt(id));// 3. 存储到 request 中request.setAttribute("brand", brand);// 4. 转发到 update.jsprequest.getRequestDispatcher("/update.jsp").forward(request, response);}@Overrideprotected void doPost(HttpServletRequest request, HttpServletResponse response) throws ServletException, IOException {this.doGet(request, response);} }update.jsp
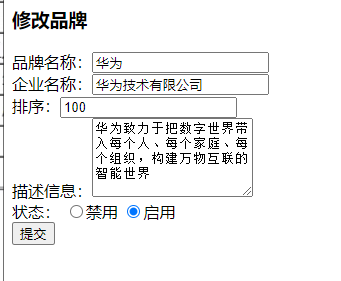
<%--Created by IntelliJ IDEA.User: ruochenDate: 2022/2/27Time: 13:32To change this template use File | Settings | File Templates. --%> <%@ page contentType="text/html;charset=UTF-8" language="java" %> <%@taglib prefix="c" uri="http://java.sun.com/jsp/jstl/core" %> <html><head><meta charset="UTF-8"><title>修改品牌</title></head><body><h3>修改品牌</h3><form action="#" method="post">品牌名称:<input name="brandName" value="${brand.brandName}"><br>企业名称:<input name="companyName" value="${brand.companyName}"><br>排序:<input name="ordered" value="${brand.ordered}"><br>描述信息:<textarea rows="5" cols="20" name="description">${brand.description}</textarea><br>状态:<c:if test="${brand.status == 0}"><input type="radio" name="status" value="0" checked>禁用<input type="radio" name="status" value="1">启用<br></c:if><c:if test="${brand.status == 1}"><input type="radio" name="status" value="0">禁用<input type="radio" name="status" value="1" checked>启用<br></c:if><input type="submit" value="提交"></form></body> </html> - 测试
业务 - 修改(修改数据)

- Dao 层:
BrandMapper/*** 修改* @param brand*/@Update("update tb_brand set brand_name = #{brandName}, company_name = #{companyName}, ordered = #{ordered}, " +"description = #{description}, status = #{status} where id = #{id}")void update(Brand brand); - Service 层:
BrandService/*** 修改* @param brand*/public void update(Brand brand) {// 2. 获取 SqlSessionSqlSession sqlSession = factory.openSession();// 3. 获取 BrandMapperBrandMapper mapper = sqlSession.getMapper(BrandMapper.class);// 4. 调用方法mapper.update(brand);// 提交事务sqlSession.commit();// 释放资源sqlSession.close();} - Web 层:
update.jsp<%--Created by IntelliJ IDEA.User: ruochenDate: 2022/2/27Time: 13:32To change this template use File | Settings | File Templates. --%> <%@ page contentType="text/html;charset=UTF-8" language="java" %> <%@taglib prefix="c" uri="http://java.sun.com/jsp/jstl/core" %> <html><head><meta charset="UTF-8"><title>修改品牌</title></head><body><h3>修改品牌</h3><form action="/brand-demo/updateServlet" method="post"><%-- 隐藏域,提交 id --%><input type="hidden" name="id" value="${brand.id}">品牌名称:<input name="brandName" value="${brand.brandName}"><br>企业名称:<input name="companyName" value="${brand.companyName}"><br>排序:<input name="ordered" value="${brand.ordered}"><br>描述信息:<textarea rows="5" cols="20" name="description">${brand.description}</textarea><br>状态:<c:if test="${brand.status == 0}"><input type="radio" name="status" value="0" checked>禁用<input type="radio" name="status" value="1">启用<br></c:if><c:if test="${brand.status == 1}"><input type="radio" name="status" value="0">禁用<input type="radio" name="status" value="1" checked>启用<br></c:if><input type="submit" value="提交"></form></body> </html>updateServlet
package com.ruochen.web;import com.ruochen.pojo.Brand; import com.ruochen.service.BrandService;import javax.servlet.ServletException; import javax.servlet.annotation.WebServlet; import javax.servlet.http.HttpServlet; import javax.servlet.http.HttpServletRequest; import javax.servlet.http.HttpServletResponse; import java.io.IOException;@WebServlet("/updateServlet") public class UpdateServlet extends HttpServlet {private BrandService service = new BrandService();@Overrideprotected void doGet(HttpServletRequest request, HttpServletResponse response) throws ServletException, IOException {// 处理 post 请求的乱码问题request.setCharacterEncoding("utf-8");// 1. 接收表单提交的数据,封装为一个 Brand 对象String id = request.getParameter("id");String brandName = request.getParameter("brandName");String companyName = request.getParameter("companyName");String ordered = request.getParameter("ordered");String description = request.getParameter("description");String status = request.getParameter("status");Brand brand = new Brand();brand.setId(Integer.parseInt(id));brand.setBrandName(brandName);brand.setCompanyName(companyName);brand.setOrdered(Integer.parseInt(ordered));brand.setDescription(description);brand.setStatus(Integer.parseInt(status));// 2. 调用 service 完成修改service.update(brand);// 3. 转发到查询所有 Servletrequest.getRequestDispatcher("/selectAllServlet").forward(request, response);}@Overrideprotected void doPost(HttpServletRequest request, HttpServletResponse response) throws ServletException, IOException {this.doGet(request, response);} } - 测试

业务 - 删除
- Dao 层:
BrandMapper/*** 删除* @param id*/@Delete("delete from tb_brand where id = #{id}")void delete(int id); - Service 层:
BrandService/*** 删除* @param id*/public void delete(int id) {// 2. 获取 SqlSessionSqlSession sqlSession = factory.openSession();// 3. 获取 BrandMapperBrandMapper mapper = sqlSession.getMapper(BrandMapper.class);// 4. 调用方法mapper.delete(id);// 提交事务sqlSession.commit();// 释放资源sqlSession.close();} - Web 层:
brand.jsp<td><a href="/brand-demo/selectByIdServlet?id=${brand.id}">修改</a> <a href="/brand-demo/deleteServlet?id=${brand.id}">删除</a></td>DeleteServlet
package com.ruochen.web;import com.ruochen.pojo.Brand; import com.ruochen.service.BrandService;import javax.servlet.ServletException; import javax.servlet.annotation.WebServlet; import javax.servlet.http.HttpServlet; import javax.servlet.http.HttpServletRequest; import javax.servlet.http.HttpServletResponse; import java.io.IOException;@WebServlet("/deleteServlet") public class DeleteServlet extends HttpServlet {private BrandService service = new BrandService();@Overrideprotected void doGet(HttpServletRequest request, HttpServletResponse response) throws ServletException, IOException {// 1. 接收 idString id = request.getParameter("id");// 2. 调用 serviceservice.delete(Integer.parseInt(id));// 3. 转发到查询所有 Servletrequest.getRequestDispatcher("/selectAllServlet").forward(request, response);}@Overrideprotected void doPost(HttpServletRequest request, HttpServletResponse response) throws ServletException, IOException {this.doGet(request, response);} } - 测试


业务 - 用户登录

- Dao 层:
UserMapper.javapackage com.ruochen.mapper;import com.ruochen.pojo.User; import org.apache.ibatis.annotations.Insert; import org.apache.ibatis.annotations.Param; import org.apache.ibatis.annotations.Select;public interface UserMapper {/*** 根据用户名和密码查询用户对象* @param username* @param password* @return*/@Select("select * from tb_user where username = #{username} and password = #{password}")User select(@Param("username") String username,@Param("password") String password);/*** 根据用户名查询用户对象* @param username* @return*/@Select("select * from tb_user where username = #{username}")User selectByUsername(String username);/*** 添加用户* @param user*/@Insert("insert into tb_user values(null,#{username},#{password})")void add(User user); }User.java
package com.ruochen.pojo;public class User {private Integer id;private String username;private String password;public Integer getId() {return id;}public void setId(Integer id) {this.id = id;}public String getUsername() {return username;}public void setUsername(String username) {this.username = username;}public String getPassword() {return password;}public void setPassword(String password) {this.password = password;}@Overridepublic String toString() {return "User{" +"id=" + id +", username='" + username + '\'' +", password='" + password + '\'' +'}';} }UserMapper.xml
<?xml version="1.0" encoding="UTF-8" ?> <!DOCTYPE mapperPUBLIC "-//mybatis.org//DTD Mapper 3.0//EN""http://mybatis.org/dtd/mybatis-3-mapper.dtd"> <mapper namespace="com.ruochen.mapper.UserMapper"></mapper> - Service 层:
UserService.javapackage com.ruochen.service;import com.ruochen.mapper.UserMapper; import com.ruochen.pojo.User; import com.ruochen.utils.SqlSessionFactoryUtils; import org.apache.ibatis.session.SqlSession; import org.apache.ibatis.session.SqlSessionFactory;public class UserService {SqlSessionFactory factory = SqlSessionFactoryUtils.getSqlSessionFactory();/*** 登录方法* @param username* @param password* @return*/public User login(String username, String password) {// 2. 获取 SqlSessionSqlSession sqlSession = factory.openSession();// 3. 获取 UserMapperUserMapper mapper = sqlSession.getMapper(UserMapper.class);// 4. 调用方法User user = mapper.select(username, password);// 5. 释放资源sqlSession.close();return user;} } - Web 层:
login.jsp<%--Created by IntelliJ IDEA.User: ruochenDate: 2022/2/27Time: 15:45To change this template use File | Settings | File Templates. --%> <%@ page contentType="text/html;charset=UTF-8" language="java" %> <html><head><meta charset="UTF-8"><title>login</title><link href="css/login.css" rel="stylesheet"></head><body><div id="loginDiv" style="height: 350px"><form action="/brand-demo/loginServlet" id="form"><h1 id="loginMsg">LOGIN IN</h1><div id="errorMsg">${login_msg}</div><p>Username:<input id="username" name="username" type="text"></p><p>Password:<input id="password" name="password" type="password"></p><p>Remember:<input id="remember" name="remember" type="checkbox"></p><div id="subDiv"><input type="submit" class="button" value="login up"><input type="reset" class="button" value="reset"> <a href="register.html">没有账号?</a></div></form></div></body> </html>brand.jsp添加
<h1>${user.username},欢迎您</h1>LoginServlet
package com.ruochen.web;import com.ruochen.pojo.User; import com.ruochen.service.UserService;import javax.servlet.*; import javax.servlet.http.*; import javax.servlet.annotation.*; import java.io.IOException;@WebServlet("/loginServlet") public class LoginServlet extends HttpServlet {private UserService service = new UserService();@Overrideprotected void doGet(HttpServletRequest request, HttpServletResponse response) throws ServletException, IOException {// 1. 获取用户名和密码String username = request.getParameter("username");String password = request.getParameter("password");// 2. 调用 service 查询User user = service.login(username, password);// 3. 判断if (user != null) {// 登录成功,,跳转到查询所有的 BrandServlet// 将登录成功的user对象存储到 sessionHttpSession session = request.getSession();session.setAttribute("user", user);String contextPath = request.getContextPath();response.sendRedirect(contextPath + "/selectAllServlet");} else {// 登录失败// 存储错误信息到 requestrequest.setAttribute("login_msg", "用户名或密码错误");// 跳转到 login.jsprequest.getRequestDispatcher("/login.jsp").forward(request, response);}}@Overrideprotected void doPost(HttpServletRequest request, HttpServletResponse response) throws ServletException, IOException {this.doGet(request, response);} } - 测试


业务 - 记住用户
- 如何自动填充用户名和密码?
- 将用户名和密码写入Cookie中,并且持久化存储 Cookie,下次访问浏览器会自动携带 Cookie
- 在页面获取 Cookie 数据后,设置到用户名和密码框中
- 何时写 Cookie?
- 登录成功
- 用户勾选记住用户复选框
LoginServletpackage com.ruochen.web;import com.ruochen.pojo.User; import com.ruochen.service.UserService;import javax.servlet.*; import javax.servlet.http.*; import javax.servlet.annotation.*; import java.io.IOException;@WebServlet("/loginServlet") public class LoginServlet extends HttpServlet {private UserService service = new UserService();@Overrideprotected void doGet(HttpServletRequest request, HttpServletResponse response) throws ServletException, IOException {// 1. 获取用户名和密码String username = request.getParameter("username");String password = request.getParameter("password");// 获取复选框数据String remember = request.getParameter("remember");// 2. 调用 service 查询User user = service.login(username, password);// 3. 判断if (user != null) {// 登录成功,,跳转到查询所有的 BrandServlet// 判断用户是否勾选记住我if ("1".equals(remember)) {// 勾选了,发送 Cookie// 1. 创建 Cookie 对象Cookie c_username = new Cookie("username", username);Cookie c_password = new Cookie("password", password);// 设置 Cookie 存活时间c_username.setMaxAge(60 * 60 * 24 * 7);c_password.setMaxAge(60 * 60 * 24 * 7);// 2. 发送 Cookieresponse.addCookie(c_username);response.addCookie(c_password);}// 将登录成功的user对象存储到 sessionHttpSession session = request.getSession();session.setAttribute("user", user);String contextPath = request.getContextPath();response.sendRedirect(contextPath + "/selectAllServlet");} else {// 登录失败// 存储错误信息到 requestrequest.setAttribute("login_msg", "用户名或密码错误");// 跳转到 login.jsprequest.getRequestDispatcher("/login.jsp").forward(request, response);}}@Overrideprotected void doPost(HttpServletRequest request, HttpServletResponse response) throws ServletException, IOException {this.doGet(request, response);} }login.jsp<%--Created by IntelliJ IDEA.User: ruochenDate: 2022/2/27Time: 15:45To change this template use File | Settings | File Templates. --%> <%@ page contentType="text/html;charset=UTF-8" language="java" %> <html><head><meta charset="UTF-8"><title>login</title><link href="css/login.css" rel="stylesheet"></head><body><div id="loginDiv" style="height: 350px"><form action="/brand-demo/loginServlet" method="post" id="form"><h1 id="loginMsg">LOGIN IN</h1><div id="errorMsg">${login_msg}</div><p>Username:<input id="username" name="username" value="${cookie.username.value}" type="text"></p><p>Password:<input id="password" name="password" value="${cookie.password.value}" type="password"></p><p>Remember:<input id="remember" name="remember" value="1" type="checkbox"></p><div id="subDiv"><input type="submit" class="button" value="login up"><input type="reset" class="button" value="reset"> <a href="register.html">没有账号?</a></div></form></div></body> </html>- 测试

业务 - 注册

UserService.java/*** 注册方法** @param user* @return*/public boolean register(User user) {// 2. 获取 SqlSessionSqlSession sqlSession = factory.openSession();// 3. 获取 UserMapperUserMapper mapper = sqlSession.getMapper(UserMapper.class);// 4. 判断用户名是否存在User u = mapper.selectByUsername(user.getUsername());if (u == null) {// 用户名不存在,注册mapper.add(user);sqlSession.commit();}sqlSession.close();return u == null;}register.jsp<%--Created by IntelliJ IDEA.User: ruochenDate: 2022/2/27Time: 16:24To change this template use File | Settings | File Templates. --%> <%@ page contentType="text/html;charset=UTF-8" language="java" %> <html><head><meta charset="UTF-8"><title>欢迎注册</title><link href="css/register.css" rel="stylesheet"></head><body><div class="form-div"><div class="reg-content"><h1>欢迎注册</h1><span>已有帐号?</span> <a href="login.html">登录</a></div><form id="reg-form" action="/brand-demo/registerServlet" method="post"><table><tr><td>用户名</td><td class="inputs"><input name="username" type="text" id="username"><br><span id="username_err" class="err_msg">${register_msg}</span></td></tr><tr><td>密码</td><td class="inputs"><input name="password" type="password" id="password"><br><span id="password_err" class="err_msg" style="display: none">密码格式有误</span></td></tr><tr><td>验证码</td><td class="inputs"><input name="checkCode" type="text" id="checkCode"><img src="imgs/a.jpg"><a href="#" id="changeImg">看不清?</a></td></tr></table><div class="buttons"><input value="注 册" type="submit" id="reg_btn"></div><br class="clear"></form></div></body> </html>login.jsp添加<div id="errorMsg">${login_msg} ${register_msg}</div> <a href="register.jsp">没有账号?</a>RegisterServletpackage com.ruochen.web;import com.ruochen.pojo.User; import com.ruochen.service.UserService;import javax.servlet.ServletException; import javax.servlet.annotation.WebServlet; import javax.servlet.http.*; import java.io.IOException;@WebServlet("/registerServlet") public class RegisterServlet extends HttpServlet {private UserService service = new UserService();@Overrideprotected void doGet(HttpServletRequest request, HttpServletResponse response) throws ServletException, IOException {// 1. 获取用户名和密码String username = request.getParameter("username");String password = request.getParameter("password");User user = new User();user.setUsername(username);user.setPassword(password);// 2. 调用 service 注册boolean flag = service.register(user);// 3. 判断注册成功与否if (flag) {// 注册成功,跳转登录页面request.setAttribute("register_msg", "注册成功,请登录");request.getRequestDispatcher("/login.jsp").forward(request, response);} else {// 注册失败,跳转到注册页面request.setAttribute("register_msg", "用户名已存在");request.getRequestDispatcher("/register.jsp").forward(request, response);}}@Overrideprotected void doPost(HttpServletRequest request, HttpServletResponse response) throws ServletException, IOException {this.doGet(request, response);} }- 测试


业务 - 注册验证码

- 验证码工具类:
checkCodeUtil.javapackage com.ruochen.utils;import javax.imageio.ImageIO; import java.awt.*; import java.awt.geom.AffineTransform; import java.awt.image.BufferedImage; import java.io.*; import java.util.Arrays; import java.util.Random;/*** 生成验证码工具类*/ public class CheckCodeUtil {public static final String VERIFY_CODES = "123456789ABCDEFGHIJKLMNOPQRSTUVWXYZ";private static Random random = new Random();/*** 输出随机验证码图片流,并返回验证码值(一般传入输出流,响应response页面端,Web项目用的较多)** @param w 图片宽度* @param h 图片高度* @param os 输出流* @param verifySize 数据长度* @return 验证码数据* @throws IOException*/public static String outputVerifyImage(int w, int h, OutputStream os, int verifySize) throws IOException {String verifyCode = generateVerifyCode(verifySize);outputImage(w, h, os, verifyCode);return verifyCode;}/*** 使用系统默认字符源生成验证码** @param verifySize 验证码长度* @return*/public static String generateVerifyCode(int verifySize) {return generateVerifyCode(verifySize, VERIFY_CODES);}/*** 使用指定源生成验证码** @param verifySize 验证码长度* @param sources 验证码字符源* @return*/public static String generateVerifyCode(int verifySize, String sources) {// 未设定展示源的字码,赋默认值大写字母+数字if (sources == null || sources.length() == 0) {sources = VERIFY_CODES;}int codesLen = sources.length();Random rand = new Random(System.currentTimeMillis());StringBuilder verifyCode = new StringBuilder(verifySize);for (int i = 0; i < verifySize; i++) {verifyCode.append(sources.charAt(rand.nextInt(codesLen - 1)));}return verifyCode.toString();}/*** 生成随机验证码文件,并返回验证码值 (生成图片形式,用的较少)** @param w* @param h* @param outputFile* @param verifySize* @return* @throws IOException*/public static String outputVerifyImage(int w, int h, File outputFile, int verifySize) throws IOException {String verifyCode = generateVerifyCode(verifySize);outputImage(w, h, outputFile, verifyCode);return verifyCode;}/*** 生成指定验证码图像文件** @param w* @param h* @param outputFile* @param code* @throws IOException*/public static void outputImage(int w, int h, File outputFile, String code) throws IOException {if (outputFile == null) {return;}File dir = outputFile.getParentFile();//文件不存在if (!dir.exists()) {//创建dir.mkdirs();}try {outputFile.createNewFile();FileOutputStream fos = new FileOutputStream(outputFile);outputImage(w, h, fos, code);fos.close();} catch (IOException e) {throw e;}}/*** 输出指定验证码图片流** @param w* @param h* @param os* @param code* @throws IOException*/public static void outputImage(int w, int h, OutputStream os, String code) throws IOException {int verifySize = code.length();BufferedImage image = new BufferedImage(w, h, BufferedImage.TYPE_INT_RGB);Random rand = new Random();Graphics2D g2 = image.createGraphics();g2.setRenderingHint(RenderingHints.KEY_ANTIALIASING, RenderingHints.VALUE_ANTIALIAS_ON);// 创建颜色集合,使用java.awt包下的类Color[] colors = new Color[5];Color[] colorSpaces = new Color[]{Color.WHITE, Color.CYAN,Color.GRAY, Color.LIGHT_GRAY, Color.MAGENTA, Color.ORANGE,Color.PINK, Color.YELLOW};float[] fractions = new float[colors.length];for (int i = 0; i < colors.length; i++) {colors[i] = colorSpaces[rand.nextInt(colorSpaces.length)];fractions[i] = rand.nextFloat();}Arrays.sort(fractions);// 设置边框色g2.setColor(Color.GRAY);g2.fillRect(0, 0, w, h);Color c = getRandColor(200, 250);// 设置背景色g2.setColor(c);g2.fillRect(0, 2, w, h - 4);// 绘制干扰线Random random = new Random();// 设置线条的颜色g2.setColor(getRandColor(160, 200));for (int i = 0; i < 20; i++) {int x = random.nextInt(w - 1);int y = random.nextInt(h - 1);int xl = random.nextInt(6) + 1;int yl = random.nextInt(12) + 1;g2.drawLine(x, y, x + xl + 40, y + yl + 20);}// 添加噪点// 噪声率float yawpRate = 0.05f;int area = (int) (yawpRate * w * h);for (int i = 0; i < area; i++) {int x = random.nextInt(w);int y = random.nextInt(h);// 获取随机颜色int rgb = getRandomIntColor();image.setRGB(x, y, rgb);}// 添加图片扭曲shear(g2, w, h, c);g2.setColor(getRandColor(100, 160));int fontSize = h - 4;Font font = new Font("Algerian", Font.ITALIC, fontSize);g2.setFont(font);char[] chars = code.toCharArray();for (int i = 0; i < verifySize; i++) {AffineTransform affine = new AffineTransform();affine.setToRotation(Math.PI / 4 * rand.nextDouble() * (rand.nextBoolean() ? 1 : -1), (w / verifySize) * i + fontSize / 2, h / 2);g2.setTransform(affine);g2.drawChars(chars, i, 1, ((w - 10) / verifySize) * i + 5, h / 2 + fontSize / 2 - 10);}g2.dispose();ImageIO.write(image, "jpg", os);}/*** 随机颜色** @param fc* @param bc* @return*/private static Color getRandColor(int fc, int bc) {if (fc > 255) {fc = 255;}if (bc > 255) {bc = 255;}int r = fc + random.nextInt(bc - fc);int g = fc + random.nextInt(bc - fc);int b = fc + random.nextInt(bc - fc);return new Color(r, g, b);}private static int getRandomIntColor() {int[] rgb = getRandomRgb();int color = 0;for (int c : rgb) {color = color << 8;color = color | c;}return color;}private static int[] getRandomRgb() {int[] rgb = new int[3];for (int i = 0; i < 3; i++) {rgb[i] = random.nextInt(255);}return rgb;}private static void shear(Graphics g, int w1, int h1, Color color) {shearX(g, w1, h1, color);shearY(g, w1, h1, color);}private static void shearX(Graphics g, int w1, int h1, Color color) {int period = random.nextInt(2);boolean borderGap = true;int frames = 1;int phase = random.nextInt(2);for (int i = 0; i < h1; i++) {double d = (double) (period >> 1)* Math.sin((double) i / (double) period+ (6.2831853071795862D * (double) phase)/ (double) frames);g.copyArea(0, i, w1, 1, (int) d, 0);if (borderGap) {g.setColor(color);g.drawLine((int) d, i, 0, i);g.drawLine((int) d + w1, i, w1, i);}}}private static void shearY(Graphics g, int w1, int h1, Color color) {int period = random.nextInt(40) + 10; // 50;boolean borderGap = true;int frames = 20;int phase = 7;for (int i = 0; i < w1; i++) {double d = (double) (period >> 1)* Math.sin((double) i / (double) period+ (6.2831853071795862D * (double) phase)/ (double) frames);g.copyArea(i, 0, 1, h1, 0, (int) d);if (borderGap) {g.setColor(color);g.drawLine(i, (int) d, i, 0);g.drawLine(i, (int) d + h1, i, h1);}}} } register.jsp<tr><td>验证码</td><td class="inputs"><input name="checkCode" type="text" id="checkCode"><img id="checkCodeImg" src="/brand-demo/checkCodeServlet"><a href="#" id="changeImg">看不清?</a></td> </tr> <script>document.getElementById("changeImg").onclick = function () {document.getElementById("checkCodeImg").src = "/brand-demo/checkCodeServlet?" + new Date().getMilliseconds();};document.getElementById("checkCodeImg").onclick = function () {document.getElementById("checkCodeImg").src = "/brand-demo/checkCodeServlet?" + new Date().getMilliseconds();}; </script>CheckCodeServlet.javapackage com.ruochen.web;import com.ruochen.utils.CheckCodeUtil;import javax.servlet.ServletException; import javax.servlet.ServletOutputStream; import javax.servlet.annotation.WebServlet; import javax.servlet.http.HttpServlet; import javax.servlet.http.HttpServletRequest; import javax.servlet.http.HttpServletResponse; import javax.servlet.http.HttpSession; import java.io.IOException;@WebServlet("/checkCodeServlet") public class CheckCodeServlet extends HttpServlet {@Overrideprotected void doGet(HttpServletRequest request, HttpServletResponse response) throws ServletException, IOException {// 生成验证码ServletOutputStream os = response.getOutputStream();String checkCode = CheckCodeUtil.outputVerifyImage(100, 50, os, 4);// 存入 sessionHttpSession session = request.getSession();session.setAttribute("checkCodeGen", checkCode);}@Overrideprotected void doPost(HttpServletRequest request, HttpServletResponse response) throws ServletException, IOException {this.doGet(request, response);} }RegisterServlet.javapackage com.ruochen.web;import com.ruochen.pojo.User; import com.ruochen.service.UserService;import javax.servlet.ServletException; import javax.servlet.annotation.WebServlet; import javax.servlet.http.*; import java.io.IOException;@WebServlet("/registerServlet") public class RegisterServlet extends HttpServlet {private UserService service = new UserService();@Overrideprotected void doGet(HttpServletRequest request, HttpServletResponse response) throws ServletException, IOException {// 1. 获取用户名和密码String username = request.getParameter("username");String password = request.getParameter("password");User user = new User();user.setUsername(username);user.setPassword(password);// 获取用户输入的验证码String checkCode = request.getParameter("checkCode");// 程序生成的验证码,从 session 获取HttpSession session = request.getSession();String checkCodeGen = (String) session.getAttribute("checkCodeGen");// 比对if (!checkCodeGen.equalsIgnoreCase(checkCode)) {request.setAttribute("register_msg", "验证码错误");request.getRequestDispatcher("/register.jsp").forward(request, response);// 不允许注册return;}// 2. 调用 service 注册boolean flag = service.register(user);// 3. 判断注册成功与否if (flag) {// 注册成功,跳转登录页面request.setAttribute("register_msg", "注册成功,请登录");request.getRequestDispatcher("/login.jsp").forward(request, response);} else {// 注册失败,跳转到注册页面request.setAttribute("register_msg", "用户名已存在");request.getRequestDispatcher("/register.jsp").forward(request, response);}}@Overrideprotected void doPost(HttpServletRequest request, HttpServletResponse response) throws ServletException, IOException {this.doGet(request, response);} }- 测试


业务 - 登录验证

LoginFilterpackage com.ruochen.web.filter;import javax.servlet.*; import javax.servlet.annotation.*; import javax.servlet.http.HttpServletRequest; import javax.servlet.http.HttpSession; import java.io.IOException;/*** 登录验证的过滤器*/ @WebFilter("/*") public class LoginFilter implements Filter {@Overridepublic void doFilter(ServletRequest request, ServletResponse response, FilterChain chain) throws ServletException, IOException {HttpServletRequest req = (HttpServletRequest) request;// 判断访问资源路径是否和登录注册相关String[] urls = {"/login.jsp", "/imgs/", "/css/", "/loginServlet", "/register.jsp", "/registerServlet", "/checkCodeServlet"};// 获取当前访问的资源路径String url = req.getRequestURL().toString();// 循环判断for (String u : urls) {if (url.contains(u)) {// 包含// 放行chain.doFilter(request, response);return;}}// 1. 判断 session 中是否有 userHttpSession session = req.getSession();Object user = session.getAttribute("user");// 2. 判断user是否为 nullif (user != null) {// 已登录// 放行chain.doFilter(request, response);} else {// 未登录,存储提示信息,跳转到登录页面req.setAttribute("login_msg", "您尚未登录!");req.getRequestDispatcher("/login.jsp").forward(req, response);}}public void init(FilterConfig config) throws ServletException {}public void destroy() {}}- 测试