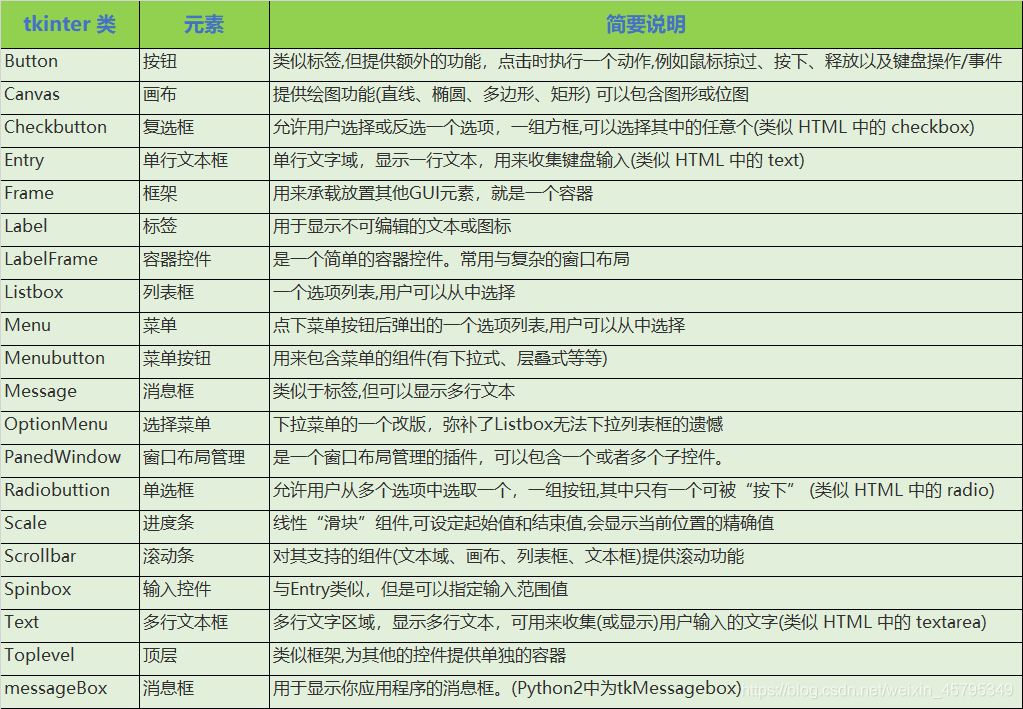
1.tkinter
tkinter是Python下面向tk的图形界面接口库,可以方便地进行图形界面设计和交互操作编程。tkinter的优点是简单易用、与Python的结合度好。tkinter在Python 3.x下默认集成,不需要额外的安装操作;不足之处为缺少合适的可视化界面设计工具,需要通过代码来完成窗口设计和元素布局。
本节采用的Python版本为3.x,如果想在python 2.x下使用tkinter,请通过apt-get进行安装。需要注意的是,不同Python版本下的tkinter使用方式可能略有不同,建议采用Python3。
1.1.hello tkinter
首先介绍一个tkinter的基本例子,在IDLE中新建hello_tkinter.py,代码如下:
import tkinter as tk
# 建立tkinter窗口,设置窗口标题
top = tk.Tk()
top.title("Hello Test")
# 在窗口中创建标签
labelHello = tk.Label(top, text = "Hello Tkinter!")
labelHello.pack()
# 运行并显示窗口
top.mainloop()
然后是top的概念和pack操作的说明:略……(懒得写啦哈哈)
表1 Label组件常用参数
| 参数 | 描述 |
| height | 组件的高度(所占行数) |
| width | 组件的宽度(所占字符个数) |
| fg | 前景字体颜色 |
| bg | 背景颜色 |
| justify | 多行文本的对齐方式,可选参数为: LEFT、 CENTER、RIGHT |
| padx | 文本左右两侧的空格数(默认为1) |
| pady | 文本上下两侧的空格数(默认为1) |
在Shell下运行程序,就可以显示出一个简单的窗口了。
$ python3 hello_tkinter.py

Tkinter窗口效果
1.2.tkinter常用组件
虽然1.1中我们已经设计出了tkinter的基本窗口,但这时的窗口还过于简陋,除了显示信息以外无法实现任何有效的功能。为了完成更多的用户交互功能,我们还需要了解更多的tkinter界面元素,本节将介绍一些常用的tkinter组件。
1.2.1.按钮组件
按钮组件(Button)是tkinter最常用的图形组件之一,通过Button可以方便地与用户进行交互。下列代码实现了通过触发按钮事件(按下按钮)来执行指定操作(改变标签内容)的例子。
import tkinter as tk
def btnHelloClicked():
labelHello.config(text = "Hello Tkinter!")
top = tk.Tk()
top.title("Button Test")
labelHello = tk.Label(top, text = "Press the button...", height = 5, width = 20, fg = "blue")
labelHello.pack()
btn = tk.Button(top, text = "Hello", command = btnHelloClicked)
btn.pack()
top.mainloop()
代码中定义了btnHelloClicked()函数,并通过给Button的command属性赋值来指定按钮按下时执行btnHelloClicked()函数中的代码的功能。在该函数中,通过labelHello.config()更改了label的text参数,即更改了标签的文字内容。
表2 Button组件基本参数
| 参数 | 描述 |
| height | 组件的高度(所占行数) |
| width | 组件的宽度(所占字符个数) |
| fg | 前景字体颜色 |
| bg | 背景颜色 |
| activebackground | 按钮按下时的背景颜色 |
| activeforeground | 按钮按下时的前景颜色 |
| justify | 多行文本的对齐方式,可选参数为: LEFT、 CENTER、RIGHT |
| padx | 文本左右两侧的空格数(默认为1) |
| pady | 文本上下两侧的空格数(默认为1) |
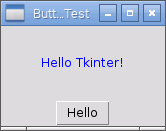
Button组件效果
1.2.2.输入框组件
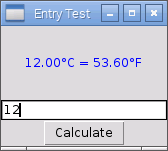
输入框(Entry)用来输入单行内容,可以方便地向程序传递用户参数。这里通过一个转换摄氏度和华氏度的小程序来演示该组件的使用。
import tkinter as tk
def btnHelloClicked():
cd = float(entryCd.get())
labelHello.config(text = "%.2f°C = %.2f°F" %(cd, cd*1.8+32))
top = tk.Tk()
top.title("Entry Test")
labelHello = tk.Label(top, text = "Convert °C to °F...", height = 5, width = 20, fg = "blue")
labelHello.pack()
entryCd = tk.Entry(top, text = "0")
entryCd.pack()
btnCal = tk.Button(top, text = "Calculate", command = btnHelloClicked)
btnCal.pack()
top.mainloop()
本例的代码从1.2.1中修改而来,并新建了一个Entry组件entryCd,text参数设置了输入框的默认值为“0”。当按钮按下后,通过entryCd.get()获取输入框中的文本内容,该内容为字符串类型,需要通过float()函数转换成数字,自后再进行换算并更新label显示内容。
表3 Entry组件常用参数
| 参数 | 描述 |
| height | 组件的高度(所占行数) |
| width | 组件的宽度(所占字符个数) |
| fg | 前景字体颜色 |
| bg | 背景颜色 |
| show | 将Entry框中的文本替换为指定字符,用于输入密码等,如设置 show="*" |
| state | 设置组件状态,默认为normal,可设置为:disabled—禁用组件,readonly—只读 |
运行效果
华氏摄氏温度换算程序效果
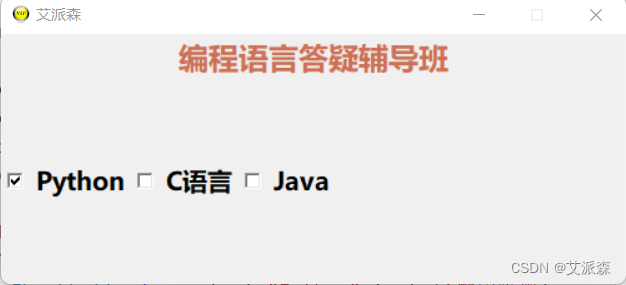
1.2.3.单选、复选框
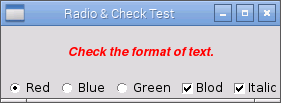
单选框(Radiobutton)和复选框(Checkbutton)分别用于实现选项的单选和复选功能。本例中的代码实现了通过单选框、复选框设置文字样式的功能。
import tkinter as tk
def colorChecked():
labelHello.config(fg = color.get())
def typeChecked():
textType = typeBlod.get() + typeItalic.get()
if textType == 1:
labelHello.config(font = ("Arial", 12, "bold"))
elif textType == 2:
labelHello.config(font = ("Arial", 12, "italic"))
elif textType == 3:
labelHello.config(font = ("Arial", 12, "bold italic"))
else :
labelHello.config(font = ("Arial", 12))
top = tk.Tk()
top.title("Radio & Check Test")
labelHello = tk.Label(top, text = "Check the format of text.", height = 3, font=("Arial", 12))
labelHello.pack()
color = tk.StringVar()
tk.Radiobutton(top, text = "Red", variable = color, value = "red", command = colorChecked).pack(side = tk.LEFT)
tk.Radiobutton(top, text = "Blue", variable = color, value = "blue", command = colorChecked).pack(side = tk.LEFT)
tk.Radiobutton(top, text = "Green", variable = color, value = "green", command = colorChecked).pack(side = tk.LEFT)
typeBlod = tk.IntVar()
typeItalic = tk.IntVar()
tk.Checkbutton(top, text = "Blod", variable = typeBlod, onvalue = 1, offvalue = 0, command = typeChecked).pack(side = tk.LEFT)
tk.Checkbutton(top, text = "Italic", variable = typeItalic, onvalue = 2, offvalue = 0, command = typeChecked).pack(side = tk.LEFT)
top.mainloop()
在代码中,文字的颜色通过Radiobutton来选择,同一时间只能选择一个颜色。在三个Red、Blue和Green三个单选框中,定义了同样的变量参数color,选择不同的单选框会为该变量赋予不同的字符串值,内容即为对应的颜色。
任何单选框被选中都会触发colorChecked()函数,将标签修改为对应单选框表示的颜色。
表4 Radiobutton组件常用参数
| 参数 | 描述 |
| variable | 单选框索引变量,通过变量的值确定哪个单选框被选中。一组单选框使用同一个索引变量 |
| value | 单选框选中时变量的值 |
| command | 单选框选中时执行的命令(函数) |
文字的粗体、斜体样式则由复选框实现,分别定义了typeBlod和typeItalic变量来表示文字是否为粗体和斜体。
当某个复选框的状态改变时会触发typeChecked()函数。该函数负责判断当前那些复选框被选中,并将字体设置为对应的样式。
表5 Checkbutton组件常用参数
| 参数 | 描述 |
| variable | 复选框索引变量,通过变量的值确定哪些复选框被选中。每个复选框使用不同的变量,使复选框之间相互独立 |
| onvalue | 复选框选中(有效)时变量的值 |
| offvalue | 复选框未选中(无效)时变量的值 |
| command | 复选框选中时执行的命令(函数) |
运行效果
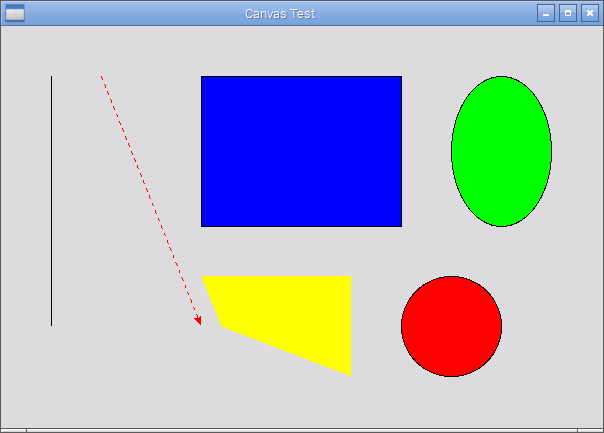
1.2.4.绘图组件
绘图组件(Canvas)可以在GUI中实现2D图形的绘制,相当于画图板。组件内置了多种绘图函数,可以通过简单的2D坐标绘制直线、矩形、圆形、多边形等。本例代码演示了Canvas组件的绘图功能,更多的绘图函数可以查阅Canvas的参考页面。
import tkinter as tk
def drawCircle(self, x, y, r, **kwargs):
return self.create_oval(x-r, y-r, x+r, y+r, **kwargs)
top = tk.Tk()
top.title("Canvas Test")
cvs = tk.Canvas(top, width = 600, height = 400)
cvs.pack()
cvs.create_line(50, 50, 50, 300)
cvs.create_line(100, 50, 200, 300, fill = "red", dash = (4, 4), arrow = tk.LAST)
cvs.create_rectangle(200, 50, 400, 200, fill = "blue")
cvs.create_oval(450, 50, 550, 200, fill = "green" )
drawCircle(cvs, 450, 300, 50, fill = "red")
cvs.create_polygon(200, 250, 350, 250, 350, 350, 220, 300, fill="yellow")
top.mainloop()
绘图函数的参数都比较好理解,包括基本的坐标和颜色、线型等附加参数。
直线(line),即线段,通过两个端点定义。坐标顺序为x1、y1、x2、y2。
矩形(rectangle)通过对角线上的两个点来定义。
需要注意的是Canvas中没有画圆函数,这里通过绘制椭圆间接实现了绘制圆形的函数drawCircle()。椭圆(oval)是通过外切矩形的对角线两点来定义的(别告诉我你不知道什么是外切矩形……)。如下图所示:
运行效果
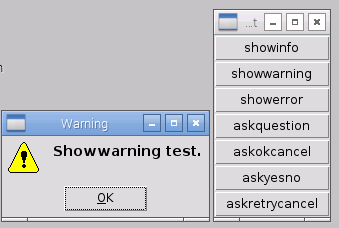
1.2.5.消息窗口
消息窗口(messagebox)用于弹出提示框向用户进行告警,或让用户选择下一步如何操作。消息框包括很多类型,常用的有info、warning、error、yeno、okcancel等,包含不同的图标、按钮以及弹出提示音。下面的代码演示了各消息框的运行效果,大家可以自己一一尝试。
import tkinter as tk
from tkinter import messagebox as msgbox
def btn1_clicked():
msgbox.showinfo("Info", "Showinfo test.")
def btn2_clicked():
msgbox.showwarning("Warning", "Showwarning test.")
def btn3_clicked():
msgbox.showerror("Error", "Showerror test.")
def btn4_clicked():
msgbox.askquestion("Question", "Askquestion test.")
def btn5_clicked():
msgbox.askokcancel("OkCancel", "Askokcancel test.")
def btn6_clicked():
msgbox.askyesno("YesNo", "Askyesno test.")
def btn7_clicked():
msgbox.askretrycancel("Retry", "Askretrycancel test.")
top = tk.Tk()
top.title("MsgBox Test")
btn1 = tk.Button(top, text = "showinfo", command = btn1_clicked)
btn1.pack(fill = tk.X)
btn2 = tk.Button(top, text = "showwarning", command = btn2_clicked)
btn2.pack(fill = tk.X)
btn3 = tk.Button(top, text = "showerror", command = btn3_clicked)
btn3.pack(fill = tk.X)
btn4 = tk.Button(top, text = "askquestion", command = btn4_clicked)
btn4.pack(fill = tk.X)
btn5 = tk.Button(top, text = "askokcancel", command = btn5_clicked)
btn5.pack(fill = tk.X)
btn6 = tk.Button(top, text = "askyesno", command = btn6_clicked)
btn6.pack(fill = tk.X)
btn7 = tk.Button(top, text = "askretrycancel", command = btn7_clicked)
btn7.pack(fill = tk.X)
top.mainloop()
运行效果
1.tkinter
tkinter是Python下面向tk的图形界面接口库,可以方便地进行图形界面设计和交互操作编程。tkinter的优点是简单易用、与Python的结合度好。tkinter在Python 3.x下默认集成,不需要额外的安装操作;不足之处为缺少合适的可视化界面设计工具,需要通过代码来完成窗口设计和元素布局。
本节采用的Python版本为3.x,如果想在python 2.x下使用tkinter,请通过apt-get进行安装。需要注意的是,不同Python版本下的tkinter使用方式可能略有不同,建议采用Python3。
1.1.hello tkinter
首先介绍一个tkinter的基本例子,在IDLE中新建hello_tkinter.py,代码如下:
import tkinter as tk
# 建立tkinter窗口,设置窗口标题
top = tk.Tk()
top.title("Hello Test")
# 在窗口中创建标签
labelHello = tk.Label(top, text = "Hello Tkinter!")
labelHello.pack()
# 运行并显示窗口
top.mainloop()
然后是top的概念和pack操作的说明:略……(懒得写啦哈哈)
表1 Label组件常用参数
| 参数 | 描述 |
| height | 组件的高度(所占行数) |
| width | 组件的宽度(所占字符个数) |
| fg | 前景字体颜色 |
| bg | 背景颜色 |
| justify | 多行文本的对齐方式,可选参数为: LEFT、 CENTER、RIGHT |
| padx | 文本左右两侧的空格数(默认为1) |
| pady | 文本上下两侧的空格数(默认为1) |
在Shell下运行程序,就可以显示出一个简单的窗口了。
$ python3 hello_tkinter.py
Tkinter窗口效果
1.2.tkinter常用组件
虽然1.1中我们已经设计出了tkinter的基本窗口,但这时的窗口还过于简陋,除了显示信息以外无法实现任何有效的功能。为了完成更多的用户交互功能,我们还需要了解更多的tkinter界面元素,本节将介绍一些常用的tkinter组件。
1.2.1.按钮组件
按钮组件(Button)是tkinter最常用的图形组件之一,通过Button可以方便地与用户进行交互。下列代码实现了通过触发按钮事件(按下按钮)来执行指定操作(改变标签内容)的例子。
import tkinter as tk
def btnHelloClicked():
labelHello.config(text = "Hello Tkinter!")
top = tk.Tk()
top.title("Button Test")
labelHello = tk.Label(top, text = "Press the button...", height = 5, width = 20, fg = "blue")
labelHello.pack()
btn = tk.Button(top, text = "Hello", command = btnHelloClicked)
btn.pack()
top.mainloop()
代码中定义了btnHelloClicked()函数,并通过给Button的command属性赋值来指定按钮按下时执行btnHelloClicked()函数中的代码的功能。在该函数中,通过labelHello.config()更改了label的text参数,即更改了标签的文字内容。
表2 Button组件基本参数
| 参数 | 描述 |
| height | 组件的高度(所占行数) |
| width | 组件的宽度(所占字符个数) |
| fg | 前景字体颜色 |
| bg | 背景颜色 |
| activebackground | 按钮按下时的背景颜色 |
| activeforeground | 按钮按下时的前景颜色 |
| justify | 多行文本的对齐方式,可选参数为: LEFT、 CENTER、RIGHT |
| padx | 文本左右两侧的空格数(默认为1) |
| pady | 文本上下两侧的空格数(默认为1) |
Button组件效果
1.2.2.输入框组件
输入框(Entry)用来输入单行内容,可以方便地向程序传递用户参数。这里通过一个转换摄氏度和华氏度的小程序来演示该组件的使用。
import tkinter as tk
def btnHelloClicked():
cd = float(entryCd.get())
labelHello.config(text = "%.2f°C = %.2f°F" %(cd, cd*1.8+32))
top = tk.Tk()
top.title("Entry Test")
labelHello = tk.Label(top, text = "Convert °C to °F...", height = 5, width = 20, fg = "blue")
labelHello.pack()
entryCd = tk.Entry(top, text = "0")
entryCd.pack()
btnCal = tk.Button(top, text = "Calculate", command = btnHelloClicked)
btnCal.pack()
top.mainloop()
本例的代码从1.2.1中修改而来,并新建了一个Entry组件entryCd,text参数设置了输入框的默认值为“0”。当按钮按下后,通过entryCd.get()获取输入框中的文本内容,该内容为字符串类型,需要通过float()函数转换成数字,自后再进行换算并更新label显示内容。
表3 Entry组件常用参数
| 参数 | 描述 |
| height | 组件的高度(所占行数) |
| width | 组件的宽度(所占字符个数) |
| fg | 前景字体颜色 |
| bg | 背景颜色 |
| show | 将Entry框中的文本替换为指定字符,用于输入密码等,如设置 show="*" |
| state | 设置组件状态,默认为normal,可设置为:disabled—禁用组件,readonly—只读 |
运行效果
华氏摄氏温度换算程序效果
1.2.3.单选、复选框
单选框(Radiobutton)和复选框(Checkbutton)分别用于实现选项的单选和复选功能。本例中的代码实现了通过单选框、复选框设置文字样式的功能。
import tkinter as tk
def colorChecked():
labelHello.config(fg = color.get())
def typeChecked():
textType = typeBlod.get() + typeItalic.get()
if textType == 1:
labelHello.config(font = ("Arial", 12, "bold"))
elif textType == 2:
labelHello.config(font = ("Arial", 12, "italic"))
elif textType == 3:
labelHello.config(font = ("Arial", 12, "bold italic"))
else :
labelHello.config(font = ("Arial", 12))
top = tk.Tk()
top.title("Radio & Check Test")
labelHello = tk.Label(top, text = "Check the format of text.", height = 3, font=("Arial", 12))
labelHello.pack()
color = tk.StringVar()
tk.Radiobutton(top, text = "Red", variable = color, value = "red", command = colorChecked).pack(side = tk.LEFT)
tk.Radiobutton(top, text = "Blue", variable = color, value = "blue", command = colorChecked).pack(side = tk.LEFT)
tk.Radiobutton(top, text = "Green", variable = color, value = "green", command = colorChecked).pack(side = tk.LEFT)
typeBlod = tk.IntVar()
typeItalic = tk.IntVar()
tk.Checkbutton(top, text = "Blod", variable = typeBlod, onvalue = 1, offvalue = 0, command = typeChecked).pack(side = tk.LEFT)
tk.Checkbutton(top, text = "Italic", variable = typeItalic, onvalue = 2, offvalue = 0, command = typeChecked).pack(side = tk.LEFT)
top.mainloop()
在代码中,文字的颜色通过Radiobutton来选择,同一时间只能选择一个颜色。在三个Red、Blue和Green三个单选框中,定义了同样的变量参数color,选择不同的单选框会为该变量赋予不同的字符串值,内容即为对应的颜色。
任何单选框被选中都会触发colorChecked()函数,将标签修改为对应单选框表示的颜色。
表4 Radiobutton组件常用参数
| 参数 | 描述 |
| variable | 单选框索引变量,通过变量的值确定哪个单选框被选中。一组单选框使用同一个索引变量 |
| value | 单选框选中时变量的值 |
| command | 单选框选中时执行的命令(函数) |
文字的粗体、斜体样式则由复选框实现,分别定义了typeBlod和typeItalic变量来表示文字是否为粗体和斜体。
当某个复选框的状态改变时会触发typeChecked()函数。该函数负责判断当前那些复选框被选中,并将字体设置为对应的样式。
表5 Checkbutton组件常用参数
| 参数 | 描述 |
| variable | 复选框索引变量,通过变量的值确定哪些复选框被选中。每个复选框使用不同的变量,使复选框之间相互独立 |
| onvalue | 复选框选中(有效)时变量的值 |
| offvalue | 复选框未选中(无效)时变量的值 |
| command | 复选框选中时执行的命令(函数) |
运行效果
1.2.4.绘图组件
绘图组件(Canvas)可以在GUI中实现2D图形的绘制,相当于画图板。组件内置了多种绘图函数,可以通过简单的2D坐标绘制直线、矩形、圆形、多边形等。本例代码演示了Canvas组件的绘图功能,更多的绘图函数可以查阅Canvas的参考页面。
import tkinter as tk
def drawCircle(self, x, y, r, **kwargs):
return self.create_oval(x-r, y-r, x+r, y+r, **kwargs)
top = tk.Tk()
top.title("Canvas Test")
cvs = tk.Canvas(top, width = 600, height = 400)
cvs.pack()
cvs.create_line(50, 50, 50, 300)
cvs.create_line(100, 50, 200, 300, fill = "red", dash = (4, 4), arrow = tk.LAST)
cvs.create_rectangle(200, 50, 400, 200, fill = "blue")
cvs.create_oval(450, 50, 550, 200, fill = "green" )
drawCircle(cvs, 450, 300, 50, fill = "red")
cvs.create_polygon(200, 250, 350, 250, 350, 350, 220, 300, fill="yellow")
top.mainloop()
绘图函数的参数都比较好理解,包括基本的坐标和颜色、线型等附加参数。
直线(line),即线段,通过两个端点定义。坐标顺序为x1、y1、x2、y2。
矩形(rectangle)通过对角线上的两个点来定义。
需要注意的是Canvas中没有画圆函数,这里通过绘制椭圆间接实现了绘制圆形的函数drawCircle()。椭圆(oval)是通过外切矩形的对角线两点来定义的(别告诉我你不知道什么是外切矩形……)。如下图所示:
运行效果
1.2.5.消息窗口
消息窗口(messagebox)用于弹出提示框向用户进行告警,或让用户选择下一步如何操作。消息框包括很多类型,常用的有info、warning、error、yeno、okcancel等,包含不同的图标、按钮以及弹出提示音。下面的代码演示了各消息框的运行效果,大家可以自己一一尝试。
import tkinter as tk
from tkinter import messagebox as msgbox
def btn1_clicked():
msgbox.showinfo("Info", "Showinfo test.")
def btn2_clicked():
msgbox.showwarning("Warning", "Showwarning test.")
def btn3_clicked():
msgbox.showerror("Error", "Showerror test.")
def btn4_clicked():
msgbox.askquestion("Question", "Askquestion test.")
def btn5_clicked():
msgbox.askokcancel("OkCancel", "Askokcancel test.")
def btn6_clicked():
msgbox.askyesno("YesNo", "Askyesno test.")
def btn7_clicked():
msgbox.askretrycancel("Retry", "Askretrycancel test.")
top = tk.Tk()
top.title("MsgBox Test")
btn1 = tk.Button(top, text = "showinfo", command = btn1_clicked)
btn1.pack(fill = tk.X)
btn2 = tk.Button(top, text = "showwarning", command = btn2_clicked)
btn2.pack(fill = tk.X)
btn3 = tk.Button(top, text = "showerror", command = btn3_clicked)
btn3.pack(fill = tk.X)
btn4 = tk.Button(top, text = "askquestion", command = btn4_clicked)
btn4.pack(fill = tk.X)
btn5 = tk.Button(top, text = "askokcancel", command = btn5_clicked)
btn5.pack(fill = tk.X)
btn6 = tk.Button(top, text = "askyesno", command = btn6_clicked)
btn6.pack(fill = tk.X)
btn7 = tk.Button(top, text = "askretrycancel", command = btn7_clicked)
btn7.pack(fill = tk.X)
top.mainloop()
运行效果