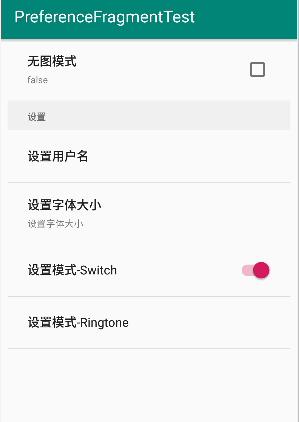
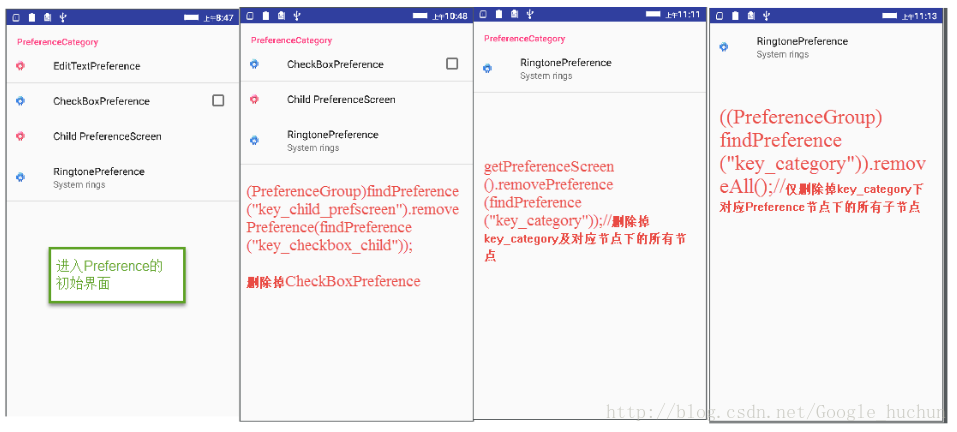
PreferenceScreen

article/2025/11/6 4:47:27
对于每个应用程序来说,都要有一些属于用户自己的设置,满足不同需求。当我们点击menu时,如下:


 点击settings时,出现:


 那么这样的效果是怎么实现的呢?我只是来个简单介绍,给自己做备忘,也是给大家点思路吧。在android的路上,我们一起努力吧。

这里我们仅说第二个图片效果的实现,第一个图片的效果,想必大家都会了,就是使用menu类的几个方法就可以了。

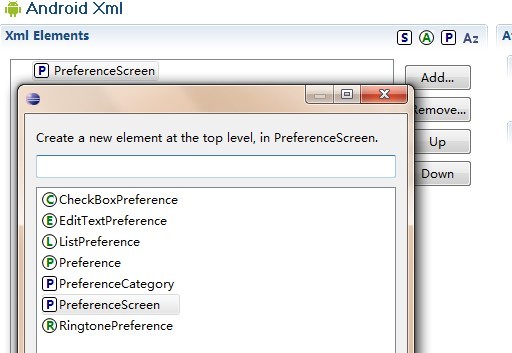
1.PreferenceScreen 的使用。

首先要定义一下整个布局即使用xml文件夹下的preferences.xml。

代码如下:

Xml代码  收藏代码
  1. <?xml version="1.0" encoding="utf-8"?>  
  2. <PreferenceScreen xmlns:android="http://schemas.android.com/apk/res/android">  
  3. <!-- 如果拥有多个首选项,可以构建一个视图来显示首选项高级类别。用户然后就可以深入到每个类别,查看和管理特  
  4. 定于该组的首选项。 可以通过两种方式来实现此目的。可以在根 PreferenceScreen中引入嵌套的 PreferenceScreen 元素,  
  5. 或者可以使用 PreferenceCategory 来获得类似的结果。 -->  
  6.     <PreferenceCategory android:title="@string/app_name"  
  7.         android:summary="Application settings">  
  8.   
  9.         <EditTextPreference android:key="user_name"  
  10.             android:defaultValue="@null"   
  11.             android:title="@string/preference_username_title"  
  12.             android:summary="@string/preference_username_summary" />  
  13.         <ListPreference  
  14.                 android:key="download_format"  
  15.                 android:title="@string/preference_codec_title"  
  16.                 android:summary="@string/preference_codec_summary"  
  17.                 android:entries="@array/stream_codecs"  
  18.                 android:entryValues="@array/stream_codecs_values" />  
  19.         <ListPreference  
  20.                 android:key="cache_option"  
  21.                 android:title="@string/preference_cache_title"  
  22.                 android:summary="@string/preference_cache_summary"  
  23.                 android:entries="@array/cache_size"                   
  24.                 android:entryValues="@array/cache_size_values"/>                  
  25.         <CheckBoxPreference android:key="wifi_only"  
  26.             android:defaultValue="false"   
  27.             android:title="@string/preference_wifi_only_title"  
  28.             android:summary="@string/preference_wifi_only_summary" />  
  29.         <CheckBoxPreference android:key="roaming_protection"  
  30.             android:defaultValue="true"   
  31.             android:title="@string/preference_roaming_summary"  
  32.             android:summary="@string/preference_roaming_summary" />  
  33.           
  34.     </PreferenceCategory>  
  35.   
  36.     <PreferenceCategory android:title="@string/preference_3rdparty_title"  
  37.         android:summary="@string/preference_3rdparty_summary">  
  38.   
  39.         <CheckBoxPreference android:defaultValue="false"   
  40.             android:key="scrobbling_enabled" android:title="@string/scrobbling_enabled"/>  
  41.         <ListPreference android:key="scrobbler_app" android:dependency="scrobbling_enabled" android:entries="@array/scrobbler_apps" android:title="@string/scrobbler_app" android:entryValues="@array/scrobbler_apps_values" android:summary="@string/scrobbler_app_summary"></ListPreference>  
  42.           
  43.     </PreferenceCategory>  
  44.   
  45.     <PreferenceCategory android:title="@string/gestures_preference_title"  
  46.         android:summary="@string/gestures_preference_summary">  
  47.         <CheckBoxPreference android:key="gestures"  
  48.             android:defaultValue="true"  
  49.             android:title="@string/gestures_support"  
  50.             android:summary="@string/gestures_support_summary"/>  
  51.     </PreferenceCategory>  
  52.     <PreferenceCategory android:title="@string/preference_reset_title">  
  53.         <Preference android:key="reset_firstrun" android:summary="@string/preference_firstrun_reset_summary" android:title="@string/preference_firstrun_reset_title"></Preference>  
  54.     </PreferenceCategory>  
  55.   
  56. </PreferenceScreen>  


其中:

特性                                说明 
android:key                       选项的名称或键(比如selected_flight_sort_option)

android:title                       选项的标题

android:summary               选项的简短摘要

android:entries                  可将选项设置成列表项的文本

android:entryValues          定义每个列表项的值。注意:每个列表项有一些文本和 一 个 值。 文本由

entries定义,值由entryValues定义。

android:dialogTitle             对话框的标题,在视图显示为模态对话框时使用 
android:defaultValue          项列表中选项的默认值


在开发文档中这样定义PreferenceScreen, Represents a top-level Preference that is the root of a Preference hierarchy. 即显示了首选项组织体系的最顶级。


2.PreferenceActivity

A PreferenceActivity points to an instance of this class to show the preferences. 即我们通过实例化一个继承PreferenceActivity 的类来展示首选项,代码如下

Java代码  收藏代码
  1. public class SettingsActivity extends PreferenceActivity {   
  2. @Override  
  3.  public void onCreate(Bundle savedInstanceState)   
Java代码  收藏代码
  1. { requestWindowFeature(Window.FEATURE_NO_TITLE);   
Java代码  收藏代码
  1. super.onCreate(savedInstanceState); //添加设置,加入引用   
Java代码  收藏代码
  1. addPreferencesFromResource(R.xml.preferences);   
  2. setContentView(R.layout.settings); }  
Java代码  收藏代码
  1. }  


 关于布局文件settings.xml:


Xml代码  收藏代码
  1. <?xml version="1.0" encoding="utf-8"?>  
  2. <LinearLayout xmlns:android="http://schemas.android.com/apk/res/android"  
  3.     android:orientation="vertical" android:layout_width="fill_parent"  
  4.     android:layout_height="fill_parent" android:background="#000000">  
  5.   
  6.     <LinearLayout android:layout_width="fill_parent"  
  7.         android:layout_height="wrap_content" android:background="@drawable/gradient_dark_purple"  
  8.         android:orientation="horizontal" android:gravity="center"  
  9.         android:minHeight="75dip">  
  10.         <LinearLayout android:layout_height="wrap_content"  
  11.             android:minHeight="75dip" android:layout_width="fill_parent"  
  12.             android:orientation="horizontal" android:gravity="center_vertical"  
  13.             android:paddingLeft="13dip" android:paddingRight="13dip">  
  14.             <ImageView android:layout_width="48dip"  
  15.                 android:layout_height="48dip" android:src="@drawable/settings"></ImageView>  
  16.             <LinearLayout android:layout_height="wrap_content"  
  17.                 android:paddingLeft="13dip" android:orientation="vertical"  
  18.                 android:layout_width="fill_parent">  
  19.                 <TextView android:layout_width="wrap_content"  
  20.                     android:singleLine="true" android:layout_height="wrap_content"  
  21.                     android:textSize="18dip" android:textColor="#ffffff" android:text="@string/settings"></TextView>  
  22.                 <TextView android:layout_width="wrap_content"  
  23.                     android:layout_height="wrap_content" android:textSize="12dip"  
  24.                     android:textColor="#ffffff"></TextView>  
  25.                 <TextView android:id="@+id/ItemsCountTextView"  
  26.                     android:layout_width="wrap_content" android:layout_height="wrap_content"  
  27.                     android:layout_gravity="right" android:textSize="12dip"  
  28.                     android:textColor="#ffffff" android:text=" "></TextView>  
  29.             </LinearLayout>  
  30.         </LinearLayout>  
  31.     </LinearLayout>  
  32.   
  33.     <ListView android:layout_width="fill_parent" android:id="@android:id/list"  
  34.         android:layout_weight="1" android:layout_height="fill_parent">  
  35.     </ListView>  
  36. </LinearLayout>  

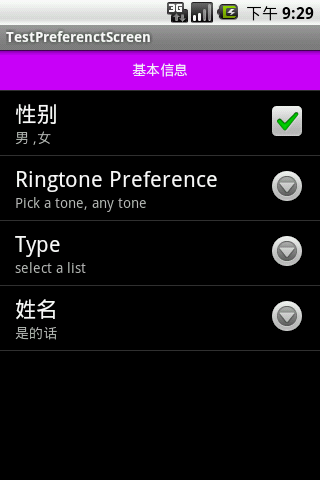
 当我们点击其中某一项时,如cache option

效果:


 用到了我们在res下定义的arrays.xml

其中部分内容如下:

Xml代码  收藏代码
  1. <resources>     
  2. lt;string-array name="cache_size">  
  3.      <item>Off</item>  
  4.      <item>50 MB</item>  
  5.      <item>100 MB</item>  
  6.      <item>250 MB</item>  
  7.      <item>500 MB</item>  
  8.  </string-array>      
  9.  <string-array name="cache_size_values">  
  10.      <item>0</item>  
  11.      <item>50</item>  
  12.      <item>100</item>  
  13.      <item>250</item>  
  14.      <item>500</item>  
  15.  </string-array>  
  16. ;/resources>  


http://chatgpt.dhexx.cn/article/H3tPj5b1.shtml

相关文章

PreferenceFragment的使用

文章目录 PreferenceFragment简介PreferenceFragment使用PreferenceFragment 扩展 PreferenceFragment简介 在我们写一个项目的时候&#xff0c;基本都有选项设置界面&#xff0c;这类设置界面的原理基本都是本地的一些个性化设置&#xff0c;通过读取本地设置来改变某些差异显…

Android中Preference的使用以及监听事件分析

转载请注明出处: http://blog.csdn.net/qinjuning 在Android系统源码中&#xff0c;绝大多数应用程序的UI布局采用了Preference的布局结构&#xff0c;而不是我们平时在模拟器中构建应用程序时使用的View布局结构&#xff0c;例如&#xff0c;Setting模块中布局。当然&#xf…

screentogif 录屏

screentogif的由来 screentogif于2013年诞生&#xff0c;主要的开发者是巴西帅哥Nicke Manarin。 最初的目的只是为了学习和提供一款软件供开发者个人使用。 在2016重新启动项目&#xff0c;使得screentogif变得更加实用。 screentogif的安装 进入官网下载软件安装包。 s…

android PreferenceScreen使用笔记

preference.xml <?xml version="1.0" encoding="utf-8"?> <PreferenceScreen xmlns:android="http://schemas.android.com/apk/res/android"><Preference android:title="基本信息"android:layout="@layout/tex…

PreferenceScreen 的使用

java代码&#xff1a; public class Main3Activity extends PreferenceActivity {Overrideprotected void onCreate(Bundle savedInstanceState) {super.onCreate(savedInstanceState); // setContentView(R.layout.activity_main3); //加载布局文件&#xff0c;相当于…

PreferenceScreen的应用

PreferenceScreen preference是偏好&#xff0c;首选的意思&#xff0c;PreferenceScreen个人翻译成 “偏好显示”&#xff0c;明白这个意思就好&#xff0c;就是说根据特点灵活的定义显示内容风格&#xff0c;一个屏幕可以包含多个风格&#xff0c;像系统自带的声音设置界面。…

PreferenceScreen 中如何自定义SwitchPreferenceCompat的布局

PreferenceScreen 中如何自定义SwitchPreferenceCompat的布局 Android Preference 使用请看这篇 Android Preference使用 系统设置的代码&#xff1a; public class SetActivity extends AppCompatActivity { Override protected void onCreate(Bundle savedInstanceSta…

Preference的使用(2) --- PreferenceCategory PreferenceScreen

上一节有讲到Preference的基本使用跟API的介绍 &#xff0c;没有看的话请先阅读 Preference的使用&#xff08;1&#xff09; 现在介绍其子类PreferenceCategory 跟 PreferenceScreen&#xff0c;现在看下继承关系 如上图&#xff0c;他们都是继承自PreferenceGroup的先看一…

preferenceActivity和preferencescreen用法

1. 首先生成一个preferencescreen的xml文件..看代码: <?xml version"1.0" encoding"utf-8"?><PreferenceScreen xmlns:android"http://schemas.android.com/apk/res/android"> <CheckBoxPreference android:key"chec…

Android Settings中Preference的理解以及使用

Preference 是Android App 中重要的控件之一&#xff0c;Settings 模块大部分都是通过 Preference 实现 优点&#xff1a; Preference 可以自动显示我们上次设置的数据&#xff0c;Android提供preference这个键值对的方式来处理这种情况&#xff0c;自动保存这些数据&#xff…

使用 Android PreferenceScreen 偏好显示类(android.preference.PreferenceScreen)

http://edu.gamfe.com/tutor/d/36925.html PreferenceScreen preference是偏好&#xff0c;首选的意思&#xff0c;PreferenceScreen个人翻译成 “偏好显示”&#xff0c;明白这个意思就好&#xff0c;就是说根据特点灵活的定义显示内容风格&#xff0c;一个屏幕可以包含多个风…

android开发之PreferenceScreen使用详解

一 PreferenceActivity 1、PreferenceActivity概述 PreferenceActivity是一个抽象类&#xff0c;继承于ListActivity&#xff0c;以列表形式视图来展现界面,加载的整个View也是基于ListActivity中那个ListView的&#xff0c;其最主要的优势在于添加Preference后可让其状态持久化…

Android PreferenceScreen的使用和详解(设置页面)

PreferenceScreen是设置选项的配置文件&#xff0c;一般用在设置页面&#xff0c;用来当前的状态是保存在。该状态无须用户处理&#xff0c;存在SharedPreferences中。 1.如何使用 1.1布局文件的创建 PreferenceScreen的用法和layout的类似&#xff0c;都是通过xml文件来管理…

Semaphore - 信号量的简单介绍与使用

一、Semaphore使用 // Test_Semaphore.cpp : 定义控制台应用程序的入口点。 //#include "stdafx.h" #include <windows.h> #include <iostream> #include <time.h>using namespace std;const int g_num 3; HANDLE g_semp[g_num] { NULL }; HAND…

C++中多线程管理

1&#xff0c;函数1 CreateSemaphore 创建或打开一个信号量&#xff0c;信号可以理解为停车场&#xff0c;创建和增加信号&#xff0c;可以理解为创建一个停车场&#xff0c;和可以停放的汽车&#xff0c; 如下&#xff1a; CreateSemaphore(NULL, 2, 3, szSemaphoreA);//开…

lspci是如何工作的

目录 前言lspci那么系统是怎么知道每个PCIe设备具体是哪个厂商的哪种设备的&#xff1f; 前言 出于好奇&#xff0c;看了看lspci的工作原理&#xff0c;操作系统是怎么认识这么多PCIe设备的&#xff1b; lspci lspci用于查看当前系统所连接的所有PCI/PCIe设备&#xff1b; …

linux系统下怎么使用lspci,Linux系统之lspci命令介绍

lspci 顾名思义 就是显示所有的pci设备信息。pci是一种总线 而通过pci总线连接的设备就是pci设备了。如今 我们常用的设备很多都是采用pci总线了 如 网卡、存储等。下面就简单介绍下该命令。 lspci 显示所有的pci设备信息。包括设备的BDF 设备类型 厂商信息等。 lspci -t [BDF]…

lspci 和 setpci 的几种用法

1、指定pci 地址查看 2、查看vender id 3、查看 pcie 地址空间数据 4、修改 pci 地址空间的数据 setpci 读地址0xd0的值 setpci -v -s 01:00.0 d0.w 写地址0xd0的值 setpci -v -s 01:00.0 d0.w0x0101

lspci 详解 pci 拓扑结构 与 pci 树形结构

一、PCIE 拓扑结构 硬盘是大家都很熟悉的设备&#xff0c;一路走来&#xff0c;从HDD到SSD&#xff0c;从SATA到NVMe&#xff0c;作为NVMe SSD的前端接口&#xff0c;PCIe再次进入我们的视野。作为x86体系关键的一环&#xff0c;PCIe标准历经PCI&#xff0c;PCI-X和PCIe&#…

lspci命令

一 lspci命令详解 lspci命令&#xff1a;列出整个系统的PCIe总线和设备 使用方式有如下几种&#xff1a; 列出整个系统的PCIe总线和设备 列出指定PCIe设备的ID信息&#xff0c;即vendor ID和device ID 具体命令如下所示&#xff1a; 从上述信息可知&#xff0c;该设备的vend…