HAWQ手动安装及使用手册
1 HAWQ简介
HAWQ 是 Pivotal 设计的一个大规模并行 SQL 分析处理引擎,支持事务处理。HAWQ 将复杂的查询分割成简单的任何,并分发到并行处理系统中的处理单元执行。包括查询规划器、动态管道、前沿互联和查询执行优化器等等。提供最高级别的性能和可伸缩性。HAWQ 基于 Hadoop 架构是GPon HDFS。
2 准备
2.1 环境说明
1 HAWQ安装采用源码编译安装的方式.
2 Hadoop版本为hadoop-2.5.0-cdh5.3.3、hadoop-2.7.1
3 HAWQ安装参考地址:
https://cwiki.apache.org/confluence/display/HAWQ/Build+and+Install
[root@localhost ranger-0.5.0-usersync]# cat /etc/issue | grep Linux
Red Hat Enterprise Linux Server release 6.5 (Santiago)
[root@localhost native]# java -version
java version "1.7.0_67"
Java(TM) SE RuntimeEnvironment (build 1.7.0_67-b01)
Java HotSpot(TM) 64-BitServer VM (build 24.65-b04, mixed mode)
3 安装
3.1安装依赖软件
#安装yum的文档(可选)
sed -i 's/tsflags=nodocs//g' /etc/yum.conf
#安装所有需要的软件
yum install -y epel-release && \
yum makecache&& \
yum install -y manpasswd sudo tar which git mlocate links make bzip2 \
autoconf automakelibtool m4 gcc gcc-c++ gdb flex cmake gperf indent \
libuuid-develkrb5-devel libgsasl-devel expat-devel libxml2-devel \
perl-ExtUtils-Embed pam-devel python-develsnappy-devel \
libyaml-devellibevent-devel bzip2-devel openssl-devel \
openldap-develreadline-devel net-snmp-devel apr-devel \
libesmtp-develxerces-c-devel python-pip json-c-devel \
apache-ivyjava-1.7.0-openjdk-devel \
openssh-clientsopenssh-server && \
yum clean all
# 安装libcurl 7.45.0
mkdir -p /tmp/build/ && \
cd /tmp/build&& curl -L "http://curl.haxx.se/download/curl-7.45.0.tar.bz2"-o curl-7.45.0.tar.bz2 && \
tar -xjfcurl-7.45.0.tar.bz2 && cd curl-7.45.0 && \
./configure--prefix=/usr && make && make install && \
rm -rf /tmp/build&& ldconfig
# 安装maven
curl -L"http://repos.fedorapeople.org/repos/dchen/apache-maven/epel-apache-maven.repo"-o /etc/yum.repos.d/epel-apache-maven.repo && \
yum install -yapache-maven && \
yum clean all
# 为root配置ssh
ssh-keygen -t rsa -N "" -f ~/.ssh/id_rsa&& \
cat~/.ssh/id_rsa.pub >> ~/.ssh/authorized_keys && \
chmod 0600~/.ssh/authorized_keys
# 为所有用户设置JAVA_HOME
echo "#!/bin/sh" > /etc/profile.d/java.sh&& \
echo "exportJAVA_HOME=/etc/alternatives/java_sdk" >> /etc/profile.d/java.sh&& \
chmod a+x/etc/profile.d/java.sh
注:centos,redhat版本需查看如下方式.
echo "export JAVA_HOME=/usr/java/latest">> /etc/profile.d/java.sh && chmod a+x /etc/profile.d/java.sh
# 安装 boost 1.59
mkdir -p /tmp/build && \
cd /tmp/build&& curl -L"http://downloads.sourceforge.net/project/boost/boost/1.59.0/boost_1_59_0.tar.bz2"-o boost_1_59_0.tar.bz2 && \
tar -xjfboost_1_59_0.tar.bz2 && cd boost_1_59_0 && \
./bootstrap.sh&& ./b2 --prefix=/usr -q && ./b2 --prefix=/usr -q install&& \
rm -rf /tmp/build
# 安装 bison 2.5.1
mkdir -p /tmp/build/ && \
cd /tmp/build&& curl -L "ftp://ftp.gnu.org/gnu/bison/bison-2.5.1.tar.gz"-o bison-2.5.1.tar.gz && \
tar -xzfbison-2.5.1.tar.gz && cd bison-2.5.1 && \
./configure--prefix=/usr && make && make install && \
rm -rf /tmp/build
#安装 thrift 0.9.2
mkdir -p /tmp/build && \
cd /tmp/build&& curl -L"http://www.us.apache.org/dist/thrift/0.9.2/thrift-0.9.2.tar.gz" -othrift-0.9.2.tar.gz && \
tar -xzfthrift-0.9.2.tar.gz && cd thrift-0.9.2 && \
./configure--prefix=/usr \
--with-cpp=yes--with-boost=yes --with-qt4=no --with-csharp=no --with-java=no --with-erlang=no--enable-tests=no \
--with-nodejs=no--with-lua=no --with-python=no --with-perl=no --with-php=no && \
make &&make install && \
rm -rf /tmp/build
#安装 protobuf 2.5.0
mkdir -p /tmp/build/ && \
cd /tmp/build&& curl -L"https://github.com/google/protobuf/releases/download/v2.5.0/protobuf-2.5.0.tar.bz2"-o protobuf-2.5.0.tar.bz2 && \
tar -xjfprotobuf-2.5.0.tar.bz2 && cd protobuf-2.5.0 && \
./configure--prefix=/usr && make && make install && ldconfig&& \
rm -rf /tmp/build
注:直接github版本需墙外操作,如不方便。可以搜索到protobuf-2.5.0的源码包再解压、编译
#安装 libhdfs3
mkdir -p /tmp/build && \
cd /tmp/build&& git clone https://github.com/PivotalRD/libhdfs3.git . && mkdirbuild && cd build && \
../bootstrap--prefix=/usr && make && make install && ldconfig&& \
rm -rf /tmp/build
#安装 python 模块
yum makecache && yum install -y postgresql-devel&& \
pip --retries=50--timeout=300 install pg8000 simplejson unittest2 pycrypto pygresql pyyamllockfile paramiko psi && \
pip --retries=50--timeout=300 install http://darcs.idyll.org/~t/projects/figleaf-0.6.1.tar.gz&& \
pip --retries=50--timeout=300 installhttp://sourceforge.net/projects/pychecker/files/pychecker/0.8.19/pychecker-0.8.19.tar.gz/download&& \
yum erase -ypostgresql postgresql-libs postgresql-devel && \
yum clean all
# 安装libyarn
RUN mkdir -p /tmp/build && \
cd /tmp/build&& git clone --depth=1 https://github.com/apache/incubator-hawq.git .&& cd depends/libyarn && mkdir build && cd build&& \
../bootstrap--prefix=/usr && make && make install && ldconfig&& \
rm -rf /tmp/build
#新增 gpadmin用户(root下不能运行HAWQ)
groupadd -g 1000 gpadmin && \
useradd -u 1000 -g 1000 gpadmin && \
echo "gpadmin ALL=(ALL) NOPASSWD:ALL" > /etc/sudoers.d/gpadmin
# sudo 里关闭require tty
sed -i -e 's|Defaults requiretty|#Defaults requiretty|' /etc/sudoers
# 配置用户环境变量
echo "#!/bin/bash" > /etc/profile.d/user.sh&& \
echo "exportUSER=\`whoami\`" >> /etc/profile.d/user.sh && \
chmod a+x/etc/profile.d/user.sh
# 配置 gpadmin用户的ssh
ssh-keygen -t rsa -N "" -f ~/.ssh/id_rsa&& \
cat~/.ssh/id_rsa.pub >> ~/.ssh/authorized_keys && \
chmod 0600~/.ssh/authorized_keys
3.2 配置操作系统参数
# 打开/etc/sysctl.conf,编辑如下内容
kernel.shmmax= 1000000000
kernel.shmmni= 4096
kernel.shmall= 4000000000
kernel.sem= 250 512000 100 2048
kernel.sysrq= 1
kernel.core_uses_pid= 1
kernel.msgmnb= 65536
kernel.msgmax= 65536
kernel.msgmni= 2048
net.ipv4.tcp_syncookies= 0
net.ipv4.ip_forward= 0
net.ipv4.conf.default.accept_source_route= 0
net.ipv4.tcp_tw_recycle= 1
net.ipv4.tcp_max_syn_backlog= 200000
net.ipv4.conf.all.arp_filter= 1
net.ipv4.ip_local_port_range= 1281 65535
net.core.netdev_max_backlog= 200000
vm.overcommit_memory= 2
fs.nr_open= 3000000
kernel.threads-max= 798720
kernel.pid_max= 798720
#increase network
net.core.rmem_max=2097152
net.core.wmem_max=2097152
#执行如下命令生效:
sysctl -p
#打开/etc/security/limits.conf编辑如下内容
*soft nofile 2900000
*hard nofile 2900000
*soft nproc 131072
*hard nproc 131072
3.3 安装hadoop
详见hadoop手动安装手册.
3.4 编译安装HAWQ
# The Apache HAWQ source code can be obtained from thethe following link:
# Apache Repo: https://git-wip-us.apache.org/repos/asf/incubator-hawq.git or
# GitHub Mirror: https://github.com/apache/incubator-hawq.
git clonehttps://git-wip-us.apache.org/repos/asf/incubator-hawq.git
# 切换到hawq源码目录
cd /root/incubator-hawq
# 执行生成makefile命令
./configure
# Or you could use--prefix=/hawq/install/path to change the Apache HAWQ install path,
# and you can also add some optionalcomponents using options (--with-python --with-perl)
./configure --prefix=/hawq/install/path --with-python--with-perl
# You can also run the command with--help for more configuration.
./configure --help
#Note: If ./configure complainsthat libyarn is missing, it is provided under ./depends/libyarn.
# Please follow the above steps toinstall libyarn. You may need to run "ldconfig -p <PATH>" afterlibyarn is installed.
注:以上可选
# 执行编译和安装
# To build concurrently , run makewith -j option. For example, make -j8
# On Linux system without largememory, you will probably encounter error like
# "Error occurred duringinitialization of VM" "Could not reserve enough space for objectheap";
# Try to set vm.overcommit_memory =1 temporarily, and/or avoid "-j" build, and/or add more memory andthen rebuild.
# On mac os, you will probably seethis error: "'openssl/ssl.h' file not found".
# "brew link openssl--force" should be able to solve the issue.
make -j8
# 安装HAWQ
make install
3.4 安装问题
暂无.
4 配置
4.1 HAWQ的参数配置
配置HAWQ的集群及其它参数
cd /usr/hawq/etc
vi hawq-site.xml
# 修改如下参数
| 参数名 | 示例值 |
| hawq_master_address_host | shenl |
| hawq_dfs_url | shenl:8020/hawq_default |
| hawq_rm_memory_limit_perseg | 64GB |
| hawq_rm_yarn_address | shenl:8032 |
| hawq_rm_yarn_scheduler_address | shenl:8030 |
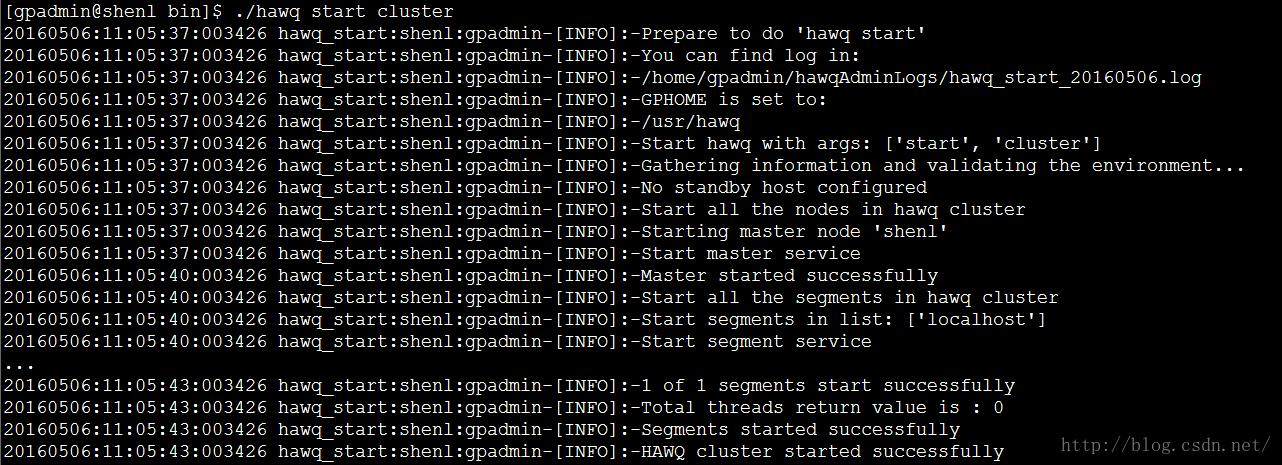
su -gpadmin
cd usr/hawq/bin
source ../greenplum_path.sh
./hawqinit cluster
# 启动hawq
hawqstop/restart/start cluster
5 使用
5.1 HAWQ基本功能验证
主要验证:
SQL基本功能
事务支持
存储过程支持
性能测试
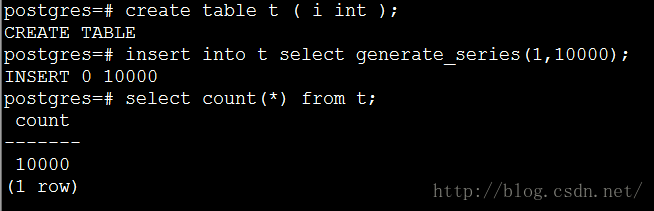
1) SQL基本功能验证
./psql -d postgres
create table t ( i int );
insert into t values(1);
insert intot select generate_series(1,10000);
select count(*) from t;
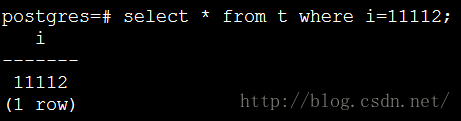
2)事务支持验证
思路:
在一个客户端里执行DML操作,没commit之前在另外个客户端里查查询表记录
具体验证:
# 会话一中执行DML事务操作,先不提交
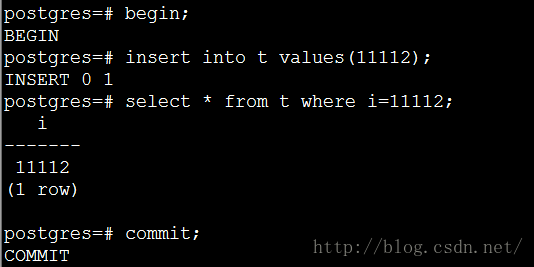
# 会话二中执行查询操作

# 待会话一执行commit;后再在会话二中执行查询操作
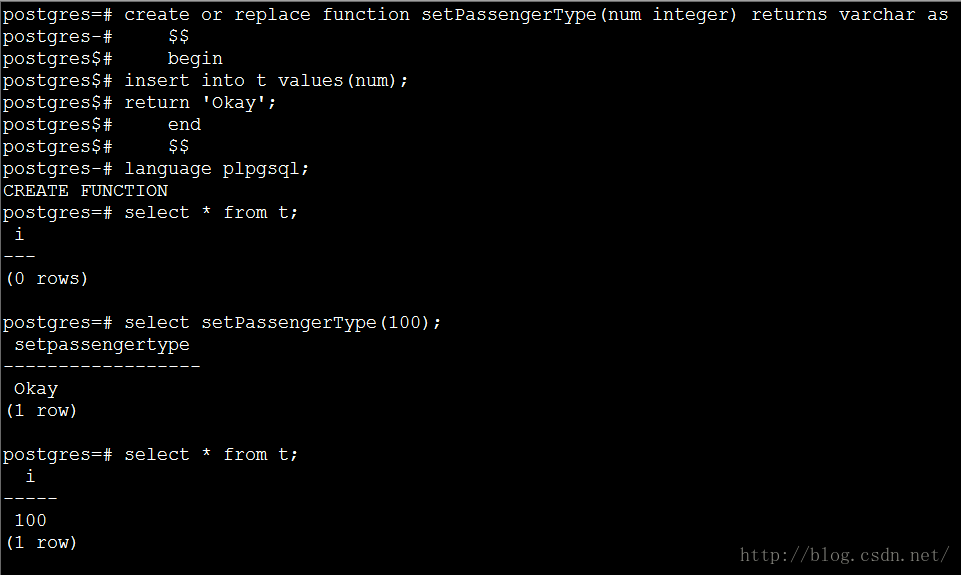
3)存储过程支持验证
create or replace functionsetPassengerType(num integer) returns varchar as
$$
begin
insert into t values(num);
return 'Okay';
end
$$
language plpgsql;
select setPassengerType(100);
4)性能测试验证
待完善
6 总结
仔细跟踪log,具体问题具体分析.