Activity跳转和传值
1.重点内容
1.重点内容
- Activity之间的跳转及数据传递(如何跳转?如何返回?)
- 使用Intent在Activity之间传递数据)(单向和双向?)
- 回传数据(怎么回传和接收?)
- 隐式启动Activity(代码量少,可以实现不同组件之间的跳转)
2.使用Intent显式启动Activity
2.1Intent简介
1.引入
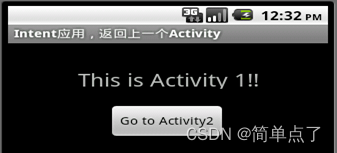
比如下面的图,当我点击”Go to Activity2“的时候就会从第一个Activity跳转到下一个Activity。再点击”Go to Activity1“就会跳转到第一个Aactivity。

2.多个Activity之间的关系
在android开发中,经常会从一个页面调转到另一个页面,在android中从一个activity启动另一个activity可以使用startActivity方法或者startActivityForResult方法(能返回值)。这里的两个方法要传递参数时需要使用到对象Intent,intent是信使,完成组件之间的通信功能。

3.Intent简介
白话:Intent起到了不同Activity之间组件传值的作用。就是传值。传数据。
简介:
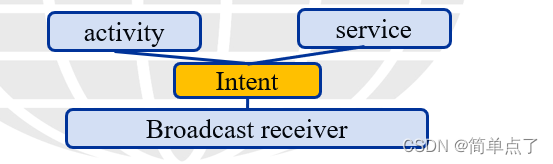
- Intent一般用于启动Activity,启动服务,发送广播等,承担了Android应用程序核心组件相互间的通信功能。
- Intent是一种运行时绑定(runtime binding)机制,它能在程序运行的过程中连接两个不同的组件。通过Intent,你的程序可以向Android表达某种请求或者意愿,Android会根据意愿的内容选择适当的组件来响应。比如,有一个Activity希望打开网页浏览器查看某一网页的内容,那么这个Activity只需要发出WEBSEARCHACTION请求给Android,Android 会根据Intent的内容,查询各组件注册时的声明的IntentFilter,找到网页浏览器Activity来浏览网页。
4.Intent简介图示:
可参考文档:https://www.cnblogs.com/mengdd/archive/2013/03/18/2965839.html
- Intent是Activity、Service、Broadcast Receiver之间的桥梁,为Activity、Service和BroadcastReceiver等组件提供交互能力
- Intent对象必须需要包含一个信息包,用于接收和传递组件需要的信息
5.Intent的两种调用方式?
显示调用需要明确的指定需要启动的Activity所在位置,隐式调用不需要指定组件的名称,但需要一定的条件进行过滤。
- 显式调用,必须在Intent中Component name指明启动的Activity所在的类;
- 隐式调用,没有明确指定目标组件的名称,那么就要通过一定的条件过滤筛选。
- Android系统根据隐式意图中设置的动作(Action)、类别(category)、数据(Uri和数据类型)决定启动哪一个组件。
也就是说在隐式启动时,Intent中只包含需要执行的动作和所包含的数据,而无需指明具体启动哪一个Activity,选择权由Android系统和最终用户来决定。
2.2Intent的显式调用
1.显式调用步骤?
- 创建一个Intent对象(new Intent())
- 指定当前的应用程序上下文以及要启动的Activity(setClass())
- 把创建好的这个Intent作为参数传递给startActivity()方法(调用startActivity())
2.2.1采用Intent有参构造函数
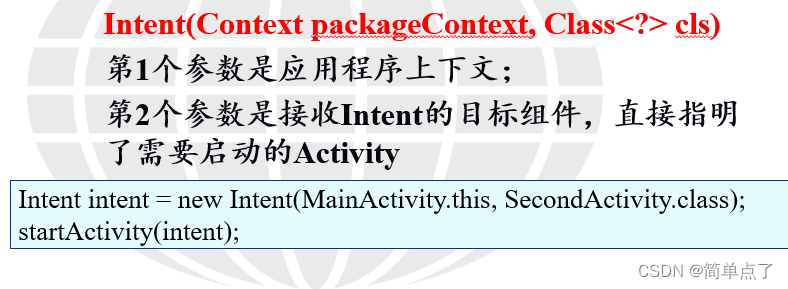
1.语法:
第一个参数传入的就是this,第二个需要指定是目标组件的类
2.案例1:
主布局文件的代码:
<?xml version="1.0" encoding="utf-8"?>
<LinearLayout xmlns:android="http://schemas.android.com/apk/res/android"xmlns:app="http://schemas.android.com/apk/res-auto"xmlns:tools="http://schemas.android.com/tools"android:layout_width="match_parent"android:layout_height="match_parent"android:orientation="vertical"tools:context=".MainActivity"><TextViewandroid:layout_width="wrap_content"android:layout_height="wrap_content"android:text="点击按钮跳转到不同的activity"/><Buttonandroid:id="@+id/helloActivity"android:layout_width="wrap_content"android:layout_height="wrap_content"android:text="helloActivity"/></LinearLayout>
主布局文件的java文件代码:
package com.example.activity_study;import androidx.appcompat.app.AppCompatActivity;import android.content.Intent;
import android.os.Bundle;
import android.view.View;
import android.widget.Button;//显式的调用activity
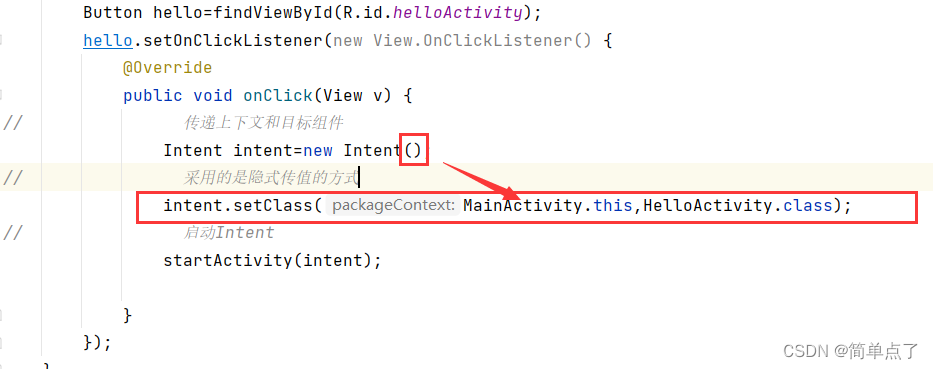
public class MainActivity extends AppCompatActivity {@Overrideprotected void onCreate(Bundle savedInstanceState) {super.onCreate(savedInstanceState);setContentView(R.layout.activity_main);// helloActivityButton hello=findViewById(R.id.helloActivity);hello.setOnClickListener(new View.OnClickListener() {@Overridepublic void onClick(View v) {
// 传递上下文和目标组件Intent intent=new Intent(MainActivity.this,HelloActivity.class);
// 启动IntentstartActivity(intent);}});}
}要跳转的布局文件<?xml version="1.0" encoding="utf-8"?>
<LinearLayout xmlns:android="http://schemas.android.com/apk/res/android"xmlns:app="http://schemas.android.com/apk/res-auto"xmlns:tools="http://schemas.android.com/tools"android:layout_width="match_parent"android:layout_height="match_parent"tools:context=".HelloActivity"><TextViewandroid:layout_width="wrap_content"android:layout_height="wrap_content"android:text="我是HelloActivity"android:textSize="30dp"android:layout_gravity="center"/>
</LinearLayout>效果图如下:

2.2.2采用Intent无参构造函数构造一个空Intent对象
1.创建的步骤
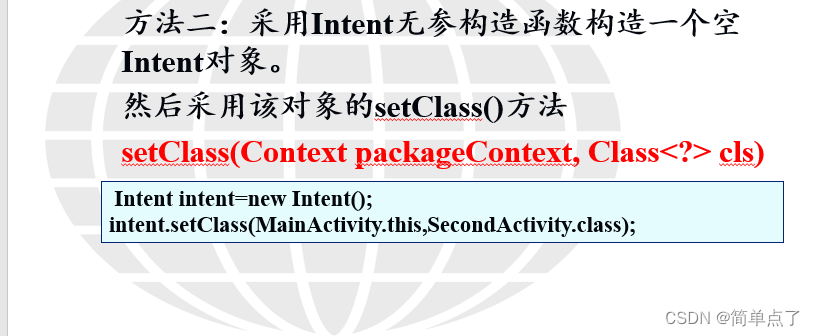
2.案例2:
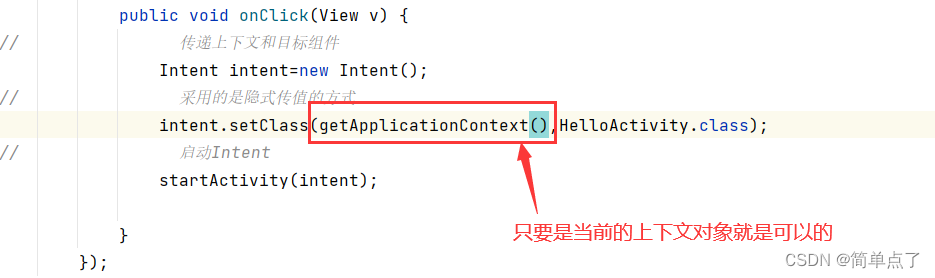
- 和案例1的区别在圈出来的地方,多调用setClass方法把上下文对象和对应的类传入进去就可以。
扩展:关于上下文对象的多种书写的方式
2.3用Intent在Activity之间传递数据(单向)
2.3.1传值的简介
1.简介:当一个Activity启动另一个Activity时,常常会有一些数据要传递过去,在Android中,需要传递的数据放在对象Intent中。
比如说:提交一个表单的时候,需要往下一个activity传递数据。

获取前一个activity传递过来的数据。
所以本小节,主要学习的是如何获取前一个activity传递的数据。
2.常见的传递数据的方法:

2.3.2使用Intent+putExtra的单向简单传值
第一步:创建登录的界面
第二步:编写登录界面的布局文件,代码如下。
<?xml version="1.0" encoding="utf-8"?>
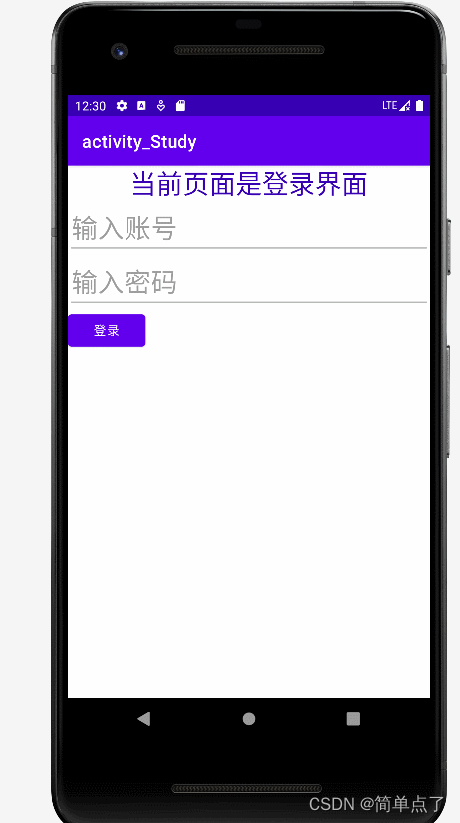
<LinearLayout xmlns:android="http://schemas.android.com/apk/res/android"xmlns:app="http://schemas.android.com/apk/res-auto"xmlns:tools="http://schemas.android.com/tools"android:layout_width="match_parent"android:layout_height="match_parent"android:orientation="vertical"tools:context=".LoginActivity"><TextViewandroid:textSize="30dp"android:layout_gravity="center"android:textColor="@color/purple_700"android:layout_width="wrap_content"android:layout_height="wrap_content"android:text="当前页面是登录界面"/>
<!--账号和密码的输入框-->
<EditTextandroid:id="@+id/account"android:layout_width="match_parent"android:layout_height="wrap_content"android:textSize="30dp"android:inputType="text"android:hint="输入账号"/><EditTextandroid:id="@+id/password"android:layout_width="match_parent"android:layout_height="wrap_content"android:textSize="30dp"android:inputType="textPassword"android:hint="输入密码"/><!-- 登录按钮--><Buttonandroid:id="@+id/login"android:layout_width="wrap_content"android:layout_height="wrap_content"android:text="登录"/></LinearLayout>第三步:编写登录界面的activity,代码如下。
package com.example.activity_study;import androidx.appcompat.app.AppCompatActivity;import android.content.Intent;
import android.os.Bundle;
import android.view.View;
import android.widget.Button;
import android.widget.EditText;//登录界面
public class LoginActivity extends AppCompatActivity {@Overrideprotected void onCreate(Bundle savedInstanceState) {super.onCreate(savedInstanceState);setContentView(R.layout.activity_login);
//        获取控件Button login=findViewById(R.id.login);EditText account=findViewById(R.id.account);EditText password=findViewById(R.id.password);login.setOnClickListener(new View.OnClickListener() {@Overridepublic void onClick(View v) {
//                获取登录的账号和密码String acc= account.getText().toString();String pswd=password.getText().toString();
//                创建Intent对象传递数据Intent intent=new Intent();intent.setClass(getBaseContext(),LoginHandleActivity.class);
//                设置需要传递的数据intent.putExtra("account",acc);intent.putExtra("password",pswd);startActivity(intent);}});}
}
第三步:创建接收数据的activity和布局文件。
第四步:显示数据的布局文件代码如下。
<?xml version="1.0" encoding="utf-8"?>
<LinearLayout xmlns:android="http://schemas.android.com/apk/res/android"xmlns:app="http://schemas.android.com/apk/res-auto"xmlns:tools="http://schemas.android.com/tools"android:layout_width="match_parent"android:layout_height="match_parent"android:orientation="vertical"tools:context=".LoginHandleActivity"><TextViewandroid:id="@+id/loginsuccess"android:layout_width="wrap_content"android:layout_height="wrap_content"android:layout_gravity="center"android:textSize="30dp"/>
</LinearLayout>
第五步:接收数据的activity代码如下。
package com.example.activity_study;import androidx.appcompat.app.AppCompatActivity;import android.content.Intent;
import android.os.Bundle;
import android.widget.TextView;
import android.widget.Toast;public class LoginHandleActivity extends AppCompatActivity {@Overrideprotected void onCreate(Bundle savedInstanceState) {super.onCreate(savedInstanceState);setContentView(R.layout.activity_login_handle);
// 登录成功的提示TextView loginsuccess=findViewById(R.id.loginsuccess);
// 获取传递的数值Intent intent=getIntent();String account=intent.getStringExtra("account");String password=intent.getStringExtra("password");
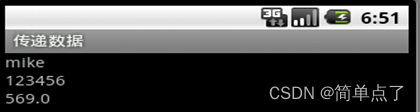
// 设置提示内容loginsuccess.setText("恭喜 用户:"+account+" 密码为:"+password+" 登录成功!");
// 打印提示消息Toast.makeText(this, ""+loginsuccess.getText(), Toast.LENGTH_SHORT).show();}
}效果图:
2.3.3使用Intent+Bundle的复杂传值
1.简介:使用Bundle实现数据传递。Bundle是数据携带包,提供了多个方法存入数据。
需要先创建一个Bundle对象
往bundle中传递数据
- putXxx(String key,Xxx data):向Bundle中放入各种类型数据。
- putSerializable(String key,Serializable data):向Bundle中放入一个可序列化的对象。(常常是自己创建的对象)
为了取出Bundle数据携带包里的数据,Bundle提供如下方法。
获取Bundle中的数据:
- getXxx(String key):从Bundle取出Int、Long等各数据类型数据。
- getSerializable(String key):从Bundle取出一个可序列化的对象。
2.案例3:-注册界面
第一步:创建一个User,包含id和name以及age属性。
package com.example.activity_study;import java.io.Serializable;//创建一个可序列化的对象
public class User implements Serializable {private String id;private String password;private int age;@Overridepublic String toString() {return "User{" +"id='" + id + '\'' +", password='" + password + '\'' +", age=" + age +'}';}public User(String id, String password, int age) {this.id = id;this.password = password;this.age = age;}public User() {}public String getId() {return id;}public void setId(String id) {this.id = id;}public String getPassword() {return password;}public void setPassword(String password) {this.password = password;}public int getAge() {return age;}public void setAge(int age) {this.age = age;}
}
第二步:创建注册的布局文件。
<?xml version="1.0" encoding="utf-8"?>
<LinearLayout xmlns:android="http://schemas.android.com/apk/res/android"xmlns:app="http://schemas.android.com/apk/res-auto"xmlns:tools="http://schemas.android.com/tools"android:layout_width="match_parent"android:layout_height="match_parent"android:orientation="vertical"tools:context=".RegisterActivity"><!--    创建的是一个注册的界面--><TextViewandroid:textSize="30dp"android:layout_gravity="center"android:textColor="@color/purple_700"android:layout_width="wrap_content"android:layout_height="wrap_content"android:text="当前页面是登注册界面"/><!--账号和密码的输入框--><EditTextandroid:id="@+id/regid"android:layout_width="match_parent"android:layout_height="wrap_content"android:textSize="30dp"android:inputType="text"android:hint="输入账号"/><EditTextandroid:id="@+id/regpassword"android:layout_width="match_parent"android:layout_height="wrap_content"android:textSize="30dp"android:inputType="textPassword"android:hint="输入密码"/><EditTextandroid:id="@+id/regage"android:layout_width="match_parent"android:layout_height="wrap_content"android:textSize="30dp"android:inputType="textPassword"android:hint="输入年龄"/><!--    注册按钮--><Buttonandroid:id="@+id/reg"android:layout_width="wrap_content"android:layout_height="wrap_content"android:text="登录"/></LinearLayout>
第三步:编写注册的activity。
package com.example.activity_study;import androidx.appcompat.app.AppCompatActivity;import android.content.Intent;
import android.os.Bundle;
import android.view.View;
import android.widget.Button;
import android.widget.EditText;public class RegisterActivity extends AppCompatActivity {@Overrideprotected void onCreate(Bundle savedInstanceState) {super.onCreate(savedInstanceState);setContentView(R.layout.activity_register);//        获取控件Button login=findViewById(R.id.reg);EditText account=findViewById(R.id.regid);EditText password=findViewById(R.id.regpassword);EditText regage=findViewById(R.id.regage);login.setOnClickListener(new View.OnClickListener() {@Overridepublic void onClick(View v) {
//                获取登录的账号和密码String acc= account.getText().toString();String pswd=password.getText().toString();int age=Integer.parseInt(regage.getText().toString());
//               创建可序列化对象User user=new User(acc,pswd,age);String desc="当前传入的对象是一个可序列化的对象";
//              创建BundleBundle bundle=new Bundle();bundle.putString("desc",desc);bundle.putSerializable("user",user);//                创建Intent对象传递数据Intent intent=new Intent();intent.setClass(getBaseContext(),RegisterHandleActivity.class);
//                设置需要传递的数据(直接传递bundle数据包就可以)intent.putExtras(bundle);startActivity(intent);}});}
}
第四步:编写接收信息的布局文件。
<?xml version="1.0" encoding="utf-8"?>
<LinearLayout xmlns:android="http://schemas.android.com/apk/res/android"xmlns:app="http://schemas.android.com/apk/res-auto"xmlns:tools="http://schemas.android.com/tools"android:layout_width="match_parent"android:layout_height="match_parent"android:orientation="horizontal"tools:context=".RegisterHandleActivity"><TextViewandroid:id="@+id/regsuccess"android:layout_width="wrap_content"android:layout_height="wrap_content"android:layout_gravity="center"android:textSize="30dp"/>
</LinearLayout>
第五步:编写接收信息的activity文件。
package com.example.activity_study;import androidx.appcompat.app.AppCompatActivity;import android.content.Intent;
import android.os.Bundle;
import android.widget.TextView;
import android.widget.Toast;public class RegisterHandleActivity extends AppCompatActivity {@Overrideprotected void onCreate(Bundle savedInstanceState) {super.onCreate(savedInstanceState);setContentView(R.layout.activity_register_handle);//        登录成功的提示TextView loginsuccess=findViewById(R.id.regsuccess);
//        获取传递的数值Intent intent=getIntent();Bundle bundle=intent.getExtras();String desc=bundle.getString("desc");
//        获取可序列化的对象User user=(User) bundle.getSerializable("user");//      设置提示内容loginsuccess.setText(desc+"  恭喜 用户"+user.toString());
//      打印提示消息Toast.makeText(this, ""+loginsuccess.getText(), Toast.LENGTH_SHORT).show();}
}
效果图:

2.4用Intent在Activity之间传递数据(双向)
1.简介:
第一个页面需要设置传递的数据+请求码。第二个页面需要设置结果码。第一个页面接收数据+请求码+结果码。
- Activity提供了一个startActivityForResult(Intent intent,int requestCode )方法来启动其他Activity。该方法用于启动指定的Activity,而且期望获取指定Activity返回的结果。
- 为了获取被启动的Activity所返回的结果,当前Activity需要重写onActivityResult(int requestCode,int resultCode,Intent intent)。
- 一个Activity中可能包含多个按钮,并调用startActivityForResult()方法来打开多个不同的Activity处理不同的业务。当这些新Activity关闭时,系统都会调用前面Activity的onActivityResult(int requestCode,int resultCode,Intent intent)方法,利用request Code区分是哪个请求结果触发的,利用resultCode区分返回的数据来自哪个新的Activity。
2.回传数据的步骤
注意:注意:
在一个Activity中可能会调用startActivityForResult()方法启动多个Activity,每一个Activity返回的数据都会回调到onActivityResult()这个方法中,所以需要通过检查requestCode的值来判断数据来源,确定数据是从正确的Activity返回,然后再通过resultCode的值来判断数据处理结果是否成功,最后从data中取出数据并打印。
- Step1:第1个Activity中使用startActivityForResult()方法实现回传数据。
- intent,int requestCode)
第一个参数是Intent,第二个参数是请求码,用于判断数据的来源
- Step2:第2个Activity中添加数据返回代码。需要使用setResult()方法。
setResult(int resultCode,Intent data)
resultCode:结果码,一般使用0或1;
Intent:带有数据的Intent - Step3:第1个Activity中使用onActivityResult()方法获取返回的数据。
protected void onActivityResult(int requestCode,int resultCode,Intent data)
requestCode:启动Activity时传递的请求码;
resultCode:表示在返回数据时传入结果码;
data:携带返回数据的Intent
2.4.1双向传递数据(聊天)
第一步:创建A的布局文件
<?xml version="1.0" encoding="utf-8"?>
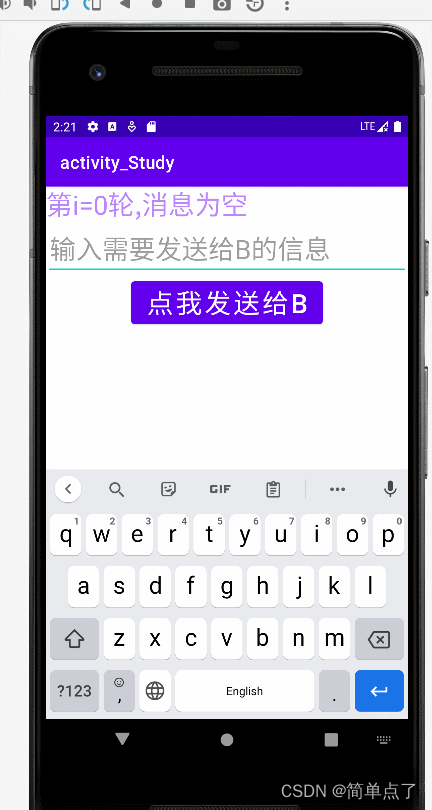
<LinearLayout xmlns:android="http://schemas.android.com/apk/res/android"xmlns:app="http://schemas.android.com/apk/res-auto"xmlns:tools="http://schemas.android.com/tools"android:layout_width="match_parent"android:layout_height="match_parent"android:orientation="vertical"tools:context=".personOne"><!-- TextView显示当前的聊天的信息--><TextViewandroid:id="@+id/Artext"android:textSize="30dp"android:textColor="@color/purple_200"android:layout_width="wrap_content"android:layout_height="wrap_content"android:text="第i=0轮,消息为空"/>
<!-- 输入需要传递的数据-->
<EditTextandroid:textSize="30dp"android:id="@+id/Astext"android:layout_width="match_parent"android:layout_height="wrap_content"android:hint="输入需要发送给B的信息"/>
<Buttonandroid:id="@+id/AtoB"android:textSize="30dp"android:layout_gravity="center"android:layout_width="wrap_content"android:layout_height="wrap_content"android:text="点我发送给B"/></LinearLayout>第二步:创建A的activity代码
package com.example.activity_study;import androidx.annotation.Nullable;
import androidx.appcompat.app.AppCompatActivity;import android.content.Intent;
import android.os.Bundle;
import android.view.View;
import android.widget.Button;
import android.widget.EditText;
import android.widget.TextView;//A用户
public class personOne extends AppCompatActivity {
static int i=0;@Overrideprotected void onCreate(Bundle savedInstanceState) {super.onCreate(savedInstanceState);setContentView(R.layout.activity_person_one);EditText Astext=findViewById(R.id.Astext);Button AtoB=findViewById(R.id.AtoB);
//        接收数据AtoB.setOnClickListener(new View.OnClickListener() {@Overridepublic void onClick(View v) {
//                传递A发送给B的数据String textA=Astext.getText().toString();Astext.setText("");Intent intent=new Intent();intent.setClass(getBaseContext(),personTwo.class);intent.putExtra("msg",textA);startActivityForResult(intent,0);}});}//    接收数据@Overrideprotected void onActivityResult(int requestCode, int resultCode, @Nullable Intent data) {super.onActivityResult(requestCode, resultCode, data);System.out.println(requestCode+"=======");if (requestCode==0&&resultCode==1){
//        获取控件TextView Artext=findViewById(R.id.Artext);if (!data.getStringExtra("msg").toString().equals("")){i++;Artext.setText(data.getStringExtra("第i="+i+"轮,"+"msg"));}else{Artext.setText("消息为空");}}}
}
第三步:创建B的布局文件。
<?xml version="1.0" encoding="utf-8"?>
<LinearLayout xmlns:android="http://schemas.android.com/apk/res/android"xmlns:app="http://schemas.android.com/apk/res-auto"xmlns:tools="http://schemas.android.com/tools"android:layout_width="match_parent"android:layout_height="match_parent"android:orientation="vertical"tools:context=".personTwo"><!--  TextView显示当前的聊天的信息--><TextViewandroid:id="@+id/Brtext"android:textSize="30dp"android:textColor="@color/purple_200"android:layout_width="wrap_content"android:layout_height="wrap_content"android:text="消息为空"/><!--   输入需要传递的数据--><EditTextandroid:id="@+id/Bstext"android:textSize="30dp"android:layout_width="match_parent"android:layout_height="wrap_content"android:hint="输入需要发送给A的信息"/><Buttonandroid:id="@+id/BtoA"android:textSize="30dp"android:layout_gravity="center"android:layout_width="wrap_content"android:layout_height="wrap_content"android:text="点我发送给A"/>
</LinearLayout>
第四步:创建B的activity代码。
package com.example.activity_study;import androidx.appcompat.app.AppCompatActivity;import android.content.Intent;
import android.os.Bundle;
import android.view.View;
import android.widget.Button;
import android.widget.EditText;
import android.widget.TextView;public class personTwo extends AppCompatActivity {
static int i=0;@Overrideprotected void onCreate(Bundle savedInstanceState) {super.onCreate(savedInstanceState);setContentView(R.layout.activity_person_two2);
//      B发送给A的数据EditText Bstext=findViewById(R.id.Bstext);
//        B接收A的消息TextView Brtext=findViewById(R.id.Brtext);
//        传递数据的按钮Button BtoA=findViewById(R.id.BtoA);
//        接收数据i++;String msg=getIntent().getStringExtra("msg");if (!msg.toString().equals("")){Brtext.setText("第i="+i+"轮消息,"+msg);}else{Brtext.setText("第i="+i+"轮,消息为空");}BtoA.setOnClickListener(new View.OnClickListener() {@Overridepublic void onClick(View v) {
//                B发送给A的数据String textB=Bstext.getText().toString();Bstext.setText("");Intent intent=new Intent();
//                回传数据不用设置classintent.putExtra("msg",textB);
//                回传数据setResult(1,intent);finish();}});}
}
效果图:
3.使用Intent隐式启动Activity
3.1简介
1.隐式传递的优点:
- 优点:不需要指明启动哪一个Activity,而由Android系统来决定,有利于使用第三方组件。
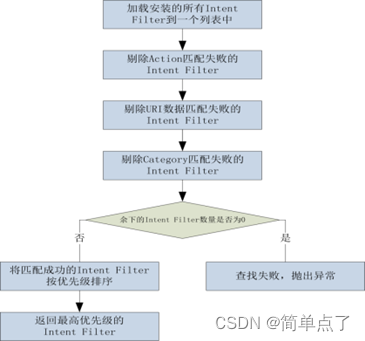
- 隐式启动Activity时,Android系统在应用程序运行时解析Intent,并根据一定的规则对Intent和Activity进行匹配,使Intent上的动作、数据与Activity完全吻合。
- 匹配的Activity可以是应用程序本身的,也可以是Android系统内置的,还可以是第三方应用程序提供的。因此,这种方式更加强调了Android应用程序中组件的可复用性
3.2IntentFilter
1.简介:
- IntentFilter中具有和Intent对应的用于过滤动作Action,数据Data和类别Category的字段,根据这些字段对适合接收该Intent的组件进行匹配和筛选的机制。
- 每个 IntentFilter描述该组件所能响应Intent请求的能力——组件希望接收什么类型的请求行为,什么类型的请求数据。
2.常见的属性
- 为了使组件能够注册IntentFilter,通常在AndroidManifest.xml文件的各个组件的节点下定义节点,然后在节点声明该组件所支持的动作、执行的环境和数据格式等信息。当然,也可以在程序代码中动态地为组件设置IntentFilter。节点支持标签、标签和标签,分别用来定义IntentFilter的“动作”、“类别”和“数据”。
Android平台通知BroadcastReceiver对象时需要给该对象发送一个Intent对象,如果该Intent对象符合action,category,data等属性值则启动该BroadcastReceiver对象,如果不符合这个标准,即intent-filter中没有这个属性能和Intent中的属性匹配,则不会启动该BroadcastReceiver。
3.属性列表
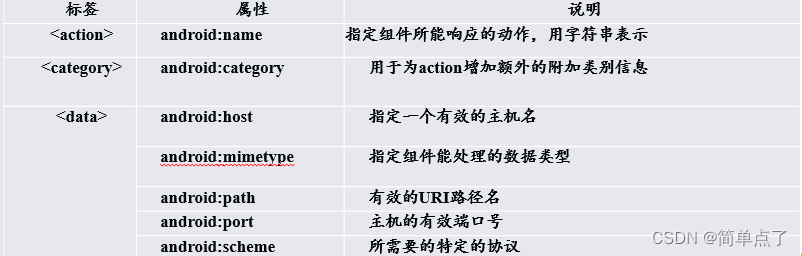
- Action属性是一个字符串, 代表某一种特定的动作
Category属性也是一个字符串, 用于指定一些目标组件需要满足的额外条件,包含了处理该Intent的组件的种类信息, 起着对action的补充说明作用。 - Data属性指定所操作数据。
- Android中的Intent通过Action,Category和data等属性进行了相应的描述,我们想做某些事情(达成某些目标),就需要填写这些参数的部分或全部,这样Android才会帮助我们自动的去进行某些操作。
Intent(发送数据的广播对象)如何处理数据是由Action和data两部分决定的,Action指的是处理数据的方法,即操作是什么类型的;data是要被处理的数据。如动作Action“洗”,对象data“衣服”,对于不同的数据,处理的动作不同。如洗衣服和洗脸的步骤不同。
4.隐式启动设置的步骤
注意事项:
如果自己定义的某个Activity要通过隐式启动,在AndroidManifast.xm那么必须加上android.intent.category.DEFAULT,否则不起作用.
在activity中
Intent newIntent=new Intent();
newIntent.setAction(“www.yzh.cn”); newIntent.addCategory(“www”);//category不匹配,则无法启动secondactivity。如果不加这条语句,也就是说不用匹配category,只要有程序也可以运行。但是如果要加addCategory(),则一定要准确。
- step1:在AndroidManifest.xml文件里
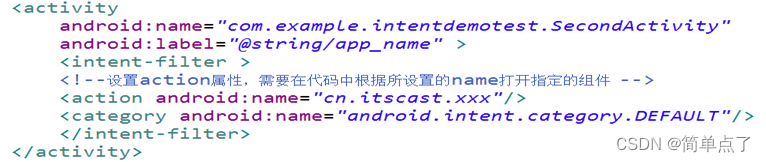
- step2:action 标签指明了当前Activity可以响应的动作为“ cn.itscast.xxx”,而category标签则包含了一些类别信息,只有当、中的内容同时匹配时,Activity才会被启动。
- step3:隐式启动的代码如下:Activity中

3.2.1隐式跳转的案例
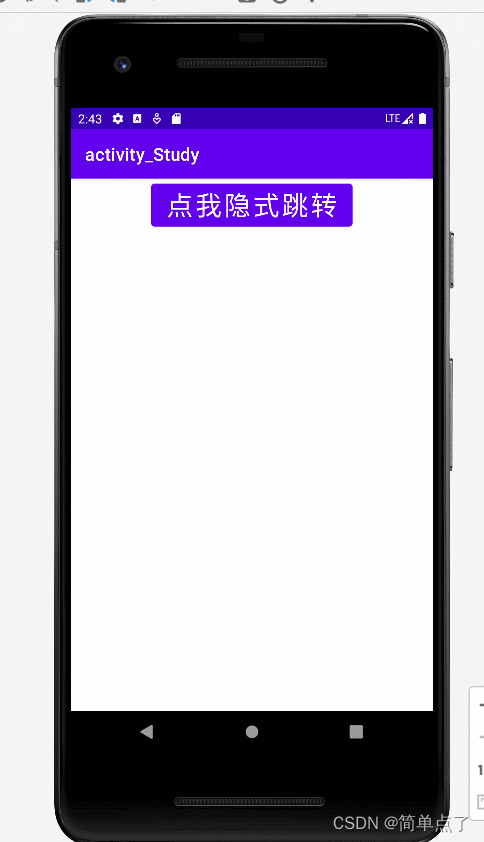
第一步:创建主布局文件
<?xml version="1.0" encoding="utf-8"?>
<LinearLayout xmlns:android="http://schemas.android.com/apk/res/android"xmlns:app="http://schemas.android.com/apk/res-auto"xmlns:tools="http://schemas.android.com/tools"android:layout_width="match_parent"android:layout_height="match_parent"android:orientation="vertical"tools:context=".MorningActivity"><!--    隐式跳转--><Buttonandroid:id="@+id/btnmorning"android:layout_gravity="center"android:textSize="30dp"android:layout_width="wrap_content"android:layout_height="wrap_content"android:text="点我隐式跳转"/>
</LinearLayout>
第二步:创建隐式启动的activity。
- 和显式启动的不同点如下。

隐式启动的代码如下:
package com.example.activity_study;import androidx.appcompat.app.AppCompatActivity;import android.content.Intent;
import android.os.Bundle;
import android.view.View;
import android.widget.Button;//设置隐式启动的activity
public class MorningActivity extends AppCompatActivity {@Overrideprotected void onCreate(Bundle savedInstanceState) {super.onCreate(savedInstanceState);setContentView(R.layout.activity_morning);Button btnmorning=findViewById(R.id.btnmorning);btnmorning.setOnClickListener(new View.OnClickListener() {@Overridepublic void onClick(View v) {
//                设置隐式跳转Intent intent=new Intent();intent.setAction("www.morning.action");
//                设置Deault的就不用设置这一条语句了
//                intent.addCategory("www.morning.categoory");
//                启动startActivity(intent);}});}
}
第三步:创建接收隐式启动的布局文件
<?xml version="1.0" encoding="utf-8"?>
<LinearLayout xmlns:android="http://schemas.android.com/apk/res/android"xmlns:app="http://schemas.android.com/apk/res-auto"xmlns:tools="http://schemas.android.com/tools"android:layout_width="match_parent"android:layout_height="match_parent"android:orientation="vertical"tools:context=".goodMorningActivity"><!--    你好--><TextViewandroid:textSize="30dp"android:textColor="@color/purple_700"android:layout_width="wrap_content"android:layout_height="wrap_content"android:text="你好!隐式跳转!"/>
</LinearLayout>
第四步:AndroidManifest.xml文件的设置。设置隐式启动的组件的名称。主要包括的是action和category。

代码如下:
<!-- 测试隐式启动的案例 -->
<activityandroid:name=".goodMorningActivity"android:exported="true"><intent-filter><!-- 设置自定义的名称 --><action android:name="www.morning.action" /><!-- 必须设置成defaulte --><category android:name="android.intent.category.DEFAULT" /><!-- 可以精确匹配的activity --><category android:name="www.morning.categoory" /></intent-filter>
</activity>
效果图:
3.3隐式启动内置的组件
1.简介
- 在缺省情况下,Android系统会调用内置的Web浏览器
Intent的语法如下 - Intent构造函数的第1个参数是Intent需要执行的动作
第2个参数是URI,表示需要传递的数据 - Uri:统一资源标识符,,应用程序中的每一种资源起的唯一的名字
2.启动系统中的组件
Intent intent = new Intent(Intent.ACTION_VIEW, Uri.parse("http://www.google.com"));
startActivity(intent);
- Intent的动作是Intent.ACTION_VIEW,根据URI的数据类型来匹配动作
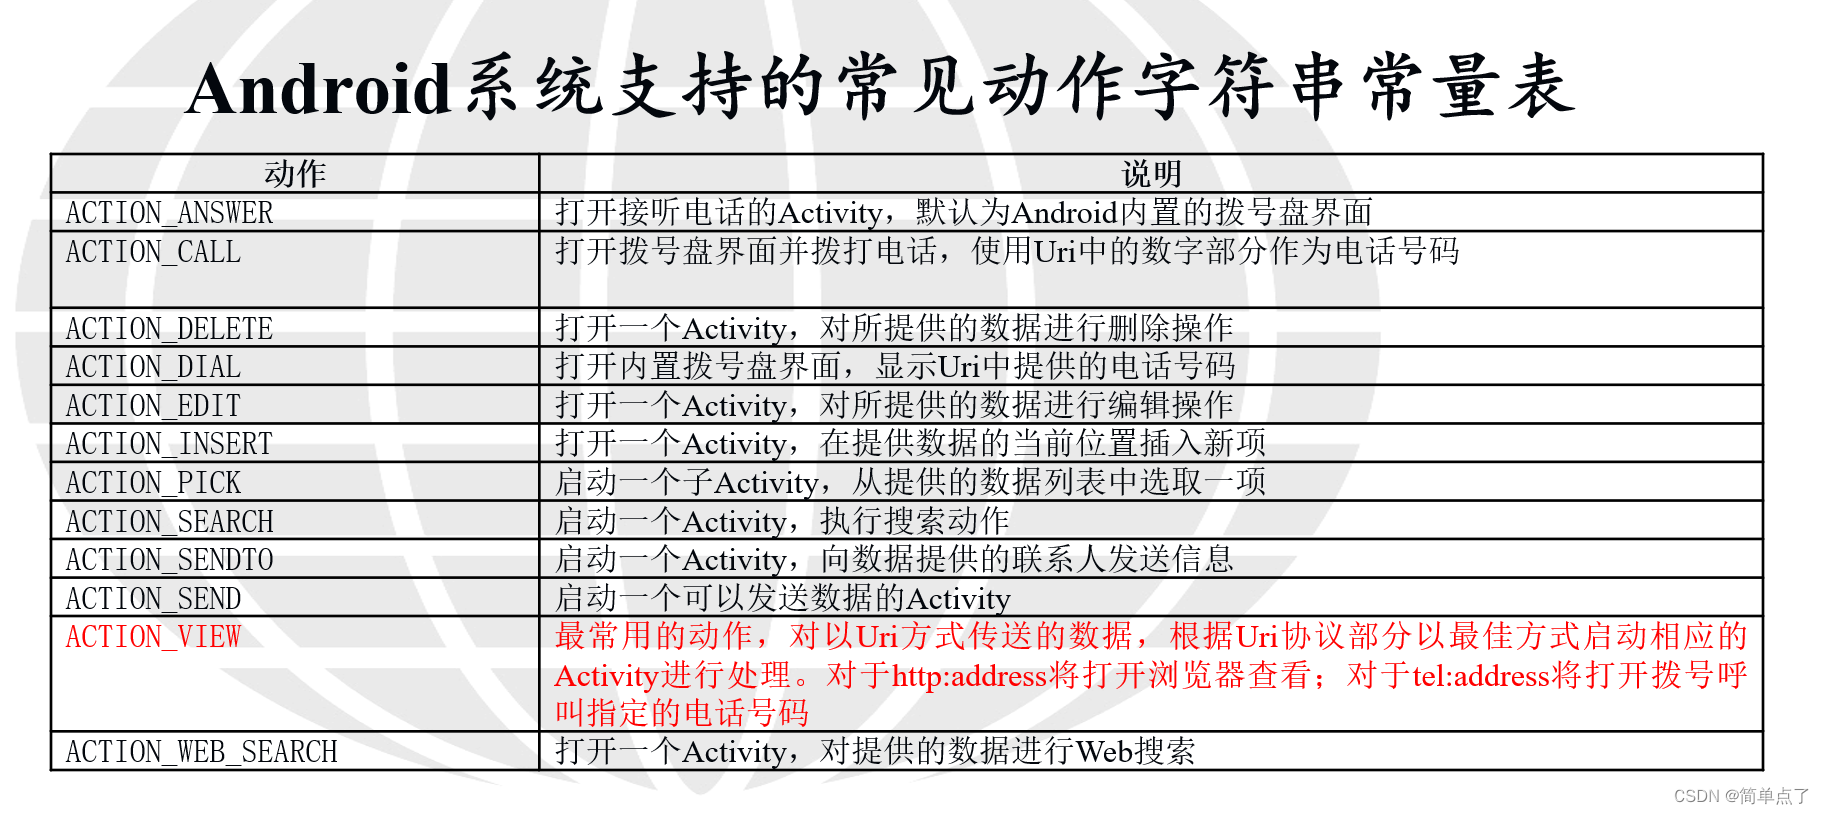
- 数据部分使用Uri.parse(urlString)方法,可以简单的把一个字符串解释成Uri对象(统一资源标识符).对以Uri方式传送的数据,根据Uri协议部分以最佳方式启动相应的Activity进行处理。对于http:address将打开浏览器查看;对于tel:address将打开拨号呼叫指定的电话号码
3.Android系统支持的常见动作字符串常量表
3.3.1隐式跳转到百度-内置组件的使用
第一步:创建主布局文件的代码
<?xml version="1.0" encoding="utf-8"?>
<LinearLayout xmlns:android="http://schemas.android.com/apk/res/android"xmlns:app="http://schemas.android.com/apk/res-auto"xmlns:tools="http://schemas.android.com/tools"android:layout_width="match_parent"android:layout_height="match_parent"tools:context=".BaiduActivity"><Buttonandroid:id="@+id/btnbaidu"android:layout_width="wrap_content"android:layout_height="wrap_content"android:text="点我进入百度"android:textSize="30dp"android:textColor="@color/purple_700"/>
</LinearLayout>
第二步:创建activity
注意点:Intent(Intent.ACTION_VIEW, Uri.parse("http://www.baidu.com"));
第一个参数设置是调用系统的组件。第二个是创建一个要跳转的Uri地址,调用parse方法将字符串转化成指定的Uri地址。
package com.example.activity_study;import androidx.appcompat.app.AppCompatActivity;import android.content.Intent;
import android.net.Uri;
import android.os.Bundle;
import android.view.View;
import android.widget.Button;//设置隐式启动打开百度
public class BaiduActivity extends AppCompatActivity {@Overrideprotected void onCreate(Bundle savedInstanceState) {super.onCreate(savedInstanceState);setContentView(R.layout.activity_baidu);
//        跳转到百度Button btnwaidu=findViewById(R.id.btnbaidu);btnwaidu.setOnClickListener(new View.OnClickListener() {@Overridepublic void onClick(View v) {
//                跳转到百度Intent intent=new Intent(Intent.ACTION_VIEW, Uri.parse("http://www.baidu.com"));startActivity(intent);}});}
}
效果图:

3.3.2隐式跳转到拨号-内置组件的使用
第一步:创建布局文件
<?xml version="1.0" encoding="utf-8"?>
<LinearLayout xmlns:android="http://schemas.android.com/apk/res/android"xmlns:app="http://schemas.android.com/apk/res-auto"xmlns:tools="http://schemas.android.com/tools"android:layout_width="match_parent"android:layout_height="match_parent"android:orientation="vertical"tools:context=".PhoneCallActivity"><EditTextandroid:id="@+id/phonenum"android:maxLength="11"android:layout_width="match_parent"android:layout_height="wrap_content"android:inputType="phone"android:textSize="30dp"android:hint="输入要拨打的电话号码"/><Buttonandroid:gravity="center_horizontal"android:id="@+id/btnphone"android:layout_width="wrap_content"android:layout_height="wrap_content"android:text="点我拨打电话"android:textSize="30dp"/>
</LinearLayout>
第二步:编写activity。
package com.example.activity_study;import androidx.appcompat.app.AppCompatActivity;import android.content.Intent;
import android.net.Uri;
import android.os.Bundle;
import android.view.View;
import android.widget.Button;
import android.widget.EditText;//跳转到打电话的界面
public class PhoneCallActivity extends AppCompatActivity {@Overrideprotected void onCreate(Bundle savedInstanceState) {super.onCreate(savedInstanceState);setContentView(R.layout.activity_phone_call2);//        跳转到百度Button btnphone=findViewById(R.id.btnphone);btnphone.setOnClickListener(new View.OnClickListener() {@Overridepublic void onClick(View v) {
//                跳转到百度EditText editText=findViewById(R.id.phonenum);
//                获取要拨打的电话号码,跳转到拨号的界面Intent intent=new Intent(Intent.ACTION_DIAL, Uri.parse("tel:"+editText.getText()));startActivity(intent);}});}
}
对于调用Action_CALL的话需要调用系统的拨号的权限,不然是不允许使用的。
效果图:

4.总结
- 多个Activity之间的调用
- Intent显式调用
- Intent隐式调用
- 使用Intent在Activity之间传递数据
- 直接使用Intent传递数据
- 使用Bundle传递数据
- 回传数据