fio引发的一些问题
- 奇怪的255扇区
- 在nvme驱动中插入打印语句
- 直接编译模块加载
- 源码编译内核
- 查找内核源码
奇怪的255扇区
由于块设备驱动项目需要测试读写速度,故使用fio工具,没想着深入了解,简单测个速就可以
使用tldr命令得到测试磁盘读写的命令
# tldr命令介绍
tldr tldr
tldr
Display simple help pages for command-line tools from the tldr-pages project.More information: https://tldr.sh.- Print the tldr page for a specific command (hint: this is how you got here!):tldr {{command}}- Print the tldr page for a specific subcommand:tldr {{command}}-{{subcommand}}- Print the tldr page for a command for a specific [p]latform:tldr -p {{android|linux|osx|sunos|windows}} {{command}}- [u]pdate the local cache of tldr pages:tldr -u# fio介绍与命令示例
tldr fio
fio
Flexible I/O tester.Tool that will spawn a number of threads or processes doing a particular type of I/O action.More information: https://fio.readthedocs.io/en/latest/fio_doc.html.- Test random reads:sudo fio --filename={{path/to/file}} --direct=1 --rw=randread --bs=4k --ioengine=libaio --iodepth=256 --runtime=120 --numjobs=4 --time_based --group_reporting --name={{job_name}} --eta-newline=1 --readonly- Test sequential reads:sudo fio --filename={{path/to/file}} --direct=1 --rw=read --bs=4k --ioengine=libaio --iodepth=256 --runtime=120 --numjobs=4 --time_based --group_reporting --name={{job_name}} --eta-newline=1 --readonly- Test random read/write:sudo fio --filename={{path/to/file}} --size=500GB --direct=1 --rw=randrw --bs=4k --ioengine=libaio --iodepth=256 --runtime=120 --numjobs=4 --time_based --group_reporting --name={{job_name}} --eta-newline=1- Test with parameters from a job file:sudo fio {{path/to/job_file}}- Convert a specific job file to command-line options:fio --showcmd {{path/to/job_file}}
由于显示的读写速度一般,就将bs设成4M
fio - Flexible I/O tester
却发现驱动的请求队列处理函数的请求字节数为130560,也就是255扇区,这是一个莫名其妙的数字,甚至不是4k的倍数,后逐渐增大bs查看下发的请求大小,发现超过128k后扇区数就会成许多个255,例如2个128k会拆分成255+1,所以我想要搞清楚255是怎么来的。
在nvme驱动中插入打印语句
思路很简单,既然我写的驱动最大扇区数是255,那测试一下nvme驱动的最大扇区数会不会也是255。刚开始我的虚拟机已经切换过内核,但是通过二进制包切换的,所以并没有相应的源代码。切换方法类似于:Ubuntu Linux内核版本升级或降级到指定版本(基于ubuntu 18.04示例)。
直接编译模块加载
刚开始我想省事,就直接网上下了相同版本的源代码:https://mirrors.tuna.tsinghua.edu.cn/kernel/v5.x/,然后在nvme驱动的请求队列处理函数中插入打印语句
/** NOTE: ns is NULL when called on the admin queue.*/
static blk_status_t nvme_queue_rq(struct blk_mq_hw_ctx *hctx,const struct blk_mq_queue_data *bd)
{struct nvme_ns *ns = hctx->queue->queuedata;struct nvme_queue *nvmeq = hctx->driver_data;struct nvme_dev *dev = nvmeq->dev;struct request *req = bd->rq;struct nvme_iod *iod = blk_mq_rq_to_pdu(req);struct nvme_command cmnd;blk_status_t ret;iod->aborted = 0;iod->npages = -1;iod->nents = 0;/** We should not need to do this, but we're still using this to* ensure we can drain requests on a dying queue.*/if (unlikely(!test_bit(NVMEQ_ENABLED, &nvmeq->flags)))return BLK_STS_IOERR;ret = nvme_setup_cmd(ns, req, &cmnd);if (ret)return ret;if (blk_rq_nr_phys_segments(req)) {ret = nvme_map_data(dev, req, &cmnd);if (ret)goto out_free_cmd;}if (blk_integrity_rq(req)) {ret = nvme_map_metadata(dev, req, &cmnd);if (ret)goto out_unmap_data;}printk(KERN_WARNING "request received: pos=%llu bytes=%u ""cur_bytes=%u dir=%c\n",(unsigned long long)blk_rq_pos(req), blk_rq_bytes(req),blk_rq_cur_bytes(req), rq_data_dir(req) ? 'W' : 'R');blk_mq_start_request(req);nvme_submit_cmd(nvmeq, &cmnd, bd->last);return BLK_STS_OK;
out_unmap_data:nvme_unmap_data(dev, req);
out_free_cmd:nvme_cleanup_cmd(req);return ret;
}
单独编译nvme与nvme-core模块,生成nvme.ko与nvme-core.ko文件
Linux内核模块的单独编译、修改内核配置
make CONFIG_NVME_CORE=m CONFIG_BLK_DEV_NVME=m -C  /root/kernel/linux-5.4  M=/root/kernel/linux-5.4/drivers/nvme/host  modules
make CONFIG_NVME_CORE=m CONFIG_BLK_DEV_NVME=m -C  /root/kernel/linux-5.4  M=/root/kernel/linux-5.4/drivers/nvme/host  clean
显示
make: Entering directory '/root/kernel/linux-5.4'ERROR: Kernel configuration is invalid.include/generated/autoconf.h or include/config/auto.conf are missing.Run 'make oldconfig && make prepare' on kernel src to fix it.
故执行make oldconfig && make prepare
build kernel时make oldconfig的作用
然后卸载当前虚拟机的nvme模块与nvme-core模块(系统盘并不是nvme盘,所以可以移除,如果挂载了文件系统需要先解除挂载),加载自己写的模块,加载nvme-core模块时没出现啥问题,加载nvme模块时显示内核地址访问错误,__slab_alloc not-present page,这有可能与模块的签名,小版本不符合之类的问题有关,但懒得研究了,直接源码编译内核然后切换
源码编译内核
源码编译内核的步骤实际上比较简单,只是执行时间长,可以参考如何编译 Linux 内核,我的操作步骤为:
apt-get install git fakeroot build-essential ncurses-dev xz-utils libssl-dev bc flex libelf-dev bison
wget https://mirrors.tuna.tsinghua.edu.cn/kernel/v5.x/linux-5.4.tar.xz	# 从清华镜像站下载源代码
tar xvf linux-5.4.tar.xz # 解压
make oldconfig && make prepare # 我全选的n,懒得看选项
修改CONFIG_SYSTEM_TRUSTED_KEYS,将其赋空值
make -j12 1> build_output_normal.txt 2>build_output_error.txt # 将正常输出与错误输出分别导入至不同的文件,便于查看
make modules_install # 安装模块
make install # 安装内核
grep menuentry /boot/grub/grub.cfg # 查看当前系统中内核的启动顺序
code /etc/default/grub # 修改内核启动顺序
GRUB_DEFAULT="Advanced options for Ubuntu>Ubuntu, with Linux 5.4.0"
update-grub # 更新grub配置
vmware重启前保存快照,以防万一
相关说明:
最好预留30G-40G的空间来编译内核,我编译源代码后文件夹大小为22G
之所以要修改CONFIG_SYSTEM_TRUSTED_KEYS选项,是防止No rule to make target 'debian/canonical-certs.pem’报错
内核错误: No rule to make target ‘debian/canonical-certs.pem‘, needed by ‘certs/x509_certificate_list‘
编译内核时输出一大堆,错误信息很容易没看到,故分开输出1> 2>
将Linux 标准输出,错误输出重定向到文件
grub相关操作:见Ubuntu Linux内核版本升级或降级到指定版本(基于ubuntu 18.04示例)
之前的博客:内核版本切换记录
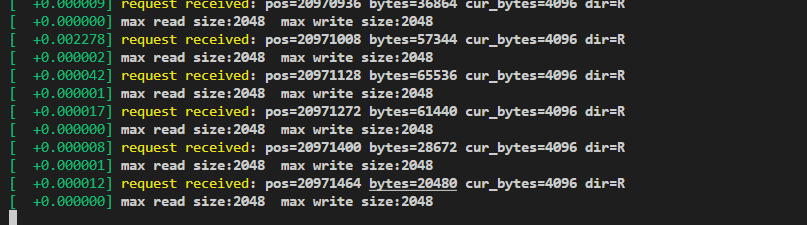
在切换后内核后在驱动增加打印语句,更换模块成功,fio测试输出如下:
fio --filename=/dev/nvme1n1 --size=5GB --direct=1 --rw=write --bs=2M --ioengine=libaio --iodepth=1 --runtime=60 --numjobs=1 --time_based --group_reporting --name="test"--eta-newline=1
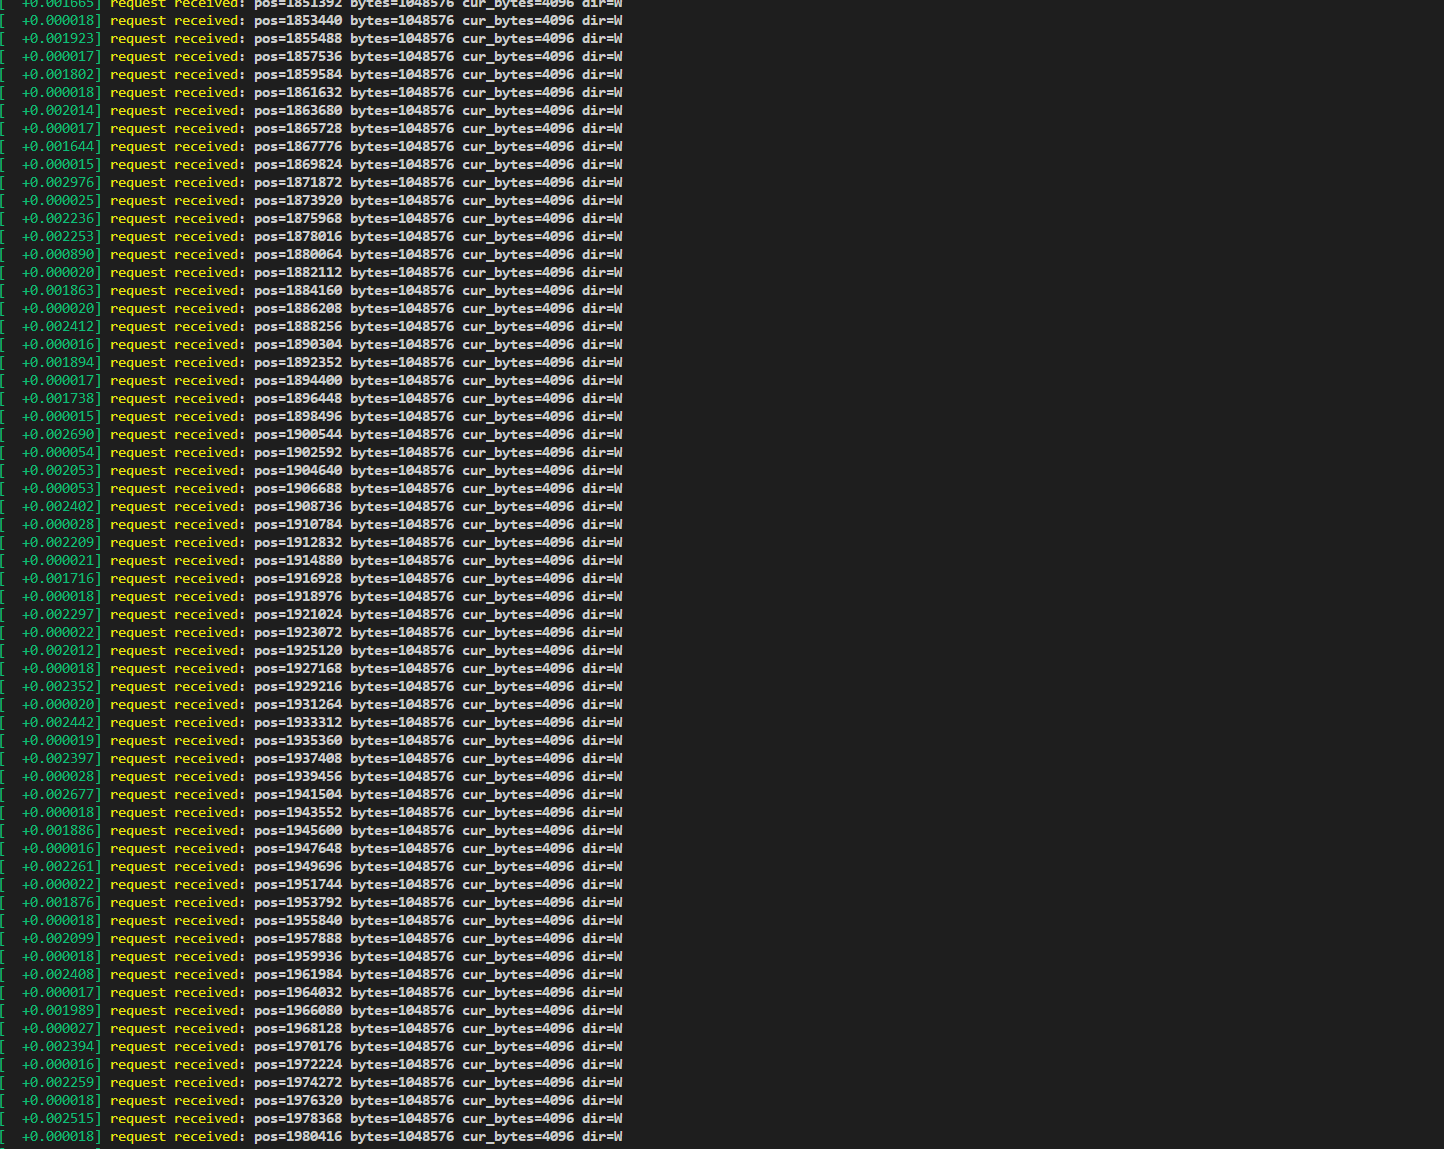
可以看到这里的字节数为1MB,也就是是最大扇区数为2048,也就是说最大扇区是可以设置的。
查找内核源码
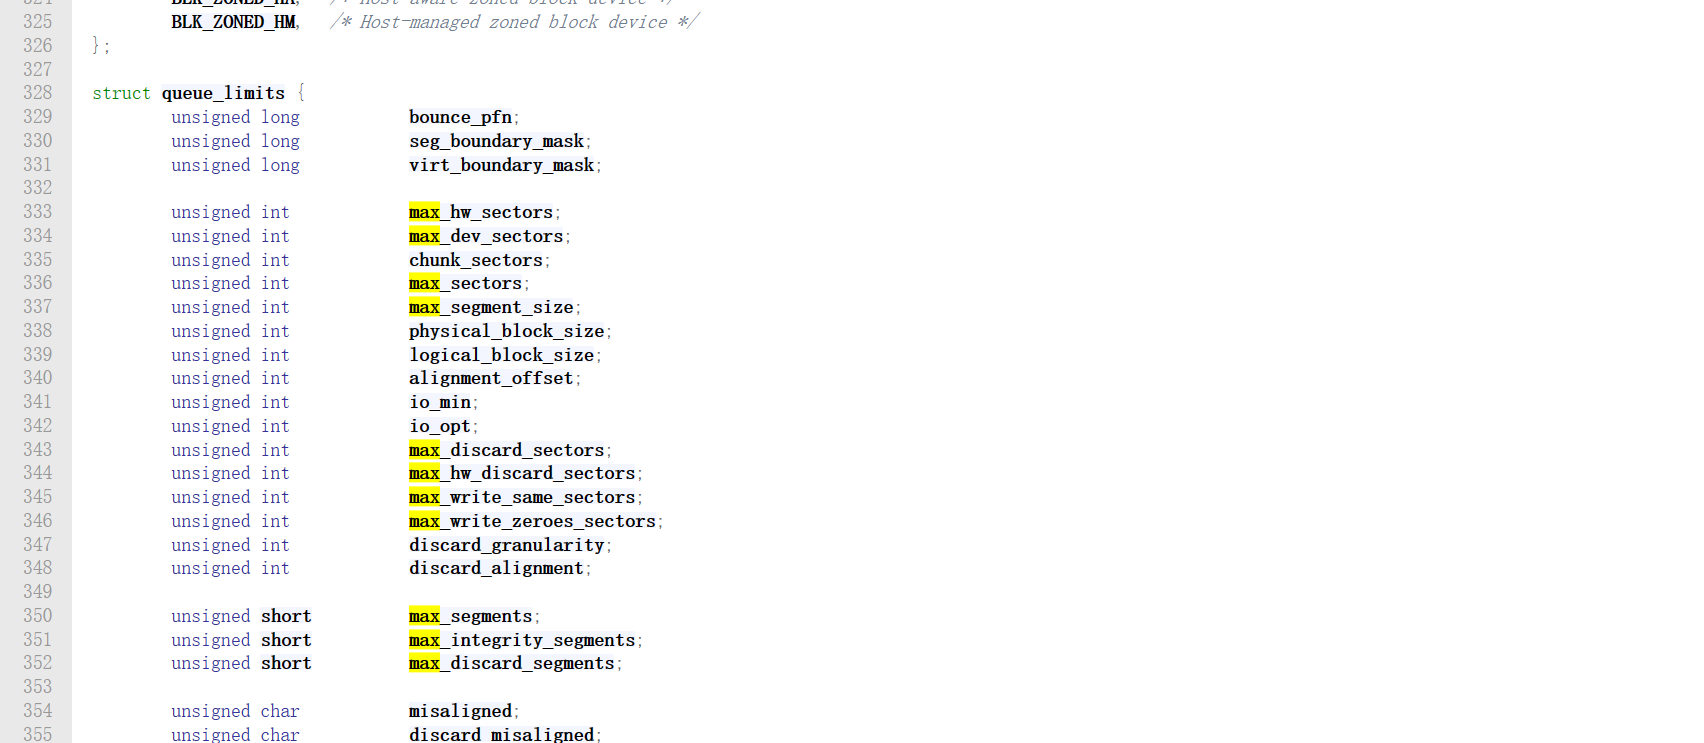
对于这个问题,可以认为协议栈请求存在一个最大扇区数限制,故查找内核源码request结构体定义。查询网站:https://elixir.bootlin.com,注意选择内核版本。
简单看了看request结构体成员,没找到觉得像的成员,故在本头文件(/include/linux/blkdev.h) crtl+f搜索max,找到了意义比较像的成员
并且意外发现以下枚举变量
enum blk_default_limits {BLK_MAX_SEGMENTS	= 128,BLK_SAFE_MAX_SECTORS	= 255,BLK_DEF_MAX_SECTORS	= 2560,BLK_MAX_SEGMENT_SIZE	= 65536,BLK_SEG_BOUNDARY_MASK	= 0xFFFFFFFFUL,
};
正好是255,查看BLK_SAFE_MAX_SECTORS的使用

找到以下函数
/*** blk_set_default_limits - reset limits to default values* @lim:  the queue_limits structure to reset** Description:*   Returns a queue_limit struct to its default state.*/
void blk_set_default_limits(struct queue_limits *lim)
{lim->max_segments = BLK_MAX_SEGMENTS;lim->max_discard_segments = 1;lim->max_integrity_segments = 0;lim->seg_boundary_mask = BLK_SEG_BOUNDARY_MASK;lim->virt_boundary_mask = 0;lim->max_segment_size = BLK_MAX_SEGMENT_SIZE;lim->max_sectors = lim->max_hw_sectors = BLK_SAFE_MAX_SECTORS;lim->max_dev_sectors = 0;lim->chunk_sectors = 0;lim->max_write_same_sectors = 0;lim->max_write_zeroes_sectors = 0;lim->max_discard_sectors = 0;lim->max_hw_discard_sectors = 0;lim->discard_granularity = 0;lim->discard_alignment = 0;lim->discard_misaligned = 0;lim->logical_block_size = lim->physical_block_size = lim->io_min = 512;lim->bounce_pfn = (unsigned long)(BLK_BOUNCE_ANY >> PAGE_SHIFT);lim->alignment_offset = 0;lim->io_opt = 0;lim->misaligned = 0;lim->zoned = BLK_ZONED_NONE;
}
EXPORT_SYMBOL(blk_set_default_limits);
故max_sectors或max_hw_sectors就是最大扇区数
寻找max_sectors成员的get set方法
set函数明显在/block/blk-settings.c文件中
找到以下函数
/*** blk_queue_max_hw_sectors - set max sectors for a request for this queue* @q:  the request queue for the device* @max_hw_sectors:  max hardware sectors in the usual 512b unit** Description:*    Enables a low level driver to set a hard upper limit,*    max_hw_sectors, on the size of requests.  max_hw_sectors is set by*    the device driver based upon the capabilities of the I/O*    controller.**    max_dev_sectors is a hard limit imposed by the storage device for*    READ/WRITE requests. It is set by the disk driver.**    max_sectors is a soft limit imposed by the block layer for*    filesystem type requests.  This value can be overridden on a*    per-device basis in /sys/block/<device>/queue/max_sectors_kb.*    The soft limit can not exceed max_hw_sectors.**/
void blk_queue_max_hw_sectors(struct request_queue *q, unsigned int max_hw_sectors)
{struct queue_limits *limits = &q->limits;unsigned int max_sectors;if ((max_hw_sectors << 9) < PAGE_SIZE) {max_hw_sectors = 1 << (PAGE_SHIFT - 9);printk(KERN_INFO "%s: set to minimum %d\n",__func__, max_hw_sectors);}limits->max_hw_sectors = max_hw_sectors;max_sectors = min_not_zero(max_hw_sectors, limits->max_dev_sectors);max_sectors = min_t(unsigned int, max_sectors, BLK_DEF_MAX_SECTORS);limits->max_sectors = max_sectors;q->backing_dev_info->io_pages = max_sectors >> (PAGE_SHIFT - 9);
}
EXPORT_SYMBOL(blk_queue_max_hw_sectors);
在/include/linux/blkdev.h中找到get函数
static inline unsigned int blk_queue_get_max_sectors(struct request_queue *q,int op)
{if (unlikely(op == REQ_OP_DISCARD || op == REQ_OP_SECURE_ERASE))return min(q->limits.max_discard_sectors,UINT_MAX >> SECTOR_SHIFT);if (unlikely(op == REQ_OP_WRITE_SAME))return q->limits.max_write_same_sectors;if (unlikely(op == REQ_OP_WRITE_ZEROES))return q->limits.max_write_zeroes_sectors;return q->limits.max_sectors;
}
然后在nvme驱动中查看是否调用blk_queue_max_hw_sectors函数设置扇区数
找到函数nvme_set_queue_limits
static void nvme_set_queue_limits(struct nvme_ctrl *ctrl,struct request_queue *q)
{bool vwc = false;if (ctrl->max_hw_sectors) {u32 max_segments =(ctrl->max_hw_sectors / (ctrl->page_size >> 9)) + 1;max_segments = min_not_zero(max_segments, ctrl->max_segments);blk_queue_max_hw_sectors(q, ctrl->max_hw_sectors);blk_queue_max_segments(q, min_t(u32, max_segments, USHRT_MAX));}if ((ctrl->quirks & NVME_QUIRK_STRIPE_SIZE) &&is_power_of_2(ctrl->max_hw_sectors))blk_queue_chunk_sectors(q, ctrl->max_hw_sectors);blk_queue_virt_boundary(q, ctrl->page_size - 1);if (ctrl->vwc & NVME_CTRL_VWC_PRESENT)vwc = true;blk_queue_write_cache(q, vwc, vwc);
}
所以说nvme驱动就是使用blk_queue_max_hw_sectors设置的最大扇区数
在nvme驱动使用get方法查看最大扇区数
printk(KERN_WARNING "request received: pos=%llu bytes=%u ""cur_bytes=%u dir=%c\n",(unsigned long long)blk_rq_pos(req), blk_rq_bytes(req),blk_rq_cur_bytes(req), rq_data_dir(req) ? 'W' : 'R');struct request_queue *q = req->q;int r_size = blk_queue_get_max_sectors(q, REQ_OP_READ);int w_size = blk_queue_get_max_sectors(q, REQ_OP_WRITE);printk(KERN_WARNING "max read size:%d max write size:%d\n", r_size,w_size);
故nvme驱动的最大扇区数即为2048,故在自己的块设备驱动中也使用blk_queue_max_hw_sectors设置最大扇区数,fio测试时发现最大扇区数也变成了2048,成功!
通过这一次的内核源码查找,发现linux内核的成员名,函数名,文件名都挺“亲民”的,大致能猜到基本用途