fio - Flexible IO Tester
一、服务器配置:
由于我们想通过fio得到SSD真实的参数信息,因此我们需要服务器BIOS一些参数的配合,以便能更好的体现硬盘的性能。

以华为1288HV5为例:

二、fio
1.安装
a.下载地址:http://freshmeat.sourceforge.net/projects/fio/
b.安装两个插件
#yum install libaio*
#yum install zlib*
c.编译安装
#tar -xvf fio-2.1.10.tar.gz
#cd fio-2.1.10
#./configure
#make
#make install
备注:
最新的fio可以在https://github.com/axboe/fio进行下载,但可能会由于系统自带的gcc版本较低导致无法顺利安装。
升级gcc后即可顺利安装。升级gcc请参考:https://blog.csdn.net/weixin_40343504/article/details/107843661
2.fio执行脚本顺序
1)Secure erase the drive
2)Prefill the drive with Sequential Write (128K Sequential Write QD=32 / size=100% with loops=2 / numjobs=1)
3)128K 100% Sequential Write (ramp_time=60sec / runtime=2h / QD=32 / numjobs=1)
4)128K 100% Sequential Read (ramp_time=60sec / runtime=2h / QD=32 / numjobs=1)
5)Prefill the drive with randwrite (128K randwrite QD=32 / runtime=3hr / numjobs=1)
6) 4K 100% Random Write (ramp_time=60sec / runtime=2h / QD=32 / numjobs=1)
7)4K 100% Random Read (ramp_time=60sec / runtime=2h / QD=32 / numjobs=1)
注意事项:
a.硬盘应直连主板这样测出来的数据更加真实,但如SATA通过Raid Card连接应将硬盘设置为JBOD。
b.硬盘测试前一定要进行安全擦除。
c.顺序读、顺序写前可以不添加稳态处理。
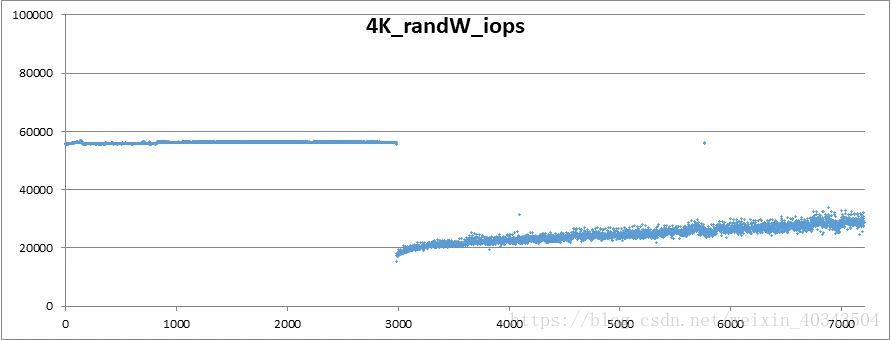
d.随机读、随机写前一定要有randwrite 2h(这个时间与硬盘容量大小有关,4T以下设置2个小时应该没有问题)左右的稳态处理,如果没有添加会影响Random write。下图就是在随机读写前未加稳态处理时,rand_write iops的图
e.测试时间runime的值应尽量不低于1h,如果时间很短没有测试实际意义。
3.执行脚本,以SATA接口硬盘为例:
./SATA.sh sdb
#**************************Script of precondition*************************#
echo "$DEV precondition seq write ready"
date
fio --ioengine=libaio --direct=1 --thread --norandommap --filename=/dev/"$DEV" --name="$DEV"_init_seq --output="$DEV"_init_seq.log --rw=write --bs=128k --numjobs=1 --iodepth=128 --loops=2#**************************Script of seq*************************#
for WL2 in write read
dofor jobs2 in 1dofor QD2 in 128dofor runt2 in 1800dofor block2 in 128kdoecho "$DEV rw_${WL2}  bs_${block2} nujobs_${jobs2} QD_${QD2} test      "
date
issdcm -drive_index 0 -smart >"$DEV"_${block2}_${WL2}_${jobs2}_${QD2}_smart.log
fio --ioengine=libaio --randrepeat=0 --norandommap --thread --direct=1 --group_reporting --name=mytest --ramp_time=60 --runtime=${runt2} --time_based --numjobs=${jobs2} --iodepth=${QD2} --filename=/dev/"$DEV" --rw=${WL2} --bs=${block2} --output="$DEV"_${block2}_${WL2}_${jobs2}_${QD2}.log --log_avg_msec=1000 --write_iops_log="$DEV"_${block2}_${WL2}_${jobs2}_${QD2}_iops --write_lat_log="$DEV"_${block2}_${WL2}_${jobs2}_${QD2}_lat --write_bw_log="$DEV"_${block2}_${WL2}_${jobs2}_${QD2}_bwdonedonedonedone
done
#**************************Script of precondition*************************#
echo "$DEV precondition random write ready"
date
fio --ioengine=libaio --direct=1 --thread --norandommap --filename=/dev/"$DEV" --name="$DEV"_init_random --output="$DEV"_init2_random.log --rw=randwrite --bs=128k --numjobs=4 --iodepth=64 --time_based --ramp_time=60 --runtime=7200
#**************************Script of random*************************#
for WL in randwrite randread
dofor jobs in 4dofor QD in 64dofor runt in 1800dofor block in 8k 4kdo	echo "$DEV rw_${WL} bs_${block} nujobs_${jobs} QD_${QD} test    "
date
issdcm -drive_index 0 -smart >"$DEV"_${block}_${WL}_${jobs}_${QD}_smart.log
fio --ioengine=libaio --randrepeat=0 --norandommap --thread --direct=1 --group_reporting --name=mytest --ramp_time=60 --runtime=${runt} --time_based --numjobs=${jobs} --iodepth=${QD} --filename=/dev/"$DEV" --rw=${WL} --bs=${block} --output="$DEV"_${block}_${WL}_${jobs}_${QD}.log --log_avg_msec=1000 --write_iops_log="$DEV"_${block}_${WL}_${jobs}_${QD}_iops --write_lat_log="$DEV"_${block}_${WL}_${jobs}_${QD}_latdonedonedonedone
done#**************************Script of randrw*************************#
for WL1 in randrw
dofor jobs1 in 4dofor QD1 in 64dofor runt1 in 1800dofor block1 in 8k 4kdo	echo "$DEV rw_${WL1}  bs_${block1} nujobs_${jobs1} QD_${QD1} test    "
date
issdcm -drive_index 0 -smart >"$DEV"_${block1}_${WL1}_${jobs1}_${QD1}_smart.log
fio --ioengine=libaio --randrepeat=0 --norandommap --thread --direct=1 --group_reporting --name=mytest --ramp_time=60 --runtime=${runt1} --time_based --numjobs=${jobs1} --iodepth=${QD1} --filename=/dev/"$DEV" --rw=${WL1} --rwmixread=70 --bs=${block1} --output="$DEV"_${block1}_${WL1}_${jobs1}_${QD1}.log --log_avg_msec=1000 --write_iops_log="$DEV"_${block1}_${WL1}_${jobs1}_${QD1}_iops --write_lat_log="$DEV"_${block1}_${WL1}_${jobs1}_${QD1}_latdonedonedonedone
done
4.数据分析
顺序读、顺序写主要看BW,随机读、随机写主要看IOPS.
1)怎么看lat分布?
bw (KB /s): min= 71, max= 251, per=0.36%, avg=154.84, stdev=18.29lat (usec) : 2= 0.01%, 4=0.01%, 10=0.01%, 20=0.01%, 50=51.41%lat (usec) : 100=48.53%, 250=0.06%, 500=0.01%, 1000=0.01%lat (msec) : 2= 0.01%, 4=0.01%, 10=0.01%, 20=0.01%
这组数据表示latency的分布,说明了51.41%的request延迟小于50微秒,48.53%的延迟小于100微秒(但是大于50微秒),以此类推
其他待续:
参考:https://blog.csdn.net/feilianbb/article/details/50497845
2)fio log收集
请参考<利用Python3.4+收集fio测试结果>
https://blog.csdn.net/weixin_40343504/article/details/97886537
5.fio常用参数详解
a.loops=int
重复运行某个job多次,默认是1。
loops与runtime是两个不能同时存在的两个参数,loops主要是定义硬盘执行的圈数,而runtime只是定义fio执行的时间。
b.time_based
如果设置的话,即使file已被完全读写或写完,也要执行完runtime规定的时间。它是通过循环执行相同的负载来实现的,与runtime相对应。
c.ramp_time=time
设定在记录任何性能信息之前要运行特定负载的时间。这个用来等性能稳定后,再记录日志结果,因此可以减少生成稳定的结果需要的运行时间。
d.randrepeat=bool
对于随机IO负载,配置生成器的种子,使得路径是可以预估的,使得每次重复执行生成的序列是一样的。
如果无–randrepeat=0这个参数不会影响seqread,但会影响seqwrite,randwrite,randread.
e.norandommap
一般情况下,fio在做随机IO时,将会覆盖文件的每一个block.如果这个选项设置的话,fio将只是获取一个新的随机offset,而不会查询过去的历史。这意味着一些块可能没有读或写,一些块可能要读/写很多次。在个选项与verify=互斥,并只有多个块大小(bsrange=)正在使用,因为fio只会记录完整的块的重写。
f.thread
fio默认会使用fork()创建job,如果这个选项设置的话,fio将使用pthread_create来创建线程。
g.direct=bool
direct=1 测试过程绕过机器自带的buffer。使测试结果更真实。
h.group_reporting
如果‘numjobs’设置的话,我们感兴趣的可能是打印group的统计值,而不是一个单独的job。这在‘numjobs’的值很大时,一般是设置为true的,可以减少输出的信息量。如果‘group_reporting’设置的话,fio将会显示最终的per-groupreport而不是每一个job都会显示。
i.numjobs=int
创建特定数目的job副本。可能是创建大量的线程/进程来执行同一件事。我们将这样一系列的job,看作一个特定的group。

参考:https://www.itzhoulin.com/2015/12/24/fio-man-guide/