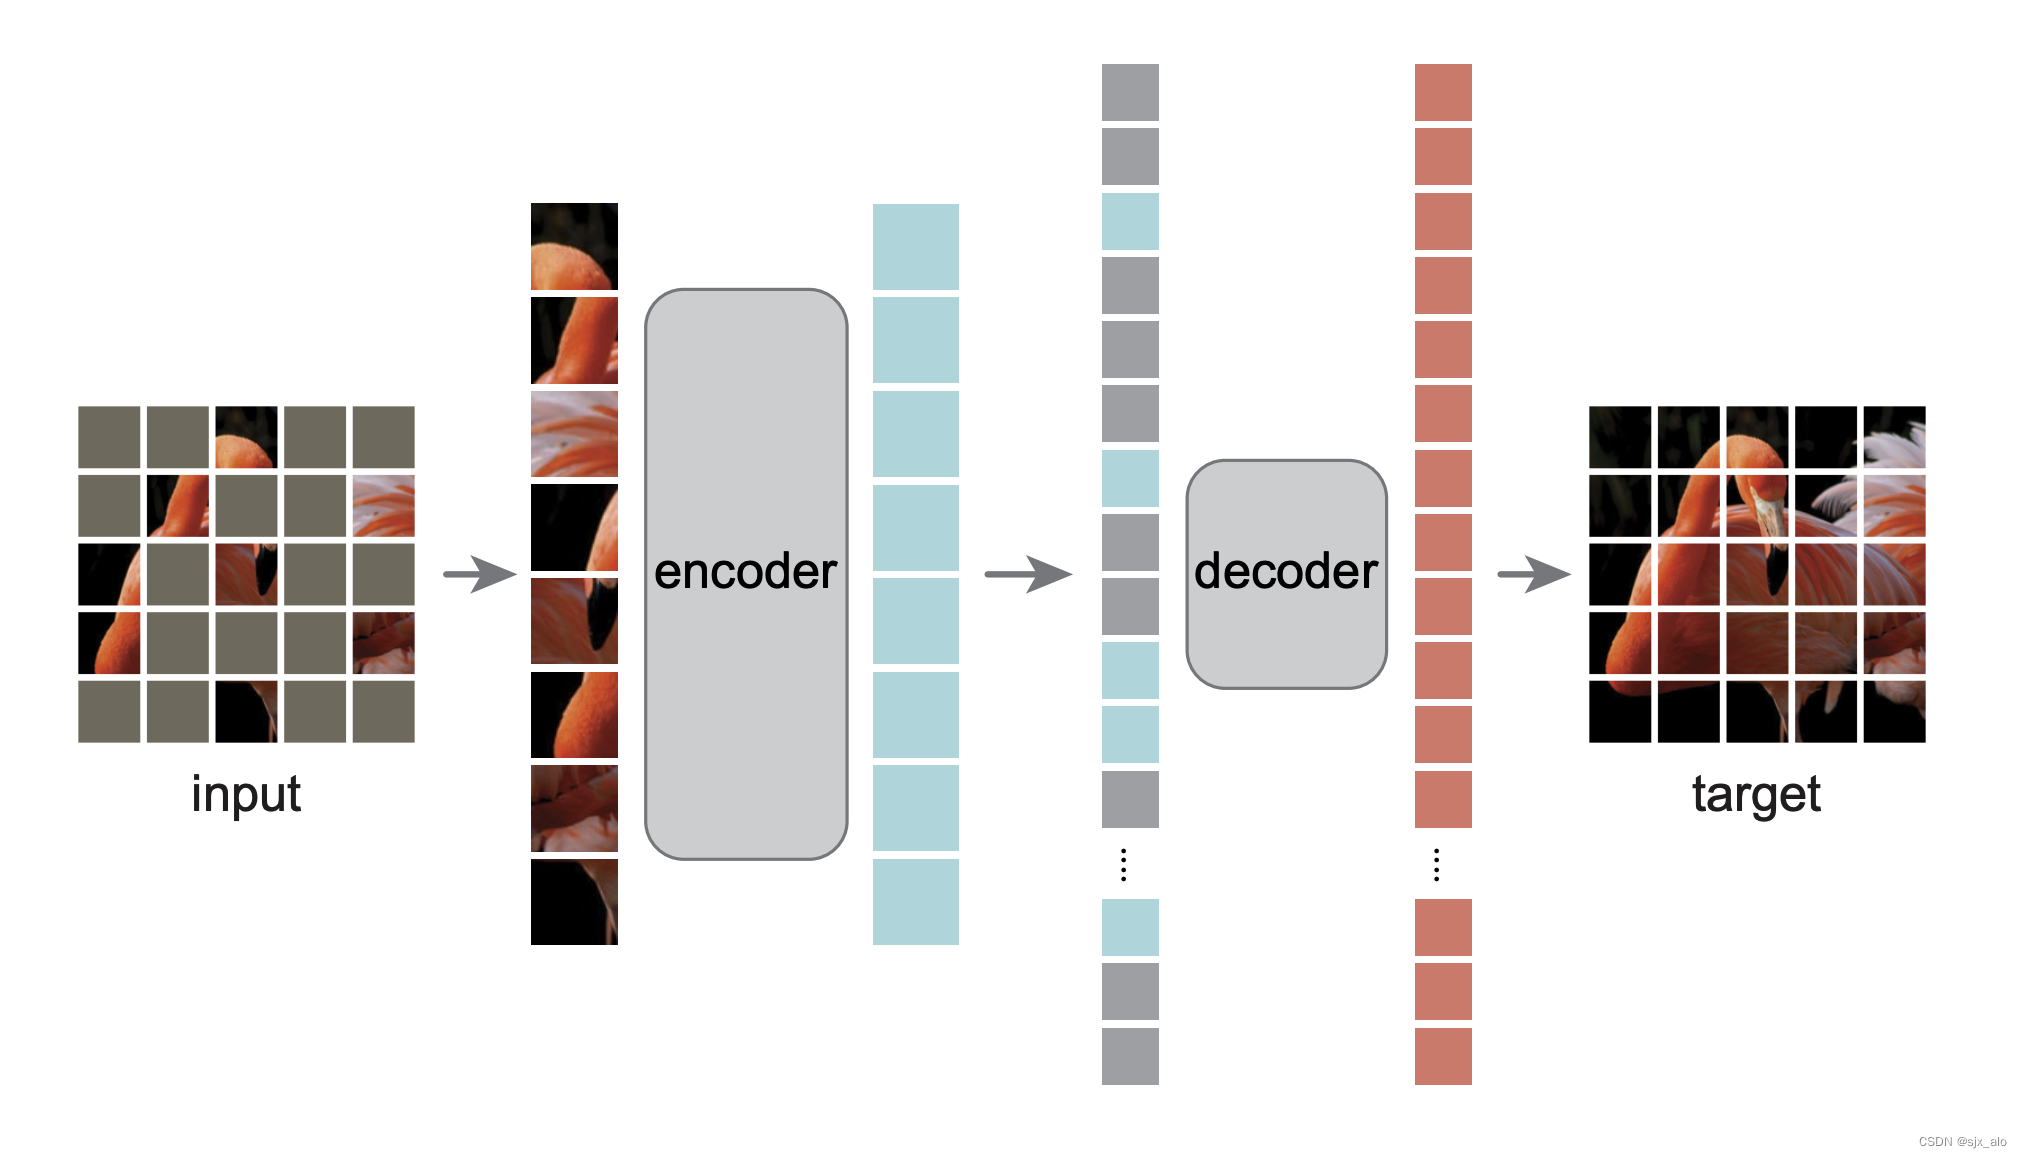
MAE 代码实战详解
- if__name__=="__main__"
- model.forward
- model.forward.encorder
- model.forward.decorder
- model.forward.loss
- 大小排序索引-有点神奇
- torch.gather
if__name__==“main”
- MAE 模型选择
def mae_vit_base_patch16_dec512d8b(**kwargs):model = MaskedAutoencoderViT(patch_size=16, embed_dim=768, depth=12, num_heads=12,decoder_embed_dim=512, decoder_depth=8, decoder_num_heads=16,mlp_ratio=4, norm_layer=partial(nn.LayerNorm, eps=1e-6), **kwargs)return model
- debug 调试
if__name__=="__main__":model = mae_vit_base_patch16_dec512d8b()input = torch.rand(1,3,224,224)output = model(input) # debug
model.forward
def forward(self, imgs, mask_ratio=0.75):latent, mask, ids_restore = self.forward_encoder(imgs, mask_ratio)pred = self.forward_decoder(latent, ids_restore) # [N, L, p*p*3]loss = self.forward_loss(imgs, pred, mask)return loss, pred, mask
model.forward.encorder
latent, mask, ids_restore = self.forward_encoder(imgs, mask_ratio)
-
x = self.patch_embed(x)
PatchEmbed理解x.shape:[B,C,H,W]->[B,H*W,C]
PatchEmbed((proj): Conv2d(3, 768, kernel_size=(16, 16), stride=(16, 16))(norm): Identity())
def forward(self, x):B, C, H, W = x.shape_assert(H == self.img_size[0], f"Input image height ({H}) doesn't match model ({self.img_size[0]}).")_assert(W == self.img_size[1], f"Input image width ({W}) doesn't match model ({self.img_size[1]}).")x = self.proj(x)#Conv2d(3, 768, kernel_size=(16, 16), stride=(16, 16))if self.flatten:x = x.flatten(2).transpose(1, 2) # BCHW -> B H*W Cx = self.norm(x)#self.norm = norm_layer(embed_dim) if norm_layer else nn.Identity()return x
LayerNorm与BatchNorm区别
pos_embed = get_2d_sincos_pos_embed(self.pos_embed.shape[-1], int(self.patch_embed.num_patches**.5), cls_token=True)
def get_2d_sincos_pos_embed(embed_dim, grid_size, cls_token=False):"""grid_size: int of the grid height and widthreturn:pos_embed: [grid_size*grid_size, embed_dim] or [1+grid_size*grid_size, embed_dim] (w/ or w/o cls_token)"""grid_h = np.arange(grid_size, dtype=np.float32)grid_w = np.arange(grid_size, dtype=np.float32)grid = np.meshgrid(grid_w, grid_h) # here w goes first #X, Y = np.meshgrid(x, y) 代表的是将x中每一个数据和y中每一个数据组合生成很多点,然后将这些点的x坐标放入到X中,y坐标放入Y中,并且相应位置是对应的 x中的元素先移动,(x1,y1),(x2,y1) ... (x1,y2),(x2,y2)... grid = np.stack(grid, axis=0)grid = grid.reshape([2, 1, grid_size, grid_size])pos_embed = get_2d_sincos_pos_embed_from_grid(embed_dim, grid)if cls_token:pos_embed = np.concatenate([np.zeros([1, embed_dim]), pos_embed], axis=0)return pos_embed
np.meshgrid
no.stack 填充
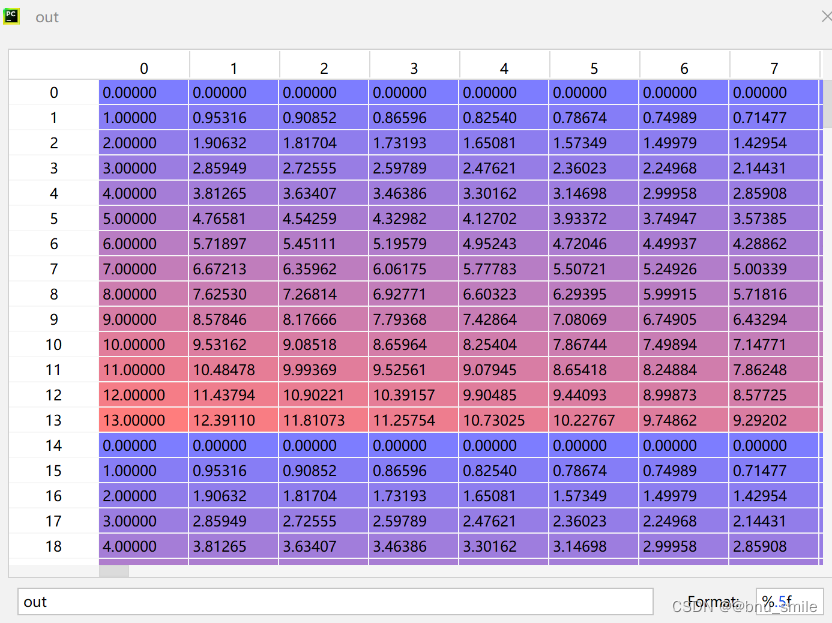
def get_2d_sincos_pos_embed_from_grid(embed_dim, grid):assert embed_dim % 2 == 0# use half of dimensions to encode grid_hemb_h = get_1d_sincos_pos_embed_from_grid(embed_dim // 2, grid[0]) # (H*W, D/2)emb_w = get_1d_sincos_pos_embed_from_grid(embed_dim // 2, grid[1]) # (H*W, D/2)emb = np.concatenate([emb_h, emb_w], axis=1) # (H*W, D)return embdef get_1d_sincos_pos_embed_from_grid(embed_dim, pos):"""embed_dim: output dimension for each positionpos: a list of positions to be encoded: size (M,)out: (M, D)"""assert embed_dim % 2 == 0omega = np.arange(embed_dim // 2, dtype=np.float)omega /= embed_dim / 2.omega = 1. / 10000**omega # (D/2,)pos = pos.reshape(-1) # (M,)out = np.einsum('m,d->md', pos, omega) # (M, D/2), outer productemb_sin = np.sin(out) # (M, D/2)emb_cos = np.cos(out) # (M, D/2)emb = np.concatenate([emb_sin, emb_cos], axis=1) # (M, D)return emb

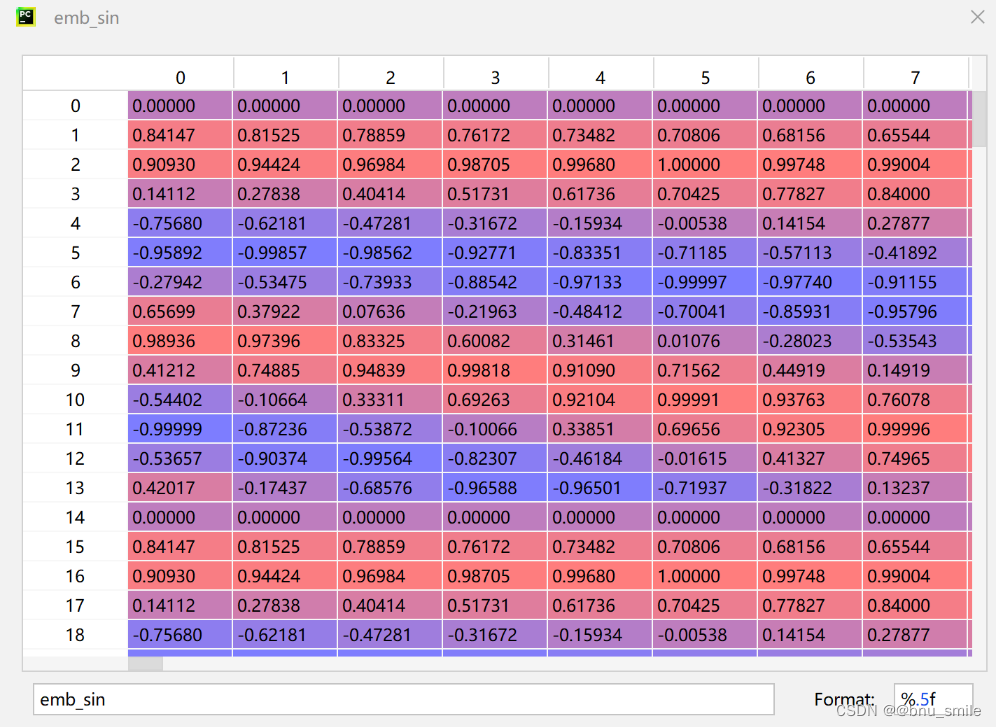
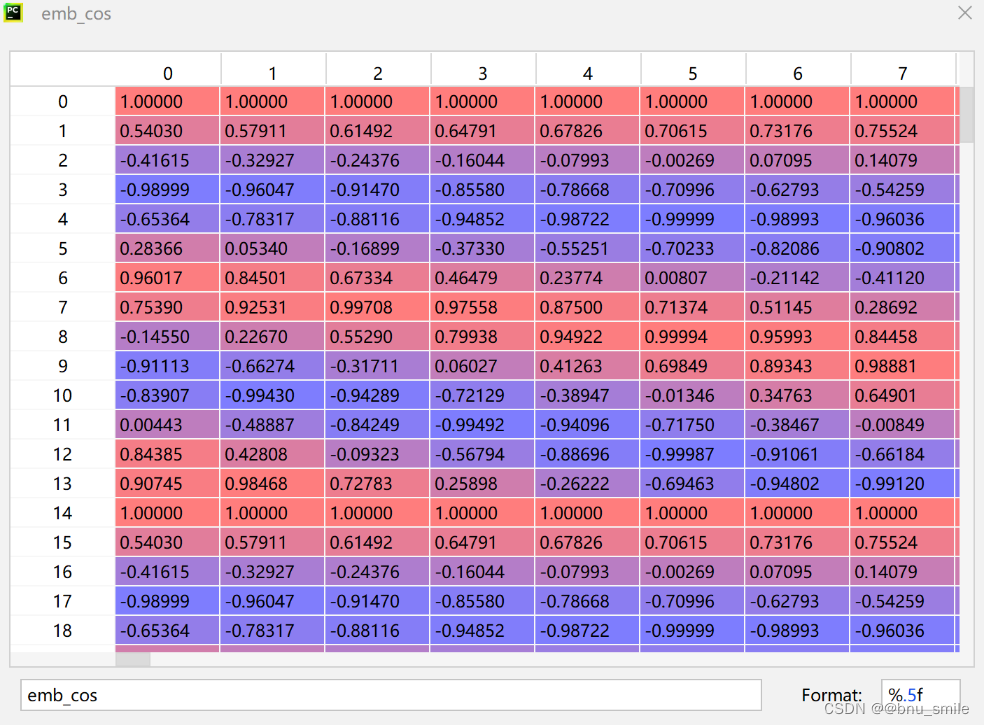
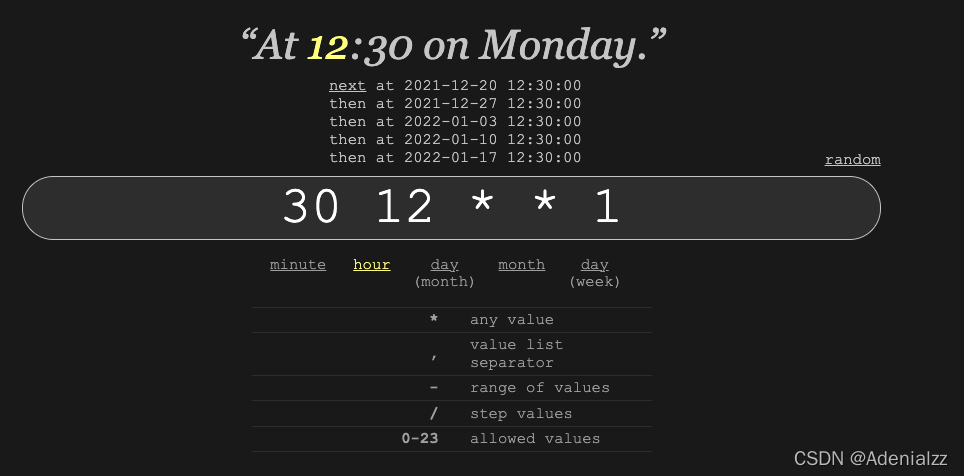
Transformer学习笔记一:Positional Encoding(位置编码)
如何理解和使用NumPy.einsum?
model.forward.decorder
model.forward.loss
大小排序索引-有点神奇
# sort noise for each sampleids_shuffle = torch.argsort(noise, dim=1) # ascend: small is keep, large is remove ’’’只在sequence length 维度进行排序,torch.argsort返回排序后的值所对应原a的下标,即torch.sort()返回的indices’’’ids_restore = torch.argsort(ids_shuffle, dim=1) # 之前从小到大的数的索引torch.gather
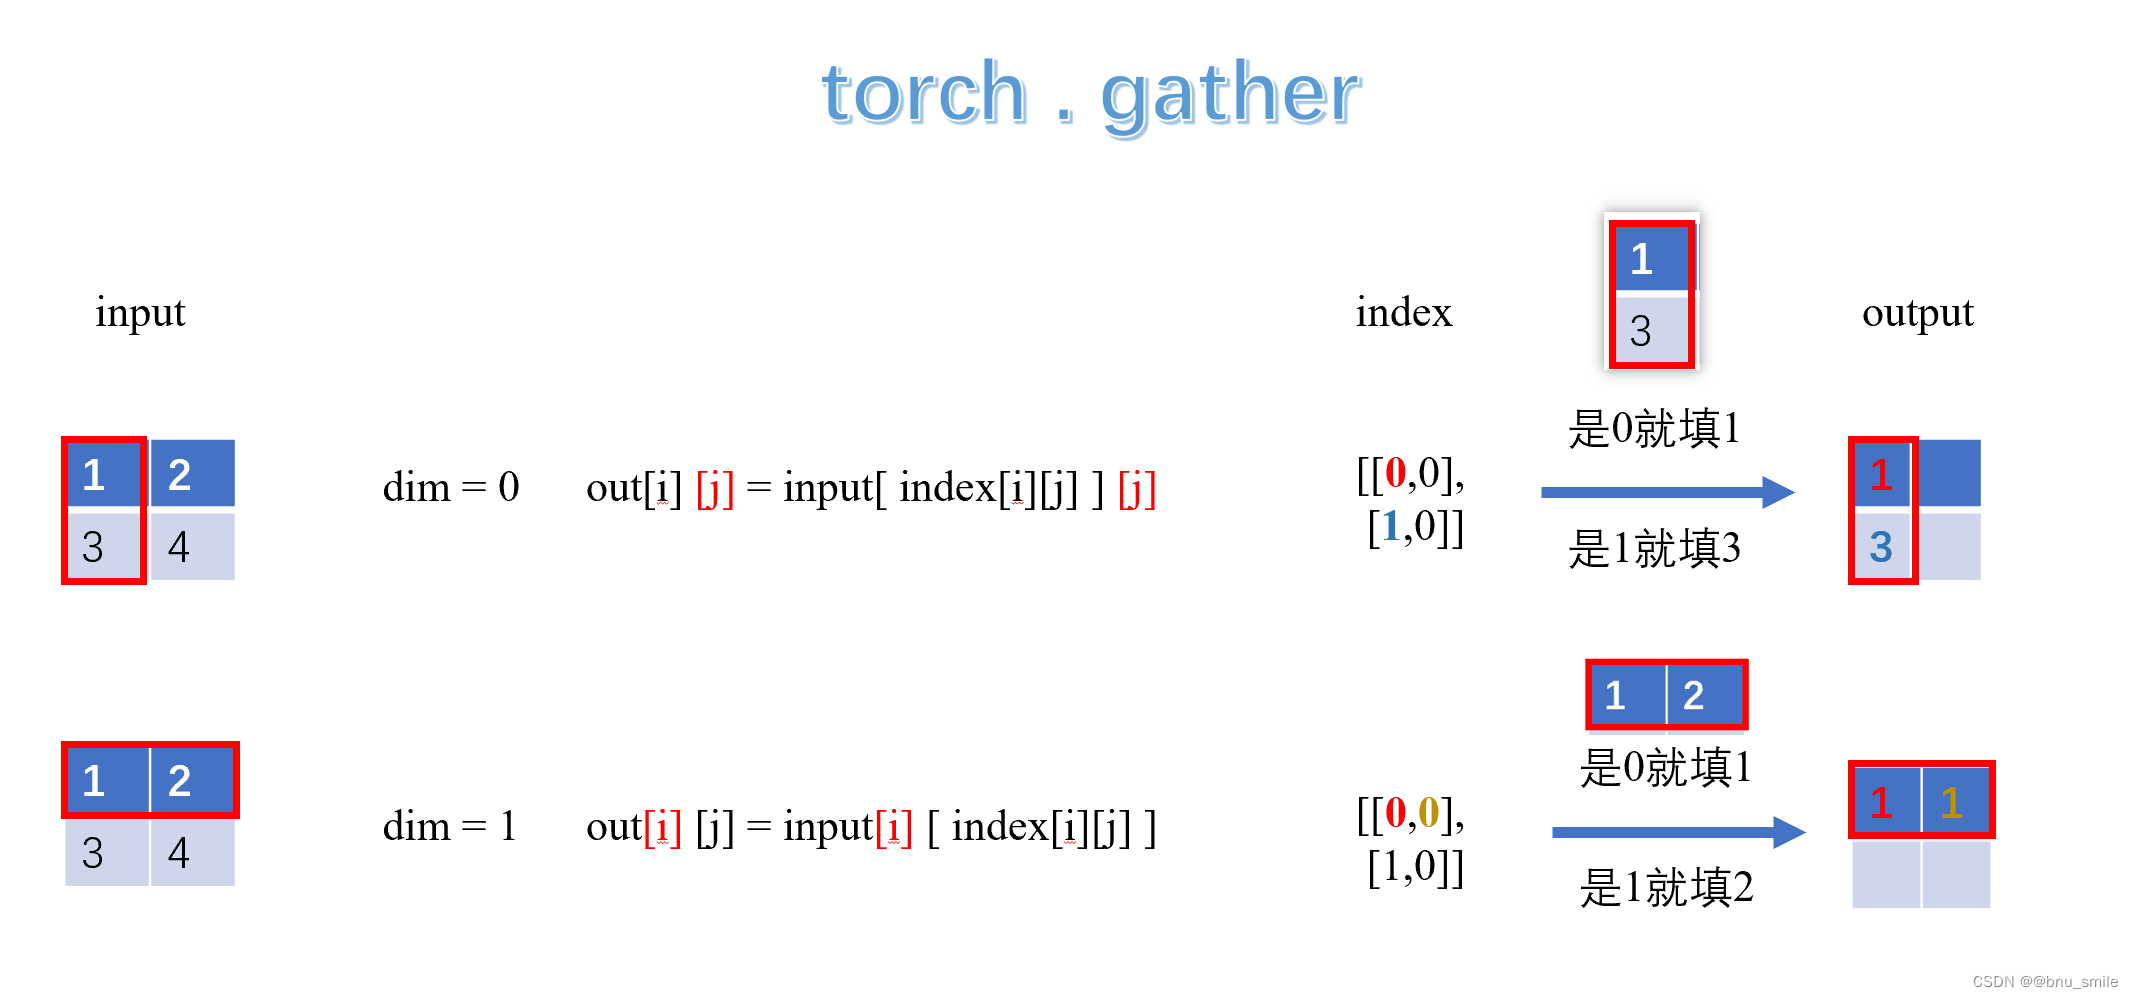
torch.gather(input, dim, index, out=None) → TensorGathers values along an axis specified by dim.For a 3-D tensor the output is specified by:out[i][j][k] = input[index[i][j][k]][j][k] # dim=0out[i][j][k] = input[i][index[i][j][k]][k] # dim=1out[i][j][k] = input[i][j][index[i][j][k]] # dim=2Parameters: input (Tensor) – The source tensordim (int) – The axis along which to indexindex (LongTensor) – The indices of elements to gatherout (Tensor, optional) – Destination tensorExample:>>> t = torch.Tensor([[1,2],[3,4]])>>> torch.gather(t, 1, torch.LongTensor([[0,0],[1,0]]))1 14 3[torch.FloatTensor of size 2x2]
For a 2-D tensor the output is specified by:out[i][j] = input[ index[i][j] ][j] # dim=0out[i][j] = input[i][ index[i][j][k] ][k] # dim=1Example:
 >>> t = torch.Tensor([[1,2],[3,4]])>>> torch.gather(t, 1, torch.LongTensor([[0,0],[1,0]]))1 14 3
output[i][j]   =   input[i][   index[i][j]   ]#行对应
>>> t = torch.Tensor([[1,2],[3,4]])>>> torch.gather(t, 0, torch.LongTensor([[0,0],[1,0]]))1 23 2output[i][j] = input[ index[i][j] ][j]#列对应
参考1