文章目录
- 零、示例代码参考
- 一、前言
- 二、共通内容
- 1.1、引入依赖
- 1.2、初始化SAML部分
- 1.2.1、检查JCE环境
- 1.2.2、初始化服务
- 1.3、拦截器部分
- 1.3.1、构建AuthnRequest
- 1.3.2、AuthRequest解析
- 1.3.3、SP模式选择
- 1.3.4、IDP模式选择
- 1.4、涉及的工具类
- 1.4.1、OpenSAMLUtils工具类
- 1.4.2、sp/idp Credentials
- 三、SP redirect 模式 + IDP post响应模式
- 1.1、SP拦截处理逻辑
- 1.1.1、利用证书对上下文进行签名
- 1.1.2、序列化和签名
- 1.1.3、跳转至IDP
- 1.1.3.1、解析SP的内容
- 1.2、IDP处理SP的讯息内容
- 1.2.1、通过URL获取Sp处理后的三个参数(可忽略)
- 1.2.2、验证解析消息是否被撰改(可忽略)
- 1.2.3、通过Post模式响应SP的请求
- 1.2.3.1、设置参数 context(响应的内容)
- 1.2.3.2、设置参数 HttpServletResponse
- 1.2.3.3、设置参数VelocityTemplateId
- 1.2.3.4、设置参数VelocityEngine
- 1.2.3.5、初始化编码器并发送讯息
- 1.3、获取IDP返回的讯息
- 四、那么怎么退出呢?
零、示例代码参考
Saml 示例项目地址点此进入 :持续性更新~,有空的话
一、前言
通常而言,我们都是基于
ADFS来进行接口对接,使用拦截器特定拦截即可。若是整个系统都需要以其为基准,可以直接使用过滤器。
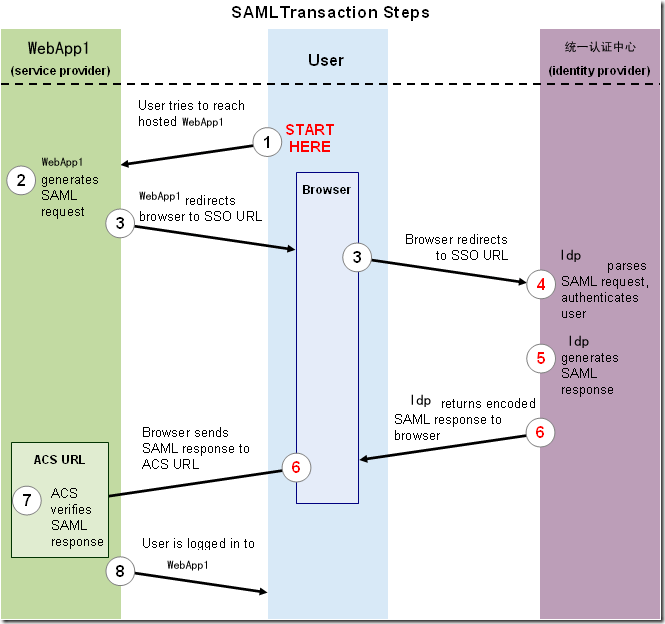
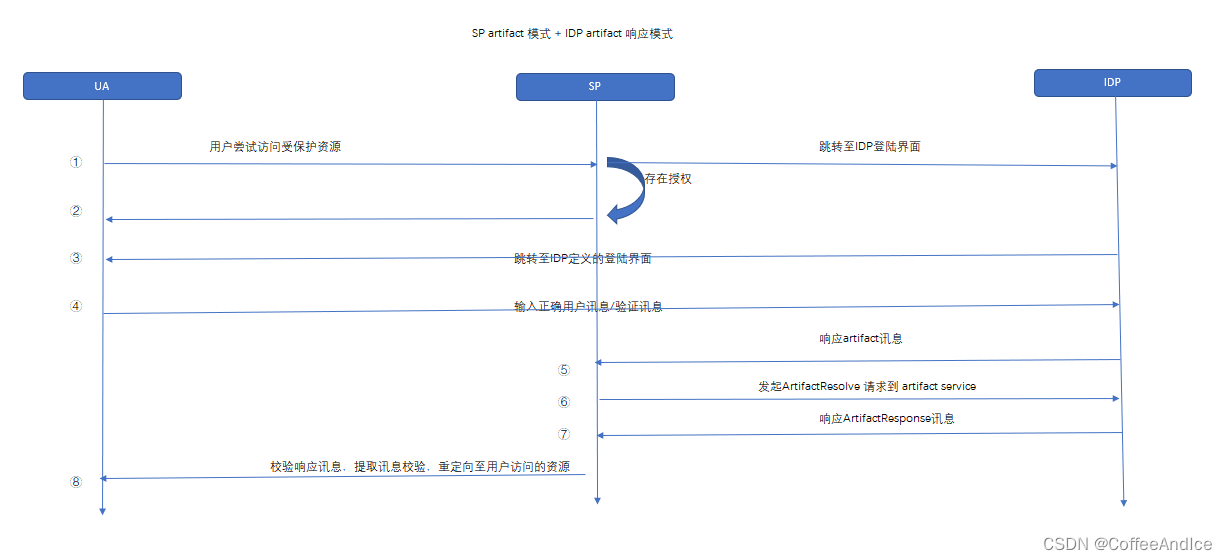
若对这里部分内容给不太熟悉: 建议参考 SAML2.0笔记(一)
二、共通内容
其实三个模式大同小异,为了方便拆解,这里三个模式一致的地方这里会单独列出说明。
1.1、引入依赖
3.x是JDK 8 的唯一选择了,故我这里直接选择3.2.0
···<opensaml.version>3.2.0</opensaml.version>
···<dependency><groupId>org.opensaml</groupId><artifactId>opensaml-core</artifactId><version>${opensaml.version}</version></dependency><dependency><groupId>org.opensaml</groupId><artifactId>opensaml-saml-api</artifactId><version>${opensaml.version}</version></dependency><dependency><groupId>org.opensaml</groupId><artifactId>opensaml-saml-impl</artifactId><version>${opensaml.version}</version></dependency><dependency><groupId>org.opensaml</groupId><artifactId>opensaml-messaging-api</artifactId><version>${opensaml.version}</version></dependency><dependency><groupId>org.opensaml</groupId><artifactId>opensaml-messaging-impl</artifactId><version>${opensaml.version}</version></dependency><dependency><groupId>org.opensaml</groupId><artifactId>opensaml-soap-api</artifactId><version>${opensaml.version}</version></dependency><dependency><groupId>org.opensaml</groupId><artifactId>opensaml-soap-impl</artifactId><version>${opensaml.version}</version></dependency>
1.2、初始化SAML部分
为了在项目中正常使用
SAML服务,可以考虑以下几步。
1.2.1、检查JCE环境
整体上为什么我们需要检查JCE环境,是因为初始化服务的时候需要创建实例
AES/CBC/ISO10126Padding
方式一: 手动检查jvm内的JCE 的provider
for (Provider jceProvider : Security.getProviders()) {System.out.println(jceProvider.getInfo());
}
//通常我们能从打印中 SunJCE Provider (...AES..) 找到AES就基本符合要求。
方式二: 利用SAML自带的检测方法来测试是否符合 (最保险)
谨记,建议在确保这步没问题后再去执行
1.2.2 步骤
①点击 InitializationService.initialize() 方法 ,进入 org.opensaml.core.config.InitializationService 类。
②点击类中 initializer.init() 方法,进入接口类 org.opensaml.core.config.Initializer ,我们可以从中找到实现类 JavaCryptoValidationInitializer
③ 可以清晰看到 方法 Cipher.getInstance("AES/CBC/ISO10126Padding"); ,同时看到头标注 An initializer which validates the Java Cryptographic Architecture environment is usable.
// 由上面步骤可以得出,我们只需要调用如下就可以验证是否支持saml初始化javaCryptoValidationInitializer.init();
1.2.2、初始化服务
为了使得SAML服务更好的加载入虚拟机,建议保证
1.2.1步骤的可靠性后在执行初始化
//注解描述: Service which initializes OpenSAML library modules using the Java Services API.
InitializationService.initialize();
1.3、拦截器部分
这里主要作拦截判断是否授权的作用。
整体上就是:
存在授权: 放行
不存在授权:
①通过对应方式存储跳转地址
②构建
SAMLRequest内容,采用对应方式来进行交互。
1.3.1、构建AuthnRequest
构建请求权限内容,以便整合到后续SP采取的方式中,也就是相对应的模式。
private AuthnRequest buildAuthnRequest() {AuthnRequest authnRequest = OpenSAMLUtils.buildSAMLObject(AuthnRequest.class);//请求时间:该对象创建的时间,以判断其时效性authnRequest.setIssueInstant(new DateTime());//目标URL:目标地址,IDP地址authnRequest.setDestination(getIPDSSODestination());//传输SAML断言所需要的绑定:也就是用何种协议使用Artifact来取回真正的认证信息,这里希望以POST返回讯息authnRequest.setProtocolBinding(SAMLConstants.SAML2_POST_BINDING_URI);//SP地址: 也就是SAML断言返回的地址authnRequest.setAssertionConsumerServiceURL(getAssertionConsumerEndpoint());//请求的ID:为当前请求设置ID,一般为随机数jauthnRequest.setID(OpenSAMLUtils.generateSecureRandomId());//Issuer: 发行人信息,也就是SP的ID,一般是SP的URLauthnRequest.setIssuer(buildIssuer());//NameID:IDP对于用户身份的标识;NameID policy是SP关于NameID是如何创建的说明authnRequest.setNameIDPolicy(buildNameIdPolicy());// 请求认证上下文(requested Authentication Context):// SP对于认证的要求,包含SP希望IDP如何验证用户,也就是IDP要依据什么来验证用户身份。authnRequest.setRequestedAuthnContext(buildRequestedAuthnContext());return authnRequest;}
1.3.2、AuthRequest解析
AuthnRequest :说明要要如何才能鉴别用户,提供给IDP使用(整个结构是XML)。
通常我们可以根据客户提供的 metadata 来配合构建这个对象
IDP地址: 我们通常可以从 metadata 中获取到所需的地址。
<!- 例如节点singleSignOnService ->
<md:SingleSignOnService Binding="urn:oasis:names:tc:SAML:2.0:bindings:HTTP-Redirect" Location="https://coffeeandice/idp/sso/signon"/>
<!- 则其IDP地址为:https://coffeeandice/idp/sso/signon ->
断言绑定: 也就是用何种协议来使用Artifact取回真正的认证信息。
<!- 例如节点singleSignOnService ->
<singleSignOnService Binding="urn:oasis:names:tc:SAML:2.0:bindings:HTTP-Artifact" Location="http://localhost:8080/adfs/ldp/"/>
<!- 则对应枚举讯息 SAMLConstants.SAML2_ARTIFACT_BINDING_URI ->
<!- 可以参考org.opensaml.saml.common.xml.SAMLConstants ->
SP地址: 我们鉴定应答的地址,说白了就是用于解析IDP处理后的应答讯息的路径地址。
Issuer标识: 发行人的标识(也有推荐使用SP的url)
//可以定义发行人的标识: demo
Issuer issuer = OpenSAMLUtils.buildSAMLObject(Issuer.class);
issuer.setValue(getSPIssuerValue());
NameID: IDP对于用户身份的标识
<!- 例如节点singleSignOnService ->
<singleSignOnService Binding="urn:oasis:names:tc:SAML:2.0:bindings:HTTP-Redirect" Location="http://localhost:8080/adfs/ldp/"/>
<NameIDFormat>urn:oasis:names:tc:SAML:1.1:nameid-format:emailAddress</NameIDFormat>
<NameIDFormat>urn:oasis:names:tc:SAML:2.0:nameid-format:persistent</NameIDFormat>
<NameIDFormat>urn:oasis:names:tc:SAML:2.0:nameid-format:transient</NameIDFormat>
<!- 则其支持 emailAddress、persistent、transient ->
<!- 对应1、NameIDType.EMAIL 2、NameIDType.PERSISTENT 3、NameIDType.TRANSIENT->
NameIDPolicy nameIDPolicy = OpenSAMLUtils.buildSAMLObject(NameIDPolicy.class);
//IDP是否被允许当发现用户不存在时创建用户账号//主要针对
nameIDPolicy.setAllowCreate(true);
nameIDPolicy.setFormat(NameIDType.EMAIL);
//nameIDPolicy.setFormat(NameIDType.PERSISTENT); 持久标识
//nameIDPolicy.setFormat(NameIDType.TRANSIENT); 临时标识
//nameIDPolicy.setFormat(NameIDType.UNSPECIFIED); 根据URL标识
//整体可以参考类 : org.opensaml.saml.saml2.core.NameIDType
构造认证上下文:
AuthnContextComparisonTypeEnumeration : 主要区分几个级别
① better: 比任意选定的内容都要严格。
② exact: 最少要有一个标识也就是
NameId与指定的上下文完全匹配。③ maximum: 建议IDP尽可能去与匹配讯息,但是不需要超过一个标识去匹配。
④ minimum: 建议IDP尽可能去与匹配讯息,没有数量限制。
AuthnContext: 内容校验部分,这里列举常用的几个,具体可以参考
org.opensaml.saml.saml2.core.AuthnContext① UNSPECIFIED_AUTHN_CTX: 针对URL来进行上下文校验
② PASSWORD_AUTHN_CTX : 基于用户名密码来上下文校验(通常是IDP用户定义的账户)
RequestedAuthnContext requestedAuthnContext = OpenSAMLUtils.buildSAMLObject(RequestedAuthnContext.class);
//涉及AuthnContextComparisonTypeEnumeration ,参考注解
requestedAuthnContext.setComparison(AuthnContextComparisonTypeEnumeration.MINIMUM);AuthnContextClassRef passwordAuthnContextClassRef = OpenSAMLUtils.buildSAMLObject(AuthnContextClassRef.class);
//AuthnContext ,参考注解
passwordAuthnContextClassRef.setAuthnContextClassRef(AuthnContext.PASSWORD_AUTHN_CTX);
requestedAuthnContext.getAuthnContextClassRefs().add(passwordAuthnContextClassRef);
1.3.3、SP模式选择
其实可以直接参考抽象类:
org.opensaml.saml.saml2.binding.encoding.impl.BaseSAML2MessageEncoder,可以帮助我们来对于AuthnRequest进行序列化和签名1、 HTTPArtifactEncoder : SAML 2 Artifact Binding encoder, support both HTTP GET and POST.
顾名思义,支持以 Artifact的模式绑定传输讯息给idp,可以是 HTTP 通过 `URL` 传输也可以通过  `post` 参数传输。
使用的时候,可以参考类详情参数,方便切换 GET 与 Post方式
2、 HTTPPostEncoder: SAML 2.0 HTTP Post binding message encoder.
3、 HTTPPostSimpleSignEncoder: SAML 2.0 HTTP-POST-SimpleSign binding message encoder.
4、 HTTPRedirectDeflateEncoder: This encoder only supports DEFLATE compression and DSA-SHA1 and RSA-SHA1 signatures.

1.3.4、IDP模式选择
有加密当然有解密,参考抽象类:
org.opensaml.messaging.decoder.servlet.BaseHttpServletRequestXMLMessageDecoder,可以帮我们来对序列化后的内容进行解密,其实大多数用到的,针对着SP模式切换即可。1、 HTTPArtifactDecoder: SAML 2 Artifact Binding decoder, support both HTTP GET and POST.
2、 HTTPPostDecoder: SAML 2.0 HTTP Post binding message decoder.
3、 HTTPPostSimpleSignDecoder: SAML 2.0 HTTP-POST-SimpleSign binding message decoder.
4、 HTTPRedirectDeflateDecoder: SAML 2.0 HTTP Redirect decoder using the DEFLATE encoding method.
图内记得区分 saml1 还是 saml2
![[外链图片转存失败,源站可能有防盗链机制,建议将图片保存下来直接上传(img-Z3uIRKxY-1668969858115)(C:\Users\1\OneDrive\Documents\笔记解决方案图片\image-20220814221237957.png)]](https://img-blog.csdnimg.cn/ae39620b6d0541278c0c330997f22e52.png)
1.4、涉及的工具类
1.4.1、OpenSAMLUtils工具类
主要涉及方法
public static <T> T buildSAMLObject(final Class<T> clazz) {T object = null;try {XMLObjectBuilderFactory builderFactory = XMLObjectProviderRegistrySupport.getBuilderFactory();QName defaultElementName = (QName) clazz.getDeclaredField("DEFAULT_ELEMENT_NAME").get(null);object = (T) builderFactory.getBuilder(defaultElementName).buildObject(defaultElementName);} catch (IllegalAccessException e) {throw new IllegalArgumentException("Could not create SAML object");} catch (NoSuchFieldException e) {throw new IllegalArgumentException("Could not create SAML object");}return object;}
1.4.2、sp/idp Credentials
关于参数
KEY_ENTRY_ID这里的参数,要与证书的别名一致,否则无法正确校验。说白点就是无法生成
signtaure
KEY_STORE_PASSWORD / KEY_STORE_ENTRY_PASSWORD: 证书的密码
public class SPCredentials {private static Logger logger = LoggerFactory.getLogger(SPCredentials.class);private static final String KEY_STORE_PASSWORD = "ringo";private static final String KEY_STORE_ENTRY_PASSWORD = "ringo";private static final String KEY_STORE_PATH = "/coffeeandice.jks";private static final String KEY_ENTRY_ID = "coffeeandice";private static final Credential credential;static {try {KeyStore keystore = readKeystoreFromFile(KEY_STORE_PATH, KEY_STORE_PASSWORD);Map<String, String> passwordMap = new HashMap<String, String>();passwordMap.put(KEY_ENTRY_ID, KEY_STORE_ENTRY_PASSWORD);KeyStoreCredentialResolver resolver = new KeyStoreCredentialResolver(keystore, passwordMap);Criterion criterion = new EntityIdCriterion(KEY_ENTRY_ID);CriteriaSet criteriaSet = new CriteriaSet();criteriaSet.add(criterion);credential = resolver.resolveSingle(criteriaSet);} catch (ResolverException e) {throw new RuntimeException("Something went wrong reading credentials", e);}}private static KeyStore readKeystoreFromFile(String pathToKeyStore, String keyStorePassword) {try {KeyStore keystore = KeyStore.getInstance(KeyStore.getDefaultType());InputStream inputStream = SPCredentials.class.getResourceAsStream(pathToKeyStore);keystore.load(inputStream, keyStorePassword.toCharArray());inputStream.close();return keystore;} catch (Exception e) {throw new RuntimeException("Something went wrong reading keystore", e);}}public static Credential getCredential() {logger.info("相应的凭证值:{}", credential);return credential;}}
三、SP redirect 模式 + IDP post响应模式
构建一个 SAML Request内容,用于重定向至IDP的介面,待校验成功后,IDP将会以
post的形式,通知SP,并将相关讯息推送至SP内。
示例目标: 整个过程,我们以邮件地址(EmailAddress)作为传递目标,忽略了校验过程。
1.1、SP拦截处理逻辑
可以根据自己的基本情况用作拦截,这里简单利用
过滤器对所有请求进行判断。由于为示例,则以简单标识存储在会话中判断。
结合标题分级,这块采用
HTTPRedirectDeflateEncoder帮助传输
1.1.1、利用证书对上下文进行签名
private void redirectUserWithRequest(HttpServletResponse httpServletResponse, AuthnRequest authnRequest) {MessageContext context = new MessageContext();context.setMessage(authnRequest);//关于传输对端实体的信息,对于IDP就是SP,对于SP就是IDP;SAMLPeerEntityContext peerEntityContext =context.getSubcontext(SAMLPeerEntityContext.class, true);//端点信息;//getIPDEndpoint() ,就是IPD的对应校验端点。SAMLEndpointContext endpointContext =peerEntityContext.getSubcontext(SAMLEndpointContext.class, true);endpointContext.setEndpoint(getIPDEndpoint());//数据签名环境消息上下文SignatureSigningParameters signatureSigningParameters = new SignatureSigningParameters();//获得证书,其中包含公钥signatureSigningParameters.setSigningCredential(SPCredentials.getCredential());//ALGO_ID_SIGNATURE_RSA_SHA256signatureSigningParameters.setSignatureAlgorithm(SignatureConstants.ALGO_ID_SIGNATURE_RSA_SHA256);context.getSubcontext(SecurityParametersContext.class, true).setSignatureSigningParameters(signatureSigningParameters);// OpenSAML提供了HTTPRedirectDefalteEncoder// 它将帮助我们来对于AuthnRequest进行序列化和签名HTTPRedirectDeflateEncoder encoder = new HTTPRedirectDeflateEncoder();encoder.setMessageContext(context);encoder.setHttpServletResponse(httpServletResponse);try {encoder.initialize();} catch (ComponentInitializationException e) {throw new RuntimeException(e);}try {//*encode*方法将会压缩消息,生成签名,添加结果到URL并从定向用户到Idp.//先使用RFC1951作为默认方法压缩数据,在对压缩后的数据信息Base64编码encoder.encode();} catch (MessageEncodingException e) {throw new RuntimeException(e);}}
1.1.2、序列化和签名
这里通过处理后,主要分为3个参数传递出去
①SAMLRequest
②SigAlg
③Signature
Tips: 若生成跳转的地址缺失了 ②、③参数,建议校验证书别名是否一致。
整体过程会发生在 HTTPRedirectDeflateEncoder 内的 buildRedirectURL 内
1.1.3、跳转至IDP
由于采取了
SP redirect 模式,所以,在到执行encoder.encode()后会重定向至,配置好的url地址,按照示例,默认值应该为
http://localhost:8088/idp/logon
1.1.3.1、解析SP的内容
理论上,我们应该对请求的内容进行解析,对其进行初步判断
当然理论上我们是需要自动解析,判断
SP模式是什么内容,然后采用解码器解码。(但是由于我是demo,不管了~滑稽)
1.2、IDP处理SP的讯息内容
整体上,这里需要一个登陆的流程,但是登陆的流程并不重要,可以自己随意加,这里就跳过了~~
1.2.1、通过URL获取Sp处理后的三个参数(可忽略)
①SAMLRequest
②SigAlg
③Signature
结合标题分级,这块采用
HTTPRedirectDeflateDecoder帮助解析内容
String samlRequest = request.getParameter("SAMLRequest");
String SigAlg = request.getParameter("SigAlg");
String Signature = request.getParameter("Signature");//解析
HTTPRedirectDeflateDecoder httpRedirectDeflateDecoder = new HTTPRedirectDeflateDecoder();
httpRedirectDeflateDecoder.setHttpServletRequest(request);//初始化解析器 & 解码
//-----初始化解析器-----
try {httpRedirectDeflateDecoder.initialize();
} catch (ComponentInitializationException e) {e.printStackTrace();
}
//-----解码-----
try {httpRedirectDeflateDecoder.decode();
} catch (MessageDecodingException e) {e.printStackTrace();
}
//解析sp传递的消息体
MessageContext<SAMLObject> messageContext = httpRedirectDeflateDecoder.getMessageContext();
1.2.2、验证解析消息是否被撰改(可忽略)
其实我们可以翻看源码来查出
HTTPRedirectDeflateEncoder如何生成Signature,我们照搬即可验证。源码路径:
org.opensaml.saml.saml2.binding.encoding.impl.HTTPRedirectDeflateEncoder#buildRedirectURL
String samlRequest = request.getParameter("SAMLRequest");
String SigAlg = request.getParameter("SigAlg");
String Signature = request.getParameter("Signature");//数据签名环境上线文
SignatureSigningParameters signatureSigningParameters1 = new SignatureSigningParameters();
//获得证书,其中包含公钥
signatureSigningParameters1.setSigningCredential(IdpCredentials.getCredential());
//ALGO_ID_SIGNATURE_RSA_SHA256
signatureSigningParameters1.setSignatureAlgorithm(SignatureConstants.ALGO_ID_SIGNATURE_RSA_SHA256);String b64Signature = null;
try {byte[] rawSignature =XMLSigningUtil.signWithURI(signatureSigningParameters1.getSigningCredential(), SigAlg, sigMaterial.getBytes("UTF-8"));b64Signature = Base64Support.encode(rawSignature, Base64Support.UNCHUNKED);
} catch (final SecurityException e) {
} catch (final UnsupportedEncodingException e) {// UTF-8 encoding is required to be supported by all JVMs
}System.out.println(b64Signature == Signature);
1.2.3、通过Post模式响应SP的请求
响应标题内容,哈哈~
既然以post请求响应,就基本是从下面两个出手,我选1,就不走simple了。
1、 HTTPPostDecoder: SAML 2.0 HTTP Post binding message decoder.
2、 HTTPPostSimpleSignDecoder: SAML 2.0 HTTP-POST-SimpleSign binding message decoder.

1.2.3.1、设置参数 context(响应的内容)
这里主要以总体目标
EmailAddress为示例
 HTTPPostEncoder httpPostEncoder = new HTTPPostEncoder();
//一、针对参数 context
// 完成最低标准讯息体构造 org.opensaml.saml.common.binding.SAMLBindingSupport
//(1)需要最低一个设置SAMLPeerEntityContext & 设置SAMLPeerEntityContext下的SAMLEndpointContext
//(2)需要最低一个传递绑定消息的SAMLBindingContext
MessageContext context = new MessageContext();
//1.1、设置SAMLPeerEntityContext
SAMLPeerEntityContext peerEntityContext =context.getSubcontext(SAMLPeerEntityContext.class, true);
//1.2、设置SAMLPeerEntityContext 下的 SAMLEndpointContext
SAMLEndpointContext endpointContext =peerEntityContext.getSubcontext(SAMLEndpointContext.class, true);
endpointContext.setEndpoint(getIPDEndpoint());
peerEntityContext.setEntityId(idpConfig.idp_entity_id);
SignatureSigningParameters signatureSigningParameters = new SignatureSigningParameters();
signatureSigningParameters.setSigningCredential(IdpCredentials.getCredential());
//ALGO_ID_SIGNATURE_RSA_SHA256
signatureSigningParameters.setSignatureAlgorithm(SignatureConstants.ALGO_ID_SIGNATURE_RSA_SHA256);//2.1、设置 SAMLBindingContext
SAMLBindingContext baseContexts = new SAMLBindingContext();
//用于给判断的时间而已
baseContexts.setRelayState("60");
baseContexts.setHasBindingSignature(true);
baseContexts.setAutoCreateSubcontexts(true);
baseContexts.setBindingUri(idpConfig.idp_sso_logon);
context.addSubcontext(baseContexts);//3.1、推送地址消息
//这里可以很多讯息 SAMLObject 下的实现类都可以
EmailAddress emailAddress = OpenSAMLUtils.buildSAMLObject(EmailAddress.class);
emailAddress.setAddress("demo@outlook.com");
ArtifactResponse artifactResponse = OpenSAMLUtils.buildSAMLObject(ArtifactResponse.class);
artifactResponse.setMessage(emailAddress);
//可通过#getOrderedChildren 设置更多的内容
//artifactResponse.getOrderedChildren()
context.setMessage(artifactResponse);//4、最终设置,将上述内容填充进入
httpPostEncoder.setMessageContext(context);
1.2.3.2、设置参数 HttpServletResponse
直接将请求参数置入即可。
httpPostEncoder.setHttpServletResponse(response);
1.2.3.3、设置参数VelocityTemplateId
一般我们走默认值即可,
/templates/saml2-post-binding.vmorg.opensaml.saml.saml2.binding.encoding.impl.HTTPPostEncoder
1.2.3.4、设置参数VelocityEngine
这里主要是一个问题,就是存在无法读取模板的问题。
包内
opensaml-saml-impl,建议直接复制模版放入resources内,本例会将默认值内的模版复制一份到resources/templates下
VelocityEngine velocityEngine = new VelocityEngine();
velocityEngine.setProperty(RuntimeConstants.RESOURCE_LOADER, "classpath");
velocityEngine.setProperty("classpath.resource.loader.class", ClasspathResourceLoader.class.getName());
//一定要初始化
velocityEngine.init();
httpPostEncoder.setVelocityEngine(velocityEngine);
1.2.3.5、初始化编码器并发送讯息
这里存在三个对象
org.opensaml.saml.saml2.binding.encoding.impl.HTTPPostEncoder#populateVelocityContext① action
② binding
③ SAMLResponse
try {httpPostEncoder.initialize();
} catch (ComponentInitializationException e) {e.printStackTrace();
}
try {//*encode*方法将会压缩消息,生成签名,添加结果到URL并从定向用户到Idp.//先使用RFC1951作为默认方法压缩数据,在对压缩后的数据信息Base64编码httpPostEncoder.encode();
} catch (MessageEncodingException e) {throw new RuntimeException(e);
}
1.3、获取IDP返回的讯息
从上述流程,我们开天眼知道,返回的内容参数内容是
SAMLResponse,用HTTPPostDecoder进行传递
String samlResponse = req.getParameter("SAMLResponse");HTTPPostDecoder httpPostDecoder = new HTTPPostDecoder();
httpPostDecoder.setHttpServletRequest(req);
try {httpPostDecoder.initialize();
} catch (ComponentInitializationException e) {e.printStackTrace();
}
try {httpPostDecoder.decode();
} catch (MessageDecodingException e) {e.printStackTrace();
}
final MessageContext<SAMLObject> messageContext = httpPostDecoder.getMessageContext();
System.out.println(messageContext);
List<XMLObject> encryptedAssert = messageContext.getMessage().getOrderedChildren();
for (int i = 0, len = encryptedAssert.size(); i < len; i++) {XMLObject xmlObject = encryptedAssert.get(i);if (xmlObject instanceof EmailAddress) {//这里是整个demo过程中默认的内容,实际上参考自己的情况决定EmailAddress emailAddress = ((EmailAddress) xmlObject);logger.info("内容:{}", emailAddress.getAddress());//附带的其他内容//                final List<XMLObject> orderedChildren = emailAddress.getOrderedChildren();//                for (int j = 0, leng = encryptedAssert.size(); j < len; j++) {//                    XMLObject xmlObject1 = orderedChildren.get(i);//                }}
}
四、那么怎么退出呢?
sign-on 必然是有 sign-out
例如登出的端点为: https://coffeeandice/adfs/ls/SingleLogoutService
只需要增加参数即可:?wa=wsignout1.0
对应相关登出端点需要IDP方进行配置才可使用。


