latex beamer制作ppt
- 参考地址
- 使用初探
- 结果展示
- 注意
参考地址
latex与word,ppt是目前用得最多得排版工具。然后,大部分人熟悉的多是word,实时上latex排版能力比word,ppt更方便。其使用代码实现插入图片、公式及表格编辑,代码自动对齐,相对于word,ppt来说,latex的入手门槛稍微要高一点,对于喜欢编程的人来说绝对会喜欢latex,其排版效率更高和文章编辑只需用键盘就能实现,不需要用鼠标。而word,ppt排版及制作文档的方便之处在于其完全可视化排版,小学生都能做出好的ppt。而且,世面上的ppt模板漫天遍地,故而,从易用性来说,ppt的使用跟简单。但是,采用latex排出材料,结构清晰可读性强移植性也比较方便,不像微软的ppt需要版本兼容性问题。latex排版的出的材料要么是pdf格式,要么就是dvi格式。
一直听说latex排版较好,有些好的期刊投稿给的是latex模板,故而,想熟悉一下latex。latex排版据说于Markdown相类似,而markdown在网页博客的排版上确实非常好用。刚开始试着用latex制作演示文稿时,了解到的时beamer。为了快速上手,在网上找了大量模板,主要分享在overleaf上。
overleaf 在线latex编辑平台,其上有大量的优秀模板。国内被墙了!有点可惜。
overleaf 上关于beamer 使用指南
30分钟学会latex
使用初探
beamer制作幻灯片分为以下几个部分
- 标题页
- 目录页
- 演示页
其中,preamble(序言)是指主题,包以及标题、目录
%%%%%%%%%%%%%%%%%%%%%%%%%%%%%%%%%%%%%%%%%%%%%%%%%%%%%%%%%%%%%%%%%%%%%%%%%%%%%%%%%%%%%%%%%%
% beamer template made by 李会
% 2019-7-12 at Taiyuan,China
%
%%%%%%%%%%%%%%%%%%%%%%%%%%%%%%%%%%%%%%%%%%%%%%%%%%%%%%%%%%%%%%%%%%%%%%%%%%%%%%%%%%%%%%%%%%%----------------------------------------------------------------------------------------
%	PACKAGES AND THEMES
%----------------------------------------------------------------------------------------\documentclass{beamer}\mode<presentation> {% The Beamer class comes with a number of default slide themes
% which change the colors and layouts of slides. Below this is a list
% of all the themes, uncomment each in turn to see what they look like.%\usetheme{default}
%\usetheme{AnnArbor}  %比较好看
%\usetheme{Antibes}
%\usetheme{Bergen}
%\usetheme{Berkeley}
%\usetheme{Berlin}
%\usetheme{Boadilla}
\usetheme{CambridgeUS} %比较好看
%\usetheme{Copenhagen}
%\usetheme{Darmstadt}  %还行
%\usetheme{Dresden}
%\usetheme{Frankfurt}   %还行
%\usetheme{Goettingen}   %比较好看
%\usetheme{Hannover}
%\usetheme{Ilmenau}
%\usetheme{JuanLesPins}
%\usetheme{Luebeck}   %比较好
%\usetheme{Madrid}
%\usetheme{Malmoe}
%\usetheme{Marburg}   %比较好
%\usetheme{Montpellier}
%\usetheme{PaloAlto}
%\usetheme{Pittsburgh}
%\usetheme{Rochester}
%\usetheme{Singapore}
%\usetheme{Szeged}
%\usetheme{Warsaw}% As well as themes, the Beamer class has a number of color themes
% for any slide theme. Uncomment each of these in turn to see how it
% changes the colors of your current slide theme.%\usecolortheme{albatross}
%\usecolortheme{beaver}
%\usecolortheme{beetle}
%\usecolortheme{crane}
%\usecolortheme{dolphin}
%\usecolortheme{dove}
%\usecolortheme{fly}
%\usecolortheme{lily}
%\usecolortheme{orchid}
%\usecolortheme{rose}
%\usecolortheme{seagull}
%\usecolortheme{seahorse}
%\usecolortheme{whale}
\usecolortheme{wolverine}%\setbeamertemplate{footline} % To remove the footer line in all slides uncomment this line
%\setbeamertemplate{footline}[page number] % To replace the footer line in all slides with a simple slide count uncomment this line%\setbeamertemplate{navigation symbols}{} % To remove the navigation symbols from the bottom of all slides uncomment this line
}\usepackage{graphicx} % Allows including images
\usepackage{booktabs} % Allows the use of \toprule, \midrule and \bottomrule in tables
\usepackage[UTF8,noindent]{ctexcap}  %使用中文输入及显示
%\usepackage[bookmarks=true,colorlinks,linkcolor=black]{hyperref}  %pdf显示书签
\usepackage[bookmarks=true]{hyperref}%----------------------------------------------------------------------------------------
%	TITLE PAGE
%----------------------------------------------------------------------------------------\title[Short title]{Full Title of the Talk} % The short title appears at the bottom of every slide, the full title is only on the title page\author{李会} % Your name
\institute[CIRP] % Your institution as it will appear on the bottom of every slide, may be shorthand to save space
{
China Institute of Radiation Protection \\ % Your institution for the title page
\medskip
\textit{hrbeulh@126.com} % Your email address
}
\date{\today} % Date, can be changed to a custom date\begin{document}\begin{frame}
\titlepage % Print the title page as the first slide
\end{frame}\begin{frame}
\frametitle{Overview} % Table of contents slide, comment this block out to remove it
\tableofcontents % Throughout your presentation, if you choose to use \section{} and \subsection{} commands, these will automatically be printed on this slide as an overview of your presentation
\end{frame}%----------------------------------------------------------------------------------------
%	PRESENTATION SLIDES
%----------------------------------------------------------------------------------------%------------------------------------------------
\section{First Section} % Sections can be created in order to organize your presentation into discrete blocks, all sections and subsections are automatically printed in the table of contents as an overview of the talk
%------------------------------------------------\subsection{Subsection Example 1} % A subsection can be created just before a set of slides with a common theme to further break down your presentation into chunks\begin{frame}
\frametitle{Paragraphs of Text}
Sed iaculis dapibus gravida. Morbi sed tortor erat, nec interdum arcu. Sed id lorem lectus. Quisque viverra augue id sem ornare non aliquam nibh tristique. Aenean in ligula nisl. Nulla sed tellus ipsum. Donec vestibulum ligula non lorem vulputate fermentum accumsan neque mollis.\\~\\Sed diam enim, sagittis nec condimentum sit amet, ullamcorper sit amet libero. Aliquam vel dui orci, a porta odio. Nullam id suscipit ipsum. Aenean lobortis commodo sem, ut commodo leo gravida vitae. Pellentesque vehicula ante iaculis arcu pretium rutrum eget sit amet purus. Integer ornare nulla quis neque ultrices lobortis. Vestibulum ultrices tincidunt libero, quis commodo erat ullamcorper id.
\end{frame}%------------------------------------------------
\subsection{Subsection Example 2}\begin{frame}
\frametitle{Bullet Points}
\begin{itemize}
\item Lorem ipsum dolor sit amet, consectetur adipiscing elit
\item Aliquam blandit faucibus nisi, sit amet dapibus enim tempus eu
\item Nulla commodo, erat quis gravida posuere, elit lacus lobortis est, quis porttitor odio mauris at libero
\item Nam cursus est eget velit posuere pellentesque
\item Vestibulum faucibus velit a augue condimentum quis convallis nulla gravida
\end{itemize}
\end{frame}%------------------------------------------------\begin{frame}
\frametitle{Blocks of Highlighted Text}
\begin{block}{Block 1}
Lorem ipsum dolor sit amet, consectetur adipiscing elit. Integer lectus nisl, ultricies in feugiat rutrum, porttitor sit amet augue. Aliquam ut tortor mauris. Sed volutpat ante purus, quis accumsan dolor.
\end{block}\begin{block}{Block 2}
Pellentesque sed tellus purus. Class aptent taciti sociosqu ad litora torquent per conubia nostra, per inceptos himenaeos. Vestibulum quis magna at risus dictum tempor eu vitae velit.
\end{block}\begin{block}{Block 3}
Suspendisse tincidunt sagittis gravida. Curabitur condimentum, enim sed venenatis rutrum, ipsum neque consectetur orci, sed blandit justo nisi ac lacus.
\end{block}
\end{frame}%------------------------------------------------\begin{frame}
\frametitle{Multiple Columns}
\begin{columns}[c] % The "c" option specifies centered vertical alignment while the "t" option is used for top vertical alignment\column{.45\textwidth} % Left column and width
\textbf{Heading}
\begin{enumerate}
\item Statement
\item Explanation
\item Example
\end{enumerate}\column{.5\textwidth} % Right column and width
Lorem ipsum dolor sit amet, consectetur adipiscing elit. Integer lectus nisl, ultricies in feugiat rutrum, porttitor sit amet augue. Aliquam ut tortor mauris. Sed volutpat ante purus, quis accumsan dolor.\end{columns}
\end{frame}%------------------------------------------------
\section{Second Section}
%------------------------------------------------\begin{frame}
\frametitle{Table}
\begin{table}
\begin{tabular}{l l l}
\toprule
\textbf{Treatments} & \textbf{Response 1} & \textbf{Response 2}\\
\midrule
Treatment 1 & 0.0003262 & 0.562 \\
Treatment 2 & 0.0015681 & 0.910 \\
Treatment 3 & 0.0009271 & 0.296 \\
\bottomrule
\end{tabular}
\caption{Table caption}
\end{table}
\end{frame}%------------------------------------------------\begin{frame}
\frametitle{Theorem}
\begin{theorem}[Mass--energy equivalence]
$E = mc^2$
\end{theorem}
\end{frame}%------------------------------------------------\begin{frame}[fragile] % Need to use the fragile option when verbatim is used in the slide
\frametitle{Verbatim}
\begin{example}[Theorem Slide Code]
\begin{verbatim}
\begin{frame}
\frametitle{Theorem}
\begin{theorem}[Mass--energy equivalence]
$E = mc^2$
\end{theorem}
\end{frame}\end{verbatim}
\end{example}
\end{frame}%------------------------------------------------\begin{frame}
\frametitle{Figure}
Uncomment the code on this slide to include your own image from the same directory as the template .TeX file.
%\begin{figure}
%\includegraphics[width=0.8\linewidth]{test}
%\end{figure}
\end{frame}%------------------------------------------------\begin{frame}[fragile] % Need to use the fragile option when verbatim is used in the slide
\frametitle{Citation}
An example of the \verb|\cite| command to cite within the presentation:\\~This statement requires citation \cite{p1}.
\end{frame}%------------------------------------------------
\section{Third Section}
%------------------------------------------------%------------------------------------------------\begin{frame}
\frametitle{References}
\footnotesize{
\begin{thebibliography}{99} % Beamer does not support BibTeX so references must be inserted manually as below
\bibitem[Smith, 2012]{p1} John Smith (2012)
\newblock Title of the publication
\newblock \emph{Journal Name} 12(3), 45 -- 678.
\end{thebibliography}
}
\end{frame}%------------------------------------------------\begin{frame}
\frametitle{Figure}
\begin{center}
\includegraphics[width=0.5\linewidth]{Fig10}    %插入图片
%\includegraphics[width=1.0\linewidth]{Fig10}
\end{center}
\end{frame}%------------------------------------------------\begin{frame}
\Huge{\centerline{The End. Any advice?}}
\end{frame}%----------------------------------------------------------------------------------------\end{document}
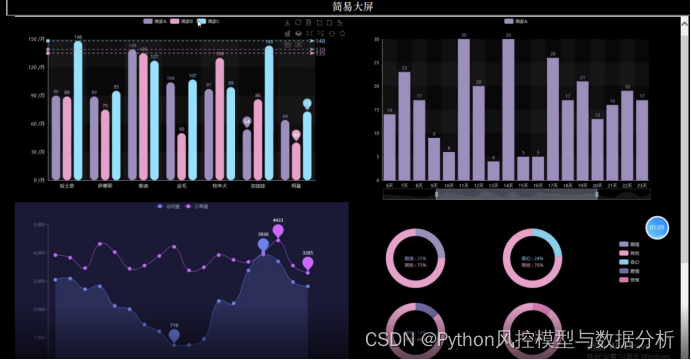
结果展示
生成的时pdf演示文稿,但是pdf中有许多超链接和按钮,动态演示非常方便,结构也比较明朗。

注意
该段代码若要试用,请把插入图片的那段frame注释掉,采用%注释