Attention UNet论文解析 - 知乎Attention UNet论文地址: https://arxiv.org/pdf/1804.03999.pdf 代码地址: https://github.com/ozan-oktay/Attention-Gated-NetworksAttention UNet在UNet中引入注意力机制,在对编码器每个分辨率上的特征与解…![]() https://zhuanlan.zhihu.com/p/480384295
https://zhuanlan.zhihu.com/p/480384295
图像分割UNet系列------Attention Unet详解_gz7seven的博客-CSDN博客_attention unet图像分割unet系列------Attention Unet详解1、Attention Unet主要目标2、Attention Unet网络结构 Attention Unet发表于2018年中期(比Res-UNet要早一些),它也是UNet非常重要的改进版本之一。当然,Attention Unet同样也是应用在医学图像分割领域,不过文章主要是以胰脏图像分割进行实验与论证的。1、Attention Unet主要目标 作者在摘要与简介中很清楚的表明了要解决的问题以及要达到的目标。具体如下所示: https://gz7seven.blog.csdn.net/article/details/119612308?spm=1001.2101.3001.6650.6&utm_medium=distribute.pc_relevant.none-task-blog-2~default~BlogCommendFromBaidu~Rate-6-119612308-blog-118300513.pc_relevant_multi_platform_whitelistv3&depth_1-utm_source=distribute.pc_relevant.none-task-blog-2~default~BlogCommendFromBaidu~Rate-6-119612308-blog-118300513.pc_relevant_multi_platform_whitelistv3&utm_relevant_index=10
一、Attention Unet主要目标
- 抑制输入图像中的不相关区域,同时突出特定局部区域的显著特征;
- 用soft-attention 代替hard-attention的思路(注意:sorf-attention可微,可以微分的attention就可以通过神经网络算出梯度并且前向传播和后向反馈来学习得到attention的权重);
- 集成到标准UNet网络结构中时要简单方便、计算开销小,最重要的是提高模型的灵敏度和预测的精度。
二、Attention Unet网络结构
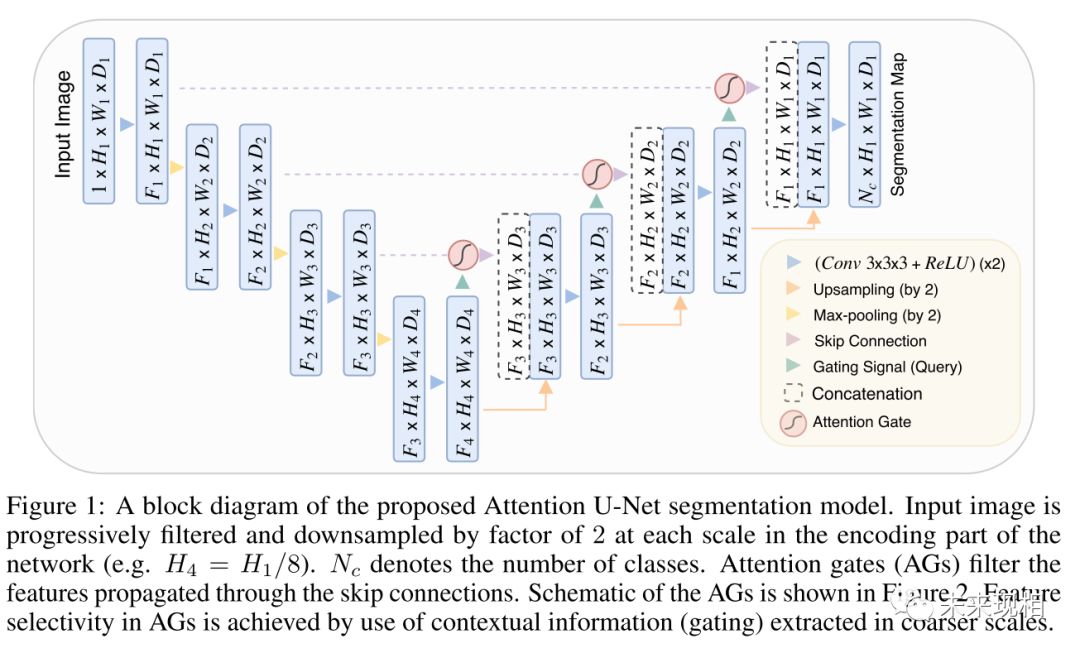
Attention UNet在UNet中引入注意力机制,在对编码器每个分辨率上的特征与解码器中对应特征进行拼接之前,使用了一个注意力模块,重新调整了编码器的输出特征。该模块生成一个门控信号,用来控制不同空间位置处特征的重要性,如下图中红色圆圈所示。
三、Attention Gate
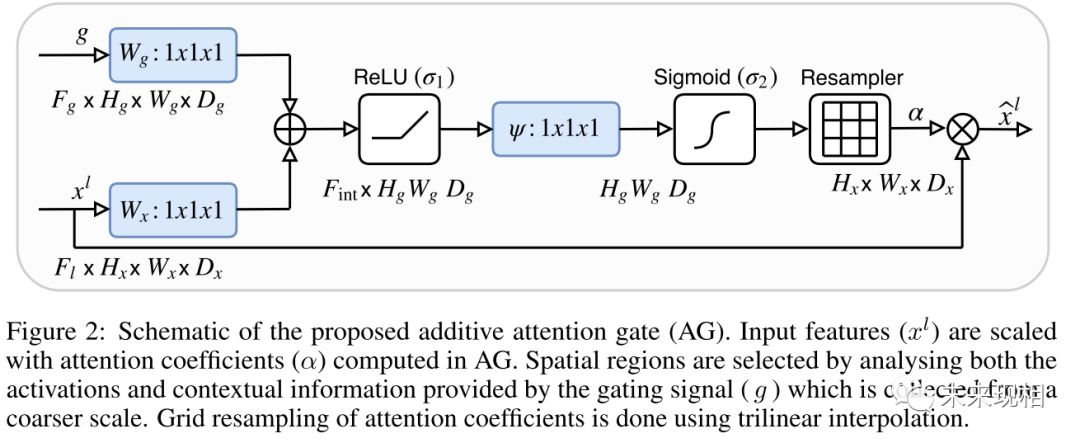
Attention Gate:AG通常用于自然图像分析、知识图和语言处理(NLP),用于图像字幕、机器翻译和分类任务。最初的工作是通过解释输出类分数相对于输入图像的梯度来探索注意图。另一方面,可训练的注意力是由设计强制执行的,并被分为hard-attention and soft-attention。
结合图1与图2可以很清楚的了解到Attention UNet网络结构的主要特点。从图1可以很清楚的看到解码部分feature map与其上一层的编码部分feature map作为AG的输入,经过AG后将结果cat上采样的解码部分feature map。

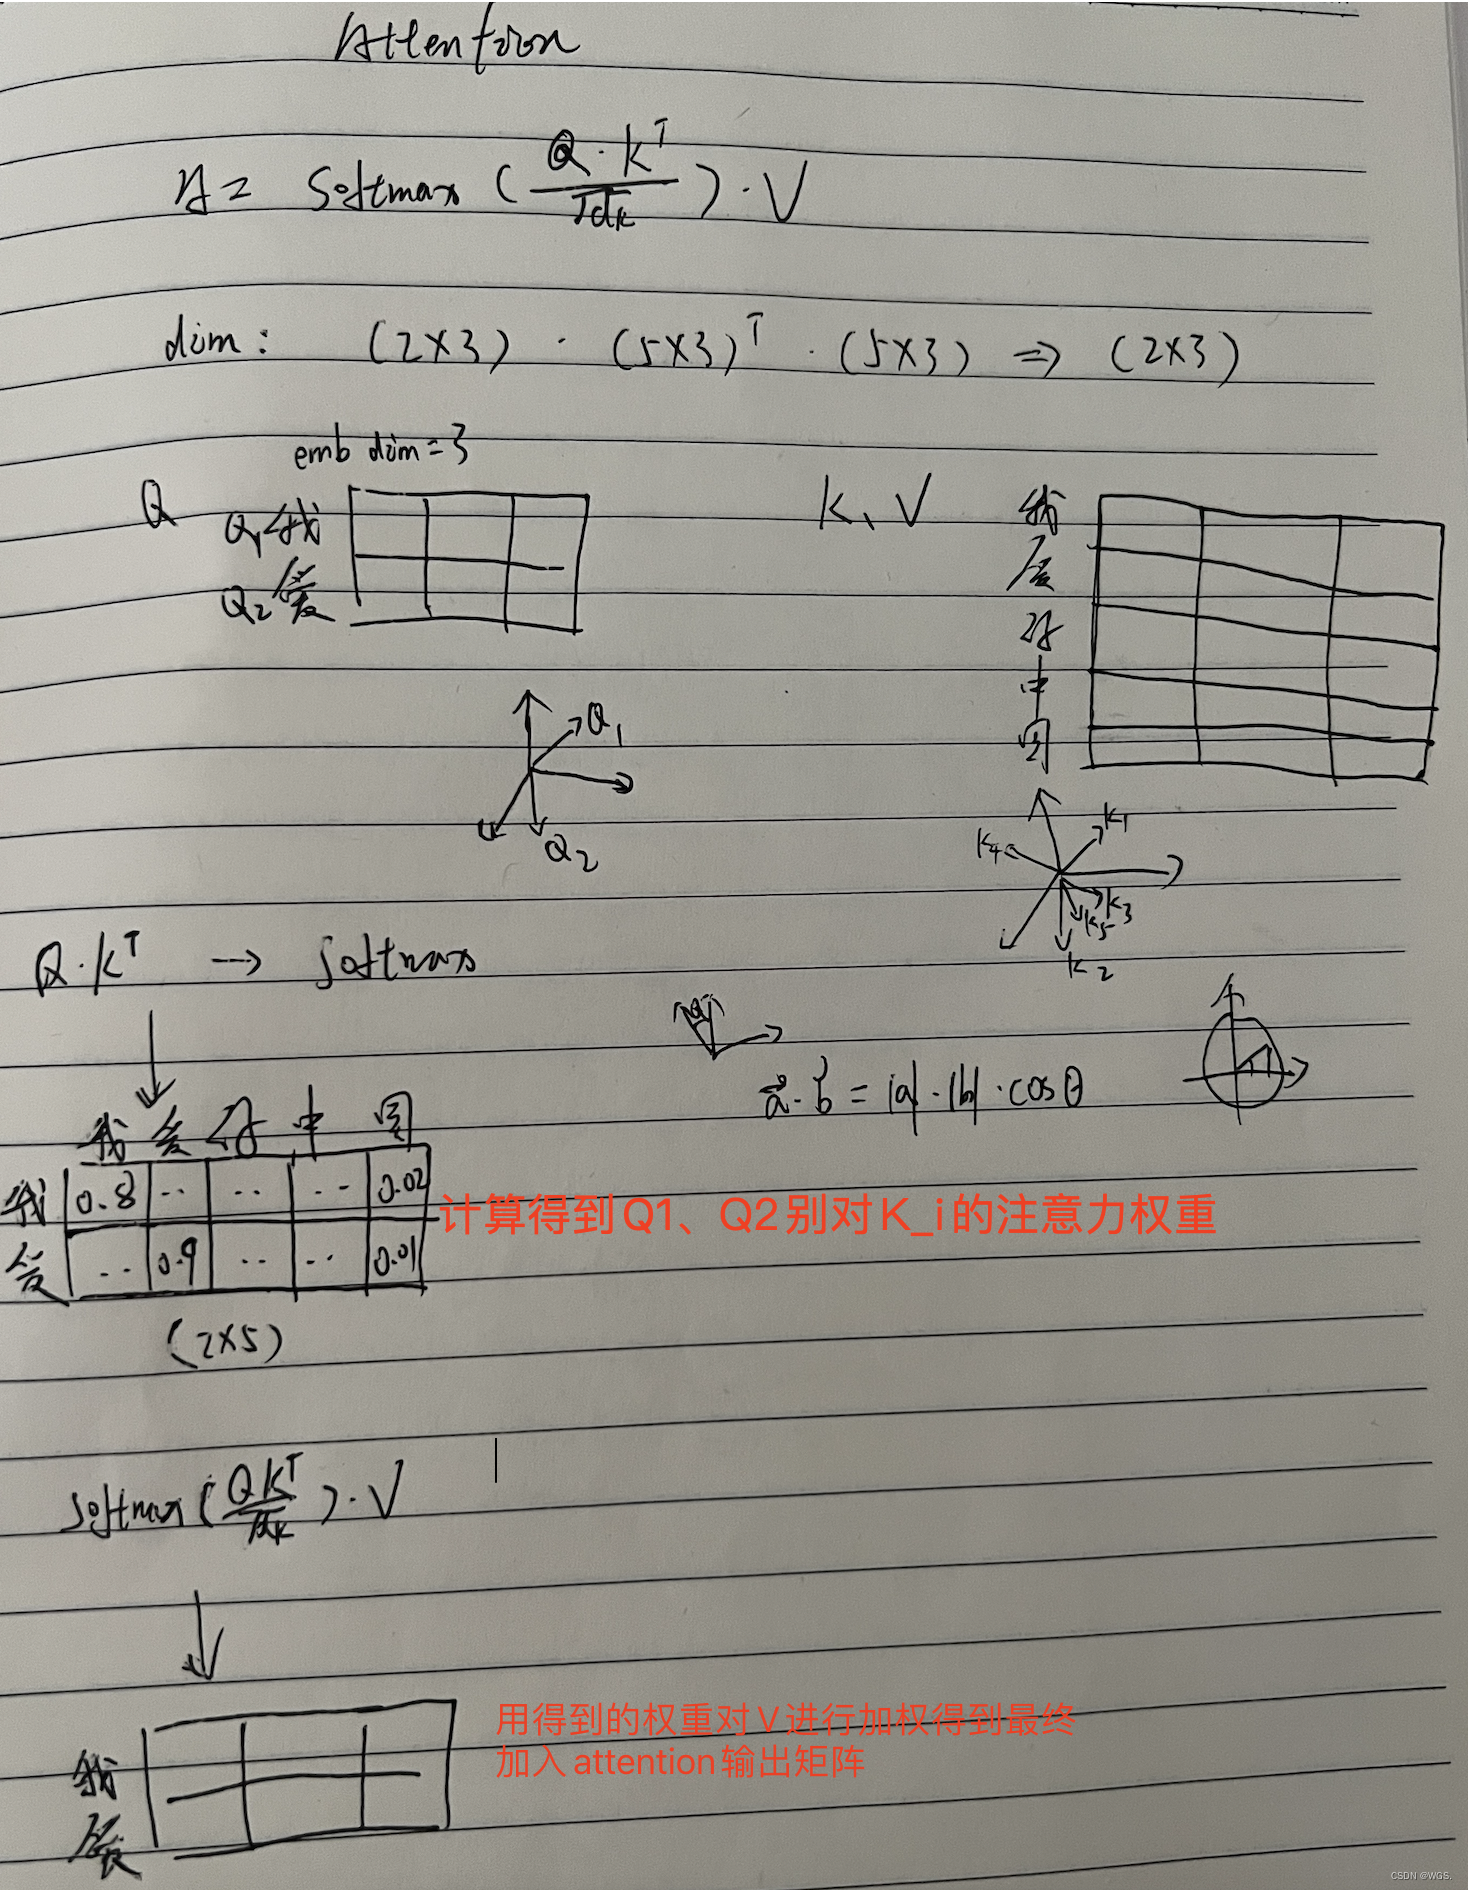
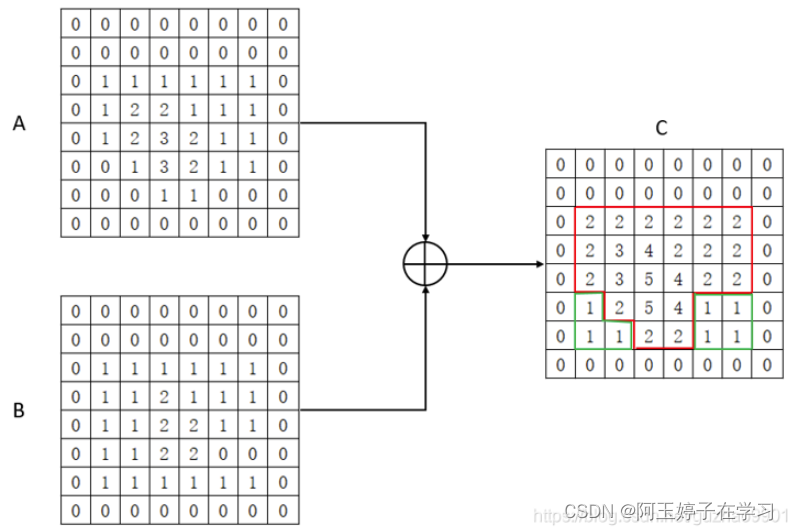
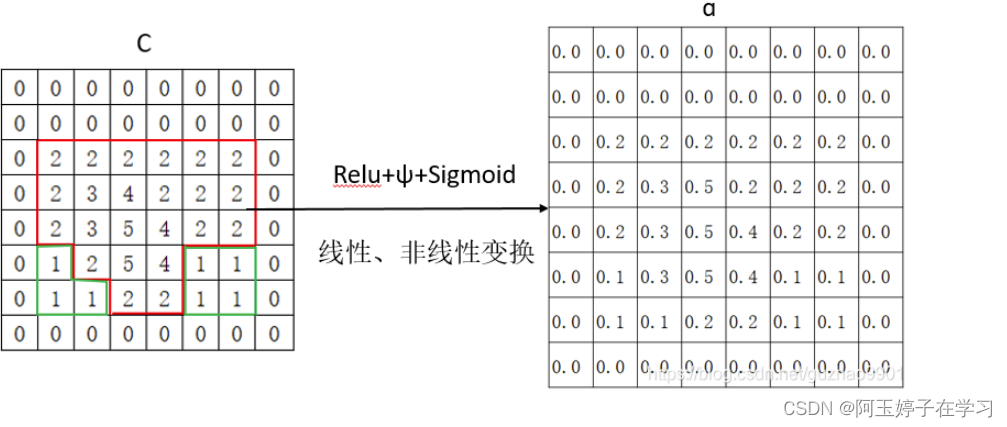
四、Attention Gate的本质
AG是如何做到提高局部(感兴趣区域ROI)特征抑制某些非感兴趣区域的呢?
![]()


五、代码实现
# python3
# @File: AttentionUNet3D.py
# --coding:utf-8--
# @Author:axjing
# 说明: For 3D Data Train
import torch
import torch.nn as nndef maxpool2x2(x):mp = nn.MaxPool3d(kernel_size=2, stride=2)x = mp(x)return x
class EncoderBlock(nn.Module):def __init__(self, in_channels, out_channels):super(EncoderBlock, self).__init__()self.encoder_block = nn.Sequential(nn.Conv3d(in_channels, out_channels, 3, padding=1, bias=False),nn.BatchNorm3d(num_features=out_channels),nn.ReLU(inplace=True),nn.Conv3d(out_channels, out_channels, 3, padding=1, bias=False),nn.BatchNorm3d(num_features=out_channels),nn.ReLU(inplace=True),# 原论文中是每层有两个卷积核进行下采样 https://arxiv.org/abs/1505.04597nn.Conv3d(out_channels, out_channels, 3, padding=1, bias=False),nn.BatchNorm3d(num_features=out_channels),nn.ReLU(inplace=True),)def forward(self, x):x = self.encoder_block(x)return xclass CenterBlock(nn.Module):def __init__(self, in_channels, out_channels):super(CenterBlock, self).__init__()mid_channels = int(in_channels * 2)self.center_block = nn.Sequential(nn.Conv3d(in_channels, mid_channels, 3, padding=1, bias=False),nn.BatchNorm3d(num_features=mid_channels),nn.ReLU(inplace=True),nn.Conv3d(int(in_channels * 2), mid_channels, 3, padding=1, bias=False),nn.BatchNorm3d(num_features=mid_channels),nn.ReLU(inplace=True),nn.ConvTranspose3d(mid_channels, out_channels, 4, stride=2, padding=1),nn.BatchNorm3d(num_features=out_channels),nn.ReLU(inplace=True),)def forward(self, x):x = self.center_block(x)return xclass DecoderBlock(nn.Module):def __init__(self, in_channels, out_channels):super(DecoderBlock, self).__init__()mid_channels = int(in_channels / 2)self.decoder_block = nn.Sequential(nn.Conv3d(in_channels, mid_channels, 3, padding=1, bias=False),nn.BatchNorm3d(num_features=mid_channels),nn.ReLU(inplace=True),nn.Conv3d(mid_channels, mid_channels, 3, padding=1, bias=False),nn.BatchNorm3d(num_features=mid_channels),nn.ReLU(inplace=True),nn.ConvTranspose3d(mid_channels, out_channels, 4, stride=2, padding=1),nn.BatchNorm3d(num_features=out_channels),nn.ReLU(inplace=True),)def forward(self, x):x = self.decoder_block(x)return xclass FinalBlock(nn.Module):def __init__(self, in_channels, out_channels):super(FinalBlock, self).__init__()mid_channels = int(in_channels / 2)self.final_block = nn.Sequential(nn.Conv3d(in_channels, mid_channels, 3, padding=1, bias=False),nn.BatchNorm3d(num_features=mid_channels),nn.ReLU(inplace=True),nn.Conv3d(mid_channels, mid_channels, 3, padding=1, bias=False),nn.BatchNorm3d(num_features=mid_channels),nn.ReLU(inplace=True),nn.Conv3d(mid_channels, out_channels, 1, bias=False),)def forward(self, x):x = self.final_block(x)return xclass AttentionGates3D(nn.Module):def __init__(self, F_g, F_l, F_int):super(AttentionGates3D, self).__init__()self.W_g = nn.Sequential(nn.Conv3d(F_l, F_int, kernel_size=1, stride=1, padding=0, bias=True),nn.BatchNorm3d(F_int))self.W_x = nn.Sequential(nn.Conv3d(F_g, F_int, kernel_size=1, stride=1, padding=0, bias=True),nn.BatchNorm3d(F_int))self.psi = nn.Sequential(nn.Conv3d(F_int, 1, kernel_size=1, stride=1, padding=0, bias=True),nn.BatchNorm3d(1),nn.Sigmoid())self.relu = nn.ReLU(inplace=True)def forward(self, g, x):g1 = self.W_g(g)x1 = self.W_x(x)psi = self.relu(g1 + x1)psi = self.psi(psi)out = x * psireturn outclass AttentionUNet3D(nn.Module):def __init__(self, in_channels, out_channels):super(AttentionUNet3D, self).__init__()# Encoder Partself.encoder1 = EncoderBlock(in_channels=in_channels, out_channels=64)self.encoder2 = EncoderBlock(in_channels=64, out_channels=128)self.encoder3 = EncoderBlock(in_channels=128, out_channels=256)self.encoder4 = EncoderBlock(in_channels=256, out_channels=512)# Center part.self.center = CenterBlock(in_channels=512, out_channels=512)# Decoder part.self.decoder4 = DecoderBlock(in_channels=1024, out_channels=256)self.decoder3 = DecoderBlock(in_channels=512, out_channels=128)self.decoder2 = DecoderBlock(in_channels=256, out_channels=64)# Final part.self.final = FinalBlock(in_channels=128, out_channels=out_channels)# Attention Gateself.att4 = AttentionGates3D(F_g=512, F_l=512, F_int=256)self.att3 = AttentionGates3D(F_g=256, F_l=256, F_int=128)self.att2 = AttentionGates3D(F_g=128, F_l=128, F_int=64)self.att1 = AttentionGates3D(F_g=64, F_l=64, F_int=32)def forward(self, x):# Encoding, compressive pathway.out_encoder1 = self.encoder1(x)out_endocer1_mp = maxpool2x2(out_encoder1)out_encoder2 = self.encoder2(out_endocer1_mp)out_endocer2_mp = maxpool2x2(out_encoder2)out_encoder3 = self.encoder3(out_endocer2_mp)out_endocer3_mp = maxpool2x2(out_encoder3)out_encoder4 = self.encoder4(out_endocer3_mp)# Decoding, expansive pathway.out_endocer4_mp = maxpool2x2(out_encoder4)out_center = self.center(out_endocer4_mp)out_att4 = self.att4(g=out_center, x=out_encoder4)out_decoder4 = self.decoder4(torch.cat((out_center, out_att4), 1))out_att3 = self.att3(g=out_decoder4, x=out_encoder3)out_decoder3 = self.decoder3(torch.cat((out_decoder4, out_att3), 1))out_att2 = self.att2(g=out_decoder3, x=out_encoder2)out_decoder2 = self.decoder2(torch.cat((out_decoder3, out_att2), 1))out_att1 = self.att1(g=out_decoder2, x=out_encoder1)out_final = self.final(torch.cat((out_decoder2, out_att1), 1))return out_finalif __name__ == '__main__':data_=torch.rand(1,1,64,64,64)model=AttentionUNet3D(in_channels=1,out_channels=2)print(model)out_data=model(data_)print(out_data.shape)print("*" * 30 + "\n |\t\tEnd Of Program\t\t|\n" + "*" * 30)
六、Attention Unet注意力机制是空间注意力还是通道注意力?
通道注意力和空间注意力,分别捕捉通道间的依赖关系和空间上的像素级关系,同时使用这两类注意力机制可以达到更好的效果(例如CBAM),但无疑增加了更多的计算量。
CBAM(convolutional block attention modules)是一个卷积块注意力模块,作用于输入图像,按照顺序将注意力机制应用于通道,然后是空间维度。CBAM的结果是一个加权的特征图,考虑了输入图像的通道和空间区域。