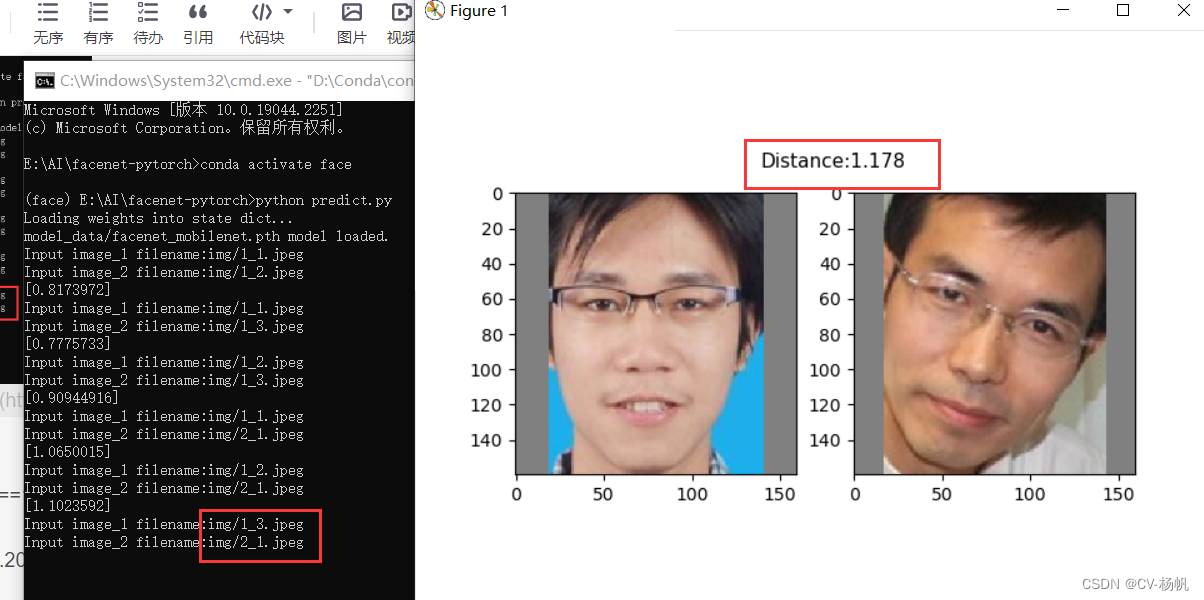
上一篇博文介绍了facenet的原理,这篇讲解一下代码的实现,对于facenet的代码目前也有写好的部分。具体见链接facenet代码实现 。大家可以通过git直接下载代码,然后运行里面的validata_on_lfw.py。输入对应的lfw数据的路径就可以检测模型对lfw数据的准确度。
validata_on_lfw.py中,主要是通过data/pairs.txt对lfw进行分对读取。并标记出每一对图片是不是一类。对于训练的结果计算其对应的距离并和给出的阀值进行比较,当距离小于给出的阀值时是一类,大于时不是一类。最后根据判断的结果和标记的结果计算对应的准确率和其他的值。
在该代码中通过(use_fixed_image_standardizatiion来控制采用固定值归一化(减去127.5然后除以128.0)),根据代码可以看出该处理并没有给use_fixed_image_standardizatiion赋值所以采用的是每张图片单独处理的方式。并且没有给crop赋值所以采用了resize_image_with_crop_or_pad的裁剪方式。同时准确度的计算方面才用看10折交叉交叉验证把输入的数据分成训练和测试在训练上找到一个合适的阀值(开始输入的阀值时0到4每隔0.01取一个),最后对测试数据采用找到的阀值计算准去度最后平均得到的。
另外在代码实现的过程中建议使用tf.cast(imag ,tf.float32)将读出的图片类型转换为float型,这样在进行去噪操作时会避免数值计算带来的误差。也会相应的提高准确度。

use_fixed_image_standardizationcluster.py:该程序主要是采用密度聚类的方式对提取出的特征进行聚类分析。对于这个文件大家可以运行一下,并且好好理解一下,可以帮助大家理解模型的使用。
对于项目中的代码,建议大家运行上述2个即可。然后根据自己的想法对模型结果进行自己的处理。我开始的时候把里面每个代码的实现过程都看了一遍,但是后来发现看完之后除了浪费时间没有别的其他作用。
基于该代码,我自己写了一个人脸的识别过程。主要是在图片中识别对应的每个人是谁。该问题主要分为两部分:第一标签的采集。首先对于输入的图片进行人脸对齐,将对齐之后的图片采用网络进行处理并将产生的向量和标签的名字存为对应的.npy文件方便后续的使用。具体如下:
from __future__ import absolute_import
from __future__ import division
from __future__ import print_functionfrom scipy import misc
import tensorflow as tf
import numpy as np
import os
import sys
import argparse
from facenetuse.use_model import until
from facenetuse.mtcnn import detect_face
from sklearn.cluster import DBSCAN
# 对标签文件中的图片进行处理,生成最终的标签和特征
# 最终返回一个二维数据对数组,第一个元素表示标签名字,第二个元素表示标签对应的特征向量def main(args):pnet, rnet, onet = create_network_face_detection()with tf.Graph().as_default():with tf.Session() as sess:until.load_model(args.model)# 从文件夹中读取数据生成对应的列表label, image_list = until.load_label_image_from_folder(args.data_dir)print(len(label))# print(image_list)# 采用MTCNN将读取的数据进行人脸检测,生成对应的大小的人脸数据images = until.align_data(image_list, args.image_size, args.margin, pnet, rnet, onet)# 定义模型中的输入和输出张量images_placeholder = sess.graph.get_tensor_by_name("input:0")embeddings = sess.graph.get_tensor_by_name("embeddings:0")phase_train_placeholder = sess.graph.get_tensor_by_name("phase_train:0")feed_dict = {images_placeholder: images, phase_train_placeholder: False}emb = sess.run(embeddings, feed_dict=feed_dict)np.save(os.path.join(args.output_dir, "label.npy"), label)np.save(os.path.join(args.output_dir, "emb.npy"), emb)def create_network_face_detection():with tf.Graph().as_default():sess = tf.Session()with sess.as_default():pnet, rnet, onet = detect_face.create_mtcnn(sess, None)return pnet, rnet, onetdef parse_arguments(argv):parser = argparse.ArgumentParser()parser.add_argument('--model', type=str,help='Either a directory containing the meta_file and ckpt_file or a model'' protobuf (.pb) file',)parser.add_argument('--data_dir', type=str,help='The directory containing the images to cluster into folders.',)parser.add_argument('--output_dir', type=str,help='The directory containing the images to cluster into folders.',)parser.add_argument('--image_size', type=int,help='Image size (height, width) in pixels.', default=160)parser.add_argument('--margin', type=int,help='Margin for the crop around the bounding box (height, width) in pixels.', default=44)parser.add_argument('--min_cluster_size', type=int,help='The minimum amount of pictures required for a cluster.', default=1)parser.add_argument('--cluster_threshold', type=float,help='The minimum distance for faces to be in the same cluster', default=1.0)parser.add_argument('--largest_cluster_only', action='store_true',help='This argument will make that only the biggest cluster is saved.')return parser.parse_args(argv)if __name__ == '__main__':main(parse_arguments(sys.argv[1:]))
对于输入的图片,采用相同的人脸对齐技术处理,然后对处理后的图片调用同样的网络生成对应的特征向量,并使用生成的特征向量和标签向量计算其对应的距离。选择距离最小的标签作为识别出来的结果。具体代码如下:
from __future__ import absolute_import
from __future__ import division
from __future__ import print_functionfrom scipy import misc
import tensorflow as tf
import numpy as np
import os
import sys
import argparse
from facenetuse.use_model import  until
from facenetuse.mtcnn import detect_face
from sklearn.cluster import DBSCAN
# 对文件夹内的图像进行读取,取出其对应的特征向量后并与标签中的特征向量
# 行比较,最终确定最终的图片类别def main(args):pnet, rnet, onet = create_network_face_detection()with tf.Graph().as_default():with tf.Session() as sess:until.load_model(args.model)# 从标签数据中读入对应的标签信息label = np.load(os.path.join(args.label_dir, "label.npy"))label_feature = np.load(os.path.join(args.label_dir, "emb.npy"))print(label.shape)print(label_feature.shape)# 从文件夹中读取数据生成对应的列表image_list, _ = until.load_images_from_folder(args.data_dir)# 采用MTCNN将读取的数据进行人脸检测,生成对应的大小的人脸数据images = until.align_data(image_list, args.image_size, args.margin, pnet, rnet, onet)# 定义模型中的输入和输出张量images_placeholder = sess.graph.get_tensor_by_name("input:0")embeddings = sess.graph.get_tensor_by_name("embeddings:0")phase_train_placeholder = sess.graph.get_tensor_by_name("phase_train:0")feed_dict = {images_placeholder: images, phase_train_placeholder: False}emb = sess.run(embeddings, feed_dict=feed_dict)print(emb.shape)# 后续均为对模型算出的数据进行的处理nrof_images = len(images)label_num = label.shape[0]matrix = np.zeros((nrof_images, label_num))# Print distance matrixprint('Distance matrix')for i in range(nrof_images):for j in range(label_num):dist = np.sqrt(np.sum(np.square(np.subtract(emb[i, :], label_feature[j, :]))))matrix[i][j] = distprint('  %1.4f  ' % dist, end='')print()for i in range(nrof_images):list_dir = matrix[i, :]min_dir = np.min(list_dir)index = np.where(min_dir == list_dir)[0]print(label[index])def create_network_face_detection():with tf.Graph().as_default():sess = tf.Session()with sess.as_default():pnet, rnet, onet = detect_face.create_mtcnn(sess, None)return pnet, rnet, onetdef parse_arguments(argv):parser = argparse.ArgumentParser()parser.add_argument('--model', type=str,help='Either a directory containing the meta_file and ckpt_file or a model'' protobuf (.pb) file',)parser.add_argument('--data_dir', type=str,help='The directory containing the images to cluster into folders.',)parser.add_argument('--out_dir', type=str,help='The output directory where the image clusters will be saved.',)parser.add_argument('--label_dir', type=str,help='The directory containing the images to cluster into folders.',')parser.add_argument('--image_size', type=int,help='Image size (height, width) in pixels.', default=160)parser.add_argument('--margin', type=int,help='Margin for the crop around the bounding box (height, width) in pixels.', default=44)parser.add_argument('--min_cluster_size', type=int,help='The minimum amount of pictures required for a cluster.', default=1)parser.add_argument('--cluster_threshold', type=float,help='The minimum distance for faces to be in the same cluster', default=1.0)parser.add_argument('--largest_cluster_only', action='store_true',help='This argument will make that only the biggest cluster is saved.')return parser.parse_args(argv)if __name__ == '__main__':main(parse_arguments(sys.argv[1:]))
经过上述两步的处理就可以识别自己的图片了。当然也可以使用结果对图片进行其他的操作,无论进行什么样的操作其实就和模型本身没有关系了。主要是对特征向量的处理。
注意:
1. 在识别过程中,我们发现图片经过处理后生成的特征向量是512维,不是128维,不知道是不是和选取的模型有关
2. 阀值的选取:在validata_on_lfw实现的过程中,阀值并不是1.1,而是在0-4每隔0.01进行切分,利用分出来的值分别作为阀值进行准确率的计算,最终选择准确率最大的阀值作为分类的依据。该值是1.23。所以在平时使用过程中当数据量较大时也可以借鉴该方法;数据量较小时可以选取最小的值作为阀值(此时最小是指生成的标签向量之间的距离最小)。