利用MTCNN和facenet实现人脸检测和人脸识别
人脸检测和人脸识别技术算是目前人工智能方面应用最成熟的技术了。本博客将利用mtcnn和faceNet搭建一个实现人脸检测和人脸识别的系统。基本思路也很简单,先利用mtcnn的进行人脸检测,当然也可以使用其他的人脸检测方法,如Dilb,OpenCV,OpenFace人脸检测等等,然后再利用faceNet进行人脸识别,faceNet可简单看成是提取人脸特征的CNN网络,这个特征就是embadding了,有了人脸特征embadding,最后一步,就只需要与数据库人脸特征进行相似性比较,即可完成人脸识别的任务。
老规矩,先上Github源码:记得给个“Star”哦,不然,对不起我的苦劳!!!!
本博客Github源码: Face_Detection_Recognition/faceRecognition at master · PanJinquan/Face_Detection_Recognition · GitHub
FaceNet的人脸识别效果并不算好,相比InsightFace(ArcFace)模型,就差很多。目前使用InsightFace模型测试,在开数据集可以达到99.6%,在自建的数据集可以达到93%的准确率,比虹软的人脸识别率还高一点,关于InsightFace(ArcFace)模型的项目,请参考:人脸识别2:Python实现人脸识别Face Recognition(含源码)
目录
利用MTCNN和facenet实现人脸检测和人脸识别
一、项目结构:
二、实现流程
三、Multi-task CNN(MTCNN)人脸检测
四、faceNet人脸识别
五、产生数据库
(1)制作人脸数据图库:
(2)生成embedding数据库
六、人脸识别过程
(1)加载人脸数据库
(2)进行人脸检测
(3)人脸识别(比较相似性)
(4)人脸识别效果
七、模型测评
八、参考资料:
一、项目结构:

打开FaceNet Github地址: GitHub - davidsandberg/facenet: Face recognition using Tensorflow,把我们需要的文件拷贝到自己独立的工程中,(1)align文件夹,(2)facenet.py文件:
align:这个文件夹是从facenet中拷贝的,https://github.com/davidsandberg/facenet/tree/master/src/align,主要是MTCNN人脸检测的相关文件
facenet.py:这个Python文件也是从facenet中拷贝的,https://github.com/davidsandberg/facenet/blob/master/src/facenet.py
其他文件介绍
dataset:这个文件夹主要存放数据,如人脸数据库
utils:这个文件是工具类文件,用于文件读写,图像相关操作的函数方法等
models:存放facenet预训练模型,百度网盘下载地址:链接: https://pan.baidu.com/s/1hAK9ylURkbeH52BtSSGWsw 提取码: jf1n
Pre-trained models:
Model name LFW accuracy Training dataset Architecture 20180408-102900 0.9905 CASIA-WebFace Inception ResNet v1 20180402-114759 0.9965 VGGFace2 Inception ResNet v1 NOTE: If you use any of the models, please do not forget to give proper credit to those providing the training dataset as well.
二、实现流程
1.通过MTCNN人脸检测模型,从照片中提取人脸图像。
2.把人脸图像输入到FaceNet,计算Embedding的特征向量。
3.比较特征向量间的欧式距离,判断是否为同一人,例如当特征距离小于1的时候认为是同一个人,特征距离大于1的时候认为是不同人。

三、Multi-task CNN(MTCNN)人脸检测
人脸检测方法很多,如Dilb,OpenCV,OpenFace人脸检测等等,这里使用MTCNN进行人脸检测,一方面是因为其检测精度确实不错,另一方面facenet工程中,已经提供了用于人脸检测的mtcnn接口。 MTCNN是多任务级联CNN的人脸检测深度学习模型,该模型中综合考虑了人脸边框回归和面部关键点检测。在facenet工程中的位置是align/detect_face.py ,它的参数模型也保存在align文件夹下,分别是det1.npy,det2.npy,det3.npy。
参考资料:
人脸检测(三)——Multi-task CNN(MTCNN)_Daisy_HJL的博客-CSDN博客
人脸检测MTCNN详解_放牛娃不吃草的博客-CSDN博客
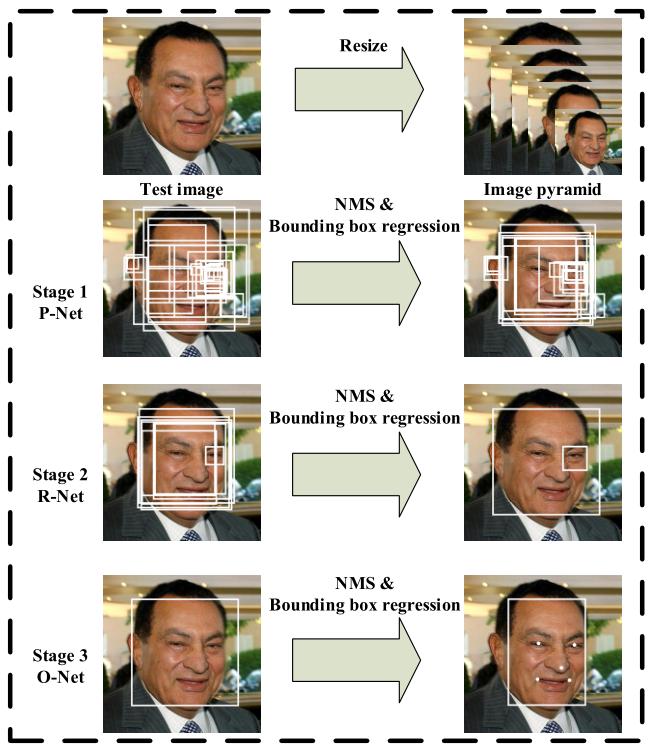
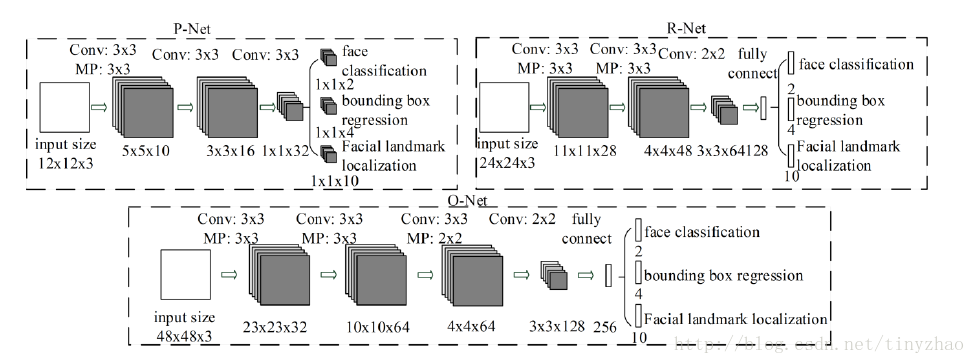
MTCNN一个深度卷积多任务的框架,这个框架利用了检测和对准之间固有的关系来增强他们的性能。特别是,在预测人脸及脸部标记点的时候,通过3个CNN级联的方式对任务进行从粗到精的处理。
Stage 1:使用P-Net是一个全卷积网络,用来生成候选窗和边框回归向量(bounding box regression vectors)。使用Bounding box regression的方法来校正这些候选窗,使用非极大值抑制(NMS)合并重叠的候选框。全卷积网络和Faster R-CNN中的RPN一脉相承。
Stage 2:使用R-Net改善候选窗。将通过P-Net的候选窗输入R-Net中,拒绝掉大部分false的窗口,继续使用Bounding box regression和NMS合并。
Stage 3:最后使用O-Net输出最终的人脸框和特征点位置。和第二步类似,但是不同的是生成5个特征点位置。
这里提供一个使用MTCNN进行人脸检测的方法:
def detection_face(img):minsize = 20 # minimum size of facethreshold = [0.6, 0.7, 0.7] # three steps's thresholdfactor = 0.709 # scale factorprint('Creating networks and loading parameters')with tf.Graph().as_default():# gpu_memory_fraction = 1.0# gpu_options = tf.GPUOptions(per_process_gpu_memory_fraction=gpu_memory_fraction)# sess = tf.Session(config=tf.ConfigProto(gpu_options=gpu_options, log_device_placement=False))sess = tf.Session()with sess.as_default():pnet, rnet, onet = detect_face.create_mtcnn(sess, None)bboxes, landmarks = detect_face.detect_face(img, minsize, pnet, rnet, onet, threshold, factor)landmarks = np.transpose(landmarks)bboxes = bboxes.astype(int)bboxes = [b[:4] for b in bboxes]landmarks_list=[]for landmark in landmarks:face_landmarks = [[landmark[j], landmark[j + 5]] for j in range(5)]landmarks_list.append(face_landmarks)return bboxes,landmarks_list当然,实际应用中,建议还是封装成一个类吧,方面初始化和单独调用:
注意:mtcnn人脸检测获得bboxes并不一定是正方形的矩形框,参数fixed指定等宽或者等高的bboxes,其实现方法可以参考get_square_bboxes()方法。当然啦,你也可以不调用get_square_bboxes()方法,直接resize成指定大小,也是OK的。
class Facedetection:def __init__(self):self.minsize = 30 # minimum size of faceself.threshold = [0.6, 0.7, 0.7] # three steps's thresholdself.factor = 0.709 # scale factorprint('Creating networks and loading parameters')with tf.Graph().as_default():# gpu_memory_fraction = 1.0# gpu_options = tf.GPUOptions(per_process_gpu_memory_fraction=gpu_memory_fraction)# sess = tf.Session(config=tf.ConfigProto(gpu_options=gpu_options, log_device_placement=False))sess = tf.Session()with sess.as_default():self.pnet, self.rnet, self.onet = detect_face.create_mtcnn(sess, None)def detect_face(self,image,fixed=None):'''mtcnn人脸检测,PS:人脸检测获得bboxes并不一定是正方形的矩形框,参数fixed指定等宽或者等高的bboxes:param image::param fixed::return:'''bboxes, landmarks = detect_face.detect_face(image, self.minsize, self.pnet, self.rnet, self.onet, self.threshold, self.factor)landmarks_list = []landmarks=np.transpose(landmarks)bboxes=bboxes.astype(int)bboxes = [b[:4] for b in bboxes]for landmark in landmarks:face_landmarks = [[landmark[j], landmark[j + 5]] for j in range(5)]landmarks_list.append(face_landmarks)if fixed is not None:bboxes,landmarks_list=self.get_square_bboxes(bboxes, landmarks_list, fixed)return bboxes,landmarks_listdef get_square_bboxes(self, bboxes, landmarks, fixed="height"):'''获得等宽或者等高的bboxes:param bboxes::param landmarks::param fixed: width or height:return:'''new_bboxes = []for bbox in bboxes:x1, y1, x2, y2 = bboxw = x2 - x1h = y2 - y1center_x, center_y = (int((x1 + x2) / 2), int((y1 + y2) / 2))if fixed == "height":dd = h / 2elif fixed == 'width':dd = w / 2x11 = int(center_x - dd)y11 = int(center_y - dd)x22 = int(center_x + dd)y22 = int(center_y + dd)new_bbox = (x11, y11, x22, y22)new_bboxes.append(new_bbox)return new_bboxes, landmarks四、faceNet人脸识别
FaceNet Github地址: https://github.com/davidsandberg/facenet
参考资料:人脸识别系列(六):FaceNet_Fire_Light_的博客-CSDN博客
Google工程师Florian Schroff,Dmitry Kalenichenko,James Philbin提出了人脸识别FaceNet模型,该模型没有用传统的softmax的方式去进行分类学习,而是抽取其中某一层作为特征,学习一个从图像到欧式空间的编码方法,然后基于这个编码再做人脸识别、人脸验证和人脸聚类等。
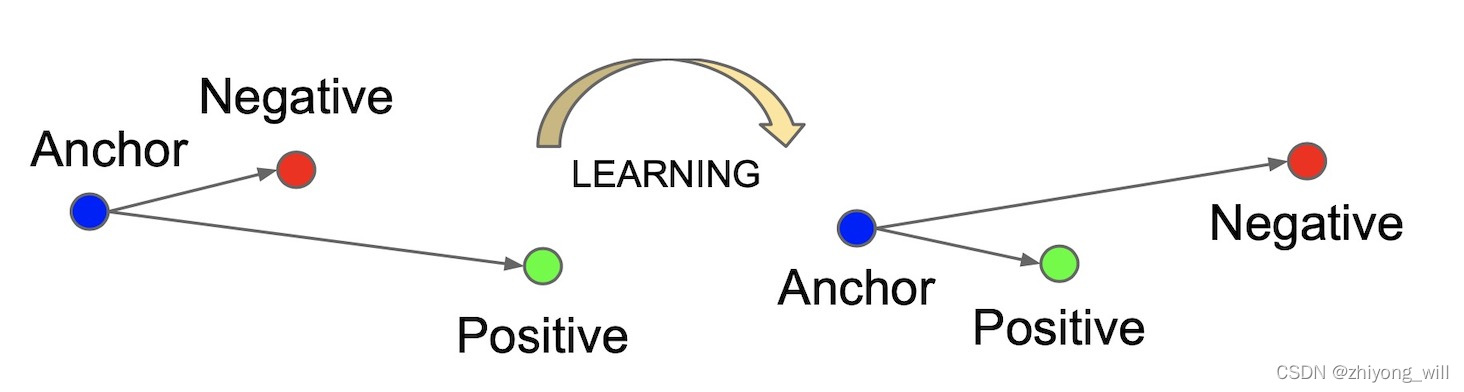
FaceNet主要用于验证人脸是否为同一个人,通过人脸识别这个人是谁。FaceNet的主要思想是把人脸图像映射到一个多维空间,通过空间距离表示人脸的相似度。同个人脸图像的空间距离比较小,不同人脸图像的空间距离比较大。这样通过人脸图像的空间映射就可以实现人脸识别,FaceNet中采用基于深度神经网络的图像映射方法和基于triplets(三联子)的loss函数训练神经网络,网络直接输出为128维度的向量空间。
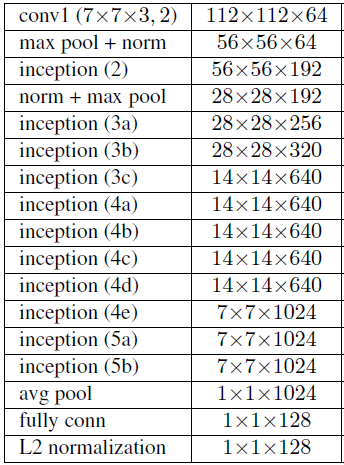
FaceNet的网络结构如下图所示,其中Batch表示人脸的训练数据,接下来是深度卷积神经网络,然后采用L2归一化操作,得到人脸图像的特征表示,最后为三元组(Triplet Loss)的损失函数。

下面是鄙人已经封装好的facenetEmbedding类,其中类函数get_embedding(self,images)方法用于提取facenet的人脸特征embadding,有了人脸embadding特征,就可以比较人脸相似性啦!
class facenetEmbedding:def __init__(self,model_path):self.sess = tf.InteractiveSession()self.sess.run(tf.global_variables_initializer())# Load the modelfacenet.load_model(model_path)# Get input and output tensorsself.images_placeholder = tf.get_default_graph().get_tensor_by_name("input:0")self.tf_embeddings = tf.get_default_graph().get_tensor_by_name("embeddings:0")self.phase_train_placeholder = tf.get_default_graph().get_tensor_by_name("phase_train:0")def get_embedding(self,images):feed_dict = {self.images_placeholder: images, self.phase_train_placeholder: False}embedding = self.sess.run(self.tf_embeddings, feed_dict=feed_dict)return embeddingdef free(self):self.sess.close()五、产生数据库
既然是人脸识别,数据库肯定要有已知人脸的数据库,不然怎么知道被检测的人脸是哪位大神,所以先制作人脸数据库。
(1)制作人脸数据图库:
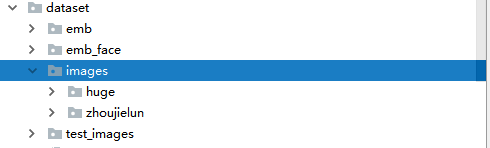
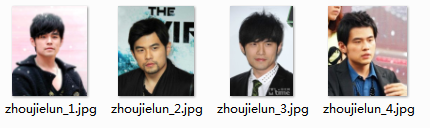
把相关大神的人像收集放在dataset/images文件夹下:

特别说明:
- 这里只收集了4张胡歌和4张周杰伦的单人照片,
- 注意制作人脸数据图库时,所使用的照片必须是单人照片!!!
- 若需要新增图库,只需在dataset/images下,新建一个文件夹,如,新增“xietingfeng”(谢霆锋)的文件夹,然后把谢霆锋的单人照片放在里面即可,图片名称可以是任意
- 函数image_list,names_list=file_processing.gen_files_labels(images_dir,postfix='jpg')可以获取目录images_dir下所有文件,包括子目录下的所有文件路径(image_list),其中names_list就是子目录的文件名,一般子目录作为样本的标签。
(2)生成embedding数据库
有了人脸数据图库,就可以使用create_dataset.py生成embedding数据库(人脸特征),后面待检测识别的人脸,只需要与这些embedding数据库(人脸特征)进行相似性比较,就可以识别人脸啦!!!!
opencv-python的imread()函数并不支持中文路径,这里在提供一个函数read_image_gbk()方便读取中文路径的图像。详细请看image_processing.py文件
# -*-coding: utf-8 -*-
"""@Project: faceRecognition@File   : create_dataset.py@Author : panjq@E-mail : pan_jinquan@163.com@Date   : 2018-12-07 11:31:09
"""
import numpy as np
from utils import image_processing , file_processing,debug
import face_recognition
import cv2
import osresize_width = 160
resize_height = 160def get_face_embedding(model_path,files_list, names_list):'''获得embedding数据:param files_list: 图像列表:param names_list: 与files_list一一的名称列表:return:'''# 转换颜色空间RGB or BGRcolorSpace="RGB"# 初始化mtcnn人脸检测face_detect = face_recognition.Facedetection()# 初始化facenetface_net = face_recognition.facenetEmbedding(model_path)embeddings=[] # 用于保存人脸特征数据库label_list=[] # 保存人脸label的名称,与embeddings一一对应for image_path, name in zip(files_list, names_list):print("processing image :{}".format(image_path))# image_path='E:/Face/dataset/bzl/subjectphoto_with_name/谢伟林_179_180.jpg'image = image_processing.read_image_gbk(image_path, colorSpace=colorSpace)# 进行人脸检测,获得bounding_boxbboxes, landmarks = face_detect.detect_face(image)bboxes, landmarks =face_detect.get_square_bboxes(bboxes, landmarks,fixed="height")# image_processing.show_image_boxes("image",image,bboxes)if bboxes == [] or landmarks == []:print("-----no face")continueif len(bboxes) >= 2 or len(landmarks) >= 2:print("-----image have {} faces".format(len(bboxes)))continue# 获得人脸区域face_images = image_processing.get_bboxes_image(image, bboxes, resize_height, resize_width)# 人脸预处理,归一化face_images = image_processing.get_prewhiten_images(face_images,normalization=True)# 获得人脸特征pred_emb = face_net.get_embedding(face_images)embeddings.append(pred_emb)# 可以选择保存image_list或者names_list作为人脸的标签# 测试时建议保存image_list,这样方便知道被检测人脸与哪一张图片相似# label_list.append(image_path)label_list.append(name)return embeddings,label_listdef create_face_embedding(model_path,dataset_path,out_emb_path,out_filename):''':param model_path: faceNet模型路径:param dataset_path: 人脸数据库路径,每一类单独一个文件夹:param out_emb_path: 输出embeddings的路径:param out_filename: 输出与embeddings一一对应的标签:return: None'''files_list,names_list=file_processing.gen_files_labels(dataset_path,postfix='jpg')embeddings,label_list=get_face_embedding(model_path,files_list, names_list)print("label_list:{}".format(label_list))print("have {} label".format(len(label_list)))embeddings=np.asarray(embeddings)np.save(out_emb_path, embeddings)file_processing.write_data(out_filename, label_list, model='w')if __name__ == '__main__':model_path = 'models/20180408-102900'dataset_path='dataset/images'out_emb_path = 'dataset/emb/faceEmbedding.npy'out_filename = 'dataset/emb/name.txt'
六、人脸识别过程
(1)加载人脸数据库
把上面制作的,已知的人脸数据库加载进来:
def load_dataset(dataset_path,filename):'''加载人脸数据库:param dataset_path: embedding.npy文件(faceEmbedding.npy):param filename: labels文件路径路径(name.txt):return:'''compare_emb=np.load(dataset_path)names_list=file_processing.read_data(filename,split=False)return compare_emb,names_list(2)进行人脸检测
def face_recognition_image(model_path,dataset_path, filename,image_path):# 加载数据库的数据dataset_emb,names_list=load_dataset(dataset_path, filename)# 初始化mtcnn人脸检测face_detect=face_recognition.Facedetection()# 初始化facenetface_net=face_recognition.facenetEmbedding(model_path)image = image_processing.read_image_gbk(image_path)# 获取 判断标识 bounding_box crop_imagebboxes, landmarks = face_detect.detect_face(image)bboxes, landmarks = face_detect.get_square_bboxes(bboxes, landmarks, fixed="height")if bboxes == [] or landmarks == []:print("-----no face")exit(0)print("-----image have {} faces".format(len(bboxes)))face_images = image_processing.get_bboxes_image(image, bboxes, resize_height, resize_width)face_images = image_processing.get_prewhiten_images(face_images)pred_emb=face_net.get_embedding(face_images)pred_name,pred_score=compare_embadding(pred_emb, dataset_emb, names_list)# 在图像上绘制人脸边框和识别的结果show_info=[ n+':'+str(s)[:5] for n,s in zip(pred_name,pred_score)]image_processing.show_image_text("face_recognition", image,bboxes,show_info)(3)人脸识别(比较相似性)
比较特征向量间的欧式距离
def compare_embadding(pred_emb, dataset_emb, names_list,threshold=0.65):# 为bounding_box 匹配标签pred_num = len(pred_emb)dataset_num = len(dataset_emb)pred_name = []pred_score=[]for i in range(pred_num):dist_list = []for j in range(dataset_num):dist = np.sqrt(np.sum(np.square(np.subtract(pred_emb[i, :], dataset_emb[j, :]))))dist_list.append(dist)min_value = min(dist_list)pred_score.append(min_value)if (min_value > threshold):pred_name.append('unknow')else:pred_name.append(names_list[dist_list.index(min_value)])return pred_name,pred_score
(4)人脸识别效果
一切准备好了,开始run:
if __name__=='__main__':model_path='models/20180408-102900'dataset_path='dataset/emb/faceEmbedding.npy'filename='dataset/emb/name.txt'image_path='dataset/test_images/1.jpg'face_recognition_image(model_path, dataset_path, filename,image_path)说明:
为了方便测试, 这里以文件的路径作为人脸label,这样方便知道被检测人脸与哪一张图片最相似
./dataset/emb_face\huge\huge_1.jpg
./dataset/emb_face\huge\huge_2.jpg
./dataset/emb_face\huge\huge_3.jpg
./dataset/emb_face\huge\huge_4.jpg
./dataset/emb_face\zhoujielun\zhoujielun_1.jpg
./dataset/emb_face\zhoujielun\zhoujielun_2.jpg
./dataset/emb_face\zhoujielun\zhoujielun_3.jpg
./dataset/emb_face\zhoujielun\zhoujielun_4.jpg对应的label是:
huge
huge
huge
huge
zhoujielun
zhoujielun
zhoujielun
zhoujielun

七、模型测评
为了对faceNed性能进行测评,这里提供一个测评文件:evaluation_test.py,该文件会绘制测试文件的ROC曲线,并给出最优阈值,以及FPR, TPR, AUC等参数。
这里的测试数据集是agedb_30,该数据集共有12000张,分为6000对照片,每对照片有一个label,即True和False,对应1和0,表示该对照片是否是同一个人;利用该数据集,就可以绘制模型的ROC曲线了
# -*- coding: utf-8 -*-import os
import pickle
from utils import image_processing,file_processing,evaluation
import cv2
import PIL.Image as Image
import numpy as np
import matplotlib.pyplot as plt
from sklearn import metrics
import face_recognitiondef load_npy(dir_path):issames_path=os.path.join(dir_path,"issames.npy")pred_score_path=os.path.join(dir_path,"pred_score.npy")issames=np.load(issames_path)pred_score=np.load(pred_score_path)return pred_score,issamesdef load_bin(path, image_size=[112,112]):'''加载人脸bin文件数据,bin_files = ['agedb_30', 'cfp_fp', 'lfw', 'calfw', 'cfp_ff', 'cplfw', 'vgg2_fp']:param path::param image_size::return:'''bins, issame_list = pickle.load(open(path, 'rb'), encoding='bytes')data=[]for i in range(len(bins)):_bin = bins[i]img = cv2.imdecode(_bin, -1) # opencv image is bgrimg = image_processing.resize_image(img,resize_height=image_size[0],resize_width=image_size[1])# image_processing.show_image("src",img)data.append(img)i += 1if i % 1000 == 0:print('loading bin', i)data = np.array(data)issames = np.array(issame_list)return data, issamesdef split_data(data):'''按照奇偶项分割数据:param data::return:'''data1 = data[0::2]data2 = data[1::2]return data1,data2def get_pair_scores(faces_data, issames_data, model_path, save_path=None):'''计算分数:param faces_data::param issames_data::param model_path: insightFace模型路径:param save_path::return:'''faces_list1,faces_list2 = split_data(faces_data)face_net=face_recognition.facenetEmbedding(model_path)pred_score=[]i=0for face1,face2,issame in zip(faces_list1, faces_list2, issames_data):# pred_id, pred_scores = faceRec.predict(faces)# 或者使用get_faces_embedding()获得embedding,再比较compare_embedding()face_images1 = image_processing.get_prewhiten_images([face1],normalization=False)face_images2 = image_processing.get_prewhiten_images([face2],normalization=False)face_emb1=face_net.get_embedding(face_images1)face_emb2=face_net.get_embedding(face_images2)# face_emb1 = face_net.get_faces_embedding([face1])# face_emb2 = face_net.get_faces_embedding([face2])dist = np.sqrt(np.sum(np.square(np.subtract(face_emb1, face_emb2))))pred_score.append(dist)i += 1if i % 100 == 0:print('processing data :', i)pred_score=np.array(pred_score).reshape(-1)issames_data= issames_data + 0 # 将true和false转为1/0if save_path is not None:issames_path = os.path.join(save_path, "issames.npy")pred_score_path = os.path.join(save_path, "pred_score.npy")np.save(issames_path, issames_data)np.save(pred_score_path,pred_score)return pred_score, issames_dataif __name__=='__main__':# bin_files = ['agedb_30', 'cfp_fp', 'lfw', 'calfw', 'cfp_ff', 'cplfw', 'vgg2_fp']bin_path='./dataset/faces_emore/agedb_30.bin'model_path = './models/20180408-102900'# 加载bin测试数据faces_data, issames_data=load_bin(bin_path,image_size=[160,160])# 计算分数save_path="./dataset/faces_emore"pred_score, issames_data=get_pair_scores(faces_data, issames_data, model_path, save_path=save_path)pred_score, issames_data=load_npy(dir_path=save_path)# 计算roc曲线fpr, tpr, roc_auc, threshold, optimal_idx=evaluation.get_roc_curve(y_true=issames_data, y_score=pred_score, invert=True, plot_roc=True)print("fpr:{}".format(fpr))print("tpr:{}".format(tpr))print("threshold:{}".format(threshold))print("roc_auc:{}".format(roc_auc))print("optimal_idx :{},best_threshold :{} ".format(optimal_idx,threshold[optimal_idx]))# 测评数据保存evaluation.save_evaluation(fpr, tpr, roc_auc, "evaluation.npz")# 加载测评数据fpr, tpr, roc_auc=evaluation.load_evaluation("evaluation.npz")evaluation.plot_roc_curve(fpr_list=[fpr], tpr_list=[tpr], roc_auc_list=[roc_auc], line_names=["FaceNet"])
对应的ROC曲线如下:optimal_idx :1038,最佳阈值:best_threshold :1.1444087028503418 
FaceNet的人脸识别效果并不算好,相比InsightFace模型,就差很多。目前使用InsightFace模型测试,在开数据集可以达到99.6%,在自建的数据集可以达到93%的准确率,比虹软的人脸识别率还高一点,关于InsightFace模型的项目,我还在整理,网友慢慢期待哈,不急!
八、参考资料:
【1】《如何应用MTCNN和FaceNet模型实现人脸检测及识别》如何应用MTCNN和FaceNet模型实现人脸检测及识别-人工智能
如果你觉得该帖子帮到你,还望贵人多多支持,鄙人会再接再厉,继续努力的~