本文为转载。
作者 :万境绝尘 转载请著名出处
eclipse 自带的 LogCat 工具太垃圾了, 开始用 adb logcat 在终端查看日志;
1. 解析 adb logcat 的帮助信息
在命令行中输入 adb logcat --help 命令, 就可以显示该命令的帮助信息;
- octopus@octopus:~$ adb logcat --help
- Usage: logcat [options] [filterspecs]
- options include:
- -s Set default filter to silent.
- Like specifying filterspec '*:s'
- -f <filename> Log to file. Default to stdout
- -r [<kbytes>] Rotate log every kbytes. (16 if unspecified). Requires -f
- -n <count> Sets max number of rotated logs to <count>, default 4
- -v <format> Sets the log print format, where <format> is one of:
- brief process tag thread raw time threadtime long
- -c clear (flush) the entire log and exit
- -d dump the log and then exit (don't block)
- -t <count> print only the most recent <count> lines (implies -d)
- -g get the size of the log's ring buffer and exit
- -b <buffer> Request alternate ring buffer, 'main', 'system', 'radio'
- or 'events'. Multiple -b parameters are allowed and the
- results are interleaved. The default is -b main -b system.
- -B output the log in binary
- filterspecs are a series of
- <tag>[:priority]
- where <tag> is a log component tag (or * for all) and priority is:
- V Verbose
- D Debug
- I Info
- W Warn
- E Error
- F Fatal
- S Silent (supress all output)
- '*' means '*:d' and <tag> by itself means <tag>:v
- If not specified on the commandline, filterspec is set from ANDROID_LOG_TAGS.
- If no filterspec is found, filter defaults to '*:I'
- If not specified with -v, format is set from ANDROID_PRINTF_LOG
- or defaults to "brief"
adb logcat 命令格式 : adb logcat [选项] [过滤项], 其中 选项 和 过滤项 在 中括号 [] 中, 说明这是可选的;
(1) 选项解析
选项解析 :
-- "-s"选项 : 设置输出日志的标签, 只显示该标签的日志;
--"-f"选项 : 将日志输出到文件, 默认输出到标准输出流中, -f 参数执行不成功;
--"-r"选项 : 按照每千字节输出日志, 需要 -f 参数, 不过这个命令没有执行成功;
--"-n"选项 : 设置日志输出的最大数目, 需要 -r 参数, 这个执行 感觉 跟 adb logcat 效果一样;
--"-v"选项 : 设置日志的输出格式, 注意只能设置一项;
--"-c"选项 : 清空所有的日志缓存信息;
--"-d"选项 : 将缓存的日志输出到屏幕上, 并且不会阻塞;
--"-t"选项 : 输出最近的几行日志, 输出完退出, 不阻塞;
--"-g"选项 : 查看日志缓冲区信息;
--"-b"选项 : 加载一个日志缓冲区, 默认是 main, 下面详解;
--"-B"选项 : 以二进制形式输出日志;
.
输出指定标签内容 :
-- "-s"选项 : 设置默认的过滤器, 如 我们想要输出 "System.out" 标签的信息, 就可以使用adb logcat -s System.out 命令;
- octopus@octopus:~$ adb logcat -s System.out
- --------- beginning of /dev/log/system
- --------- beginning of /dev/log/main
- I/System.out(22930): GSM -91
- I/System.out(22930): SignalStrength issssssssss : -91
- I/System.out(22930): GSM -91
- I/System.out(22930): SignalStrength issssssssss : -91
- I/System.out(22930): Supervisor Thread
- I/System.out(22930): Got run mode
输出日志信息到文件 :
-- "-f"选项 : 该选向后面跟着输入日志的文件, 使用adb logcat -f /sdcard/log.txt 命令, 注意这个log文件是输出到手机上,需要指定合适的路径。
- octopus@octopus:~$ adb logcat -f /sdcard/log.txt
这个参数对对不能一直用电脑连着手机收集日志的场景非常有用,其实android shell下也有一个相同参数的logcat命令。使用如下命令可以执行后断开PC和手机持续收集LOG。
- shell@pc$ adb shell
- shell@android$ logcat -f /sdcard/log.txt & #这里的&符号表示后台执行,别少了。
- shell@android$ exit
注:
(1)以上shell@pc$ 指在pc的shell终端执行后边的命令, shell@android$ 表示在手机shell中执行后边的命令l
(2)一定注意合适的时候需要停止掉以上命令,否则再次使用相同命令的时候,就会有两个logcat写同一个文件了
停止方法: adb shell kill -9 <logcat_pid>
其中logcat_pid 通过 如下命令获取
adb shell ps | grep logcat # linux 平台
adb shell ps | findstr "logcat" #Windows平台
-- ">"输出 : ">" 后面跟着要输出的日志文件, 可以将 logcat 日志输出到文件中, 使用adb logcat > log 命令, 使用more log 命令查看日志信息;
- octopus@octopus:~$ adb logcat > log
- ^C
- octopus@octopus:~$ more log
- --------- beginning of /dev/log/system
- V/ActivityManager( 500): We have pending thumbnails: null
- V/ActivityManager( 500): getTasks: max=1, flags=0, receiver=null
- V/ActivityManager( 500): com.android.settings/.Settings: task=TaskRecord{42392278 #448 A com.android.settings U 0}
- V/ActivityManager( 500): We have pending thumbnails: null
-- " -d -f <log>" 组合命令:可以将日志保存到手机上的指定位置,对不能一直用电脑连着手机收集日志的场景非常有用。
- adb logcat -d -v /sdcard/mylog.txt
指定 logcat 的日志输出格式 :
-- "-v"选项 : 使用adb logcat -v time 命令, 可以啥看日志的输出时间;
使用adb logcat -v threadtime 命令, 可以啥看日志的输出时间和线程信息;
-- "brief"格式 : 这是默认的日志格式" 优先级 / 标签 (进程ID) : 日志信息 ", 使用adb logcat -v prief命令;
- octopus@octopus:~$ adb logcat -v brief
- --------- beginning of /dev/log/system
- D/PowerManagerService( 500): handleSandman: canDream=true, mWakefulness=Awake
- D/PowerManagerService( 500): releaseWakeLockInternal: lock=1101267696, flags=0x0
- octopus@octopus:~$ adb logcat -v process
- --------- beginning of /dev/log/system
- D( 500) MobileDataStateReceiver received: ACTION_ANY_DATA_CONNECTION_STATE_CHANGED_MOBILE [wap] (MobileDataStateTracker)
- V( 500) Broadcast: Intent { act=android.intent.action.ANY_DATA_STATE_MOBILE flg=0x10 (has extras) } ordered=true userid=0 (ActivityManager)
- D( 500) wap: Intent from SIM 0, current SIM 0, current DataState DISCONNECTED (MobileDataStateTracker)
- D( 500) wap: wap setting isAvailable to false (MobileDataStateTracker)
- D( 500) wap: Received state=DISCONNECTED, old=DISCONNECTED, reason=dataDetached (MobileDataStateTracker)
- D( 500) BDC-Calling finishReceiver: IIntentReceiver=41c46ba0 (ActivityThread)
- octopus@octopus:~$ adb logcat -v tag
- --------- beginning of /dev/log/system
- I/PowerManagerService: setBrightness mButtonLight 0.
- D/PowerManagerService: updateScreenStateLocked: mDisplayReady=true, newScreenState=2, mWakefulness=1, mWakeLockSummary=0x1, mUserActivitySummary=0x1, mBootCompleted=true
- D/PowerManagerService: handleSandman: canDream=true, mWakefulness=Awake
- octopus@octopus:~$ adb logcat -v thread
- --------- beginning of /dev/log/system
- V( 500: 2141) getTasks: max=1, flags=0, receiver=null
- V( 500: 2141) com.lewa.launcher/.Launcher: task=TaskRecord{41dccc20 #425 A com.lewa.launcher U 0}
- V( 500: 2141) We have pending thumbnails: null
- V( 500: 2140) getTasks: max=1, flags=0, receiver=null
- octopus@octopus:~$ adb logcat -v raw
- --------- beginning of /dev/log/system
- notifications are enabled for com.kindroid.security
- Assigned score=0 to Notification(pri=0 contentView=com.kindroid.security/0x7f030052 vibrate=null sound=null defaults=0x0 flags=0x2 kind=[null])
- Native set alarm :Alarm{41e1ca00 type 3 com.kindroid.security}
- reset poweroff alarm none
- octopus@octopus:~$ adb logcat -v time
- --------- beginning of /dev/log/system
- 04-25 17:18:13.019 V/ActivityManager( 500): Broadcast sticky: Intent { act=android.intent.action.SIG_STR flg=0x10 (has extras) } ordered=false userid=-1
- 04-25 17:18:13.157 V/NotificationService( 500): enqueueNotificationInternal: pkg=com.kindroid.security id=1020 notification=Notification(pri=0 contentView=com.kindroid.security/0x7f030052 vibrate=null sound=null defaults=0x0 flags=0x2 kind=[null])
- 04-25 17:18:13.158 V/NotificationService( 500): notifications are enabled for com.kindroid.security
- 04-25 17:18:13.158 V/NotificationService( 500): Assigned score=0 to Notification(pri=0 contentView=com.kindroid.security/0x7f030052 vibrate=null sound=null defaults=0x0 flags=0x2 kind=[null])
- 04-25 17:18:13.555 V/ActivityManager( 500): getTasks: max=1, flags=0, receiver=null
- octopus@octopus:~$ adb logcat -v long
- --------- beginning of /dev/log/system
- [ 04-25 17:21:18.118 500:0x2fe V/ActivityManager ]
- We have pending thumbnails: null
- [ 04-25 17:21:18.696 593:0x251 W/ActivityThread ]
- Content provider com.android.providers.telephony.TelephonyProvider already published as telephony
- [ 04-25 17:21:19.119 500:0x396 V/ActivityManager ]
- getTasks: max=1, flags=0, receiver=null
清空日志缓存信息 : 使用 adb logcat -c 命令, 可以将之前的日志信息清空, 重新开始输出日志信息;
将缓存日志输出 : 使用 adb logcat -d 命令, 输出命令, 之后推出命令, 不会进行阻塞;
输出最近的日志 : 使用adb logcat -t 5 命令, 可以输出最近的5行日志, 并且不会阻塞;
- octopus@octopus:~$ adb logcat -t 5
- --------- beginning of /dev/log/system
- --------- beginning of /dev/log/main
- W/ADB_SERVICES(10028): adb: unable to open /proc/10028/oom_adj
- D/dalvikvm(23292): threadid=11: created from interp
- D/dalvikvm(23292): start new thread
- D/dalvikvm(23292): threadid=11: notify debugger
- D/dalvikvm(23292): threadid=11 (Thread-24538): calling run()
- octopus@octopus:~$
查看日志缓冲区信息 : 使用 adb logcat -g 命令;
- octopus@octopus:~$ adb logcat -g
- /dev/log/main: ring buffer is 256Kb (255Kb consumed), max entry is 5120b, max payload is 4076b
- /dev/log/system: ring buffer is 256Kb (255Kb consumed), max entry is 5120b, max payload is 4076b
- octopus@octopus:~$
加载日志缓冲区 : 使用 adb logcat -b 缓冲区类型 命令;
-- Android中的日志缓冲区 : system缓冲区 - 与系统相关的日志信息, radio缓冲区 - 广播电话相关的日志信息, events缓冲区 - 事件相关的日志信息, main缓冲区 - 默认的缓冲区;
- octopus@octopus:~$ adb logcat -b radio -t 5
- D/PHONE (23599): [GeminiDataSubUtil] UAPP_C6-4
- D/GSM (23599): [GDCT][simId1]apnType = default
- D/GSM (23599): [GDCT][simId1]isDataAllowed: not allowed due to - gprs= 1 - SIM not loaded - desiredPowerState= false
- D/GSM (23599): [GDCT][simId1]isDataPossible(default): possible=false isDataAllowed=false apnTypePossible=true apnContextisEnabled=true apnContextState()=IDLE
- I/MUXD (23591): [gsm0710muxd] 3426:main(): Frames received/dropped: 18242/0
- octopus@octopus:~$
- octopus@octopus:~$ adb logcat -b main -t 5
- D/NotificationService( 500): notification.sound=null
- D/NotificationService( 500): mDmLock=false
- I/ATCIJ (16576): Couldn't find 'atci-serv-fw' socket; retrying after timeout
- W/ADB_SERVICES( 246): create_local_service_socket() name=shell:export ANDROID_LOG_TAGS="" ; exec logcat -b main -t 5
- W/ADB_SERVICES(16815): adb: unable to open /proc/16815/oom_adj
- octopus@octopus:~$
- octopus@octopus:~$ adb logcat -b system -t 5
- D/PowerManagerService( 500): updateScreenStateLocked: mDisplayReady=true, newScreenState=0, mWakefulness=0, mWakeLockSummary=0x1, mUserActivitySummary=0x0, mBootCompleted=true
- D/PowerManagerService( 500): handleSandman: canDream=false, mWakefulness=Asleep
- V/NotificationService( 500): enqueueNotificationInternal: pkg=com.kindroid.security id=1020 notification=Notification(pri=0 contentView=com.kindroid.security/0x7f030052 vibrate=null sound=null defaults=0x0 flags=0x2 kind=[null])
- V/NotificationService( 500): notifications are enabled for com.kindroid.security
- V/NotificationService( 500): Assigned score=0 to Notification(pri=0 contentView=com.kindroid.security/0x7f030052 vibrate=null sound=null defaults=0x0 flags=0x2 kind=[null])
- octopus@octopus:~$
- octopus@octopus:~$ adb logcat -b event -t 5
- Unable to open log device '/dev/log/event': No such file or directory
- octopus@octopus:~$ adb logcat -b events -t 5
- I/notification_cancel( 500): [com.kindroid.security,1026,NULL,0,0,64]
- I/notification_enqueue( 500): [com.kindroid.security,1020,NULL,0,Notification(pri=0 contentView=com.kindroid.security/0x7f030052 vibrate=null sound=null defaults=0x0 flags=0x2 kind=[null])]
- I/notification_cancel( 500): [com.kindroid.security,1026,NULL,0,0,64]
- I/notification_enqueue( 500): [com.kindroid.security,1020,NULL,0,Notification(pri=0 contentView=com.kindroid.security/0x7f030052 vibrate=null sound=null defaults=0x0 flags=0x2 kind=[null])]
- I/notification_cancel( 500): [com.kindroid.security,1026,NULL,0,0,64]
- octopus@octopus:~$
以二进制形式输出日志 : 使用 adb logcat -B 命令;
- octopus@octopus:~$ adb logcat -B -t 5
- O��_�3ZS�4gps_mt3326nmea_reader_parse: line = 1218GPS get accuracy failed, fix mode:1
- ^��_�3ZS�=gps_mt3326nmea_reader_addc: line = 1331the structure include nmea_cb address is 0x658cc8e8
- H��_�3ZSEGEgps_mt3326nmea_reader_addc: line = 1332nmea_cb address is 0x5d2fe279
- i���3ZS�)>ADB_SERVICEScreate_local_service_socket() name=shell:export ANDROID_LOG_TAGS="" ; exec logcat -B -t 5
- 7*E*E�3ZSo�YADB_SERVICESadb: unable to open /proc/17706/oom_adj
(2) 过滤项解析
过滤项格式 : <tag>[:priority] , 标签:日志等级, 默认的日志过滤项是 " *:I " ;
-- V : Verbose (明细);
-- D : Debug (调试);
-- I : Info (信息);
-- W : Warn (警告);
-- E : Error (错误);
-- F: Fatal (严重错误);
-- S : Silent(Super all output) (最高的优先级, 可能不会记载东西);
过滤指定等级日志 : 使用 adb logcat 10 *:E 命令, 显示 Error 以上级别的日志;
- octopus@octopus:~$ adb logcat *:E
- Note: log switch off, only log_main and log_events will have logs!
- --------- beginning of /dev/log/main
- E/WifiHW ( 441): wifi_send_command : SCAN_RESULTS ; interface index=0;
- E/WifiHW ( 441): wifi_send_command : AP_SCAN 1 ; interface index=0;
- E/WifiHW ( 441): wifi_send_command : SCAN_RESULTS ; interface index=0;
- E/dalvikvm( 756): GC_CONCURRENT freed 1809K, 27% free 19489K/26695K, paused 16ms+5ms, total 109ms
- E/WifiHW ( 441): wifi_send_command : SCAN ; interface index=0;
- E/WifiHW ( 441): wifi_send_command : AP_SCAN 1 ; interface index=0;
- E/WifiHW ( 441): wifi_send_command : SCAN_RESULTS ; interface index=0;
- E/dalvikvm( 756): GC_CONCURRENT freed 1820K, 27% free 19490K/26695K, paused 16ms+3ms, total 102ms
- E/WifiHW ( 441): wifi_send_command : AP_SCAN 1 ; interface index=0;
- E/WifiHW ( 441): wifi_send_command : SCAN_RESULTS ; interface index=0;
过滤指定标签等级日志 : 使用 adb logcat WifiHW:D *:S 命令进行过滤;
-- 命令含义 : 输出10条日志, 日志是 标签为 WifiHW, 并且优先级 Debug(调试) 等级以上的级别的日志;
--注意 *:S : 如果没有 *S 就会输出错误;
- octopus@octopus:~$ adb logcat WifiHW:D *:S
- Note: log switch off, only log_main and log_events will have logs!
- --------- beginning of /dev/log/main
- E/WifiHW ( 441): wifi_send_command : SCAN_RESULTS ; interface index=0;
- E/WifiHW ( 441): wifi_send_command : AP_SCAN 1 ; interface index=0;
- E/WifiHW ( 441): wifi_send_command : SCAN_RESULTS ; interface index=0;
- E/WifiHW ( 441): wifi_send_command : AP_SCAN 1 ; interface index=0;
- E/WifiHW ( 441): wifi_send_command : SCAN_RESULTS ; interface index=0;
- E/WifiHW ( 441): wifi_send_command : AP_SCAN 1 ; interface index=0;
- E/WifiHW ( 441): wifi_send_command : SCAN_RESULTS ; interface index=0;
可以同时设置多个过滤器 : 使用adb logcat WifiHW:D dalvikvm:I *:S 命令, 输出 WifiHW 标签 的 Debug 以上级别 和 dalvikvm 标签的 Info 以上级别的日志;
- octopus@octopus:~$ adb logcat WifiHW:D dalvikvm:I *:S
- Note: log switch off, only log_main and log_events will have logs!
- --------- beginning of /dev/log/main
- E/WifiHW ( 441): wifi_send_command : AP_SCAN 1 ; interface index=0;
- E/WifiHW ( 441): wifi_send_command : SCAN_RESULTS ; interface index=0;
- E/dalvikvm( 756): GC_CONCURRENT freed 1820K, 27% free 19490K/26695K, paused 17ms+2ms, total 110ms
- E/WifiHW ( 441): wifi_send_command : AP_SCAN 1 ; interface index=0;
- E/WifiHW ( 441): wifi_send_command : SCAN_RESULTS ; interface index=0;
- E/WifiHW ( 441): wifi_send_command : AP_SCAN 1 ; interface index=0;
- E/WifiHW ( 441): wifi_send_command : SCAN_RESULTS ; interface index=0;
- E/dalvikvm( 756): GC_CONCURRENT freed 1810K, 27% free 19489K/26695K, paused 17ms+5ms, total 108ms
- E/WifiHW ( 441): wifi_send_command : AP_SCAN 1 ; interface index=0;
- E/WifiHW ( 441): wifi_send_command : SCAN_RESULTS ; interface index=0;
2. 使用管道过滤日志
(1) 过滤固定字符串
过滤固定字符串 : 只要命令行出现的日志都可以过滤, 不管是不是标签;
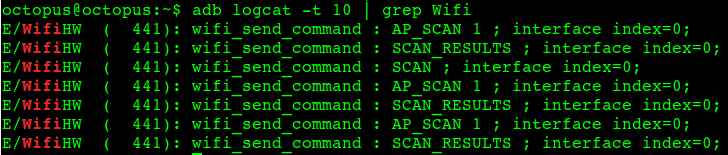
-- 命令 : adb logcat | grep Wifi ;
- octopus@octopus:~$ adb logcat | grep Wifi
- E/WifiHW ( 441): wifi_send_command : AP_SCAN 1 ; interface index=0;
- E/WifiHW ( 441): wifi_send_command : SCAN_RESULTS ; interface index=0;
- E/WifiHW ( 441): wifi_send_command : SCAN ; interface index=0;
- E/WifiHW ( 441): wifi_send_command : AP_SCAN 1 ; interface index=0;
- E/WifiHW ( 441): wifi_send_command : SCAN_RESULTS ; interface index=0;
- E/WifiHW ( 441): wifi_send_command : AP_SCAN 1 ; interface index=0;
- E/WifiHW ( 441): wifi_send_command : SCAN_RESULTS ; interface index=0;
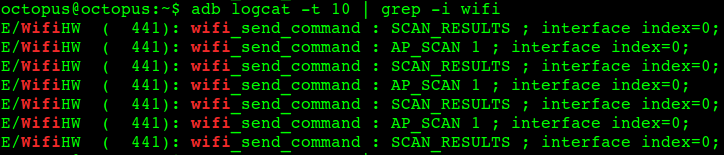
过滤字符串忽略大小写 : adb logcat | grep -i wifi ;
(2) 使用正则表达式匹配
分析日志 : 该日志开头两个字符是 "V/", 后面开始就是标签, 写一个正则表达式 "^..ActivityManager", 就可以匹配日志中的 "V/ActivityManager" 字符串;
- V/ActivityManager( 574): getTasks: max=1, flags=0, receiver=null
正则表达式过滤日志: 使用上面的正则表达式组成命令 adb logcat | grep "^..Activity" ;


![[Android]Logcat调试](https://img-blog.csdnimg.cn/a98798faf3ca46eb8f6cbd786c1e2e22.png)