下图是我对 Notification 做的思维导图,也是本文的主要逻辑。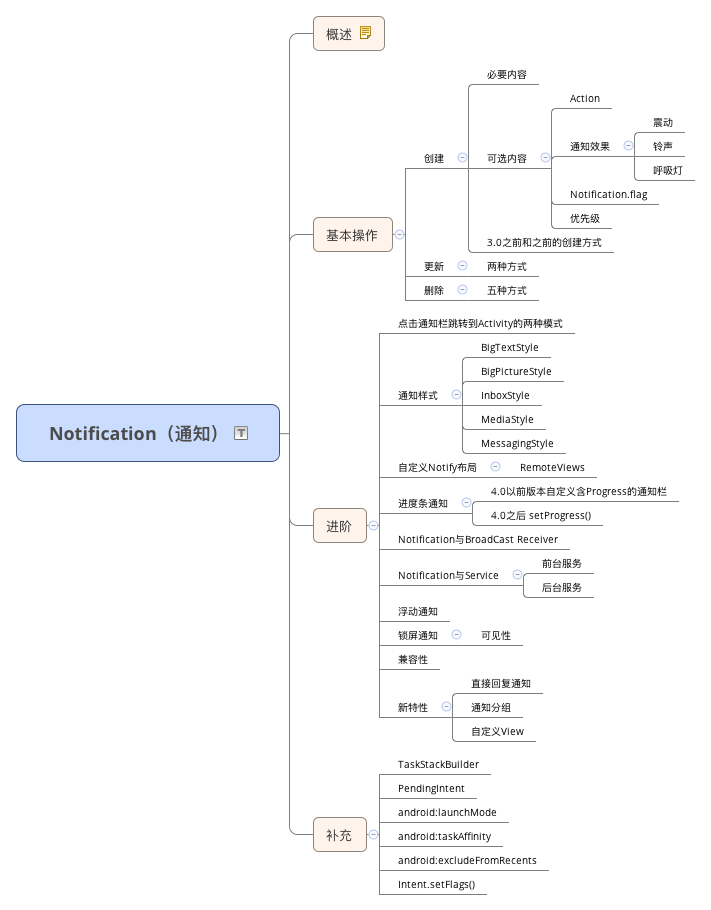 

本文主要讲述 Notification 的基本操作部分,进阶部分的内容还在学习ing~
Notification 概述
Notification,是一种具有全局效果的通知,可以在系统的通知栏中显示。当 APP 向系统发出通知时,它将先以图标的形式显示在通知栏中。用户可以下拉通知栏查看通知的详细信息。通知栏和抽屉式通知栏均是由系统控制,用户可以随时查看。下面两张图均是来自 Google 官方文档。
 

图 1 .通知栏中的通知
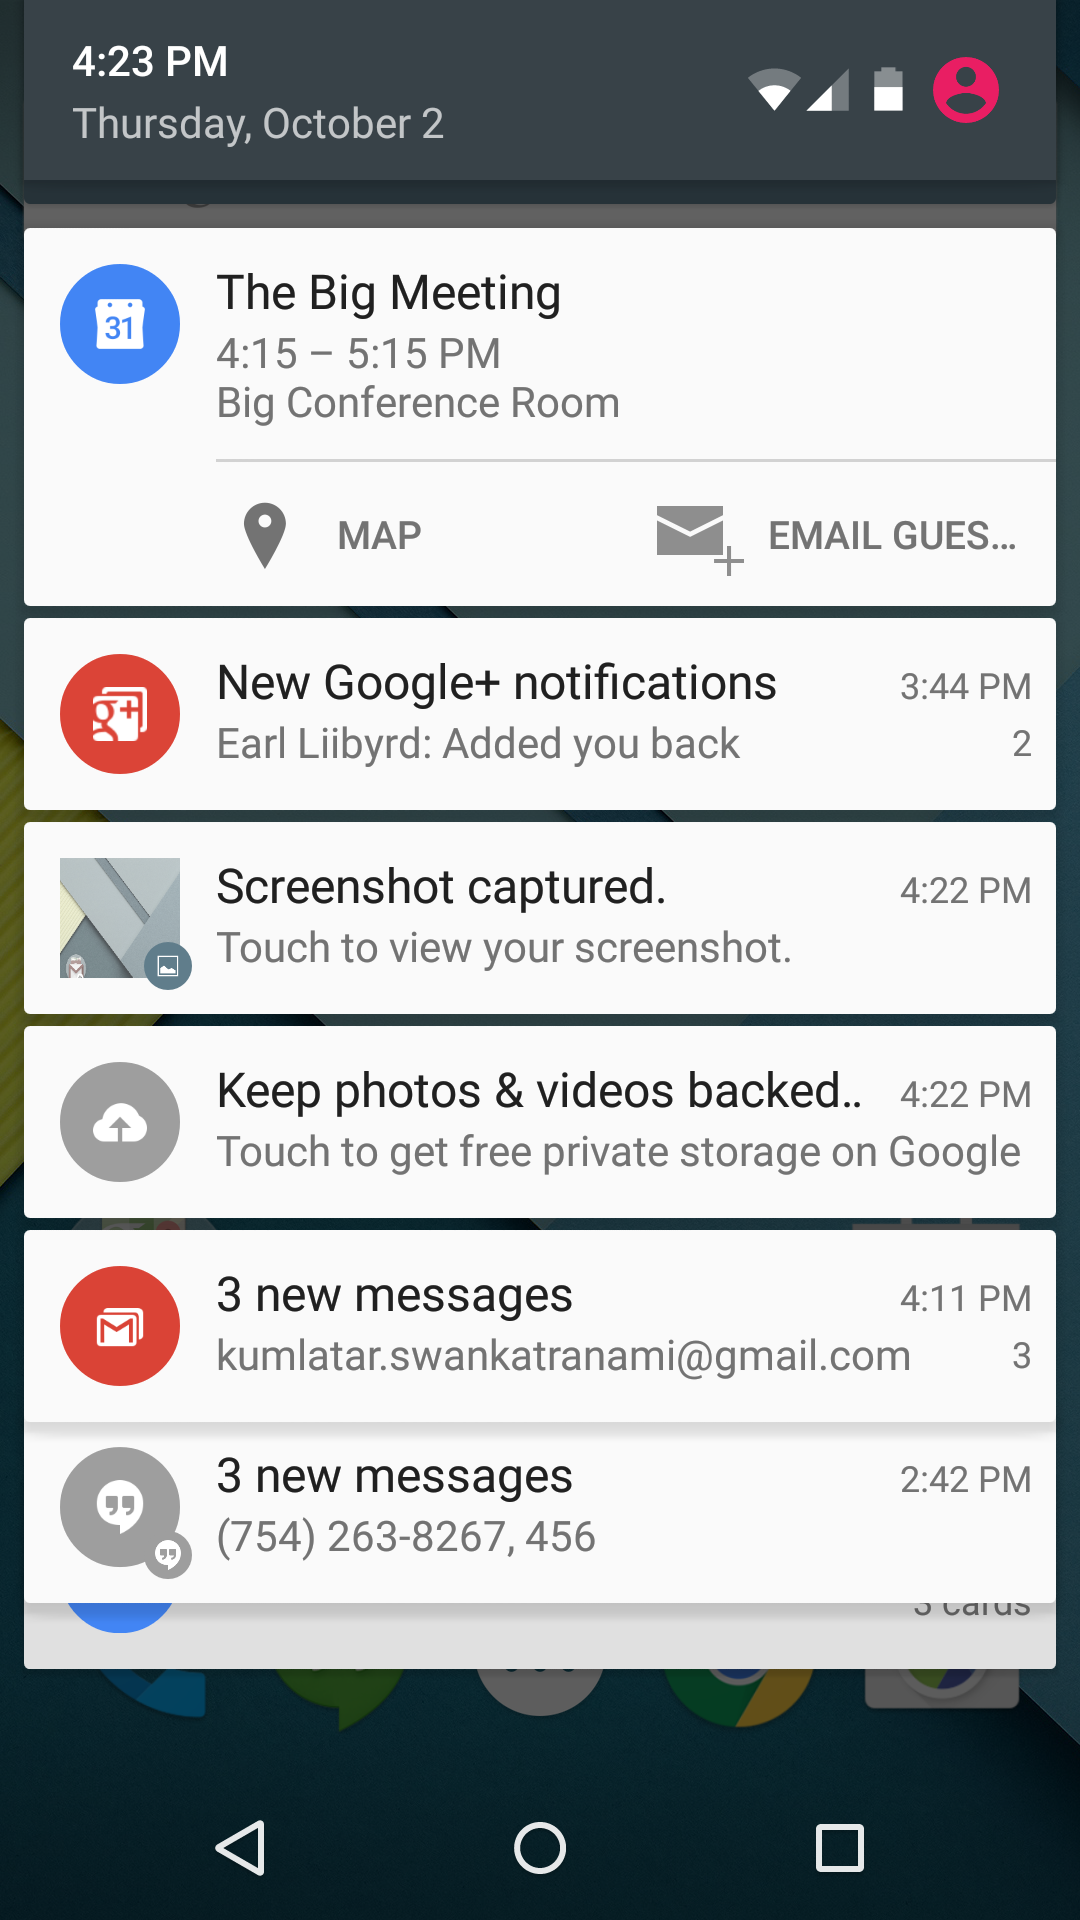 

图 2 .抽屉式通知栏中的通知
通知的目的是告知用户 App 事件。在平时的使用中,通知主要有以下几个作用:
- 显示接收到短消息、及时消息等信息(如QQ、微信、新浪、短信)
- 显示客户端的推送消息,如广告、优惠、版本更新、推荐新闻等,常用的第三方 SDK 有: JPush 、 个推 、 信鸽 、 网易云信(偏重 IM ) 、 阿里云推送
- 显示正在进行的事物,例如:后台运行的程序,如音乐播放进度、下载进度等
其中,前两点可以归结为与用户交互,第三点是实时的任务提醒,但不可否认的是,第三点也会与用户交互。
Notification 作为 Android 重要的用户界面组成部分,它有自己的设计指南。在 Android 5.0(Api level 21) 中引入的 Material Design 尤为重要。关于 Notification 的设计指南请参考 Notification Pattern
Notification 的概述就这么多,接下去就开始讲 Notification 的基本使用,中间会穿插 Notification 的基本 UI 、各个版本的区别、常见的通知效果以及自己在学习过程中踩到的坑。
Notification 的基本操作
Notification 的基本操作主要有创建、更新、取消这三种。一个 Notification 的必要属性有三项,如果不设置则在运行时会抛出异常:
- 小图标,通过 setSmallIcon() 方法设置
- 标题,通过 setContentTitle() 方法设置
- 内容,通过 setContentText() 方法设置
除了以上三项,其它均为可选项。虽然如此,但还是应该给 Notification 设置一个 Action ,这样就可以直接跳转到 App 的某个 Activity 、启动一个 Service 或者发送一个 Broadcast。否则,Notification 仅仅只能起到通知的效果,而不能与用户交互。
当系统接收到通知时,可以通过震动、响铃、呼吸灯等多种方式进行提醒。
创建 Notification
Notification 的创建主要涉及到 Notification.Builder 、 Notification 、 NotificationManager 。
- Notification.Builer : 使用建造者模式构建 Notification 对象。由于 Notification.Builder 仅支持 Android 4.1及之后的版本,为了解决兼容性问题, Google 在 Android Support v4 中加入了 NotificationCompat.Builder 类。对于某些在 Android 4.1 之后才特性,即使 NotificationCompat.Builder 支持该方法,在之前的版本中也不能运行。点我 查看更多关于 Notification 兼容性问题处理。文中使用的都是 NotificationCompat。
- Notification : 通知对应类,保存通知相关的数据。NotificationManager 向系统发送通知时会用到。
- NotificationManager : NotificationManager 是通知管理类,它是一个系统服务。调用 NotificationManager 的 notify() 方法可以向系统发送通知。
获取 NotificationManager 对象:
NotificationManager mNotifyManager = (NotificationManager) getSystemService(Context.NOTIFICATION_SERVICE);前面讲到,Notification 有三个必要属性。下面,我们就来创建一个简单的 Notification 。主要有以下三步:
- 获取 NotificationManager 实例
- 实例化 NotificationCompat.Builder 并设置相关属性
- 通过 builder.build() 方法生成 Notification 对象,并发送通知
private void sendNotification() {//获取NotificationManager实例NotificationManager notifyManager = (NotificationManager) getSystemService(Context.NOTIFICATION_SERVICE);//实例化NotificationCompat.Builde并设置相关属性NotificationCompat.Builder builder = new NotificationCompat.Builder(this)//设置小图标.setSmallIcon(R.mipmap.icon_fab_repair)//设置通知标题.setContentTitle("最简单的Notification")//设置通知内容.setContentText("只有小图标、标题、内容")//设置通知时间,默认为系统发出通知的时间,通常不用设置//.setWhen(System.currentTimeMillis());//通过builder.build()方法生成Notification对象,并发送通知,id=1notifyManager.notify(1, builder.build());
}
以上代码是对 Android 3.0 及之后的版本而言(包括使用 Support Library),对于 Android 3.0 之前的版本,主要使用 new Notification() 方法来创建 Notification 对象,本文不对此方式做任何讲解,代码如下:
NotificationManager mNotifyMgr = (NotificationManager) getSystemService(NOTIFICATION_SERVICE);
PendingIntent contentIntent = PendingIntent.getActivity(this, 0, new Intent(this, ResultActivity.class), 0);Notification notification = new Notification(icon, tickerText, when);
notification.setLatestEventInfo(this, title, content, contentIntent);mNotifyMgr.notify(NOTIFICATIONS_ID, notification);补充:
- Android Support Library包的区别
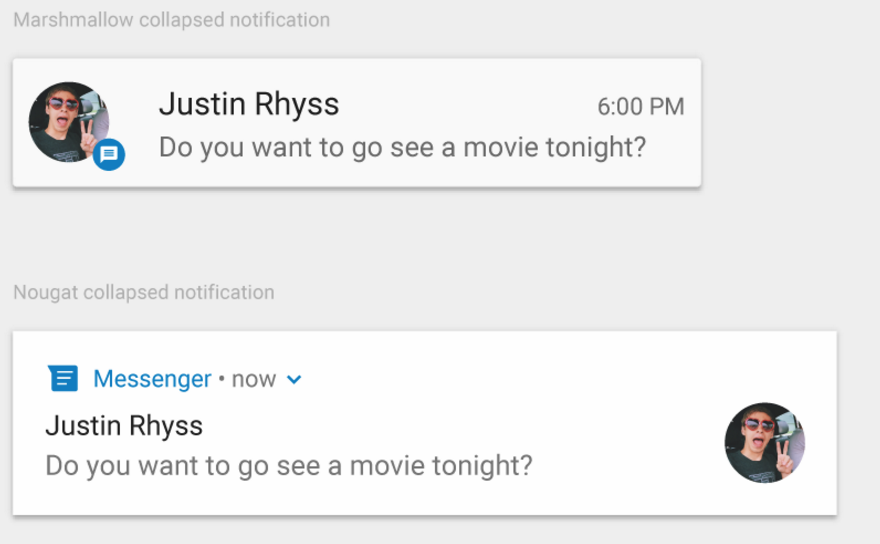
Android Support v4:这个包是为了照顾1.6及更高版本而设计的,这个包是使用最广泛的。Android Support v7:这个包是为了考虑照顾2.1及以上版本而设计的,但不包含更低,故如果不考虑1.6,我们可以采用再加上这个包,另外注意,v7是要依赖v4这个包的,即,两个得同时被包含。Android Support v13:这个包的设计是为了android 3.2及更高版本的,一般我们都不常用,平板开发中能用到。- Notification 中的元素。在 Android N(24) 中, Google 对 Notification 的 UI 进行了修改。下图是 Android M 和 Android N 的对比。
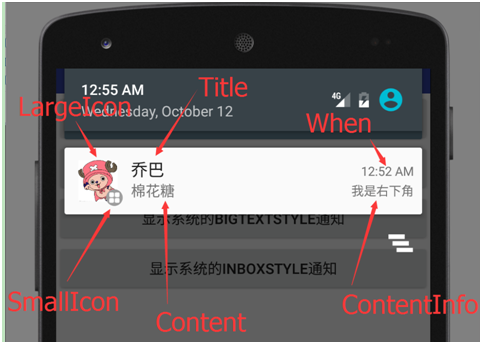
 - 关于 setSmallIcon() 与 setLargeIcon()。在 NotificationCompat.Builder 中有设置通知的大小图标的两个方法。这两个方法有什么区别呢?当 setSmallIcon() 与 setLargeIcon() 同时存在时, smallIcon 显示在通知的右下角, largeIcon 显示在左侧;当只设置 setSmallIcon() 时, smallIcon 显示在左侧。看下图你就明白了。对于部分 ROM ,可能修改过源码,如 MIUI 上通知的大图标和小图标是没有区别的。
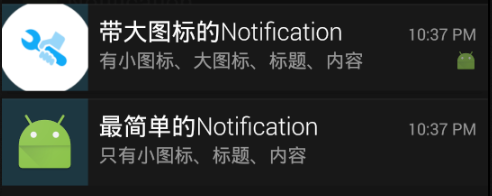 

Google 官方是这么解释 setSmallIcon() 这个方法的:
Set the small icon resource, which will be used to represent the notification in the status bar. The platform template for the expanded view will draw this icon in the left, unless a large icon has also been specified, in which case the small icon will be moved to the right-hand side.
给 Notification 设置 Action
在前一章节 创建 Notification 中发送的通知并不具备与用户交互的能力,这是因为我们并没有给 Notification 设置 Action 。在这一节,我们就来讲讲如何给 Notification 设置 Action 。这里,我们来实现一个点击 Notification 跳转到 MainActivity 的效果。代码如下:
/**
* 发送一个点击跳转到MainActivity的消息
*/
private void sendSimplestNotificationWithAction() {//获取PendingIntentIntent mainIntent = new Intent(this, MainActivity.class);PendingIntent mainPendingIntent = PendingIntent.getActivity(this, 0, mainIntent, PendingIntent.FLAG_UPDATE_CURRENT);//创建 Notification.Builder 对象NotificationCompat.Builder builder = new NotificationCompat.Builder(this).setSmallIcon(R.mipmap.ic_launcher)//点击通知后自动清除.setAutoCancel(true).setContentTitle("我是带Action的Notification").setContentText("点我会打开MainActivity").setContentIntent(mainPendingIntent);//发送通知mNotifyManager.notify(3, builder.build());
}
相比发送最简单的通知,发送具有 Action 的通知多了创建 Intent 、 PendingIntent 和 setContentIntent() 这几步。
不难看出, PendingIntent 才是重点,那么, PendingIntent 是什么呢?
PendingIntent
如果您了解 PendingIntent ,请直接跳过本节。
PendingIntent 是一种特殊的 Intent ,字面意思可以解释为延迟的 Intent ,用于在某个事件结束后执行特定的 Action 。从上面带 Action 的通知也能验证这一点,当用户点击通知时,才会执行。
PendingIntent 是 Android 系统管理并持有的用于描述和获取原始数据的对象的标志(引用)。也就是说,即便创建该PendingIntent对象的进程被杀死了,这个PendingItent对象在其他进程中还是可用的。
日常使用中的短信、闹钟等都用到了 PendingIntent。
PendingIntent 主要可以通过以下三种方式获取:
//获取一个用于启动 Activity 的 PendingIntent 对象
public static PendingIntent getActivity(Context context, int requestCode, Intent intent, int flags);//获取一个用于启动 Service 的 PendingIntent 对象
public static PendingIntent getService(Context context, int requestCode, Intent intent, int flags);//获取一个用于向 BroadcastReceiver 广播的 PendingIntent 对象
public static PendingIntent getBroadcast(Context context, int requestCode, Intent intent, int flags)
PendingIntent 具有以下几种 flag:
FLAG_CANCEL_CURRENT:如果当前系统中已经存在一个相同的 PendingIntent 对象,那么就将先将已有的 PendingIntent 取消,然后重新生成一个 PendingIntent 对象。FLAG_NO_CREATE:如果当前系统中不存在相同的 PendingIntent 对象,系统将不会创建该 PendingIntent 对象而是直接返回 null 。FLAG_ONE_SHOT:该 PendingIntent 只作用一次。FLAG_UPDATE_CURRENT:如果系统中已存在该 PendingIntent 对象,那么系统将保留该 PendingIntent 对象,但是会使用新的 Intent 来更新之前 PendingIntent 中的 Intent 对象数据,例如更新 Intent 中的 Extras 。更新 Notification
更新通知很简单,只需要再次发送相同 ID 的通知即可,如果之前的通知还未被取消,则会直接更新该通知相关的属性;如果之前的通知已经被取消,则会重新创建一个新通知。
更新通知跟发送通知使用相同的方式。详见上节:创建 Notification
取消 Notification
取消通知有如下 5 种方式:
- 点击通知栏的清除按钮,会清除所有可清除的通知
- 设置了 setAutoCancel() 或 FLAG_AUTO_CANCEL 的通知,点击该通知时会清除它
- 通过 NotificationManager 调用 cancel(int id) 方法清除指定 ID 的通知
- 通过 NotificationManager 调用 cancel(String tag, int id) 方法清除指定 TAG 和 ID 的通知
- 通过 NotificationManager 调用 cancelAll() 方法清除所有该应用之前发送的通知
如果你是通过 NotificationManager.notify(String tag, int id, Notification notify) 方法创建的通知,那么只能通过 NotificationManager.cancel(String tag, int id) 方法才能清除对应的通知,调用NotificationManager.cancel(int id) 无效。
关于 Notification 的基本操作代码如下,布局文件代码这就不贴了。我是 Demo 传送门:
/**
 * 为了方便,大部分通知都没设置对应的Action,即PendingIntent
 * 除了sendFlagAutoCancelNotification()方法
 */
public class SimpleNotificationActivity extends Activity implements View.OnClickListener {//Notification.FLAG_FOREGROUND_SERVICE    //表示正在运行的服务public static final String NOTIFICATION_TAG = "littlejie";public static final int DEFAULT_NOTIFICATION_ID = 1;private NotificationManager mNotificationManager;@Overrideprotected void onCreate(Bundle savedInstanceState) {super.onCreate(savedInstanceState);setContentView(R.layout.activity_simple_notification);findViewById(R.id.btn_remove_all_notification).setOnClickListener(this);findViewById(R.id.btn_send_notification).setOnClickListener(this);findViewById(R.id.btn_remove_notification).setOnClickListener(this);findViewById(R.id.btn_send_notification_with_tag).setOnClickListener(this);findViewById(R.id.btn_remove_notification_with_tag).setOnClickListener(this);findViewById(R.id.btn_send_ten_notification).setOnClickListener(this);findViewById(R.id.btn_send_flag_no_clear_notification).setOnClickListener(this);findViewById(R.id.btn_send_flag_ongoing_event_notification).setOnClickListener(this);findViewById(R.id.btn_send_flag_auto_cancecl_notification).setOnClickListener(this);mNotificationManager = (NotificationManager) this.getSystemService(Context.NOTIFICATION_SERVICE);}@Overridepublic void onClick(View v) {switch (v.getId()) {case R.id.btn_remove_all_notification://移除当前 Context 下所有 Notification,包括 FLAG_NO_CLEAR 和 FLAG_ONGOING_EVENTmNotificationManager.cancelAll();break;case R.id.btn_send_notification://发送一个 Notification,此处 ID = 1sendNotification();break;case R.id.btn_remove_notification://移除 ID = 1 的 Notification,注意:该方法只针对当前 Context。mNotificationManager.cancel(DEFAULT_NOTIFICATION_ID);break;case R.id.btn_send_notification_with_tag://发送一个 ID = 1 并且 TAG = littlejie 的 Notification//注意:此处发送的通知与 sendNotification() 发送的通知并不冲突//因为此处的 Notification 带有 TAGsendNotificationWithTag();break;case R.id.btn_remove_notification_with_tag://移除一个 ID = 1 并且 TAG = littlejie 的 Notification//注意:此处移除的通知与 NotificationManager.cancel(int id) 移除通知并不冲突//因为此处的 Notification 带有 TAGmNotificationManager.cancel(NOTIFICATION_TAG, DEFAULT_NOTIFICATION_ID);break;case R.id.btn_send_ten_notification://连续发十条 NotificationsendTenNotifications();break;case R.id.btn_send_flag_no_clear_notification://发送 ID = 1, flag = FLAG_NO_CLEAR 的 Notification//下面两个 Notification 的 ID 都为 1,会发现 ID 相等的 Notification 会被最新的替换掉sendFlagNoClearNotification();break;case R.id.btn_send_flag_auto_cancecl_notification:sendFlagOngoingEventNotification();break;case R.id.btn_send_flag_ongoing_event_notification:sendFlagAutoCancelNotification();break;}}/**
     * 发送最简单的通知,该通知的ID = 1
     */private void sendNotification() {//这里使用 NotificationCompat 而不是 Notification ,因为 Notification 需要 API 16 才能使用//NotificationCompat 存在于 V4 Support LibraryNotificationCompat.Builder builder = new NotificationCompat.Builder(this).setSmallIcon(R.mipmap.ic_launcher).setContentTitle("Send Notification").setContentText("Hi,My id is 1");mNotificationManager.notify(DEFAULT_NOTIFICATION_ID, builder.build());}/**
     * 使用notify(String tag, int id, Notification notification)方法发送通知
     * 移除对应通知需使用 cancel(String tag, int id)
     */private void sendNotificationWithTag() {NotificationCompat.Builder builder = new NotificationCompat.Builder(this).setSmallIcon(R.mipmap.ic_launcher).setContentTitle("Send Notification With Tag").setContentText("Hi,My id is 1,tag is " + NOTIFICATION_TAG);mNotificationManager.notify(NOTIFICATION_TAG, DEFAULT_NOTIFICATION_ID, builder.build());}/**
     * 循环发送十个通知
     */private void sendTenNotifications() {for (int i = 0; i < 10; i++) {NotificationCompat.Builder builder = new NotificationCompat.Builder(this).setSmallIcon(R.mipmap.ic_launcher).setContentTitle("Send Notification Batch").setContentText("Hi,My id is " + i);mNotificationManager.notify(i, builder.build());}}/**
     * 设置FLAG_NO_CLEAR
     * 该 flag 表示该通知不能被状态栏的清除按钮给清除掉,也不能被手动清除,但能通过 cancel() 方法清除
     * Notification.flags属性可以通过 |= 运算叠加效果
     */private void sendFlagNoClearNotification() {NotificationCompat.Builder builder = new NotificationCompat.Builder(this).setSmallIcon(R.mipmap.ic_launcher).setContentTitle("Send Notification Use FLAG_NO_CLEAR").setContentText("Hi,My id is 1,i can't be clear.");Notification notification = builder.build();//设置 Notification 的 flags = FLAG_NO_CLEAR//FLAG_NO_CLEAR 表示该通知不能被状态栏的清除按钮给清除掉,也不能被手动清除,但能通过 cancel() 方法清除//flags 可以通过 |= 运算叠加效果notification.flags |= Notification.FLAG_NO_CLEAR;mNotificationManager.notify(DEFAULT_NOTIFICATION_ID, notification);}/**
     * 设置FLAG_AUTO_CANCEL
     * 该 flag 表示用户单击通知后自动消失
     */private void sendFlagAutoCancelNotification() {//设置一个Intent,不然点击通知不会自动消失Intent resultIntent = new Intent(this, MainActivity.class);PendingIntent resultPendingIntent = PendingIntent.getActivity(this, 0, resultIntent, PendingIntent.FLAG_UPDATE_CURRENT);NotificationCompat.Builder builder = new NotificationCompat.Builder(this).setSmallIcon(R.mipmap.ic_launcher).setContentTitle("Send Notification Use FLAG_AUTO_CLEAR").setContentText("Hi,My id is 1,i can be clear.").setContentIntent(resultPendingIntent);Notification notification = builder.build();//设置 Notification 的 flags = FLAG_NO_CLEAR//FLAG_AUTO_CANCEL 表示该通知能被状态栏的清除按钮给清除掉//等价于 builder.setAutoCancel(true);notification.flags |= Notification.FLAG_AUTO_CANCEL;mNotificationManager.notify(DEFAULT_NOTIFICATION_ID, notification);}/**
     * 设置FLAG_ONGOING_EVENT
     * 该 flag 表示发起正在运行事件(活动中)
     */private void sendFlagOngoingEventNotification() {NotificationCompat.Builder builder = new NotificationCompat.Builder(this).setSmallIcon(R.mipmap.ic_launcher).setContentTitle("Send Notification Use FLAG_ONGOING_EVENT").setContentText("Hi,My id is 1,i can't be clear.");Notification notification = builder.build();//设置 Notification 的 flags = FLAG_NO_CLEAR//FLAG_ONGOING_EVENT 表示该通知通知放置在正在运行,不能被手动清除,但能通过 cancel() 方法清除//等价于 builder.setOngoing(true);notification.flags |= Notification.FLAG_ONGOING_EVENT;mNotificationManager.notify(DEFAULT_NOTIFICATION_ID, notification);}
}
设置 Notification 的通知效果
前面讲了 Notification 的创建、更新和取消,以及给 Notification 设置 Action 等基本操作。那么,我怎么给 Notification 设置诸如震动、铃声、呼吸灯等效果呢?别急,接下来马上就会告诉你怎么给 Notification 添加效果。
Notification 有震动、响铃、呼吸灯三种响铃效果,可以通过 setDefaults(int defualts) 方法来设置。 Default 属性有以下四种,一旦设置了 Default 效果,自定义的效果就会失效。楼主在这里踩了坑,愣是调了半天没找到为什么自定义效果会消失,忘大家慎之。
//设置系统默认提醒效果,一旦设置默认提醒效果,则自定义的提醒效果会全部失效。具体可看源码
//添加默认震动效果,需要申请震动权限
//<uses-permission android:name="android.permission.VIBRATE" />
Notification.DEFAULT_VIBRATE//添加系统默认声音效果,设置此值后,调用setSound()设置自定义声音无效
Notification.DEFAULT_SOUND//添加默认呼吸灯效果,使用时须与 Notification.FLAG_SHOW_LIGHTS 结合使用,否则无效
Notification.DEFAULT_LIGHTS//添加上述三种默认提醒效果
Notification.DEFAULT_ALL
除了以上几种设置 Notification 默认通知效果,还可以通过以下几种 FLAG 设置通知效果。
//提醒效果常用 Flag
//三色灯提醒,在使用三色灯提醒时候必须加该标志符
Notification.FLAG_SHOW_LIGHTS//发起正在运行事件(活动中)
Notification.FLAG_ONGOING_EVENT//让声音、振动无限循环,直到用户响应 (取消或者打开)
Notification.FLAG_INSISTENT//发起Notification后,铃声和震动均只执行一次
Notification.FLAG_ONLY_ALERT_ONCE//用户单击通知后自动消失
Notification.FLAG_AUTO_CANCEL//只有调用NotificationManager.cancel()时才会清除
Notification.FLAG_NO_CLEAR//表示正在运行的服务
Notification.FLAG_FOREGROUND_SERVICE
Notification 通知效果的设置方式及注意事项全部在代码中,核心代码如下:
/**
* 最普通的通知效果
*/
private void showNotifyOnlyText() {NotificationCompat.Builder builder = new NotificationCompat.Builder(this).setSmallIcon(R.mipmap.ic_launcher).setLargeIcon(mLargeIcon).setContentTitle("我是只有文字效果的通知").setContentText("我没有铃声、震动、呼吸灯,但我就是一个通知");mManager.notify(1, builder.build());
}/**
* 展示有自定义铃声效果的通知
* 补充:使用系统自带的铃声效果:Uri.withAppendedPath(Audio.Media.INTERNAL_CONTENT_URI, "6");
*/
private void showNotifyWithRing() {NotificationCompat.Builder builder = new NotificationCompat.Builder(this).setSmallIcon(R.mipmap.ic_launcher).setContentTitle("我是伴有铃声效果的通知").setContentText("美妙么?安静听~")//调用系统默认响铃,设置此属性后setSound()会无效//.setDefaults(Notification.DEFAULT_SOUND)//调用系统多媒体裤内的铃声//.setSound(Uri.withAppendedPath(MediaStore.Audio.Media.INTERNAL_CONTENT_URI,"2"));//调用自己提供的铃声,位于 /res/values/raw 目录下.setSound(Uri.parse("android.resource://com.littlejie.notification/" + R.raw.sound));//另一种设置铃声的方法//Notification notify = builder.build();//调用系统默认铃声//notify.defaults = Notification.DEFAULT_SOUND;//调用自己提供的铃声//notify.sound = Uri.parse("android.resource://com.littlejie.notification/"+R.raw.sound);//调用系统自带的铃声//notify.sound = Uri.withAppendedPath(MediaStore.Audio.Media.INTERNAL_CONTENT_URI,"2");//mManager.notify(2,notify);mManager.notify(2, builder.build());
}/**
* 展示有震动效果的通知,需要在AndroidManifest.xml中申请震动权限
* <uses-permission android:name="android.permission.VIBRATE" />
* 补充:测试震动的时候,手机的模式一定要调成铃声+震动模式,否则你是感受不到震动的
*/
private void showNotifyWithVibrate() {//震动也有两种设置方法,与设置铃声一样,在此不再赘述long[] vibrate = new long[]{0, 500, 1000, 1500};NotificationCompat.Builder builder = new NotificationCompat.Builder(this).setSmallIcon(R.mipmap.ic_launcher).setContentTitle("我是伴有震动效果的通知").setContentText("颤抖吧,凡人~")//使用系统默认的震动参数,会与自定义的冲突//.setDefaults(Notification.DEFAULT_VIBRATE)//自定义震动效果.setVibrate(vibrate);//另一种设置震动的方法//Notification notify = builder.build();//调用系统默认震动//notify.defaults = Notification.DEFAULT_VIBRATE;//调用自己设置的震动//notify.vibrate = vibrate;//mManager.notify(3,notify);mManager.notify(3, builder.build());
}/**
* 显示带有呼吸灯效果的通知,但是不知道为什么,自己这里测试没成功
*/
private void showNotifyWithLights() {final NotificationCompat.Builder builder = new NotificationCompat.Builder(this).setSmallIcon(R.mipmap.ic_launcher).setContentTitle("我是带有呼吸灯效果的通知").setContentText("一闪一闪亮晶晶~")//ledARGB 表示灯光颜色、 ledOnMS 亮持续时间、ledOffMS 暗的时间.setLights(0xFF0000, 3000, 3000);Notification notify = builder.build();//只有在设置了标志符Flags为Notification.FLAG_SHOW_LIGHTS的时候,才支持呼吸灯提醒。notify.flags = Notification.FLAG_SHOW_LIGHTS;//设置lights参数的另一种方式//notify.ledARGB = 0xFF0000;//notify.ledOnMS = 500;//notify.ledOffMS = 5000;//使用handler延迟发送通知,因为连接usb时,呼吸灯一直会亮着Handler handler = new Handler();handler.postDelayed(new Runnable() {@Overridepublic void run() {mManager.notify(4, builder.build());}}, 10000);
}/**
* 显示带有默认铃声、震动、呼吸灯效果的通知
* 如需实现自定义效果,请参考前面三个例子
*/
private void showNotifyWithMixed() {NotificationCompat.Builder builder = new NotificationCompat.Builder(this).setSmallIcon(R.mipmap.ic_launcher).setContentTitle("我是有铃声+震动+呼吸灯效果的通知").setContentText("我是最棒的~")//等价于setDefaults(Notification.DEFAULT_SOUND | Notification.DEFAULT_LIGHTS | Notification.DEFAULT_VIBRATE);.setDefaults(Notification.DEFAULT_ALL);mManager.notify(5, builder.build());
}/**
* 通知无限循环,直到用户取消或者打开通知栏(其实触摸就可以了),效果与FLAG_ONLY_ALERT_ONCE相反
* 注:这里没有给Notification设置PendingIntent,也就是说该通知无法响应,所以只能手动取消
*/
private void showInsistentNotify() {NotificationCompat.Builder builder = new NotificationCompat.Builder(this).setSmallIcon(R.mipmap.ic_launcher).setContentTitle("我是一个死循环,除非你取消或者响应").setContentText("啦啦啦~").setDefaults(Notification.DEFAULT_ALL);Notification notify = builder.build();notify.flags |= Notification.FLAG_INSISTENT;mManager.notify(6, notify);
}/**
* 通知只执行一次,与默认的效果一样
*/
private void showAlertOnceNotify() {NotificationCompat.Builder builder = new NotificationCompat.Builder(this).setSmallIcon(R.mipmap.ic_launcher).setContentTitle("仔细看,我就执行一遍").setContentText("好了,已经一遍了~").setDefaults(Notification.DEFAULT_ALL);Notification notify = builder.build();notify.flags |= Notification.FLAG_ONLY_ALERT_ONCE;mManager.notify(7, notify);
}/**
* 清除所有通知
*/
private void clearNotify() {mManager.cancelAll();
}
至此, Notification 的基本操作都已经讲完了,发送一个带有自定义效果的简单通知已经不在话下。接下去,我们会讲 Notification 的一些高级操作。快上车,没时间解释了~
补充:当用户点击通知栏的时候,正在进行的通知,比如 Notification 的 flags = Notification.FLAG_INSISTENT ,那么相当于用户响应了该通知,后面的 Demo 中会给出具体的代码
文中如有纰漏,欢迎大家留言指出。
微博:厉圣杰
源码:AndroidDemo/Notification
参考
- Android Patterns——Notification
- Android User Interface——Notification
- 全面了解Android Notification