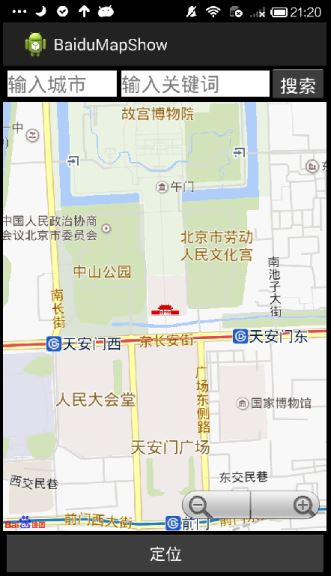
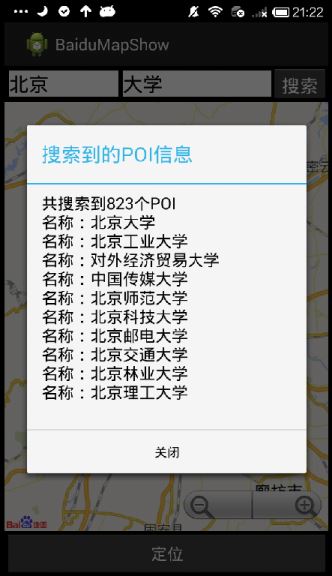
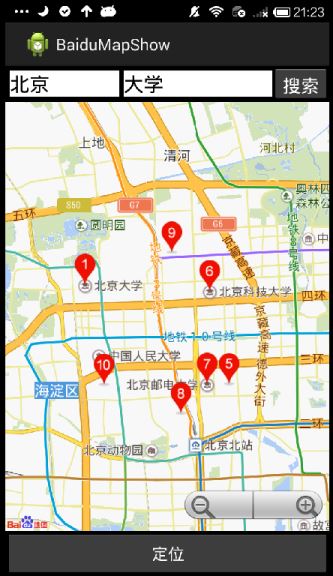
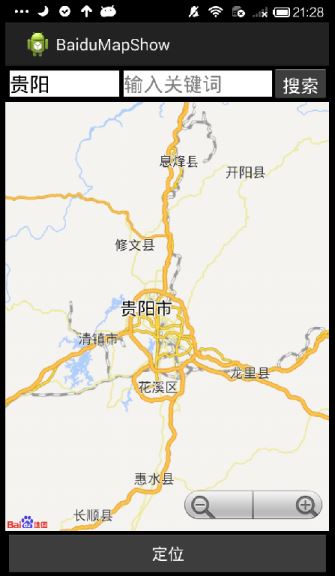
前一篇百度地图开发讲述"(二).定位城市位置和城市POI搜索",主要通过监听对象MKSearchListener类实现城市兴趣点POI(Point of Interest)搜索。该篇讲述定位当前自己的位置及使用getLastKnownLocation获取location总时为空值的问题。
一. 定位当前位置的原理及实现
定位当前位置可以通过LBS(Location Based Service,基于位置的服务),主要工作原理是利用无线网络Network或GPS定位方式确定移动设备所在的位置。
其基本步骤如下:(参考郭神《Android第一行代码》)
1.先实例LocationManager,getSystemService(Context.LOCATION_SERVICE)再确定获取系统的定位服务;
2.选择位置提供器,通常会使用LocationManager.NETWORK_PROVIDER网络定位(精准度差、耗电少)或LocationManager.GPS_PROVIDER实现GPS定位(精准度高、耗电多);
3.然后通过LocationManager的getLastKnownLocation()函数,它选择位置提供器provider得到Location对象;
4.此时你已经获取了地理位置,如果手机移动可以通过LocationManager的另一个函数requestLocationUpdates()方法获取动态的位置信息;
5.获取当前Location后需要加载到百度地图中,可以通过GeoPoint设置当前位置经度和纬度,并使用MyLocationOverlay载入该数据及添加当前位置覆盖物。
其核心代码如下所示:
//定位
private Button button1;
private LocationManager locationManager;
private String provider;/*** 定位自己位置 onCreate函数中点击按钮事件*/
button1.setOnClickListener(new OnClickListener() {@Overridepublic void onClick(View v) {//获取所有位置提供器locationManager =  (LocationManager) getSystemService(Context.LOCATION_SERVICE);List<String> providerList = locationManager.getProviders(true);if(providerList.contains(LocationManager.NETWORK_PROVIDER)) { //网络提供器provider = LocationManager.NETWORK_PROVIDER;} else if(provider.contains(LocationManager.GPS_PROVIDER)) { //GPS提供器provider = LocationManager.GPS_PROVIDER;} else {Toast.makeText(MainActivity.this, "No location provider to use",Toast.LENGTH_SHORT).show();return;}//获取到记录当前位置Location location = locationManager.getLastKnownLocation(provider);if(location!=null) {//定位我的位置MapController controller = mapView.getController();controller.setZoom(16);//latitude 纬度 longitude 经度GeoPoint point =  new GeoPoint((int) (location.getLatitude()*1E6),(int) (location.getLongitude()*1E6));controller.setCenter(point); //设置地图中心mapView.getOverlays().clear(); //清除地图上所有覆盖物MyLocationOverlay locationOverlay = new MyLocationOverlay(mapView);LocationData locationData = new LocationData();locationData.latitude = location.getLatitude(); //纬度locationData.longitude = location.getLongitude(); //经度locationOverlay.setData(locationData);//添加覆盖物mapView.getOverlays().add(locationOverlay);mapView.refresh(); //刷新}
}
二. 定位当前位置的问题
但是此时你可能会遇到两个问题:
第一个问题是有时候百度地图不能定位到当前位置,究其原因我发现代码获取的location总为空值,即:
Location location = locationManager.getLastKnownLocation(provider);
第二个问题就是在能定位当前位置的情况下,获取的位置总是存在偏移,向左下方偏移一定方位。
其中第一个问题在getLastKnownLocation(provider)总是获取Null,据说是该函数获取的是上一次Location,而且它不是一次就能定位成功的,需要多次定位才能实现。通过在getLastKnownLocation()函数后添加循环多次定位如下代码:
location = locationManager.getLastKnownLocation(provider);
while(location  == null)
{  mgr.requestLocationUpdates("gps", 60000, 1, locationListener);
} private final LocationListener locationListener = new LocationListener() { //位置发生改变后调用 public void onLocationChanged(Location location) { //更新当前设备的新位置信息showLocation(location);} //provider 被用户关闭后调用 public void onProviderDisabled(String provider) { } //provider 被用户开启后调用 public void onProviderEnabled(String provider) { } //provider 状态变化时调用 public void onStatusChanged(String provider, int status, Bundle extras) { }
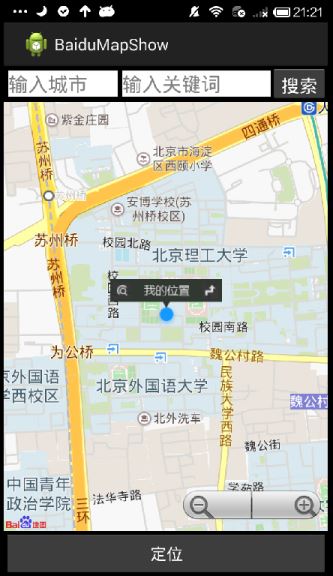
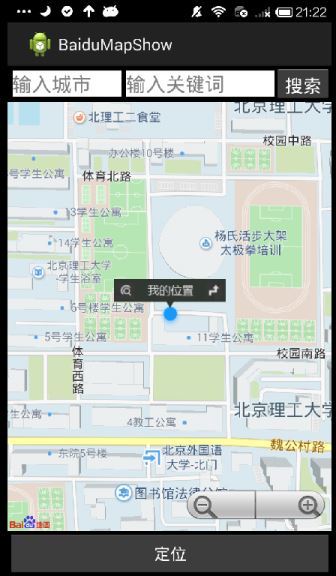
};三. 定位当前位置(源码)
此种方法参考xiaanming大神的博客,推荐大家阅读,讲述的非常好尤其是其实现细节,我主要是阐述该问题及提供一个可行方法罢了。
http://blog.csdn.net/xiaanming/article/details/11380619
主要通过locSDK的LocationClient实现显示当前位置,同时此种方法如果遇到没有显示地图。其原因是:首先需要在AndroidManifest.xml中添加如下代码。
参考:http://bbs.csdn.net/topics/390382448
<application><activity></activity>....<serviceandroid:name="com.baidu.location.f"android:enabled="true"android:process=":remote" ></service>
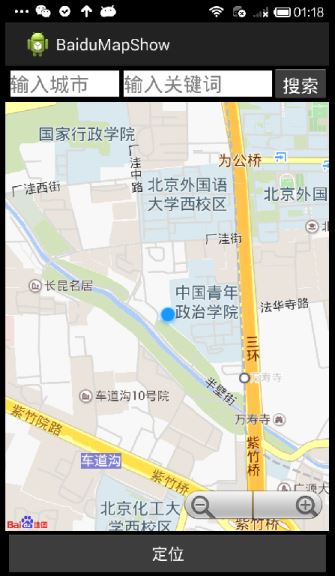
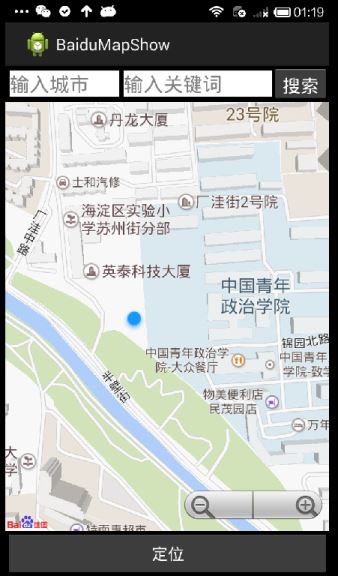
</application>它能获取当前位置,并且通过监听函数5秒间隔获取一次;
public class BDLocationListenerImpl implements BDLocationListener
在监听函数中富国flag!=1表示没有点击“定位”按钮则不实现监听定位当前位置功能;同时结合前面第二篇文章POI搜索及城市定位功能。
下载地址Demo:http://download.csdn.net/detail/eastmount/8349191
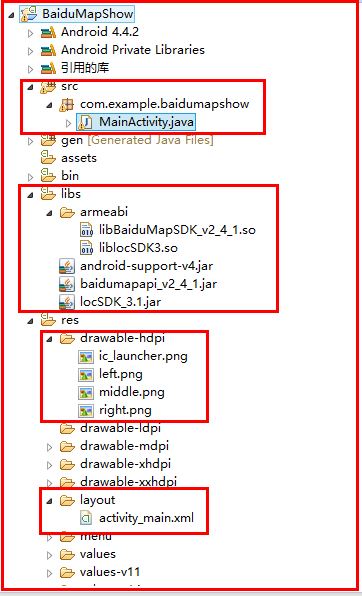
2.注意需要引入SDK包括LocSDK_3.1.jar和liblocSDK3.so,其工程结构如下所示:
3.MainActivity.java文件
public class MainActivity extends Activity {//BMapManager 对象管理地图、定位、搜索功能private BMapManager mBMapManager; private MapView mapView = null; //地图主控件 private MapController mMapController = null; //地图控制 MKMapViewListener mMapListener = null; //处理地图事件回调 private MKSearch mMKSearch; //定义搜索服务类//搜索private EditText keyWordEditText; private EditText cityEditText;private Button queryButton;private static StringBuilder sb; private MyLocationOverlay myLocationOverlay;//定位private Button button1; private LocationManager locationManager;private String provider;//方法二 定位位置private BDLocation myLocation; private LocationData mLocData; //用户位置信息 private LocationClient mLocClient; //定位SDK的核心类 private MyLocationOverlay locationOverlay = null; //我的图层private PopupOverlay pop; //弹出pop 我的位置private int flag=0; //标记变量 定位我的位置=1 POI为2@Overrideprotected void onCreate(Bundle savedInstanceState) {super.onCreate(savedInstanceState);/*** 创建对象BMapManager并初始化操作* V2.3.1中init(APIKey,null) V2.4.1在AndroidManifest中赋值AK* 注意 初始化操作在setContentView()前*/mBMapManager = new BMapManager(getApplication()); mBMapManager.init(null); setContentView(R.layout.activity_main); //获取对象mapView = (MapView) findViewById(R.id.map_view); cityEditText = (EditText) findViewById(R.id.city_edittext);keyWordEditText = (EditText) findViewById(R.id.keyword_edittext);queryButton = (Button) findViewById(R.id.query_button);button1 = (Button) findViewById(R.id.button1);//地图初始化mMapController = mapView.getController(); //获取地图控制器mMapController.enableClick(true); //设置地图是否响应点击事件mMapController.setZoom(16); //设置地图缩放级别mapView.setBuiltInZoomControls(true); //显示内置缩放控件/*** 定位自己位置*/ //方法二button1.setOnClickListener(new OnClickListener() {@Overridepublic void onClick(View v) {flag = 1;locationManager = (LocationManager) getSystemService(Context.LOCATION_SERVICE);//设置缩放级别 级别越高地图显示精细MapController controller = mapView.getController();controller.setZoom(16);//实例化定位服务 LocationClient类必须在主线程中声明 并注册定位监听接口mLocClient = new LocationClient(getApplicationContext()); mLocClient.registerLocationListener(new BDLocationListenerImpl()); /** * LocationClientOption 该类用来设置定位SDK的定位方式。 */ LocationClientOption option = new LocationClientOption(); option.setOpenGps(true); //打开GPRS option.setAddrType("all"); //返回的定位结果包含地址信息 option.setCoorType("bd09ll"); //返回的定位结果是百度经纬度,默认值gcj02 option.setPriority(LocationClientOption.GpsFirst); // 设置GPS优先 option.setScanSpan(5000); //设置发起定位请求的间隔时间为5000ms option.disableCache(false); //禁止启用缓存定位mLocClient.setLocOption(option); //设置定位参数mLocClient.start(); // 调用此方法开始定位 //定位图层初始化mapView.getOverlays().clear(); locationOverlay= new MyLocationOverlay(mapView); //实例化定位数据,并设置在我的位置图层 mLocData = new LocationData(); locationOverlay.setData(mLocData); //添加定位图层 mapView.getOverlays().add(locationOverlay); //修改定位数据后刷新图层生效 mapView.refresh(); }});/*** 初始化MKSearch 调用城市和POI搜索 */mMKSearch = new MKSearch();mMKSearch.init(mBMapManager, new MySearchListener()); queryButton.setOnClickListener(new OnClickListener() { @Override public void onClick(View v) { if(flag==1) {pop.hidePop();flag = 2;}mMapController = mapView.getController();mMapController.setZoom(10); sb = new StringBuilder(); //内容清空 //输入正确城市关键字String city = cityEditText.getText().toString().trim(); String keyWord = keyWordEditText.getText().toString().trim(); if(city.isEmpty()) { //默认城市设置为贵阳city="贵阳";}//如果关键字为空只搜索城市 GEO搜索 if(keyWord.isEmpty()) {mMKSearch.geocode(city, city); //具体地址和城市 geocode(adress, city)} else {//搜索城市+关键字 mMKSearch.setPoiPageCapacity(10); //每页返回POI数mMKSearch.poiSearchInCity(city, keyWord); }} }); }/** * 定位接口,需要实现两个方法 * 参考 http://blog.csdn.net/xiaanming/article/details/11380619*/ public class BDLocationListenerImpl implements BDLocationListener { /** * 接收异步返回的定位结果,参数是BDLocation类型参数 */ @Override public void onReceiveLocation(BDLocation location) { if (location == null || flag != 1) { return; } MapController controller = mapView.getController();//设置经纬度MainActivity.this.myLocation = location; mLocData.latitude = location.getLatitude(); mLocData.longitude = location.getLongitude(); GeoPoint point = new GeoPoint((int) (location.getLatitude() * 1E6),(int) (location.getLongitude() * 1E6));controller.setCenter(point);//如果不显示定位精度圈,将accuracy赋值为0即可 //mLocData.accuracy = location.getRadius(); mLocData.direction = location.getDerect(); mLocData.accuracy = 0;//将定位数据设置到定位图层里 locationOverlay.setData(mLocData); //更新图层数据执行刷新后生效 mapView.refresh(); //覆盖物if(flag==1) {//添加图形pop = new PopupOverlay(mapView, new PopupClickListener() { @Overridepublic void onClickedPopup(int index) {}});Bitmap[] bitmaps = new Bitmap[3];try {bitmaps[0] = BitmapFactory.decodeResource(getResources(),R.drawable.left);bitmaps[1] = BitmapFactory.decodeResource(getResources(),R.drawable.middle);bitmaps[2] = BitmapFactory.decodeResource(getResources(),R.drawable.right);} catch (Exception e) {e.printStackTrace();}pop.showPopup(bitmaps, point, 18);} } /** * 接收异步返回的POI查询结果,参数是BDLocation类型参数 */ @Override public void onReceivePoi(BDLocation poiLocation) { } } @Overrideprotected void onResume() {mapView.onResume();if (mBMapManager != null) {mBMapManager.start();}super.onResume();}@Overrideprotected void onDestroy() {mapView.destroy();if (mBMapManager != null) {mBMapManager.destroy();mBMapManager = null;}super.onDestroy();}@Overrideprotected void onPause() {mapView.onPause();if (mBMapManager != null) {mBMapManager.stop();}super.onPause();} /** * 内部类实现MKSearchListener接口,用于实现异步搜索服务 */ public class MySearchListener implements MKSearchListener { /** * 根据经纬度搜索地址信息结果 * 同时mMKSearch.geocode(city, city)搜索城市返回至该函数* * @param result 搜索结果 * @param iError 错误号(0表示正确返回) */ @Override public void onGetAddrResult(MKAddrInfo result, int iError) { if (result == null) { return; } StringBuffer sbcity = new StringBuffer(); sbcity.append(result.strAddr).append("\n"); //经纬度所对应的位置 mapView.getOverlays().clear(); //清除地图上已有的所有覆盖物 mMapController.setCenter(result.geoPt); //置为地图中心//添加原点并刷新LocationData locationData = new LocationData();locationData.latitude = result.geoPt.getLatitudeE6();locationData.longitude = result.geoPt.getLongitudeE6();myLocationOverlay = new MyLocationOverlay(mapView);myLocationOverlay.setData(locationData);mapView.getOverlays().add(myLocationOverlay);mapView.refresh();// 通过AlertDialog显示地址信息new AlertDialog.Builder(MainActivity.this) .setTitle("显示当前城市地图") .setMessage(sbcity.toString()) .setPositiveButton("关闭", new DialogInterface.OnClickListener() { public void onClick(DialogInterface dialog, int whichButton) { dialog.dismiss(); } }).create().show();} /** * POI搜索结果(范围检索、城市POI检索、周边检索) * * @param result 搜索结果 * @param type 返回结果类型(11,12,21:poi列表 7:城市列表) * @param iError 错误号(0表示正确返回) */ @Override public void onGetPoiResult(MKPoiResult result, int type, int iError) { if (result == null) { return; } //获取POI并显示mapView.getOverlays().clear(); PoiOverlay poioverlay = new PoiOverlay(MainActivity.this, mapView); //显示POIpoioverlay.setData(result.getAllPoi()); //设置搜索到的POI数据 mapView.getOverlays().add(poioverlay); //兴趣点标注在地图上mapView.refresh(); //设置其中一个搜索结果所在地理坐标为地图的中心 if(result.getNumPois() > 0) { MKPoiInfo poiInfo = result.getPoi(0); mMapController.setCenter(poiInfo.pt); } //添加StringBuffer 遍历当前页返回的POI (默认只返回10个)sb.append("共搜索到").append(result.getNumPois()).append("个POI\n"); for (MKPoiInfo poiInfo : result.getAllPoi()) { sb.append("名称:").append(poiInfo.name).append("\n");}// 通过AlertDialog显示当前页搜索到的POI new AlertDialog.Builder(MainActivity.this) .setTitle("搜索到的POI信息") .setMessage(sb.toString()) .setPositiveButton("关闭", new DialogInterface.OnClickListener() { public void onClick(DialogInterface dialog, int whichButton) { dialog.dismiss(); } }).create().show();} /** * 驾车路线搜索结果 * * @param result 搜索结果 * @param iError 错误号(0表示正确返回) */ @Override public void onGetDrivingRouteResult(MKDrivingRouteResult result, int iError) { } /** * 公交换乘路线搜索结果 * * @param result 搜索结果 * @param iError 错误号(0表示正确返回) */ @Override public void onGetTransitRouteResult(MKTransitRouteResult result, int iError) { } /** * 步行路线搜索结果 * * @param result 搜索结果 * @param iError 错误号(0表示正确返回) */ @Override public void onGetWalkingRouteResult(MKWalkingRouteResult result, int iError) { }@Overridepublic void onGetBusDetailResult(MKBusLineResult arg0, int arg1) {// TODO Auto-generated method stub}@Overridepublic void onGetPoiDetailSearchResult(int arg0, int arg1) {// TODO Auto-generated method stub}@Overridepublic void onGetShareUrlResult(MKShareUrlResult arg0, int arg1, int arg2) {// TODO Auto-generated method stub}@Overridepublic void onGetSuggestionResult(MKSuggestionResult arg0, int arg1) {// TODO Auto-generated method stub }} }<RelativeLayout xmlns:android="http://schemas.android.com/apk/res/android"xmlns:tools="http://schemas.android.com/tools"android:id="@+id/container"android:layout_width="match_parent"android:layout_height="match_parent"android:background="#000000"tools:context="com.example.baidumapshow.MainActivity"tools:ignore="MergeRootFrame" ><!-- 顶部搜索 --><RelativeLayout android:id="@+id/MyLayout_top"android:orientation="horizontal" android:layout_width="fill_parent"android:layout_height="40dp" android:layout_alignParentTop="true"android:gravity="center"><LinearLayout android:orientation="horizontal" android:layout_width="fill_parent" android:layout_height="wrap_content" android:background="@null" android:padding="0dip" > <EditText android:id="@+id/city_edittext" android:layout_width="wrap_content" android:layout_height="wrap_content" android:layout_gravity="center_vertical"android:layout_marginLeft="5dp"android:background="#ffffff" android:textSize="22dp" android:hint="输入城市"android:layout_weight="15" /><EditText android:id="@+id/keyword_edittext" android:layout_width="wrap_content" android:layout_height="wrap_content" android:layout_gravity="center_vertical"android:layout_marginLeft="5dp"android:background="#ffffff" android:textSize="22dp" android:hint="输入关键词"android:layout_weight="25" /> <Button android:id="@+id/query_button" android:layout_width="wrap_content" android:layout_height="wrap_content" android:layout_gravity="center_vertical" android:textColor="#ffffff"android:textSize="20dp"android:text="搜索" /> </LinearLayout> </RelativeLayout><!-- 底部添加按钮 --> <RelativeLayout android:id="@+id/MyLayout_bottom" android:orientation="horizontal" android:layout_width="fill_parent" android:layout_height="50dp" android:layout_alignParentBottom="true" android:gravity="center"> <LinearLayout android:layout_width="match_parent" android:layout_height="match_parent" android:orientation="horizontal" android:layout_alignParentBottom="true" > <Button android:id="@+id/button1" android:layout_width="wrap_content" android:layout_height="match_parent" android:layout_weight="1" android:textColor="#ffffff"android:text="定位" /> </LinearLayout> </RelativeLayout> <!-- 显示图片 --><RelativeLayoutandroid:id="@+id/Content_Layout" android:orientation="horizontal"android:layout_width="fill_parent" android:layout_height="fill_parent"android:layout_above="@id/MyLayout_bottom" android:layout_below="@id/MyLayout_top"android:gravity="center"><com.baidu.mapapi.map.MapView android:id="@+id/map_view"android:layout_width="fill_parent" android:layout_height="fill_parent" android:clickable="true" /></RelativeLayout>
</RelativeLayout><?xml version="1.0" encoding="utf-8"?>
<manifest xmlns:android="http://schemas.android.com/apk/res/android"package="com.example.baidumapshow"android:versionCode="1"android:versionName="1.0" ><uses-sdkandroid:minSdkVersion="19"android:targetSdkVersion="19" /><!-- 获取网络状态 --><uses-permission android:name="android.permission.ACCESS_NETWORK_STATE" /><!-- 访问网络 --><uses-permission android:name="android.permission.INTERNET" /><!-- 获取WiFi状态 --><uses-permission android:name="android.permission.ACCESS_WIFI_STATE" /><uses-permission android:name="android.permission.CHANGE_WIFI_STATE" /><!-- 允许程序写入外部存储,如SD卡上写文件 --><uses-permission android:name="android.permission.WRITE_EXTERNAL_STORAGE" /><uses-permission android:name="android.permission.WRITE_SETTINGS" /><!-- 读取电话状态 --><uses-permission android:name="android.permission.READ_PHONE_STATE" /><uses-permission android:name="android.permission.CALL_PHONE" /><!-- 获取精确位置 GPS芯片接收卫星的定位信息,定位精度达10米以内 --><uses-permission android:name="android.permission.ACCESS_FINE_LOCATION" /><!-- 通过WiFi或移动基站的方式获取用户错略的经纬度信息 --><uses-permission android:name="android.permission.ACCESS_COARSE_LOCATION" /><!-- 获取模拟定位信息 --><uses-permission android:name="android.permission.ACCESS_MOCK_LOCATION" /><uses-permission android:name="android.permission.ACCESS_GPS" /><applicationandroid:allowBackup="true"android:icon="@drawable/ic_launcher"android:label="@string/app_name"android:theme="@style/AppTheme" ><meta-data android:name="com.baidu.lbsapi.API_KEY" android:value="QwaNhFQ0ty2QmdYh3Nrr0gQx"></meta-data> <activityandroid:name="com.example.baidumapshow.MainActivity"android:label="@string/app_name" ><intent-filter><action android:name="android.intent.action.MAIN" /><category android:name="android.intent.category.LAUNCHER" /></intent-filter></activity><serviceandroid:name="com.baidu.location.f"android:enabled="true"android:process=":remote" ></service></application></manifest>下载地址:http://download.csdn.net/detail/eastmount/8349191
[android] 百度地图开发 (一).申请AK显示地图及解决显示空白网格问题
[android] 百度地图开发 (二).定位城市位置和城市POI搜索
(By:Eastmount 2015-01-11 夜2点 http://blog.csdn.net/eastmount/)