线程概念
什么是多线程,提出这个问题的时候,我还是很老实的拿出操作系统的书,按着上面的话敲下“为了减少进程切换和创建开销,提高执行效率和节省资源,我们引入了线程的概念,与进程相比较,线程是CPU调度的一个基本单位。”
当 Linux 最初开发时,在内核中并不能真正支持线程。那为什么要使用多线程?
使用多线程的理由之一是和进程相比,它是一种非常"节俭"的多任务操作方式。运行于一个进程中的多个线程,它们彼此之间使用相同的地址空间,共享大部分数据,启动一个线程所花费的空间远远小于启动一个进程所花费的空间,而且,线程间彼此切换所需的时间也远远小于进程间切换所需要的时间。
那么线程是干什么的呢?简要概括下线程的职责:线程是程序中完成一个独立任务的完整执行序列。
线程管理
创建线程
#include<pthread.h>intpthread_create(pthread_t *thread, constpthread_attr_t *attr,void *(*start_routine) (void *),void *arg);- thread:线程id,唯一标识- attr:线程属性,参数可选- start_routine:线程执行函数- arg:传递给线程的参数Demo1:创建一个线程
#include<pthread.h>intpthread_create(pthread_t *thread, constpthread_attr_t *attr,void *(*start_routine) (void *),void *arg);- thread:线程id,唯一标识- attr:线程属性,参数可选- start_routine:线程执行函数- arg:传递给线程的参数Demo1:创建一个线程#include<pthread.h>
#include<stdio.h>
void *workThreadEntry(void *args)
{char*str = (char*)args;printf("threadId:%lu,argv:%s\n",pthread_self(),str);
}
intmain(int argc,char *agrv[])
{pthread_t thread_id;char*str = "hello world"; pthread_create(&thread_id,NULL,workThreadEntry,str);printf("threadId=%lu\n",pthread_self()); pthread_join(thread_id,NULL);
}
//编译运行
$ gcc -o main main.c -pthread$ ./main threadId=140381594486592threadId:140381585938176,argv:hello world运行结果是创建一个线程,打印线程id和主线程传递过来的参数。
线程退出与等待
#include<pthread.h>
int pthread_join(pthread_t thread, void **retval);
这是一个阻塞函数,用于等待线程退出,对线程资源进行收回。
一个线程对应一个pthread_join()调用,对同一个线程进行多次pthread_join()调用属于逻辑错误,俗称耍流氓。
那么线程什么时候退出?
1.在线程函数运行完后,该线程也就退出了
2.线程内调用函数pthread_exit()主动退出
3.当线程可以被取消时,通过其他线程调用pthread_cancel的时候退出
4.创建线程的进程退出
5.主线程执行了exec类函数,该进程的所有的地址空间完全被新程序替换,子线程退出
线程的状态
线程pthread有两种状态:joinable状态和unjoinable状态;
如果线程是joinable状态,当线程函数自己返回退出时或pthread_exit时都不会释放线程所占用堆栈和线程描述符(总计8K多)。只有当你调用了pthread_join之后这些资源才会被释放。
若是unjoinable状态的线程,这些资源在线程函数退出时或pthread_exit时自动会被释放。pthread的状态在创建线程的时候指定,创建一个线程默认的状态是joinable。
状态为joinable的线程可在创建后,用pthread_detach()显式地分离,但分离后不可以再合并,该操作不可逆。
#include<pthread.h>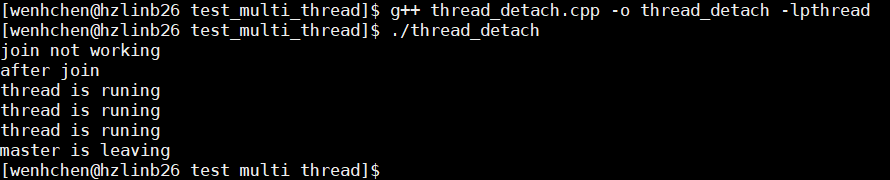
int pthread_detach(pthread_t thread);pthread_detach这个函数就是用来分离主线程和子线程,这样做的好处就是当子线程退出时系统会自动释放线程资源。
主线程与子线程分离,子线程结束后,资源自动回收。
线程取消
在线程的退出中我们说到线程可以被其他线程结束。
1.一个线程可以调用pthread_cancel来取消另一个线程。
2.被取消的线程需要被join来释放资源。
3.被取消的线程的返回值为PTHREAD_CANCELED
有关线程的取消,一个线程可以为如下三个状态:
1.可异步取消:一个线程可以在任何时刻被取消。
2.可同步取消:取消的请求被放在队列中,直到线程到达某个点,才被取消。
3.不可取消:取消的请求被忽略。
首先线程默认是可以取消的,通过pthread_setcancelstate设置线程的取消状态属性

调用pthread_setcanceltype来设定线程取消的方式:
pthread_setcanceltype (PTHREAD_CANCEL_ASYNCHRONOUS, NULL); //异步取消、pthread_setcanceltype (PTHREAD_CANCEL_DEFERRED, NULL); //同步取消、pthread_setcanceltype (PTHREAD_CANCEL_DISABLE, NULL); //不能取消线程回收Linux提供回收器(cleanup handler),它是一个API函数,在线程退出的时候被调用。
#include<pthread.h>
void pthread_cleanup_push(void (*routine)(void *)
void pthread_cleanup_pop(int execute);
//这两个API是为了解决线程终止或者异常终止时,释放资源的问题。
Demo2:线程回收示例
//pthread_pop_push.c
#include<pthread.h>
#include<unistd.h>
#include<stdlib.h>
#include<stdio.h>
void cleanup(){printf("cleanup\n");}
void *test_cancel(void){
//注册一个回收器
pthread_cleanup_push(cleanup,NULL);printf("test_cancel\n");while(1) {printf("test message\n"); sleep(1); }//调用且注销回收器 pthread_cleanup_pop(1);}int main()]{pthread_t tid; pthread_create(&tid,NULL,(void *)test_cancel,NULL); sleep(2); pthread_cancel(tid); pthread_join(tid,NULL);}//线程的私有数据
我们在开头的概述中讲到运行于一个进程中的多个线程,它们彼此之间使用相同的地址空间,共享大部分数据。既然是大部分数据那么就有属于线程的私有数据
TSD私有数据,同名但是不同内存地址的私有数据结构
创建私有数据
int pthread_key_create(pthread_key_t *__key,void (*__destr_function) (void *));
int pthread_key_delete(pthread_key_t __key);
- __key:pthread_key_t类型的变量- __destr_function:清理函数,用来在线程释放该线程存储的时候被调用创建和删除私有数据是对应的读写私有数据extern int pthread_setspecific(pthread_key_t __key,constvoid *__pointer);
void *pthread_getspecific(pthread_key_t __key);
- __key:pthread_key_t类型的变量
- __pointer:void*类型的值
Demo3:线程私有数据示例
//pthread_key_test.c
#include<stdio.h>
#include<unistd.h>
#include<pthread.h>
pthread_key_t key;
void echomsg(void *t)
{
printf("destructor excuted in thread %lu,param=%p\n",pthread_self(),((int *)t));
}
void * thread1(void *arg)
{
int i=10;
printf("set key value %d in thread %lu\n",i,pthread_self());pthread_setspecific(key,&i);
printf("thread 2s..\n");
sleep(2);
printf("thread:%lu,key:%d,address:%p\n",pthread_self(),*((int *)pthread_getspecific(key)),(int *)pthread_getspecific(key));
}
void * thread2(void *arg)
{
int temp=20;
printf("set key value %d in thread %lu\n",temp,pthread_self()); pthread_setspecific(key,&temp);
printf("thread 1s..\n");
sleep(1);
printf("thread:%lu,key:%d,address:%p\n",pthread_self(),*((int *)pthread_getspecific(key)),(int *)pthread_getspecific(key));
}
int main(void)
{
pthread_t tid1,tid2;
pthread_key_create(&key,echomsg);
pthread_create(&tid1,NULL,(void *)thread1,NULL); pthread_create(&tid2,NULL,(void *)thread2,NULL); pthread_join(tid1,NULL);
pthread_join(tid2,NULL);pthread_key_delete(key); return0; } 运行结果$ ./main set key value 20 in thread 139739044730624thread 1s..
set key value 10 in thread 139739053123328thread 2s..
thread:139739044730624,
key:20,
address:0x7f17881f4ed4de
structor excuted in thread 139739044730624,
param=0x7f17881f4ed4
thread:139739053123328,
key:10,
address:0x7f17889f5ed4de
structor excuted in thread 139739053123328,
param=0x7f17889f5ed4
从结果集里面可以看到key在两个线程中的地址是一样的但是key值不同。
线程属性
在创建线程的时候,pthread_create第二个参数设为NULL即线程属性,一般情况下,使用默认属性就可以解决我们开发过程中的大多数问题。
线程属性标识pthread_attr_t结构如下
//线程属性结构如下:
typedef struct{
int detachstate;
//线程的分离状态
int schedpolicy;
//线程调度策略
struct sched_param schedparam;
//线程的调度参数
int inheritsched;
//线程的继承性
int scope;
//线程的作用域
size_t guardsize;
//线程栈末尾的警戒缓冲区大小
int stackaddr_set;
//线程的栈设置
void* stackaddr;
//线程栈的位置
size_t stacksize;
//线程栈的大小}pthread_attr_t;//属性值不能直接设置,须使用相关函数进行操作,//初始化的函数为pthread_attr_init,//这个函数必须在pthread_create函数之前调用。//之后须用pthread_attr_destroy函数来释放资源。
#include<pthread.h>
int pthread_attr_init(pthread_attr_t *attr);
int pthread_attr_destroy(pthread_attr_t *attr);
作用域(scope)
栈尺寸(stack size)
栈地址(stack address)
优先级(priority)
分离的状态(detached state)
调度策略和参数(scheduling policy and parameters)。
默认的属性为非绑定、非分离、缺省1M的堆栈、与父进程同样级别的优先级。
这里简要说明下线程分离状态(detached state)和堆栈大小(stacksize),主要是这个我个人用的比较多
Demo4:线程属性设置
#include<pthread.h>
#include<unistd.h>
#include<stdio.h>
void* thread_run(void* args)
{
size_t threadSize;
pthread_attr_t* threadAttr = (pthread_attr_t*)args; pthread_attr_getstacksize(threadAttr,&threadSize);
printf("thread threadSize:%ld\n",threadSize);
}
int main()
{
pthread_t threadId;
pthread_attr_t threadAttr;pthread_attr_init(&threadAttr); pthread_attr_setdetachstate(&threadAttr, PTHREAD_CREATE_DETACHED); //PTHREAD_CREATE_DETACHED:线程分离 ;//PTHREAD_CREATE_JOINABLE:非分离线程 pthread_attr_setstacksize(&threadAttr, 4 * 1024 * 1024); pthread_create(&threadId, &threadAttr, thread_run, &threadAttr); sleep(1);return0;}
运行结果
$ gcc -o main main.c -lpthread$ ./main thread threadSize:4194304这样我们就创建一个堆栈大小为 4194304 线程分离的线程。
Linux线程属性总结文章参考:
https://blog.csdn.net/nkguohao/article/details/38796475
线程的同步互斥
在开头说道,在多线程的程序中,多个线程共享堆栈空间,那么就会存在问题
互斥锁
在多线程的程序中,多个线程共享临界区资源,那么就会有竞争问题,互斥锁mutex是用来保护线程间共享的全局变量安全的一种机制, 保证多线程中在某一时刻只允许某一个线程对临界区的访问。
POSIX标准下互斥锁是pthread_mutex_t,与之相关的函数有:
int pthread_mutex_init(pthread_mutex_t * mutex ,pthread_mutexattr_t * attr);
int pthread_mutex_destroy(pthread_mutex_t * mutex);
int pthread_mutex_lock(pthread_mutex_t * mutex );
//阻塞式
int pthread_mutex_unlock(pthread_mutex_t * mutex );
int pthread_mutex_trylock(pthread_mutex_t * mutex );
//非阻塞式
int pthread_mutex_timedlock(pthread_mutex_t mutex, const struct timespec *tsptr);
//返回值: 成功则返回 0, 出错则返回错误编号.
对共享资源的访问, 要对互斥量进行加锁, 如果互斥量已经上了锁, 调用线程会阻塞, 直到互斥量被解锁. 在完成了对共享资源的访问后, 要对互斥量进行解锁。
Demo5:互斥锁的应用
//使用互斥量解决多线程抢占资源的问题
#include<stdio.h>
#include<stdlib.h>
#include<unistd.h>
#include<pthread.h>
#include<string.h>
char* buf[5]; //字符指针数组 全局变量
int pos; //用于指定上面数组的下标
//1.定义互斥量
pthread_mutex_t mutex;
void *task(void *p)
{
//3.使用互斥量进行加锁
//
pthread_mutex_lock(&mutex);
buf[pos] = (char *)p;
usleep(200);
//耗时操作
pos++;
//4.使用互斥量进行解锁
// pthread_mutex_unlock(&mutex);
}
int main(void){
//2.初始化互斥量, 默认属性pthread_mutex_init(&mutex, NULL);//1.启动一个线程 向数组中存储内容pthread_t tid, tid2; pthread_create(&tid, NULL, task, (void *)"str1"); pthread_create(&tid2, NULL, task, (void *)"str2");//2.主线程进程等待,并且打印最终的结果 pthread_join(tid, NULL); pthread_join(tid2, NULL);//5.销毁互斥量 pthread_mutex_destroy(&mutex);int i = 0;printf("字符指针数组中的内容是:");for(i = 0; i < pos; ++i) {printf("%s ", buf[i]); }printf("\n");return 0;}
Demo中注释掉了互斥锁,运行结果如下
$ ./main 字符指针数组中的内容是:str1 (null) Demo中创建了两个线程用来给buf赋值字符串,期望的效果是第一个线程给buf[0]赋值‘str1’,第二个线程给buf[0]赋值‘str2’,当出现耗时操作的时候同时给buf[0]赋值’str1’和’str2’,与期望不符
加上互斥锁之后,运行结果如下
$ ./main 字符指针数组中的内容是:str2 str1读写锁
读写锁与互斥量类似,不过读写锁允许更改的并行性,也叫共享互斥锁。
如果当前线程读数据 则允许其他线程进行读操作 但不允许写操作
如果当前线程写数据 则其他线程的读写都不允许操作
例如对数据库数据的读写应用:为了满足当前能够允许多个读出,但只允许一个写入的需求,线程提供了读写锁来实现。
与读写锁相关的API函数如下所示
#include<pthread.h>
int pthread_rwlock_init(pthread_rwlock_t *rwlock,constpthread_rwlockattr_t *attr);
int pthread_rwlock_rdlock(pthread_rwlock_t *rwlock ); //非阻塞式
int pthread_rwlock_wrlock(pthread_rwlock_t *rwlock ); //非阻塞式
int pthread_rwlock_tryrdlock(pthread_rwlock_t *rwlock); //阻塞式
int pthread_rwlock_trywrlock(pthread_rwlock_t *rwlock); //阻塞式
int pthread_rwlock_unlock(pthread_rwlock_t *rwlock);
int pthread_rwlock_destroy(pthread_rwlock_t *rwlock);
读写锁的使用和互斥锁类似,接下来Demo简单演示下
Demo创建了四个线程,两个读线程,两个写线程,当写线程抢到锁之后,读取用户输入(有人在写),这个时候其他读写锁都不能锁定,当用户输入完之后,其他线程抢锁,读线程抢到锁之后,只有另一个读线程才可以抢到锁,写线程不可以抢到锁。
Demo6:读写锁的应用
#include<errno.h>
#include<pthread.h>
#include<stdio.h>
#include<stdlib.h>
#include<unistd.h>
#include<string.h>
static pthread_rwlock_t rwlock;
#define WORK_SIZE 1024
char work_area[WORK_SIZE];
int time_to_exit;
void *thread_function_read_o(void *arg);
void *thread_function_read_t(void *arg);
void *thread_function_write_o(void *arg);
void *thread_function_write_t(void *arg);
int main(int argc,char *argv[])
{
int res;
pthread_t a_thread,b_thread,c_thread,d_thread;
void *thread_result;
res=pthread_rwlock_init(&rwlock,NULL);
res = pthread_create(&a_thread, NULL, thread_function_read_o, NULL);
//create new thread
res = pthread_create(&b_thread, NULL, thread_function_read_t, NULL);
//create new thread
res = pthread_create(&c_thread, NULL, thread_function_write_o, NULL);
//create new thread
res = pthread_create(&d_thread, NULL, thread_function_write_t, NULL);
//create new thread
res = pthread_join(a_thread, &thread_result);
res = pthread_join(b_thread, &thread_result);
res = pthread_join(c_thread, &thread_result);
res = pthread_join(d_thread, &thread_result);
pthread_rwlock_destroy(&rwlock);
exit(EXIT_SUCCESS);
}
void *thread_function_read_o(void *arg)
{
while(strncmp("end", work_area, 3) != 0)
{
pthread_rwlock_rdlock(&rwlock);
printf("this is thread read one.");
printf("read characters is %s",work_area);
pthread_rwlock_unlock(&rwlock);
sleep(1);
}
pthread_rwlock_unlock(&rwlock);
time_to_exit=1;
pthread_exit(0);
}
void *thread_function_read_t(void *arg)
{
while(strncmp("end", work_area, 3) != 0)
{
pthread_rwlock_rdlock(&rwlock);
printf("this is thread read two.");
printf("read characters is %s",work_area);
pthread_rwlock_unlock(&rwlock);
sleep(2);
}
time_to_exit=1;
pthread_exit(0);
}
void *thread_function_write_o(void *arg){
while(!time_to_exit)
{
pthread_rwlock_wrlock(&rwlock);
printf("this is write thread one.\nInput some text.\n");
fgets(work_area, WORK_SIZE, stdin);
pthread_rwlock_unlock(&rwlock);
sleep(1);
}
pthread_rwlock_unlock(&rwlock);
pthread_exit(0);
}
void *thread_function_write_t(void *arg)
{
while(!time_to_exit)
{
pthread_rwlock_wrlock(&rwlock);
printf("this is write thread two.\nInput some text.\n");
fgets(work_area, WORK_SIZE, stdin);
pthread_rwlock_unlock(&rwlock);
sleep(2);
}
pthread_rwlock_unlock(&rwlock);
pthread_exit(0);
}
//可以自行运行试一下效果.
条件变量
条件变量(cond)使在多线程程序中用来实现“等待—>唤醒”逻辑常用的方法,是进程间同步的一种机制。条件变量用来阻塞一个线程,直到条件满足被触发为止,通常情况下条件变量和互斥量同时使用。
一般条件变量有两个状态:
1.一个/多个线程为等待“条件变量的条件成立“而挂起;
2.另一个线程在“条件变量条件成立时”通知其他线程。
条件变量的类型 pthread_cond_t
#include<pthread.h>
int pthread_cond_init(pthread_cond_t *restrict cond, constpthread_condattr_t *restrict attr);
int pthread_cond_destroy(pthread_cond_t *cond);
int pthread_cond_wait(pthread_cond_t *restrict cond, pthread_mutex_t *restrict mutex);
//阻塞等待条件变量
int pthread_cond_timedwait(pthread_cond_t *restrict cond, pthread_mutex_t *restrict mutex, const struct timespec *restrict abstime);
//超时等待
int pthread_cond_signal(pthread_cond_t *cond);//唤醒一个或者多个等待的线程int pthread_cond_broadcast(pthread_cond_t *cond);//唤醒所有的等待的线程条件变量通过允许线程阻塞和等待另一个线程发送信号,可以解决消费者和生产者的关系
案例如下:
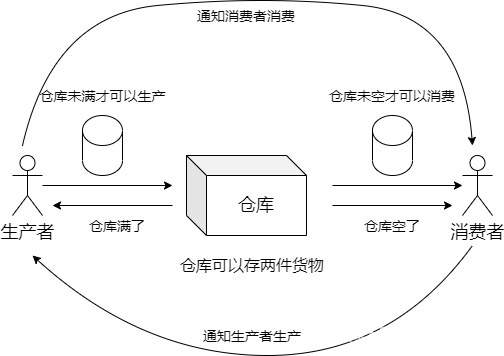
生产者消费者模型
Demo7:生产者消费者模型
#include<stdio.h>
#include<stdlib.h>
#include<unistd.h>
#include<time.h>
#include"pthread.h"
#define BUFFER_SIZE 2/*生产者*/
struct producons{
int buffer[BUFFER_SIZE];/*数据*/pthread_mutex_t lock; //互斥锁int readpos,writepos; //读写位置pthread_cond_t nottempty; //条件变量 非空pthread_cond_t notfull; //条件变量 非满};struct produconsbuffer;//生产者对象/*生产者初始化函数*/void init(struct producons *prod){ pthread_mutex_init(&prod->lock,NULL); //初始化互斥锁 pthread_cond_init(&prod->nottempty,NULL); //初始化条件变量 pthread_cond_init(&prod->notfull,NULL); //初始化条件变量 prod->readpos = 0; prod->writepos = 0;}//生产消息void put(struct producons * prod,int data){ pthread_mutex_lock(&prod->lock); //加锁//write until buffer not full while((prod->writepos + 1)%BUFFER_SIZE == prod->readpos) {printf("生产者等待生产,直到buffer有空位置\n"); pthread_cond_wait(&prod->notfull,&prod->lock); }//将数据写入到buffer里面去 prod->buffer[prod->writepos] = data;prod->writepos++;if(prod->writepos >= BUFFER_SIZE) prod->writepos = 0;//触发非空条件变量 告诉消费者可以消费 pthread_cond_signal(&prod->nottempty); pthread_mutex_unlock(&prod->lock); //解锁}//生产者线程void * producer(void * data){int n;for(n = 0;n<5;n++) {printf("生产者睡眠 1s...\n"); sleep(1);printf("生产信息:%d\n", n); put(&buffer, n); }for(n=5; n<10; n++) {printf("生产者睡眠 3s...\n"); sleep(3);printf("生产信息:%d\n",n); put(&buffer,n); } put(&buffer, -1);printf("结束生产者!\n");returnNULL;}//消费消息int get(struct producons *prod){int data; pthread_mutex_lock(&prod->lock); //加锁while(prod->writepos == prod->readpos) {printf("消费者等待,直到buffer有消息\n"); pthread_cond_wait(&prod->nottempty,&prod->lock);}//读取buffer里面的消息 data = prod->buffer[prod->readpos];prod->readpos++;if(prod->readpos >=BUFFER_SIZE) prod->readpos = 0;//触发非满条件变量 告诉生产者可以生产 pthread_cond_signal(&prod->notfull); pthread_mutex_unlock(&prod->lock); //解锁return data;}//消费者线程void * consumer(void * data){int d = 0;while(1) {printf("消费者睡眠 2s...\n"); sleep(2); d = get(&buffer);printf("读取信息:%d\n",d);if(d == -1) break; }printf("结束消费者!\n");returnNULL;}int main(int argc ,char *argv[]){pthread_t th_a,th_b;//定义a,b两个线程void * retval; //线程参数 init(&buffer);pthread_create(&th_a,NULL,producer,0); //创建生产者线程 pthread_create(&th_b,NULL,consumer,0); //创建消费者线程 pthread_join(th_a,&retval); //等待a线程返回 pthread_join(th_b,&retval); //等待b线程返回return0;}//运行效果如下(截取):
…消费者等待,直到buffer有消息生产信息:8生产者睡眠 3s…读取信息:8消费者睡眠 2s…消费者等待,直到buffer有消息生产信息:9生产者等待生产,直到buffer有空位置读取信息:9消费者睡眠 2s…结束生产者!读取信息:-1结束消费者!在这个Demo中,生产者生产货物(数据)到仓库(缓冲区),消费者从仓库消费货物,当仓库已满时通知生产者,生产者调用pthread_cond_wait阻塞等待条件变量notfull,这个条件变量由消费者唤醒;当仓库非空的时候通知消费者,消费者调用pthread_cond_wait阻塞等待条件变量nottempty,这个条件变量由生产者唤醒。