一.在虚拟机上安装centos7


如果你的磁盘空间足够大,可以写大一些
最后在虚拟机界面上双击CD/DVD,选择使用ISO镜像文件,点击浏览,找到你镜像所下载的位置

然后开启虚拟机,进行相关的设置即可
你可以参考博客:
https://blog.csdn.net/hui_2016/article/details/68927487
二、lnmp环境搭建
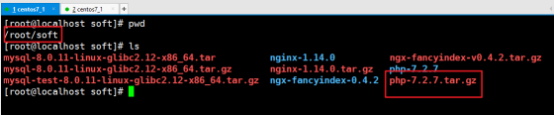
所有安装文件放入到/root下的soft目录下
1、nginx 源码编译
软件目录上传解压
安装执行命令

shell > yum -y install gcc pcre-devel openssl-devel zlib-devel   //安装依赖文件
shell > tar xvf nginx-1.12.2.tar.gz
shell > cd /root/ruanjian/nginx-1.14.0
shell > ./configure --prefix=/usr/local/nginx --with-http_ssl_module --add-module=/root/soft/ngx-fancyindex-0.4.2/    //加载编译第三方模块
shell > make && make install
检测:
whereis nginx
nginx: /usr/local/nginx
[root@localhost nginx-1.14.0]# cd /usr/local/nginx
[root@localhost nginx]# ./nginx
-bash: ./nginx: 没有那个文件或目录
[root@localhost nginx]# ls
conf  html  logs  sbin
[root@localhost nginx]# cd sbin
[root@localhost sbin]# ./nginx
[root@localhost sbin]# ps aux|grep nginx
root      4050  0.0  0.0  45936  1120 ?        Ss   19:03   0:00 nginx: master process ./nginx
nobody    4051  0.0  0.1  46384  1896 ?        S    19:03   0:00 nginx: worker process
root      4053  0.0  0.0 112720   972 pts/0    S+   19:03   0:00 grep --color=auto nginx
启动:
cd /usr/local/nginx/sbin ./nignx
防火墙设置:
Systemctl stop firewalld.service (停止firewall)
Systemctl disable firewalld.service(禁止firewall开机启动)
打开浏览器 输入IP 地址 出现nginx的欢迎界面,安装成功
关闭 :
./nignx -s stop
查看状态:Status
重启服务:restart
2.mysql
参考https://www.cnblogs.com/jorzy/p/8455519.html
启动时报错:Access denied for user ‘root’@‘localhost’ (using password: NO)
1.停止mysql服务
systemctl stop mysqld.service
2.修改配置文件无密码登录
vim /etc/my.cnf
在最后加上
skip-grant-tables
保存
3.启动mysql
systemctl start mysqld.service
4.登录mysql
mysql -u root
注意这里不要加-p
5.修改密码,mysql5.7用此语法
use mysql;
update mysql.user set authentication_string=password('123456') where user='root' ;
6.回到第二步把刚加的那句删掉
保存,重启mysql就可以了
##################################################################
其实默认安装完了mysql后或在日志中生成一个默认的密码 /var/log/mysqld.log 中
拿到默认密码后登录mysql 进行密码重新设置
set pssword=password('your password');
如果密码级别与默认的级别要求不符时候会报
Your password does not satisfy the current policy requirements
此时需要修改级别与最小的默认密码位数
set global validate_password_policy=0;
set global validate_password_length=4;
然后在进行设置密码就好了
###################
远程连接时1130错误
mysql;use mysql;
mysql;select 'host' from user where user='root';
mysql;update user set host = '%' where user ='root';
mysql;flush privileges;
mysql;select 'host'   from user where user='root';
3.php7
编译最新版本php 7.2
①上传文件包
②解压部署
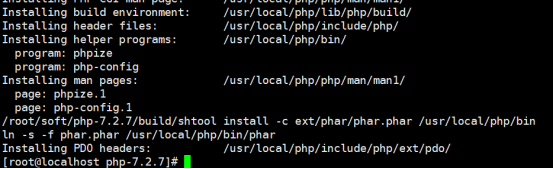
shell > tar xvf php-7.2.7.tar.gz
shell > cd /root/soft/php-7.2.7
解决依赖文件问题
shell > yum -y install libxml2-devel openssl-devel curl-devel libjpeg-devel libpng-devel freetype-devel libmcrypt-devel
libmcrypt-devel需要epel源里安装,yum源需要提前配置好epel的源
configure参数
shell > ./configure --prefix=/usr/local/php --with-config-file-path=/usr/local/php/etc --enable-fpm --with-fpm-user=www --with-fpm-group=www --with-mysqli=mysqlnd --with-pdo-mysql=mysqlnd --with-iconv-dir --with-freetype-dir --with-jpeg-dir --with-png-dir --with-zlib --with-libxml-dir --enable-xml --disable-rpath --enable-bcmath --enable-shmop --enable-sysvsem --enable-inline-optimization --with-curl --enable-mbregex --enable-mbstring --enable-ftp --with-gd --with-openssl --with-mhash --enable-pcntl --enable-sockets --with-xmlrpc --enable-zip --enable-soap --without-pear --with-gettext --disable-fileinfo --enable-maintainer-zts
编译安装
shell > make && make install
配置
①php.ini phpfpm.conf www.conf.default 配置处理
shell > cp php.ini-production /usr/local/php/etc/php.ini
shell > cd /usr/local/php/etc
shell > cp php-fpm.conf.default php-fpm.conf
shell > cd /usr/local/php/etc/php-fpm.d/
shell > cp www.conf.default www.conf
②创建允许phpfpm的 www用户
shell > useradd www -s /sbin/nologin -M
③php命令行方便使用加path
shell > echo 'PATH=/usr/local/php/bin:$PATH' >> /etc/profile
shell > echo 'export PATH' >> /etc/profile
shell > source /etc/profile
以上过程php已经配置完成
启动php-fpm
nginx和php-fpm进行关联
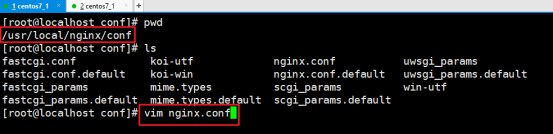
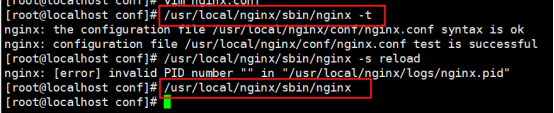
改nginx的配置文件

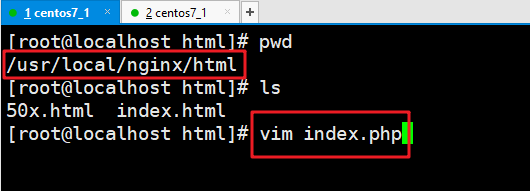
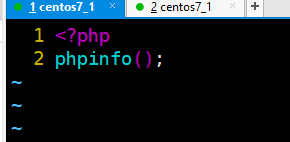
建立phpinfo,查看php的配置

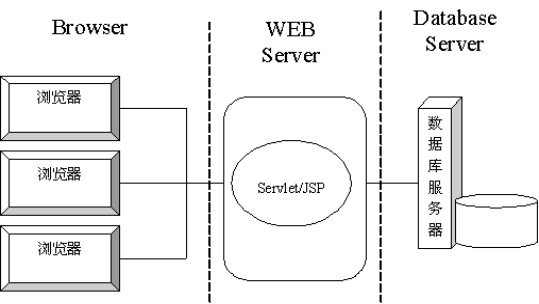
三.将项目打包放到服务器
第一步,将jcf.jar包放在/usr/local/nginx/html里
解压
tar -xvf jcf.jar
然后配置nginx.conf,设置一下域名,项目地址

#定义Nginx运行的用户和用户组
#user  nobody;
#nginx进程数,建议设置为等于CPU总核心数
worker_processes  1;
#全局错误日志定义类型
#error_log  logs/error.log;
#error_log  logs/error.log  notice;
#error_log  logs/error.log  info;
#进程文件
#pid        logs/nginx.pid;
events {
#单个进程最大连接数(最大连接数=连接数*进程数worker_connections  1024;
}
#设定http服务器
http {include       mime.types;#文件扩展名与文件类型映射表default_type  application/octet-stream;#默认文件类型log_format  main  '$remote_addr - $remote_user [$time_local] "$request" ''$status $body_bytes_sent "$http_referer" ''"$http_user_agent" "$http_x_forwarded_for"';#access_log  logsaccess.log  main;sendfile        on;#tcp_nopush     on;#keepalive_timeout  0;keepalive_timeout  65;#开启Gzipgzip  on;##http协议版本gzip_http_version 1.0;##禁止IE 6以下使用gzip_disable 'MSIE [1-6]';gzip_types image/jpeg image/jpg;# server {#     listen       10086;#     server_name  localhost;#     root html/port;#     location / {#         proxy_pass http://172.16.1.140:3000;#         proxy_set_header Host $host;#         }# }server {listen       80;#监听端口server_name  www.ml.com; #域名可以有多个,用空格隔开#charset koi8-r;access_log  logs/host.access.log  main;root   html/jcf/public;#项目地址index index.php index.html index.htm;#Thinkphp rewrite支持,如果没有,浏览器会报错404找不到网页location / {if (!-e $request_filename) {rewrite ^(.*)$ /index.php?s=$1 last;break;}}#location ~ \.(jpeg|jpg|png)$ {#expires 1d;#}#location / {# root   html;#    index index.php index.html index.htm;#}#error_page  404              /404.html;# redirect server error pages to the static page /50x.html#error_page   500 502 503 504  /50x.html;location = /50x.html {root   html;}# proxy the PHP scripts to Apache listening on 127.0.0.1:80##location ~ \.php$ {#    proxy_pass   http://127.0.0.1;#}# pass the PHP scripts to FastCGI server listening on 127.0.0.1:9000#location ~ \.php$ {#    root           html;fastcgi_pass   127.0.0.1:9000;fastcgi_index  index.php;fastcgi_param  SCRIPT_FILENAME  $document_root$fastcgi_script_name;include        fastcgi_params;}# deny access to .htaccess files, if Apache's document root# concurs with nginx's one##location ~ /\.ht {#    deny  all;#}}# another virtual host using mix of IP-, name-, and port-based configuration##server {#    listen       8000;#    listen       somename:8080;#    server_name  somename  alias  another.alias;#    location / {#        root   html;#        index  index.html index.htm;#    }#}# HTTPS server##server {#    listen       443 ssl;#    server_name  localhost;#    ssl_certificate      cert.pem;#    ssl_certificate_key  cert.key;#    ssl_session_cache    shared:SSL:1m;#    ssl_session_timeout  5m;#    ssl_ciphers  HIGH:!aNULL:!MD5;#    ssl_prefer_server_ciphers  on;#    location / {#        root   html;#        index  index.html index.htm;#    }#}
}
第二步,配置数据库
找到数据库配置的相关代码,修改库名和ip地址
Sql语句导入到指定库中,然后用浏览器打开指定域名即可