一、准备工作
小编今天以 QQ邮箱 进行演示操作。
想要使用代码操作邮箱发送邮件,需要在邮箱设置中申请开通 POP3/SMTP 服务。
接下来跟着小编的图文一步一步的操作开通吧!
1.1 登录网页QQ邮箱,点击页面顶部设置按钮。

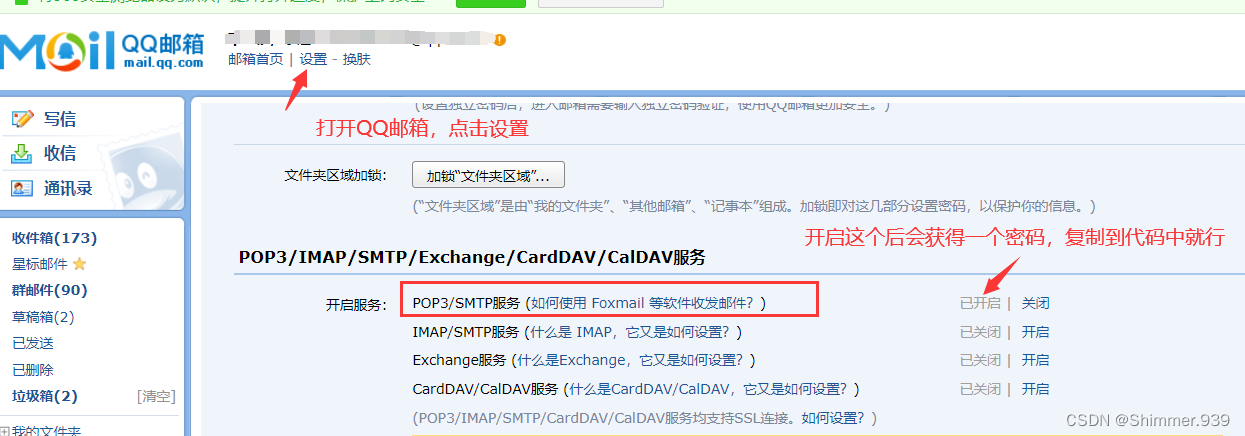
1.2 点击后会打开邮箱设置页面,如下所示,点击第二栏账户。

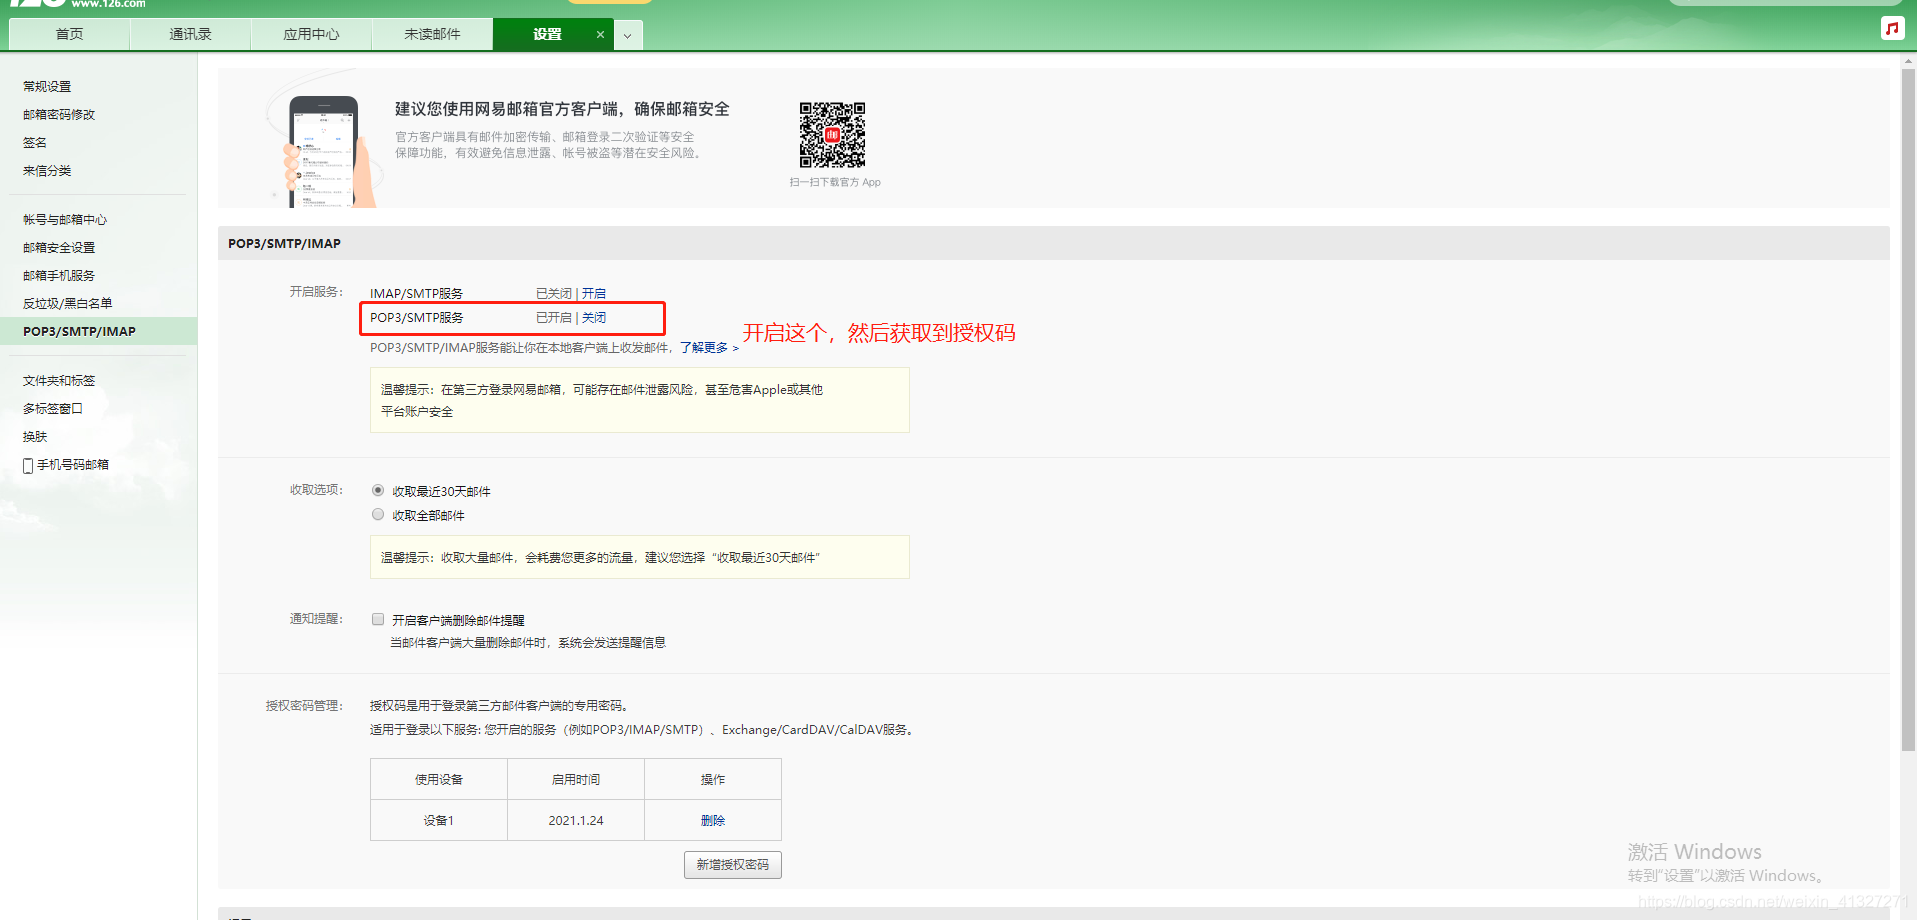
1.3 点击后往下拉,直到有如下页面选项。

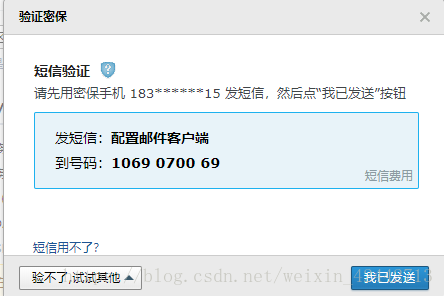
选择POP3/SMTP服务,点击后面的开启,此时会让你使用绑定邮箱的手机号发送短信。

发送完成后点击 我已发送 按钮,进行验证。
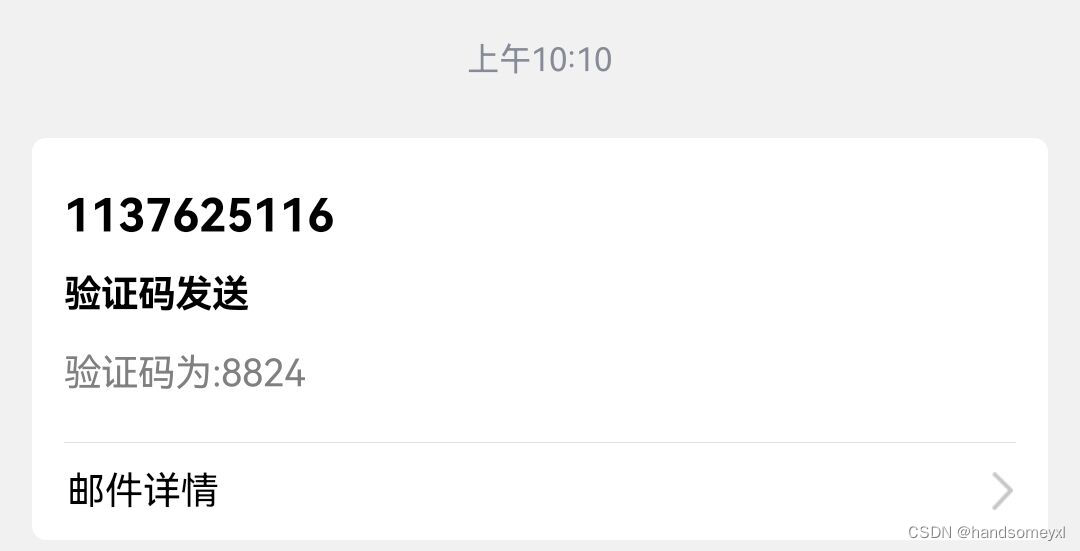
1.4 验证完成后会显示授权码(复制下来,一会要用)

到此,准备工作已完成!
二、项目中配置邮件发送功能
2.1 引入发送邮件相关依赖
<!--邮件发送依赖-->
<dependency><groupId>org.springframework.boot</groupId><artifactId>spring-boot-starter-mail</artifactId>
</dependency>
引入后,更新maven,下载相关依赖

2.2 在application.yml文件中添加邮件基本配置
spring: # 发送邮件配置mail:host: smtp.qq.com # 配置 smtp 服务器地址port: 587 # smtp 服务器的端口username: 1354720889@qq.com # 配置邮箱用户名(你的邮箱地址)password: batrgddaqykegfss # 配置申请到的授权码(刚让复制的授权码)default-encoding: UTF-8 # 配置邮件编码properties:mail:smtp:socketFactoryClass: javax.net.ssl.SSLSocketFactory # 配饰 SSL 加密工厂debug: truefrom: 1354720889@qq.com # 发送方邮件,配在yml中可方便更改
2.3 为了方便使用,新建一个操作email的工具类(EmailUtil.java)
封装邮件工具类是为了方便后续调用操作。
package com.clover.utils;import org.springframework.beans.factory.annotation.Autowired;
import org.springframework.beans.factory.annotation.Value;
import org.springframework.mail.SimpleMailMessage;
import org.springframework.mail.javamail.JavaMailSender;
import org.springframework.mail.javamail.MimeMessageHelper;
import org.springframework.stereotype.Component;import javax.mail.Message;
import javax.mail.MessagingException;
import javax.mail.internet.MimeMessage;
import java.io.File;/*** @ClassName EmailUtil* @Description 邮件发送工具* @Author Sophia* @Date 2022/4/6 16:06*/
@Component
public class EmailUtil {@Value("${spring.mail.from}") // 从application.yml配置文件中获取private String from; // 发送发邮箱地址@Autowiredprivate JavaMailSender mailSender;/*** 发送纯文本邮件信息** @param to      接收方* @param subject 邮件主题* @param content 邮件内容(发送内容)*/public void sendMessage(String to, String subject, String content) {// 创建一个邮件对象SimpleMailMessage msg = new SimpleMailMessage();msg.setFrom(from); // 设置发送发msg.setTo(to); // 设置接收方msg.setSubject(subject); // 设置邮件主题msg.setText(content); // 设置邮件内容// 发送邮件mailSender.send(msg);}/*** 发送带附件的邮件信息** @param to      接收方* @param subject 邮件主题* @param content 邮件内容(发送内容)* @param files 文件数组 // 可发送多个附件*/public void sendMessageCarryFiles(String to, String subject, String content, File[] files) {MimeMessage mimeMessage = mailSender.createMimeMessage();try {MimeMessageHelper helper = new MimeMessageHelper(mimeMessage,true);helper.setFrom(from); // 设置发送发helper.setTo(to); // 设置接收方helper.setSubject(subject); // 设置邮件主题helper.setText(content); // 设置邮件内容if (files != null && files.length > 0) { // 添加附件(多个)for (File file : files) {helper.addAttachment(file.getName(), file);}}} catch (MessagingException e) {e.printStackTrace();}// 发送邮件mailSender.send(mimeMessage);}
/*** 发送带附件的邮件信息** @param to      接收方* @param subject 邮件主题* @param content 邮件内容(发送内容)* @param file 单个文件*/public void sendMessageCarryFile(String to, String subject, String content, File file) {MimeMessage mimeMessage = mailSender.createMimeMessage();try {MimeMessageHelper helper = new MimeMessageHelper(mimeMessage,true);helper.setFrom(from); // 设置发送发helper.setTo(to); // 设置接收方helper.setSubject(subject); // 设置邮件主题helper.setText(content); // 设置邮件内容helper.addAttachment(file.getName(), file); // 单个附件} catch (MessagingException e) {e.printStackTrace();}// 发送邮件mailSender.send(mimeMessage);}public String getFrom() {return from;}public void setFrom(String from) {this.from = from;}
}
2.4 测试邮件发送功能
我使用的SpringBoot项目,因此我在测试类中进行测试。
测试类代码:
package com.clover.api.blogapi;import com.clover.utils.EmailUtil;
import org.junit.jupiter.api.Test;
import org.springframework.beans.factory.annotation.Autowired;
import org.springframework.boot.test.context.SpringBootTest;import java.io.File;@SpringBootTest
class BlogApiApplicationTests {@Autowiredprivate EmailUtil emailUtil;@Testvoid contextLoads() {}@Testvoid sendStringEmail() {// 测试文本邮件发送(无附件)String to = "135472099@qq.com"; // 这是个假邮箱,写成你自己的邮箱地址就可以String title = "文本邮件发送测试";String content = "文本邮件发送测试";emailUtil.sendMessage(to, title, content);}@Testvoid sendFileEmail() {// 测试单个附件邮件发送String to = "135472099@qq.com"; // 这是个假邮箱,写成你自己的邮箱地址就可以String title = "单个附件邮件发送测试";String content = "单个附件邮件发送测试";File file = new File("D:\\GCH\\Typora\\Linux中常用的查看系统相关信息命令.md");emailUtil.sendMessageCarryFile(to, title, content, file);}@Testvoid sendFilesEmail() {// 测试多个附件邮件发送String to = "135472099@qq.com"; // 这是个假邮箱,写成你自己的邮箱地址就可以String title = "多个附件邮件发送测试";String content = "多个附件邮件发送测试";File[] files = new File[2];files[0] = new File("C:\\Users\\root\\Desktop\\配置邮箱\\1.png");files[1] = new File("C:\\Users\\root\\Desktop\\配置邮箱\\2.png");emailUtil.sendMessageCarryFile(to, title, content, files);}}
2.5 测试结果
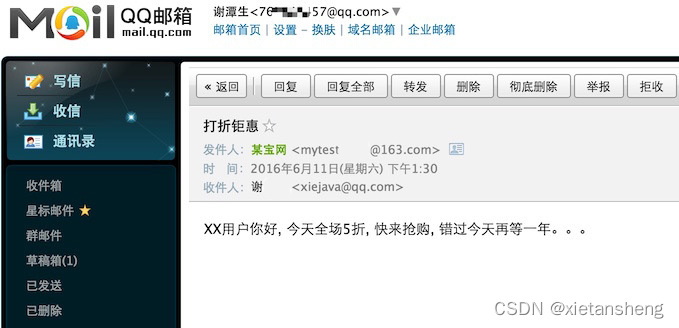
邮箱已收到

2.5.1 文本邮件发送

2.5.2 单个附件邮件发送

2.5.3 多个附件邮件发送