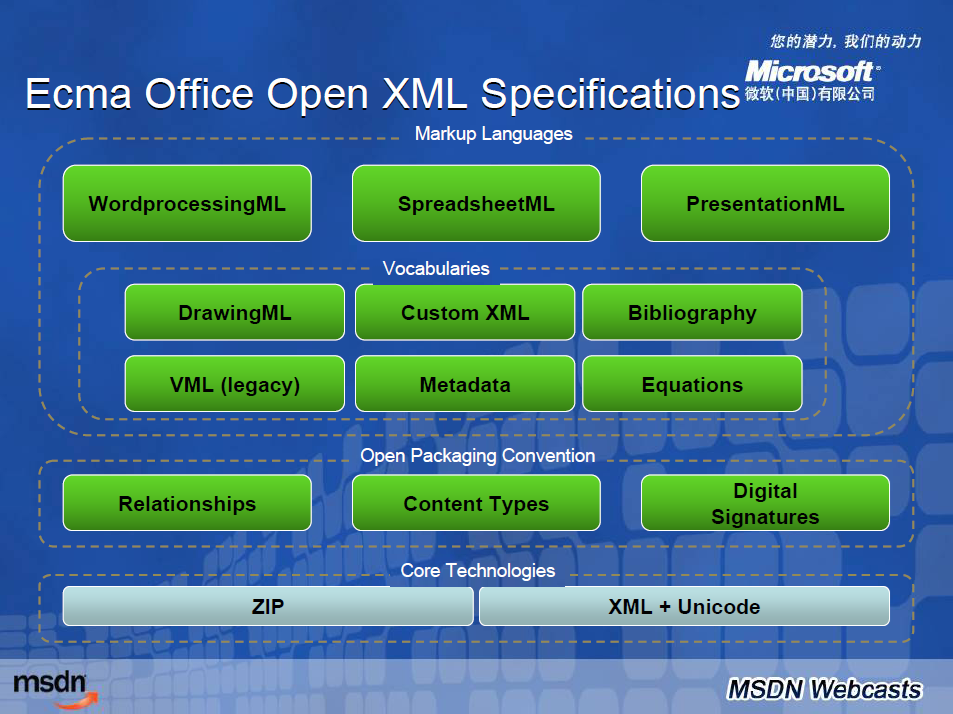
OpenXml相对于用MS提供的COM组件来生成WORD,有如下优势:
1.相对于MS 的COM组件,因为版本带来的不兼容问题,及各种会生成WORD半途会崩溃的问题.
2.对比填满一张30多页的WORD来说(包含图,表等),用COM组件来生成会占用20秒,Openxml1秒.
3.MS Word软件太贵了,你的客户装的是开源WORD,如LibreOffice,OpenOffice.这样你就只能用Openxml生成的WORD文档,各种支持MS Word都能打开,避免客户机器上安装MS Word.
简单来说OpenXml的各个操作.
首先用OpenXml打开一张报表.
public void CreateOpenXMLFile(stringfilePath)
{using (WordprocessingDocument objWordDocument =WordprocessingDocument.Create(filePath, WordprocessingDocumentType.Document))
{
MainDocumentPart objMainDocumentPart=objWordDocument.AddMainDocumentPart();
objMainDocumentPart.Document= new Document(newBody());
Body objBody=objMainDocumentPart.Document.Body;//创建一些需要用到的样式,如标题3,标题4,在OpenXml里面,这些样式都要自己来创建的//ReportExport.CreateParagraphStyle(objWordDocument);
SectionProperties sectionProperties = newSectionProperties();
PageSize pageSize= newPageSize();
PageMargin pageMargin= newPageMargin();
Columns columns= new Columns() { Space = "220" };//720
DocGrid docGrid = new DocGrid() { LinePitch = 100 };//360//创建页面的大小,页距,页面方向一些基本的设置,如A4,B4,Letter,//GetPageSetting(PageSize,PageMargin);//在这里填充各个Paragraph,与Table,页面上第一级元素就是段落,表格.
objBody.Append(newParagraph());
objBody.Append(newTable());
objBody.Append(newParagraph());//我会告诉你这里的顺序很重要吗?下面才是把上面那些设置放到Word里去.(大家可以试试把这下面的代码放上面,会不会出现打开openxml文件有误,因为内容有误)
sectionProperties.Append(pageSize, pageMargin, columns, docGrid);
objBody.Append(sectionProperties);//如果有页眉,在这里添加页眉.
if(IsAddHead)
{//添加页面,如果有图片,这个图片和上面添加在objBody方式有点不一样,这里搞了好久.//ReportExport.AddHeader(objMainDocumentPart, image);
}
objMainDocumentPart.Document.Save();
}
}
发现上面有点注解说错,那个顺序不影响Word,但是影响如LibreOffice软件打开后看到的格式不正确.改里面太麻烦,直接在这说了.
从这个总纲里,把上面的各个步骤再来仔细说下.
首先是在Openxml创建标题3,标题4.
// 为文档创建段落样式
public static voidCreateParagraphStyle(WordprocessingDocument doc)
{//进入文档控制样式部分
StyleDefinitionsPart styleDefinitionsPart;
styleDefinitionsPart= doc.MainDocumentPart.AddNewPart();
Styles root= newStyles();
root.Save(styleDefinitionsPart);
Styles styles=styleDefinitionsPart.Styles;if (styles == null)
{
styleDefinitionsPart.Styles= newStyles();
styleDefinitionsPart.Styles.Save();
}
Style style3= CreateTitleStyle(3);
Style style4= CreateTitleStyle(4);//把样式添加入文档中
styles.Append(style3);
styles.Append(style4);
}private static Style CreateTitleStyle(inttitleIndex)
{string titleID =titleIndex.ToString();string rsid = string.Empty;string before = string.Empty;string after = string.Empty;string line = string.Empty;string val = string.Empty;int outline = titleIndex - 1;if (titleIndex == 3)
{
rsid= "00BA1E98";
before= "130";//"260"
after = "0";
line= "286";//"416"
val = "32";
}else if (titleIndex == 4)
{
rsid= "00BA1E98";
before= "88";
after= "0";
line= "288";//"376"
val = "28";
}
Style style2= new Style() { Type = StyleValues.Paragraph, StyleId =titleID };
StyleName styleName2= new StyleName() { Val = "heading" +titleID };
BasedOn basedOn1= new BasedOn() { Val = "a"};
NextParagraphStyle nextParagraphStyle1= new NextParagraphStyle() { Val = "a"};
LinkedStyle linkedStyle1= new LinkedStyle() { Val = titleID + "Char"};
UIPriority uIPriority1= new UIPriority() { Val = 9};
PrimaryStyle primaryStyle2= newPrimaryStyle();
Rsid rsid2= new Rsid() { Val =rsid };
style2.Append(styleName2);
style2.Append(basedOn1);
style2.Append(nextParagraphStyle1);
style2.Append(linkedStyle1);
style2.Append(uIPriority1);
style2.Append(primaryStyle2);
style2.Append(rsid2);
StyleParagraphProperties styleParagraphProperties2= newStyleParagraphProperties();
KeepNext keepNext1= newKeepNext();
KeepLines keepLines1= newKeepLines();
SpacingBetweenLines spacingBetweenLines1= new SpacingBetweenLines() { Before = before, After = after, Line = line, LineRule =LineSpacingRuleValues.Auto };
OutlineLevel outlineLevel1= new OutlineLevel() { Val =outline };
styleParagraphProperties2.Append(keepNext1);
styleParagraphProperties2.Append(keepLines1);
styleParagraphProperties2.Append(spacingBetweenLines1);
styleParagraphProperties2.Append(outlineLevel1);
style2.Append(styleParagraphProperties2);
StyleRunProperties styleRunProperties1= newStyleRunProperties();
Bold bold1= newBold();
BoldComplexScript boldComplexScript1= newBoldComplexScript();//Kern kern2 = new Kern() { Val = (UInt32)44U };
FontSize fontSize2 = new FontSize() { Val =val };
FontSizeComplexScript fontSizeComplexScript2= new FontSizeComplexScript() { Val =val };
styleRunProperties1.Append(bold1);
styleRunProperties1.Append(boldComplexScript1);//styleRunProperties1.Append(kern2);
styleRunProperties1.Append(fontSize2);
styleRunProperties1.Append(fontSizeComplexScript2);
style2.Append(styleRunProperties1);returnstyle2;
}
然后是对页面大小,页面方向,页距设置.(懒的和报表里的一个个对应,里面的页距有很多大家可以精确设置.)
public static void GetPageSetting(ref PageSize pageSize, refPageMargin pageMargin)
{bool val =IsPaperOrientation;string str_paperSize = "Letter";//A4,B4
UInt32Value width = 15840U;
UInt32Value height= 12240U;int top = 1440;
UInt32Value left= 1440U;if (str_paperSize == "A4")
{
width= 16840U;
height= 11905U;
}else if (str_paperSize == "B4")
{
width= 20636U;
height= 14570U;
}if (!val)
{
UInt32Value sweep=width;
width=height;
height=sweep;int top_sweep =top;
top= (int)left.Value;
left= (uint)top_sweep;
}
pageSize.Width=width;
pageSize.Height=height;
pageSize.Orient= new EnumValue(val ?PageOrientationValues.Landscape : PageOrientationValues.Portrait);
pageMargin.Top=top;
pageMargin.Bottom=top;
pageMargin.Left=left;
pageMargin.Right=left;
pageMargin.Header= (UInt32Value)720U;
pageMargin.Footer= (UInt32Value)720U;
pageMargin.Gutter= (UInt32Value)0U;
}
然后重点来了,大家对各元素如何在OpenXml添加的.
我先说下,在Openxml里相关元素的关系,在Word里,按一下Enter,转一行,对应的一行元素就是Paragraph,那如果一行文字在里面如何存放.Paragraph->Run->Text,图表Paragraph->Run->Drawing,表格Table->TableRow->TableCell->Paragraph->Run->Text与Drawing.在关系上说,还是很简洁的.来看一下具体的操作,我们先定义一个类.对应OpenXML里的基本样式设置.
public classReportCommon
{public const float defaultSize =12f;public const float H1 =20f;public const float H3 =16f;public const float H4 =14f;private string text = string.Empty;publicReportCommon()
{
Alignment= -1;
Size=defaultSize;
}//规定-1左对齐,0中间,1右对齐
public int Alignment { get; set; }public virtual float Size { get; set; }public string Text { get; set; }public virtual bool IsBold { get; set; }
}
其中我定义这个类的三个子类,分别是ReportValue:主要是这种A: B,ReportImage:包含一个图片的路径.ReportText:只有一个文本.
private static ListGetRuns(ReportCommon common)
{
List runs = new List();if (common isReportValue)
{
ReportValue reportvalue= common asReportValue;
Run r= newRun();
RunProperties rP= GetRunProperties(reportvalue, true);
r.Append(rP);string text =reportvalue.Text;if (text.EndsWith(":"))
text= text + " ";if (!text.EndsWith(":"))
text= text + ":";
Text t=CreateText(text);
r.Append(t);
runs.Add(r);
r= newRun();
rP= GetRunProperties(reportvalue, false);
r.Append(rP);
r.Append(CreateText(reportvalue.Value));
runs.Add(r);
}else if (common isReportImage)
{
ReportImage reportImage= common asReportImage;
Run r= newRun();
RunProperties rP=GetRunProperties(reportImage);
Drawing image= GetImageToBody(reportImage.RId, reportImage.Width * 600, reportImage.Height * 800);//Drawing image = new Drawing();//image.Append(new A.Blip() { Embed = new StringValue(reportImage.RId) });
r.Append(rP);
r.Append(image);
runs.Add(r);
}else if (common isReportText)
{
Run r= newRun();
RunProperties rP=GetRunProperties(common);
r.Append(rP);
r.Append(CreateText(common.Text));
runs.Add(r);
}returnruns;
}
看了这里,问题是不是越来越多.图片具体操作先不说.上面的RunProperties,与CreateText分别是指什么.
RunProperties是指包含这段Text,你要设置的一些字体大小,颜色,文本对齐设置.
而CreateText是因为我们在Openxml你在后面加个空格,而会给你过滤掉,空格要对应到XML的具体设置,看如下代码.
public static RunProperties GetRunProperties(ReportCommon common, bool bBold = false)
{
RunProperties rPr= newRunProperties();//Color color = new Color() { Val = "FF0000" };//the color is red
RunFonts rFont = newRunFonts();
rFont.Ascii= "Arial"; //the font is Arial//rPr.Append(color);//rPr.Append(rFont);
if (common.IsBold ||bBold)
rPr.Append(new Bold()); //it is Bold//TextAlignment
rPr.Append(new FontSize() { Val = new StringValue((common.Size * 2).ToString()) }); //font size (in 1/72 of an inch)
returnrPr;
}private static Text CreateText(stringtext)
{if (text == null)
text= string.Empty;
Text t= newText(text);if (text.EndsWith(" "))
{
t.Space= new EnumValue(SpaceProcessingModeValues.Preserve);
}if (text.StartsWith(" "))
{
t.Space= new EnumValue(SpaceProcessingModeValues.Default);
}returnt;
}
不知这么多代码大家看烦没,因为我这人喜欢不是业务与大纲的事,都喜欢直接看代码来说,比人讲的清楚.所以讲的时候也喜欢,直接上代码.废话不说了,说下图片的问题,Openxml插入图片比较麻烦,先贴一段代码.
private static Drawing GetImageToBody(string relationshipId, int x = 914400, int y = 360000)
{//Define the reference of the image.
var element =
newDrawing(newDW.Inline(new DW.Extent() { Cx = x, Cy =y },newDW.EffectExtent()
{
LeftEdge= 0L,
TopEdge= 0L,
RightEdge= 0L,
BottomEdge= 0L},newDW.DocProperties()
{
Id= (UInt32Value)1U,
Name= "Picture 1"},newDW.NonVisualGraphicFrameDrawingProperties(new A.GraphicFrameLocks() { NoChangeAspect = true}),newA.Graphic(newA.GraphicData(newPIC.Picture(newPIC.NonVisualPictureProperties(newPIC.NonVisualDrawingProperties()
{
Id= (UInt32Value)0U,
Name= "New Bitmap Image.jpg"},newPIC.NonVisualPictureDrawingProperties()),newPIC.BlipFill(newA.Blip(newA.BlipExtensionList(newA.BlipExtension()
{
Uri=
"{28A0092B-C50C-407E-A947-70E740481C1C}"})
)
{
Embed=relationshipId,
CompressionState=A.BlipCompressionValues.Print
},newA.Stretch(newA.FillRectangle())),newPIC.ShapeProperties(newA.Transform2D(new A.Offset() { X = 0L, Y = 0L},new A.Extents() { Cx = x, Cy =y }),newA.PresetGeometry(newA.AdjustValueList()
) { Preset=A.ShapeTypeValues.Rectangle }))
) { Uri= "http://schemas.openxmlformats.org/drawingml/2006/picture"})
)
{
DistanceFromTop= (UInt32Value)0U,
DistanceFromBottom= (UInt32Value)0U,
DistanceFromLeft= (UInt32Value)0U,
DistanceFromRight= (UInt32Value)0U,
EditId= "50D07946"});//Append the reference to body, the element should be in a Run.
var blip = element.Descendants()
.FirstOrDefault();returnelement;
}
这段代码里,东东比较多,大家主要看这一节, Embed = relationshipId,也是参数里要求传入的,我们可以这么理解,在OpenXML插入一张电脑的图片,插入数据到word后,word然后把保存这个图片的一个标识量给我们,让我们来用,就是relationshipId.说到这,我们好像还没看如何把一张路径下的图片插入word.如下
public static voidCreateImageRid(ReportImage reportImage, MainDocumentPart objMainDocumentPart)
{
ImagePartType imagetype=ImagePartType.Jpeg;
FileInfo newImg= newFileInfo(reportImage.Value);
ImagePart newImgPart=objMainDocumentPart.AddImagePart(imagetype);//插入图片数据到Word里去.
using (FileStream stream =newImg.OpenRead())
{
newImgPart.FeedData(stream);
}//Word返回给我们插入数据的标识符.
reportImage.RId =objMainDocumentPart.GetIdOfPart(newImgPart);
}
这里图片插入有先后关系,要先调用上面这段,插入数据到word,然后才能调用上上段的那段代码来生成Drawing元素.
大家如果要把图片的宽度,设为当前Word的可用宽度.Int32Value width = (int)(pageSize.Width - pageMargin.Right - pageMargin.Left);
好吧,大家会发现上上段那里的长度特大,这里发现这里的值要很大才能显现比较好看的图片,一般我在原来的基础宽度*600,基础长度*800.原因吗,我也不清楚,有些猜测,没有验证就不说了,这个要求OpenXML生成报表比较急,我把这几天所有操作先总结一下.后面再来修改,如果有知道的道友,不妨说一下.
在这里,文字与图片如何生成Paragraph就很简单了.
public staticParagraph GetParagraph(ReportCommon common)
{
Paragraph p= newParagraph();
ParagraphProperties pPr=GetParagraphProperties(common);
p.Append(pPr);
List run =GetRuns(common);foreach (var r inrun)
{
p.Append(r);
}returnp;
}
好吧,最后说到如何在OpenXML生成一张表.生成图表我用的基础数据是List>,上面的ReportTable数据就放在这个里面.当然还有一些基本的定义属性就不说.具体如下看代码.
public staticTable GetParagraph(ReportTable reportTable, Int32Value width)
{
Table table= newTable();
TableProperties tblProp= newTableProperties(newTableBorders(new TopBorder() { Val = new EnumValue(BorderValues.Single), Size = 4},new BottomBorder() { Val = new EnumValue(BorderValues.Single), Size = 4},new LeftBorder() { Val = new EnumValue(BorderValues.Single), Size = 4},new RightBorder() { Val = new EnumValue(BorderValues.Single), Size = 4},new InsideHorizontalBorder() { Val = new EnumValue(BorderValues.Single), Size = 4},new InsideVerticalBorder() { Val = new EnumValue(BorderValues.Single), Size = 4}
)
);
tblProp.TableWidth= new TableWidth() { Width = width.ToString(), Type =TableWidthUnitValues.Dxa };
table.Append(tblProp);int count =reportTable.Value.Count;int cols =reportTable.Column;int j = 0;foreach (List strs inreportTable.Value)
{
TableRow row= newTableRow();for (int i = 0; i < cols; i++)
{
TableCell cell= newTableCell();
TableCellProperties tableCellProperties= newTableCellProperties();
TableCellMargin margin= newTableCellMargin();
margin.LeftMargin= new LeftMargin() { Width = "100", Type =TableWidthUnitValues.Dxa };
margin.RightMargin= new RightMargin() { Width = "100", Type =TableWidthUnitValues.Dxa };
tableCellProperties.Append(margin);
Paragraph par= newParagraph();
Run run= newRun();if (j == 0 &&reportTable.IsHaveColumn)
{
RunProperties rPr= newRunProperties();
rPr.Append(newBold());
run.Append(rPr);
}if (strs.Count != cols && i >= strs.Count - 1)
{
HorizontalMerge verticalMerge= newHorizontalMerge();if (i == strs.Count - 1)
{
RunProperties rPr= newRunProperties();
rPr.Append(newBold());
run.Append(rPr);
verticalMerge.Val=MergedCellValues.Restart;
run.Append(CreateText(strs[i]));
}else{
verticalMerge.Val=MergedCellValues.Continue;
}
tableCellProperties.Append(verticalMerge);
}else{
run.Append(CreateText(strs[i]));
}
par.Append(run);
cell.Append(tableCellProperties);
cell.Append(par);
row.Append(cell);
}
j++;
table.Append(row);
}returntable;
}
代码可以简单的多,只是因为有一些要求,比如你表每行是5个数据,但是有一行,数据只有四个,有二个表格合并了,这里会默认把最后二格合并,具体意思大家可以改改代码看.
好吧,到这里,就差不多,元素添加完后,然后是把相关页面大小的设置加到objBody,最后是添加页眉.
public static voidAddHeader(MainDocumentPart mainDocPart, ReportImage reportImge)
{//Delete the existing header parts.
mainDocPart.DeleteParts(mainDocPart.HeaderParts);//Create a new header part and get its relationship id.
HeaderPart newHeaderPart = mainDocPart.AddNewPart();string rId =mainDocPart.GetIdOfPart(newHeaderPart);
ImagePart imagepart=newHeaderPart.AddImagePart(ImagePartType.Jpeg);
FileInfo newImg= newFileInfo(reportImge.Value);using (FileStream stream =newImg.OpenRead())
{
imagepart.FeedData(stream);
}string imageRID =newHeaderPart.GetIdOfPart(imagepart);
reportImge.RId=imageRID;
Header header=GeneratePageHeaderPart(reportImge);
header.Save(newHeaderPart);foreach (SectionProperties sectProperties inmainDocPart.Document.Descendants())
{//Delete any existing references to headers.
foreach (HeaderReference headerReference insectProperties.Descendants())
sectProperties.RemoveChild(headerReference);
HeaderReference newHeaderReference=
new HeaderReference() { Id = rId, Type =HeaderFooterValues.Default };
sectProperties.Append(newHeaderReference);
}
header.Save();
}//Creates an header instance and adds its children.
private staticHeader GeneratePageHeaderPart(ReportImage reportImge)
{var runs =GetRuns(reportImge);
Paragraph paragraph= newParagraph();
paragraph.Append(GetParagraphProperties(reportImge));foreach (var run inruns)
{
paragraph.Append(run);
}
paragraph.Append(new Run(new Text() { Text = ""}));
Header header= newHeader();
header.Append(paragraph);returnheader;
}
上面的代码主要注意,Image所指的路径存放的和在前面的Document里不一样,这里存放在Header里,从Word文件解压来说,二都是不同的XML文档,你把图片数据写在Document里,得到的标识符在Header是空的.
好了.OpenXML的主要操作都在这了,但是大家如果想生成这种样式,应该如何处理?
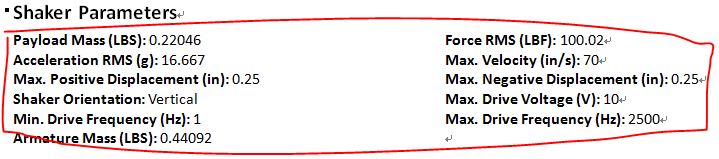
上面每一个元素如Payload Mass (LBS): 0.22046,就是前面的ReportValue,如何以这种对齐方式来插入了?引入一个新的结构,ReportValueList,主要就是ReportValue的键表信息.
public static List GetParagraph(ReportValueList valueList, Int32Value width, int column = 2)
{if (column < 1)
column= 1;
List list = new List();int currentcolumn = 0;
Paragraph currentParagraph= null;foreach (var reportvalue invalueList.Values)
{
reportvalue.Size=valueList.Size;if (currentcolumn == 0)
{
currentParagraph= newParagraph();
ParagraphProperties pPr= newParagraphProperties();//添加标签类
Tabs tabs = newTabs();
Int32Value eachWidth= width / (newInt32Value(column));for (int i = 1; i < column; i++)
{
TabStop stop= newTabStop();
stop.Val= new EnumValue(TabStopValues.Left);
stop.Position= eachWidth *i;
tabs.Append(stop);
}
pPr.Append(tabs);
currentParagraph.Append(pPr);
list.Add(currentParagraph);
}
List runs =GetRuns(reportvalue);foreach (var run inruns)
{
currentParagraph.Append(run);
}
currentcolumn++;if (currentcolumn
{
Run run= newRun();
run.Append(newTabChar());
currentParagraph.Append(run);
}if (currentcolumn >=column)
{
currentcolumn= 0;
}
}returnlist;
}
主要是对元素TabStop的运用,仔细的大家可以去查查文档
写到这里,忘记写要用到的命名空间.
using A = DocumentFormat.OpenXml.Drawing;
using PIC = DocumentFormat.OpenXml.Drawing.Pictures;
using DW = DocumentFormat.OpenXml.Drawing.Wordprocessing;
using DocumentFormat.OpenXml;
using DocumentFormat.OpenXml.Packaging;
using DocumentFormat.OpenXml.Wordprocessing;
这个就到这里了.下面如果有时间,我会讲一下,如果对整张报表来进行模版化,意思是在word里的每一个表,一个图片,一个文字,在软件上用生成的结果来替换相应的元素.