一、简介
这个估计大家都比我清楚了,JUnit是一个单元测试框架,我们可以基于它编写用来测试代码的代码,从而更方便地进行回归测试。
二、编写测试与断言(Assertion)
在Junit4中,编写一个测试方法只需要使用@Test注解并保证被注解的方法满足以下条件
- 方法可见性为public
- 方法无返回值
- 方法没有参数
在一个测试中,往往需要满足某种条件才能断定测试成功,而不仅仅是测试方法执行完毕,org.junit.Assert对象提供了各种断言方法,用于判定程序的执行结果是否符合预期,从而通过测试。
例如我们需要测试以下类的两个方法:
- package org.haibin369.common;
- public class ObjectGenerator {
- public String getString(){
- return "String";
- }
- public Object getNull(){
- return null;
- }
- }
我们需要编写以下的测试类和方法:
- package org.haibin369.test;
- import org.haibin369.common.ObjectGenerator;
- import org.junit.Test;
- //静态导入,方便使用Assert对象的断言方法
- import static org.junit.Assert.*;
- /**
- * 测试类,不需继承任何JUnit的类
- */
- public class ObjectGeneratorTest {
- //使用@Test标注测试方法
- @Test
- public void testGetString() {
- ObjectGenerator generator = new ObjectGenerator();
- String msg = generator.getString();
- if (msg == null) {
- //Assert中也有使测试失败的fail方法,参数为失败信息(此处仅作演示)
- fail("Message is null");
- }
- //断言得到的msg为AString,否则测试失败,第一个参数为失败时的信息
- assertEquals("Wrong message generated.", "AString", msg);
- }
- @Test
- public void testGetNull() {
- ObjectGenerator generator = new ObjectGenerator();
- //断言为空
- assertNull("Returned object is not null", generator.getNull());
- }
- }
执行以上测试,第二个测试会通过,而第一个会报错(org.junit.ComparisonFailure: Wrong message generated.),表明代码返回的结果和预期的不一样。
org.junit.Assert对象中还有很多断言方法,详情可参考API。
三、Before & After
现在有一个简单的登陆Action需要测试(User和ACLException代码比较简单,这里就不贴出来了)。
- public class LoginAction {
- private static final User FORBIDDEN_USER = new User("admin", "admin");
- private static final List<User> LOGIN_USER = new ArrayList<User>();
- public void login(User user) throws ACLException, InterruptedException {
- if (FORBIDDEN_USER.equals(user)) {
- Thread.sleep(2000);
- throw new ACLException("Access Denied!");
- }
- if (!LOGIN_USER.contains(user)) {
- LOGIN_USER.add(user);
- }
- }
- public void logout(User user) throws InterruptedException {
- LOGIN_USER.remove(user);
- }
- public List<User> getLoginUser() {
- return LOGIN_USER;
- }
- }
测试类很简单,如下:
- public class LoginActionTest {
- @Test
- public void testLoginSuccess() throws Exception {
- LoginAction loginAction = new LoginAction();
- User user = new User("haibin369", "123456");
- loginAction.login(user);
- assertTrue("User didn't login!", loginAction.getLoginUser().contains(user));
- }
- @Test
- public void testLogout() throws Exception {
- LoginAction loginAction = new LoginAction();
- User user = new User("haibin369", "123456");
- loginAction.login(user);
- loginAction.logout(user);
- assertFalse("User didn't logout!", loginAction.getLoginUser().contains(user));
- }
- }
问题是这些测试中都有重复的代码去创建LoginAction,所以可以考虑把LoginAction作为成员变量,只初始化一次。同时为了避免测试方法间的影响,可以在每个测试执行完之后重置LoginAction的状态,即清空LOGIN_USER。在一般的测试中也许也会有类似的需求:在测试开始时打开一个文件,所有测试结束之后关闭这个文件。为了实现这种目的,JUnit提供了以下四个方法注解实现这种目的:
- @BeforeClass / @AfterClass:在所有测试方法执行之前 / 后执行,被注解的方法必须是public,static,无返回值,无参数;
- @Before / @After:在每个测试方法执行之前 / 后执行,被注解的方法必须是public,无返回值,无参数;
重写后的测试如下:
- public class LoginActionTest {
- private static LoginAction loginAction;
- private static User user;
- @BeforeClass
- public static void init() {
- loginAction = new LoginAction();
- user = new User("haibin369", "123456");
- }
- @After
- public void clearLoginUser() {
- loginAction.getLoginUser().clear();
- }
- @Test
- public void testLoginSuccess() throws Exception {
- loginAction.login(user);
- assertTrue("User didn't login!", loginAction.getLoginUser().contains(user));
- }
- @Test
- public void testLogout() throws Exception {
- loginAction.login(user);
- loginAction.logout(user);
- assertFalse("User didn't logout!", loginAction.getLoginUser().contains(user));
- }
- }
四、异常测试
在上面的LoginAction中,当使用Admin帐号登陆时,会抛出异常,这部分代码也需要测试,我们可以在@Test注解中配置期待异常,当测试抛出指定异常的时候则测试成功。
- //当测试方法抛出ACLException时测试成功
- @Test(expected = ACLException.class)
- public void testAdminLogin() throws ACLException, InterruptedException {
- loginAction.login(new User("admin", "admin"));
- }
上面的测试能测试出方法按照预期抛出异常,但是如果代码里面不只一个地方抛出ACLException(只是包含的信息不一样),我们还是无法分辨出来。这种情况可以使用JUnit的ExpectedException Rule来解决。
- //使用@Rule标记ExpectedException
- @Rule
- public ExpectedException expectedException = ExpectedException.none();
- @Test
- public void testAdminLogin2() throws ACLException, InterruptedException {
- //期待抛出ACLException
- expectedException.expect(ACLException.class);
- //期待抛出的异常信息中包含"Access Denied"字符串
- expectedException.expectMessage(CoreMatchers.containsString("Access Denied"));
- //当然也可以直接传入字符串,表示期待的异常信息(完全匹配)
- //expectedException.expectMessage("Access Denied!");
- loginAction.login(new User("admin", "admin"));
- }
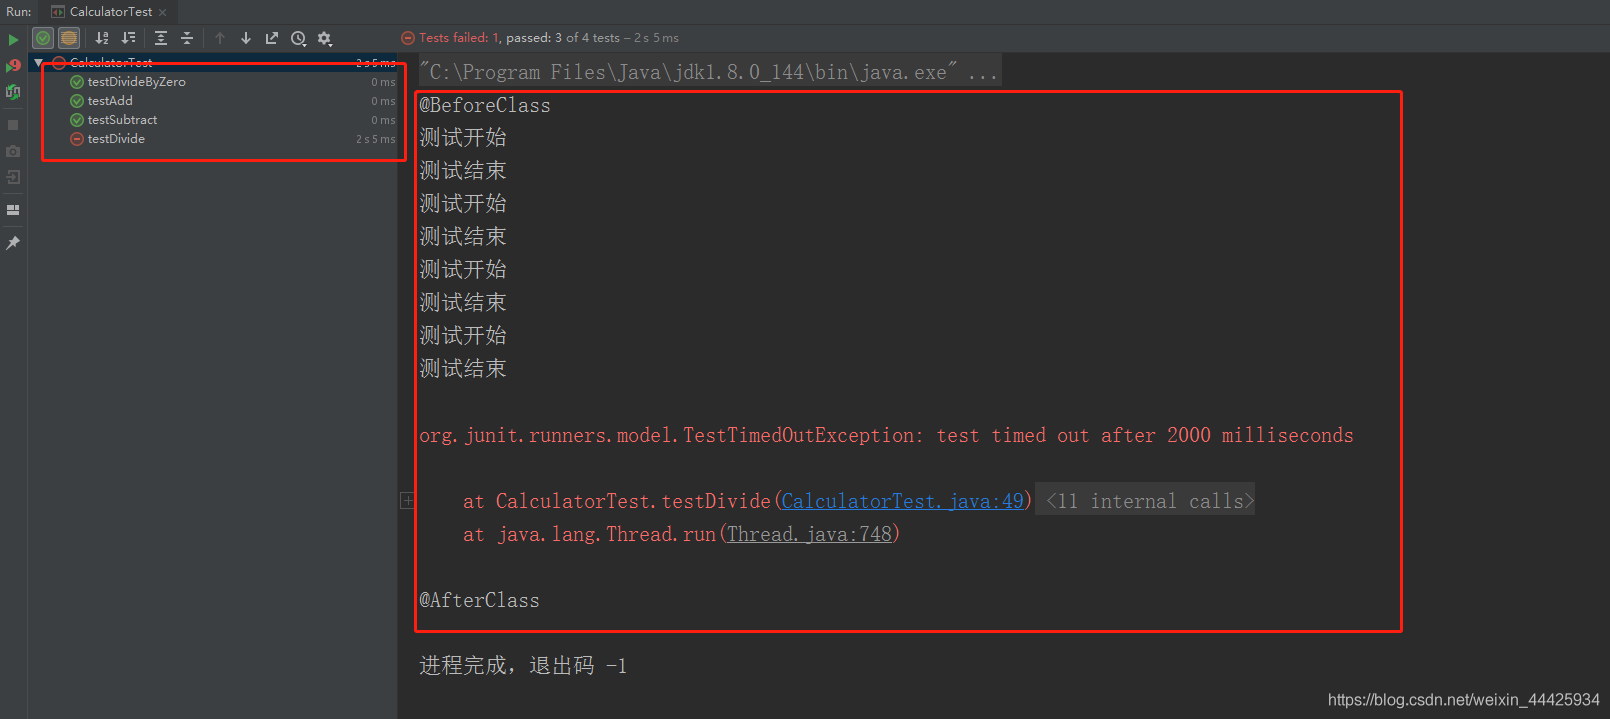
五、超时测试
在JUnit中测试超时是使用@Test的timeout属性设置
- //设置1000ms的超时时间,当超过这个时间测试还没执行完毕则失败
- @Test(timeout = 1000)
- public void testLoginTimeout() throws Exception {
- loginAction.login(new User("admin", "admin"));
- }
也可以使用Timeout Rule设定全局的超时时间
- //设置1000ms的超时时间,当超过这个时间测试还没执行完毕则失败
- @Rule
- public Timeout timeout = new Timeout(1000);
- @Test
- public void testLoginTimeout() throws Exception {
- loginAction.login(new User("admin", "admin"));
- }
上面两个测试执行都会失败:java.lang.Exception: test timed out after 1000 milliseconds
六、忽略测试
使用@Ignore可以忽略一个测试
- //忽略该测试,参数为输出信息
- @Ignore("Temporary ignored as no changes.")
- @Test(timeout = 1000)
- public void testLoginTimeout() throws Exception {
- loginAction.login(new User("admin", "admin"));
- }
执行类里的所有测试,会输出一下信息,表示该测试被忽略了。
Test 'org.haibin369.test.LoginActionTest.testLoginTimeout' ignored (Temporary ignored as no changes.)
七、使用Suite执行多个测试类
现在我们有了ObjectGeneratorTest和LoginActionTest,如果需要一次过执行多个测试类的所有方法,可以使用@Suite与@Suite.SuiteClasses注解
- //使用JUnit的Suite Runner执行测试
- @RunWith(Suite.class)
- //配置所有需要执行的测试
- @Suite.SuiteClasses({
- ObjectGeneratorTest.class,
- LoginActionTest.class
- })
- //创建一个类作为Test Suite的入口
- public class MyTestSuite {
- }
原文链接:http://haibin369.iteye.com/blog/2077638


![[Swift]代码触发UIButton的点击事件](https://img-blog.csdnimg.cn/33f90731c40949d688e657881ffb0582.png#pic_left)