我使用的服务器是阿里云的服务器。
配置好后,直接用IP访问网站没有问题,但是使用域名解析访问一直是welcome to nginx!页面,是因为其使用了默认配置,将下文所给配置中第19行注释掉即可!
首先更新一下yum
yum update
1. 安装Nginx
Nginx官网
官网CentOS系统上安装方法
1.1 安装说明
Installation instructions
Before you install nginx for the first time on a new machine, you need to set up the nginx packages repository. Afterward, you can install and update nginx from the repository.
在第一次在新机器上安装nginx之前,需要设置nginx包存储库。之后,您可以从存储库安装和更新nginx。
1.2 安装必备组件
sudo yum install yum-utils
1.3 设置存储库
To set up the yum repository, create the file named with the following contents:
/etc/yum.repos.d/nginx.repo
在/etc/yum.repos.d目录下创建nginx.repo文件,将下面内容写入到该文件中;
[nginx-stable]
name=nginx stable repo
baseurl=http://nginx.org/packages/centos/$releasever/$basearch/
gpgcheck=1
enabled=1
gpgkey=https://nginx.org/keys/nginx_signing.key
module_hotfixes=true[nginx-mainline]
name=nginx mainline repo
baseurl=http://nginx.org/packages/mainline/centos/$releasever/$basearch/
gpgcheck=1
enabled=0
gpgkey=https://nginx.org/keys/nginx_signing.key
module_hotfixes=true
By default, the repository for stable nginx packages is used. If you would like to use mainline nginx packages, run the following command:
注:默认使用稳定的nginx包存储库,如需修改使用主线存储库,请执行以下命令:
sudo yum-config-manager --enable nginx-mainline
1.4 安装nginx
To install nginx, run the following command:
sudo yum install nginx
When prompted to accept the GPG key, verify that the fingerprint matches , and if so, accept it. 573B FD6B 3D8F BC64 1079 A6AB ABF5 BD82 7BD9 BF62
执行以下命令,开始安装nginx:
sudo yum install nginx
当提示接受GPG密钥时,请验证是否与573B FD6B 3D8F BC64 1079 A6AB ABF5 BD82 7BD9 BF62匹配,如果匹配,请接受。

2. 配置Nginx
# 查看Nginx配置信息位置及校验nginx配置信息是否存在错误
nginx -t
Nginx 配置文件nginx.conf中文详解
我的配置:
/etc/nginx中输入vim nginx.conf
user  nginx;
worker_processes  2;
error_log  /var/log/nginx/error.log warn;
pid        /var/run/nginx.pid;
events {worker_connections  1024;
}
http {include       /etc/nginx/mime.types;default_type  application/octet-stream;log_format  main  '$remote_addr - $remote_user [$time_local] "$request" ''$status $body_bytes_sent "$http_referer" ''"$http_user_agent" "$http_x_forwarded_for"';access_log  /var/log/nginx/access.log  main;sendfile        on;#tcp_nopush     on;keepalive_timeout  65;#gzip  on;#include /etc/nginx/conf.d/*.conf;server{listen 80;server_name 主机IP地址;location /{root /www;index index.html;}}
}
注意第十九行需要注释掉,否则其会使用默认配置!
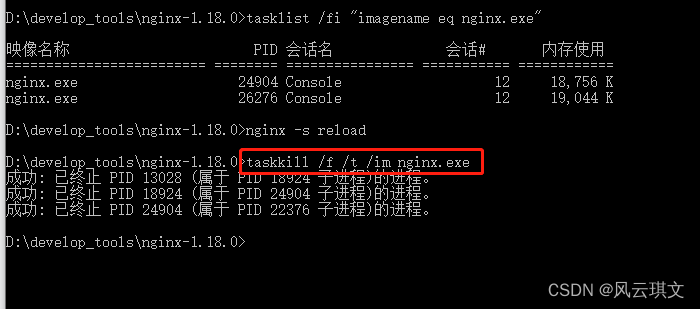
3. 启动Nginx
打开/sbin输入./nginx启动nginx
关闭nginx,输入./nginx -s stop