前言
各种YUV格式多如牛毛啊,刚开始学起来确实很费劲,网上搜索的文章讲的并不是很明白。
各种不同的YUV格式其实只是采样方式和存储方式不同,就这两点,不同的采样方式是为了实现节省内存,不同的存储方式暂时不了解有什么用处。
RGB转YUV444
我们假设有一张宽为4像素,高为2像素的图片,则这张图片一共有8个像素,我用一个格子代表一个像素,8个像素就是8个格子,如下图:

如上图,共有8个格子代表8个像素,0 ~ 7代表像素的位置。事实上一个像素是非常小的,在电脑上的一个像素用肉眼几乎看不见,所以我用一个大格子表示一个像素,方便理解。电脑中的像素是由RGB三原色组成的,这里我把RGB标注到像素中,如下:

每个R用1个字节来存储,G用1个字节存储,B也用1个字节存储,所以1个像素中的RGB需要3个字节来存储,而上图中有8个像素,也就是有8对RGB值,需要24字节来存储。
RGB通过数学公式可以转换为YUV,至于转换的原理我们不用去理解,只要知道通过公式能相互转换就行了,把上图的RGB转换为YUV格式,如下:

Y需要1个字节来存储,U需要1个字节来存储,V也需要1个字节来存储,所以8个像素的YUV图片也是需要24个字节来存储,和RGB一样。这感觉好像YUV没什么优势啊,别急,后面就知道有什么好处了。
YV12的采集方式(YUV444 ➜ YV12)
前面RGB转换后的YUV数据称为YUV444,这种格式的YUV采样是完整的,没有丢失任何精度。而我们从摄像头拿到的YUV图像数据绝对不可能是YUV444格式的,而是其它的YUV格式,是那些有丢失精度的格式,比如YV12,在Android系统中,可以设置摄像头采集的数据出来就是YV12格式(或者NV21格式),YV12是一种丢失精度的YUV格式,它在采样时,Y不会有丢失,而在采集U时,隔一个采一个,而且隔一行采一行,采集V时也是隔一个采一个,隔一行采一行,假设一张图片高为6像素(6行),则YV12格式采集的方式为:
第一行:Y都采集,采集U,隔一个采集一个,不采集V
第二行:Y都采集,采集V,隔一个采集一个,不采集U
第三行:Y都采集,采集U,隔一个采集一个,不采集V
第四行:Y都采集,采集V,隔一个采集一个,不采集U
第五行:Y都采集,采集U,隔一个采集一个,不采集V
第六行:Y都采集,采集V,隔一个采集一个,不采集U
应该很容易理解了,U和V有丢失,所以需要的存储空间就会变少,YV12相比YUV444要节省一半的存储空间,这就是为什么摄像头出来的数据都是YUV格式而不是RGB格式的原因,因为需要的存储空间小,而且虽然丢失了一些U和V,但是图像质量用肉眼看几乎是没有下降的。
按照YV12格式的采样方式,我们把之前YUV444的图片采样为YV12格式,如下:
第一行:Y都采集,采集U,隔一个采集一个,不采集V,如下:

第二行:Y都采集,采集V,隔一个采集一个,不采集U,如下:

两行合起来看,如下:

从上图也可以看出,YUV444的每一行都有12个YUV相关数据,需要12个字节来存储,采集成YV12后,每一行就只有6个YUV相关的数据了,只需要6个字节即可存储,比原来节省了一半的存储空间,这就是为什么摄像头采集的数据一般都是YUV格式的原因了。
YV12的存储方式
YV12的存储方式是:把Y、U、V分别保存,先存Y,再存V,再存U,如下:

YV12的这种方式把Y、U、V都分别存储了,专业术语叫做分成了3个平面,看起来需要用3个数组来存储,实际上摄像头采集画面传给我们的YUV数据是一个一维数组,并不是二维的,如下:

所以,我们不要以为YV12分三个平面就是用3个数组来存储,摄像头出来的YV12是一个一维数组,保存文件时直接保存这个一维数组即可。当然了,在代码中,为了方便操作这个YV12数据,可以把一维数组转换为分别保存Y、U、V的三个数组。
讲到这里,我们顺便了解另一种YUV格式:YU12(也叫 I420),它和YV12很像,只是存储时YU12先存的U再存V,如下:

YV12的还原(YV12 ➜ YUV444)
通过YV12采样的数据是丢失了一些U和V的,那怎么还原呢?如下:

如上图可以看到,YV12的还原方式为:每两行中,每4个相邻的Y共用一套UV(即红色框中的4个Y共用一套UV,蓝色框中的4个Y共用一套UV),当再把YUV转换回RGB时,和之前的原始RGB肯定是不太一样的,但是在实际效果上看,我们肉眼几乎是看不出差别来的(只看一个颜色是可以看出来差别,但是如果看一张整体的图片就看不出来差别了)。
根据这个YV12还原回YUV444的原理,可以知道,图像的宽和高都应该是偶数,所以我们在做练习时,在设置图像的宽高的时候就不要搞出单数的宽高来,以免出现异常!我们在看一些手机或者摄像机的分辨率设置也都是偶数的,没有单数的情况。
通过代码模拟YUV444 ➜ YV12 ➜ YUV444
1、图解

如上图所示,接下来我们就通过代码的方式来模拟YUV444到YV12数据的采集和存储过程,然后还原回YUV444。为了方便后面操作YUV数据的方便,YV12的数据在存储时我们使用三个数组来保存,而不是用一个数组保存。
2、模拟出YUV444数据

通过代码的方式模拟出如上图的YUV444数据,如下:
fun main() {val yuv444Bytes = arrayOf(arrayOf("Y0", "U0", "V0", "Y1", "U1", "V1", "Y2", "U2", "V2", "Y3", "U3", "V3"),arrayOf("Y4", "U4", "V4", "Y5", "U5", "V5", "Y6", "U6", "V6", "Y7", "U7", "V7"))printYUV444(yuv444Bytes)
}fun printYUV444(yuv444Bytes: Array<Array<String>>) {println("下面输出YUV444数据")for (oneLine in yuv444Bytes) {for (columnIndex in oneLine.indices step 3) {val y = oneLine[columnIndex + 0]val u = oneLine[columnIndex + 1]val v = oneLine[columnIndex + 2]print("$y $u $v | ")}println()}
}
运行结果如下:
下面输出YUV444数据
Y0 U0 V0 | Y1 U1 V1 | Y2 U2 V2 | Y3 U3 V3 |
Y4 U4 V4 | Y5 U5 V5 | Y6 U6 V6 | Y7 U7 V7 |
这里我们通过一个二维的字符串数组来表示了一张宽为4,高为2的图片的YUV444数据,使用字符串来模拟YUV数据是为了方便大家查看结果。接下来要实现从YUV444中采集出YV12数据。
3、从YUV444中采集出YV12数据

如上图,我们要从YUV444的数据中采集出YV12的数据,代码如下:
fun main() {val yuv444Bytes = arrayOf(arrayOf("Y0", "U0", "V0", "Y1", "U1", "V1", "Y2", "U2", "V2", "Y3", "U3", "V3"),arrayOf("Y4", "U4", "V4", "Y5", "U5", "V5", "Y6", "U6", "V6", "Y7", "U7", "V7"))printYUV444(yuv444Bytes)val (yBytes, uBytes, vBytes) = yuv444ToYv12(yuv444Bytes)printYV12(yBytes, uBytes, vBytes)
}fun printYUV444(yuv444Bytes: Array<Array<String>>) {println("下面输出YUV444数据")for (oneLine in yuv444Bytes) {for (columnIndex in oneLine.indices step 3) {val y = oneLine[columnIndex + 0]val u = oneLine[columnIndex + 1]val v = oneLine[columnIndex + 2]print("$y $u $v | ")}println()}
}fun printYV12(yBytes: Array<String>, uBytes: Array<String>, vBytes: Array<String>) {println("下面输出YV12数据")yBytes.forEach { print("$it ") }println()vBytes.forEach { print("$it ") }println()uBytes.forEach { print("$it ") }println()
}private fun yuv444ToYv12(yuv444Bytes: Array<Array<String>>): Triple<Array<String>, Array<String>, Array<String>> {val width = yuv444Bytes[0].size / 3 // 注:因为yuv444格式的一个像素是3个字节,所以要除以3val height = yuv444Bytes.sizeval ySize = width * heightval vSize = ySize / 4val yBytes = Array(ySize) { "" }val uBytes = Array(vSize) { "" }val vBytes = Array(vSize) { "" }var yIndex = 0var uIndex = 0var vIndex = 0var saveU = truevar saveV = truefor (rowIndex in 0 until height) {val oneLine = yuv444Bytes[rowIndex]for (columnIndex in oneLine.indices step 3) {val y = oneLine[columnIndex + 0]val u = oneLine[columnIndex + 1]val v = oneLine[columnIndex + 2]yBytes[yIndex++] = yif (rowIndex % 2 == 0) {// 偶数行取U,隔一个取一个if (saveU) {uBytes[uIndex++] = u}saveU = !saveU} else {// 单数行取V,隔一个取一个if (saveV) {vBytes[vIndex++] = v}saveV = !saveV}}}return Triple(yBytes, uBytes, vBytes)
}
运行效果如下:
下面输出YUV444数据
Y0 U0 V0 | Y1 U1 V1 | Y2 U2 V2 | Y3 U3 V3 |
Y4 U4 V4 | Y5 U5 V5 | Y6 U6 V6 | Y7 U7 V7 |
下面输出YV12数据
Y0 Y1 Y2 Y3 Y4 Y5 Y6 Y7
V4 V6
U0 U2
4、把YV12还原为YUV444

实现代码如下:
fun main() {val yuv444Bytes = arrayOf(arrayOf("Y0", "U0", "V0", "Y1", "U1", "V1", "Y2", "U2", "V2", "Y3", "U3", "V3"),arrayOf("Y4", "U4", "V4", "Y5", "U5", "V5", "Y6", "U6", "V6", "Y7", "U7", "V7"))printYUV444(yuv444Bytes)val (yBytes, uBytes, vBytes) = yuv444ToYv12(yuv444Bytes)printYV12(yBytes, uBytes, vBytes)val width = yuv444Bytes[0].sizeval height = yuv444Bytes.sizeval yuv444 = yv12ToYuv444(width, height, yBytes, uBytes, vBytes)printYUV444(yuv444)
}fun yv12ToYuv444(width: Int, height: Int, yBytes: Array<String>, uBytes: Array<String>, vBytes: Array<String>): Array<Array<String>> {var yIndex = 0val yuv444Bytes = Array(height) { Array(width) { " " } }val oneLineUvSize = width / 2 // 在YV12中,一行中的U或V的数量var twoLineIndex = -1  // 每两行的计数for (rowIndex in 0 until height) {val oneLineBytes = yuv444Bytes[rowIndex]var u = ""var v = ""// 因为每两行读取UV的时起始位置是一样的,所以我们只在这两行的偶数行时把twoLineIndex进行加加即可if (rowIndex % 2 == 0) {twoLineIndex++}// 计算每一行在取UV时uvIndex的起始位置var uvIndex = twoLineIndex * oneLineUvSizefor (columnIndex in oneLineBytes.indices step 3) {if (yIndex % 2 == 0) {// 一行之中,每两个Y只取一次UVu = uBytes[uvIndex]v = vBytes[uvIndex]uvIndex++}val y = yBytes[yIndex++]oneLineBytes[columnIndex + 0] = yoneLineBytes[columnIndex + 1] = uoneLineBytes[columnIndex + 2] = v}}return yuv444Bytes
}
运行结果如下:
下面输出YUV444数据
Y0 U0 V0 | Y1 U1 V1 | Y2 U2 V2 | Y3 U3 V3 |
Y4 U4 V4 | Y5 U5 V5 | Y6 U6 V6 | Y7 U7 V7 |
下面输出YV12数据
Y0 Y1 Y2 Y3 Y4 Y5 Y6 Y7
V4 V6
U0 U2
下面输出YUV444数据
Y0 U0 V4 | Y1 U0 V4 | Y2 U2 V6 | Y3 U2 V6 |
Y4 U0 V4 | Y5 U0 V4 | Y6 U2 V6 | Y7 U2 V6 |
可以和之前的截图对比一下结果 :

可以看到,4个Y共用一套UV,这样的话,每个像素的YUV值并不是之前原始的YUV值了,所以颜色效果肯定有偏差,但是就整张图片来看的话,肉眼几乎看不出差别,前面也说到过的,这个我们需要清楚。
YUV444到YV12是比较简单的,但是把YV12还原回YUV444的逻辑是挺复杂的,所以这里对一些细节进行分析:
如上图所示,一行之中,每两个Y共用一套UV,所以,每两个Y只读取一次UV即可,我们观察一下保存Y的数组的每个元素的索引,如下:

即然是每两个Y读一次UV,通过上图发现,其实在y的索引为双数时读取就行了,也就是在0、2、4、6的时候读取,所以实现代码如下:
if (yIndex % 2 == 0) {u = uBytes[uvIndex]v = vBytes[uvIndex]uvIndex++
}
每两个Y读取一次UV还比较容易实现,比较难的是第二行、第三行、第四行的UV怎么取?这个确实是比较难,属于逻辑问题,要找到它的规律:
- 第一行取UV和第二行取UV是一模一样的,都是从0开始读取的,所以只要让他们的uvIndex在读第一行和第二行时保持一样即可。
- 第三行取UV和第四行取UV是一样一样的,与第一、二行不同的是,uvIndex的起始位置不是从0开始了。
所以,难点就是如何找出uvIndex的起始位置即可,为了找出规律,我们需要数据多一点,假设宽为8像素,高为6像素,则一共有 6 x 8 = 48像素,就会有48个Y,我们知道每4个Y对应一个U和V,则48 / 4 = 12,即会有12个U和12个V,画图分析如下:

如上图,它是分析计算每一行读取UV时的起始位置的公式的,对应的实现代码如下:
。。。
fun yv12ToYuv444(。。。): Array<Array<String>> {。。。val oneLineUvSize = width / 2 // 在YV12中,一行中的U或V的数量var twoLineIndex = -1  // 每两行的计数for (rowIndex in 0 until height) {。。。// 因为每两行读取UV的时起始位置是一样的,所以我们只在这两行的偶数行时把twoLineIndex进行加加即可if (rowIndex % 2 == 0) {twoLineIndex++}// 计算每一行在读取UV时uvIndex的起始位置var uvIndex = twoLineIndex * oneLineUvSize。。。}return yuv444Bytes
}
5、完整代码
fun main() {val yuv444Bytes = arrayOf(arrayOf("Y0", "U0", "V0", "Y1", "U1", "V1", "Y2", "U2", "V2", "Y3", "U3", "V3"),arrayOf("Y4", "U4", "V4", "Y5", "U5", "V5", "Y6", "U6", "V6", "Y7", "U7", "V7"))printYUV444(yuv444Bytes)val (yBytes, uBytes, vBytes) = yuv444ToYv12(yuv444Bytes)printYV12(yBytes, uBytes, vBytes)val width = yuv444Bytes[0].sizeval height = yuv444Bytes.sizeval yuv444 = yv12ToYuv444(width, height, yBytes, uBytes, vBytes)printYUV444(yuv444)
}fun yv12ToYuv444(width: Int, height: Int, yBytes: Array<String>, uBytes: Array<String>, vBytes: Array<String>): Array<Array<String>> {var yIndex = 0val yuv444Bytes = Array(height) { Array(width) { " " } }val oneLineUvSize = width / 2 // 在YV12中,一行中的U或V的数量var twoLineIndex = -1  // 每两行的计数for (rowIndex in 0 until height) {val oneLineBytes = yuv444Bytes[rowIndex]var u = ""var v = ""// 因为每两行读取UV的时起始位置是一样的,所以我们只在这两行的偶数行时把twoLineIndex进行加加即可if (rowIndex % 2 == 0) {twoLineIndex++}// 计算每一行在取UV时uvIndex的起始位置var uvIndex = twoLineIndex * oneLineUvSizefor (columnIndex in oneLineBytes.indices step 3) {if (yIndex % 2 == 0) {// 一行之中,每两个Y只取一次UVu = uBytes[uvIndex]v = vBytes[uvIndex]uvIndex++}val y = yBytes[yIndex++]oneLineBytes[columnIndex + 0] = yoneLineBytes[columnIndex + 1] = uoneLineBytes[columnIndex + 2] = v}}return yuv444Bytes
}fun printYUV444(yuv444Bytes: Array<Array<String>>) {println("下面输出YUV444数据")for (oneLine in yuv444Bytes) {for (columnIndex in oneLine.indices step 3) {val y = oneLine[columnIndex + 0]val u = oneLine[columnIndex + 1]val v = oneLine[columnIndex + 2]print("$y $u $v | ")}println()}
}fun printYV12(yBytes: Array<String>, uBytes: Array<String>, vBytes: Array<String>) {println("下面输出YV12数据")yBytes.forEach { print("$it ") }println()vBytes.forEach { print("$it ") }println()uBytes.forEach { print("$it ") }println()
}fun yuv444ToYv12(yuv444Bytes: Array<Array<String>>): Triple<Array<String>, Array<String>, Array<String>> {val width = yuv444Bytes[0].size / 3val height = yuv444Bytes.sizeval ySize = width * heightval vSize = ySize / 4val yBytes = Array(ySize) { "" }val uBytes = Array(vSize) { "" }val vBytes = Array(vSize) { "" }var yIndex = 0var uIndex = 0var vIndex = 0var saveU = truevar saveV = truefor (rowIndex in 0 until height) {val oneLine = yuv444Bytes[rowIndex]for (columnIndex in oneLine.indices step 3) {val y = oneLine[columnIndex + 0]val u = oneLine[columnIndex + 1]val v = oneLine[columnIndex + 2]yBytes[yIndex++] = yif (rowIndex % 2 == 0) {// 偶数行取U,隔一个取一个if (saveU) {uBytes[uIndex++] = u}saveU = !saveU} else {// 单数行取V,隔一个取一个if (saveV) {vBytes[vIndex++] = v}saveV = !saveV}}}return Triple(yBytes, uBytes, vBytes)
}
6、完整代码(把String换为byte)
下面,我们把yuv444转YV12和YV12转YUV444的代码修改为使用byte,并封装到YuvUtil中,以方便复用,需要特别注意的是,这里一行数据的byte数组大小是要用宽度乘以3的,因为1个像素要用3个字节来存储的,反过来,当我们通过一行byte数组计算出宽时,就需要拿数组大小除以3。
object YuvUtil {fun yv12ToYuv444(width: Int, height: Int, yBytes: Array<Byte>, uBytes: Array<Byte>, vBytes: Array<Byte>): Array<ByteArray> {var yIndex = 0val yuv444Bytes = Array(height) { ByteArray(width * 3) } // 因为每个像素需要3个字节,所以这里乘以3val oneLineUvSize = width / 2 // 在YV12中,一行中的U或V的数量var twoLineIndex = -1 // 每两行的计数for (rowIndex in 0 until height) {val oneLineBytes = yuv444Bytes[rowIndex]var u: Byte = 0var v: Byte = 0// 因为每两行读取UV的时起始位置是一样的,所以我们只在这两行的偶数行时把twoLineIndex进行加加即可if (rowIndex % 2 == 0) {twoLineIndex++}// 计算每一行在取UV时uvIndex的起始位置var uvIndex = twoLineIndex * oneLineUvSizefor (columnIndex in oneLineBytes.indices step 3) {if (yIndex % 2 == 0) {// 一行之中,每两个Y只取一次UVu = uBytes[uvIndex]v = vBytes[uvIndex]uvIndex++}val y = yBytes[yIndex++]oneLineBytes[columnIndex + 0] = yoneLineBytes[columnIndex + 1] = uoneLineBytes[columnIndex + 2] = v}}return yuv444Bytes}private fun yuv444ToYv12(yuv444Bytes: Array<ByteArray>): Triple<ByteArray, ByteArray, ByteArray> {val width = yuv444Bytes[0].size / 3 // 因为每个像素占3个字节,所以要除以3val height = yuv444Bytes.sizeval ySize = width * heightval vSize = ySize / 4val yBytes = ByteArray(ySize)val uBytes = ByteArray(vSize)val vBytes = ByteArray(vSize)var yIndex = 0var uIndex = 0var vIndex = 0var saveU = truevar saveV = truefor (rowIndex in 0 until height) {val oneLine = yuv444Bytes[rowIndex]for (columnIndex in oneLine.indices step 3) {val y = oneLine[columnIndex + 0]val u = oneLine[columnIndex + 1]val v = oneLine[columnIndex + 2]yBytes[yIndex++] = yif (rowIndex % 2 == 0) {// 偶数行取U,隔一个取一个if (saveU) {uBytes[uIndex++] = u}saveU = !saveU} else {// 单数行取V,隔一个取一个if (saveV) {vBytes[vIndex++] = v}saveV = !saveV}}}return Triple(yBytes, uBytes, vBytes)}fun printYUV444(yuv444Bytes: Array<ByteArray>) {println("下面输出YUV444数据")for (oneLine in yuv444Bytes) {for (columnIndex in oneLine.indices step 3) {val y = oneLine[columnIndex + 0]val u = oneLine[columnIndex + 1]val v = oneLine[columnIndex + 2]print("$y $u $v | ")}println()}}fun printYV12(yBytes: ByteArray, uBytes: ByteArray, vBytes: ByteArray) {// 以16进制进行打印println("下面输出YV12数据")println("下面输出Y数据")yBytes.forEach { print("${toHexString(byteToInt(it))} ") }println("\n下面输出V数据")vBytes.forEach { print("${toHexString(byteToInt(it))} ") }println("\n下面输出U数据")uBytes.forEach { print("${toHexString(byteToInt(it))} ") }println()}fun byteToInt(byte: Byte): Int = byte.toInt() shl 24 ushr 24fun toHexString(int: Int): String = Integer.toHexString(int)}
YV12图片与bmp图片相互
bmp图片的相关知识可以参考这篇文件:https://blog.csdn.net/android_cai_niao/article/details/120528734
YV12与bmp的转换,说白了就是yuv和rgb的转换,找到转换公式即可。在网上转换公式有很多,这些转换公式到底哪个靠谱,我也不清楚,因为这里面的知识点太多了,不同的颜色空间有不同的转换公式,我就以手机摄像头出来的一张YUV图片转换为bmp图片在电脑下查看,颜色差不多我就认为它是正确的公式,我也懒得去想它是个什么颜色空间了。
RGB转YUV公式
- Y = 0.299 * R + 0.587 * G + 0.114 * B
- U = -0.169 * R - 0.331 * G + 0.499 * B + 128
- V = 0.499 * R - 0.418 * G - 0.0813 * B + 128
需要注意的是,R、G、B的范围是0 ~ 255,正好一个byte可以表示,我们从内存中读取RGB时,也是byte类型的数据,但是在参与转换公式时需要注意,java中的byte是有符号的,一个byte有8个比特位,如果全是1,在byte中就是-1,如果在int中就是255,所以我们需要把byte转换为一个正数的int值,否则计算公式就不管用了。还要注意的是:byte.toInt()这个函数,一个-1的byte转换为int后还是-1,所以需要注意,我们要取int的最低8位,然后把高位都变成0,然后就变成正数了。还有就是转换公式计算出来的Y、U、V值也范围也是0 ~ 255的,需要做超范围的处理。
相应的Kotlin实现代码如下:
object YuvUtil {   fun byteToInt(byte: Byte): Int = byte.toInt() shl 24 ushr 24fun verify(int: Int) = if (int < 0) 0 else if (int > 255) 255 else intfun toHexString(int: Int): String = Integer.toHexString(int)fun rgbToYuv(R: Byte, G: Byte, B: Byte): Triple<Byte, Byte, Byte> {// 注:R、G、B值的范围是0 ~ 255,是没有负数的,需要转换为正数的int。// 一个负数用byte.toInt()转换后还是一个负数,所以我们通过位运算符来进行转换,Byte的-1转换为Int值应该是255return rgbToYuv(byteToInt(R), byteToInt(G), byteToInt(B))}fun rgbToYuv(R: Int, G: Int, B: Int): Triple<Byte, Byte, Byte> {var Y = (0.299 * R + 0.587 * G + 0.114 * B).toInt()var U = (-0.169 * R - 0.331 * G + 0.499 * B + 128).toInt()var V = (0.499 * R - 0.418 * G - 0.0813 * B + 128).toInt()Y = verify(Y)U = verify(U)V = verify(V)println("rgb: ${toHexString(R)} ${toHexString(G)} ${toHexString(B)} -> yuv: ${toHexString(Y)} ${toHexString(U)} ${toHexString(V)}")return Triple(Y.toByte(), U.toByte(), V.toByte())}
}
YUV转RGB公式
- R = Y + 1.4075 * (V - 128)
- G = Y - 0.3455 * (U - 128) - 0.7169 * (V - 128)
- B = Y + 1.7790 * (U - 128)
这里同样需要注意byte数据在参与公式计算前的处理,还有计算结果的超范围处理。
相应的Kotlin实现代码如下:
object YuvUtil { fun byteToInt(byte: Byte): Int = byte.toInt() shl 24 ushr 24fun verify(int: Int) = if (int < 0) 0 else if (int > 255) 255 else intfun toHexString(int: Int): String = Integer.toHexString(int) fun yuvToRgb(Y: Byte, U: Byte, V: Byte): Triple<Byte, Byte, Byte> {// 注:Y、U、V值的范围是0 ~ 255,是没有负数的,需要转换为正数的int。// 一个负数用byte.toInt()转换后还是一个负数,所以我们通过位运算符来进行转换,Byte的-1转换为Int值应该是255return yuvToRgb(byteToInt(Y), byteToInt(U), byteToInt(V))}fun yuvToRgb(Y: Int, U: Int, V: Int): Triple<Byte, Byte, Byte> {var R = (Y + 1.4075 * (V - 128)).toInt()var G = (Y - 0.3455 * (U - 128) - 0.7169 * (V - 128)).toInt()var B = (Y + 1.779 * (U - 128)).toInt()R = verify(R)G = verify(G)B = verify(B)println("yuv: ${toHexString(Y)} ${toHexString(U)} ${toHexString(V)} -> rgb: ${toHexString(R)} ${toHexString(G)} ${toHexString(B)}")return Triple(R.toByte(), G.toByte(), B.toByte())}}
RGB和YUV互转偏差
RGB和YUV不可能完美互转的,也就是说RGB转换为YUV后,再转换回GRB时跟原来的RGB可能会有偏差,示例如下:
fun main() {val (Y, U, V) = YuvUtil.rgbToYuv(0xff, 0, 0)val (R, G, B) = YuvUtil.yuvToRgb(Y, U, V)
}
运行结果如下:
rgb: ff 0 0 -> yuv: 4c 54 ff
yuv: 4c 54 ff -> rgb: fe 0 0
从结果可以看到,最初的RGB为:0xff0000,转换为YUV为:0x4c54ff,再转换回RGB为:0xfe0000,和最初的RGB值不一样了,但是很接近,也就是说都是红色,最初的红色和转换后的红色用肉眼看几乎没有差别。
bmp图片转 YUV图片
import java.io.*object YuvUtil {fun bmpFileToYV12FileDemo() {val grbBytes = BmpUtil.createRgbBytes(4, 2)println("下面输出RGB像素数据:")BmpUtil.printColorBytes(grbBytes)val yuv444Bytes = rgbBytesToYuv444Bytes(grbBytes)println("下面输出YUV像素数据:")BmpUtil.printColorBytes(yuv444Bytes)val (yBytes, uBytes, vBytes) = yuv444BytesToYv12Bytes(yuv444Bytes)printYV12(yBytes, uBytes, vBytes)val yv12File = File("C:\\Users\\Even\\Pictures\\demo.yuv")writeYv12BytesToFile(yv12File, yBytes, vBytes, uBytes)}fun bmpFileToYV12FileDemo2() {val bmpFile = File("C:\\Users\\Even\\Pictures\\海琴烟.bmp")val yv12File = File("C:\\Users\\Even\\Pictures\\海琴烟.yuv")val rgbBytes = BmpUtil.readBmpFilePixelBytes(bmpFile)val yuv444Bytes = rgbBytesToYuv444Bytes(rgbBytes)val (yBytes, uBytes, vBytes) = yuv444BytesToYv12Bytes(yuv444Bytes)writeYv12BytesToFile(yv12File, yBytes, vBytes, uBytes)}private fun writeYv12BytesToFile(yv12File: File, yBytes: ByteArray, vBytes: ByteArray, uBytes: ByteArray) {FileOutputStream(yv12File).use { fos ->BufferedOutputStream(fos).use { bos ->bos.write(yBytes)bos.write(vBytes)bos.write(uBytes)}}}fun rgbBytesToYuv444Bytes(rgbBytes: Array<ByteArray>): Array<ByteArray> {val yuv444Bytes = Array(rgbBytes.size) { ByteArray(rgbBytes[0].size) }for (rowIndex in rgbBytes.indices) {val oneLineBytes = rgbBytes[rowIndex]val oneLineYuv444Bytes = yuv444Bytes[rowIndex]for (columnIndex in oneLineBytes.indices step 3) {val red = oneLineBytes[columnIndex + 0]val green = oneLineBytes[columnIndex + 1]val blue = oneLineBytes[columnIndex + 2]val (Y, U, V) = rgbToYuv(red, green, blue)oneLineYuv444Bytes[columnIndex + 0] = YoneLineYuv444Bytes[columnIndex + 1] = UoneLineYuv444Bytes[columnIndex + 2] = V}}return yuv444Bytes}fun byteToInt(byte: Byte): Int = byte.toInt() shl 24 ushr 24fun verify(int: Int) = if (int < 0) 0 else if (int > 255) 255 else intfun toHexString(int: Int): String = Integer.toHexString(int)fun rgbToYuv(R: Byte, G: Byte, B: Byte): Triple<Byte, Byte, Byte> {// 注:R、G、B值的范围是0 ~ 255,是没有负数的,需要转换为正数的int。// 一个负数用byte.toInt()转换后还是一个负数,所以我们通过位运算符来进行转换,Byte的-1转换为Int值应该是255return rgbToYuv(byteToInt(R), byteToInt(G), byteToInt(B))}fun rgbToYuv(R: Int, G: Int, B: Int): Triple<Byte, Byte, Byte> {var Y = (0.299 * R + 0.587 * G + 0.114 * B).toInt()var U = (-0.169 * R - 0.331 * G + 0.499 * B + 128).toInt()var V = (0.499 * R - 0.418 * G - 0.0813 * B + 128).toInt()Y = verify(Y)U = verify(U)V = verify(V)//println("rgb: ${toHexString(R)} ${toHexString(G)} ${toHexString(B)} -> yuv: ${toHexString(Y)} ${toHexString(U)} ${toHexString(V)}")return Triple(Y.toByte(), U.toByte(), V.toByte())}fun yuvToRgb(Y: Byte, U: Byte, V: Byte): Triple<Byte, Byte, Byte> {// 注:Y、U、V值的范围是0 ~ 255,是没有负数的,需要转换为正数的int。// 一个负数用byte.toInt()转换后还是一个负数,所以我们通过位运算符来进行转换,Byte的-1转换为Int值应该是255return yuvToRgb(byteToInt(Y), byteToInt(U), byteToInt(V))}fun yuvToRgb(Y: Int, U: Int, V: Int): Triple<Byte, Byte, Byte> {var R = (Y + 1.4075 * (V - 128)).toInt()var G = (Y - 0.3455 * (U - 128) - 0.7169 * (V - 128)).toInt()var B = (Y + 1.779 * (U - 128)).toInt()R = verify(R)G = verify(G)B = verify(B)//println("yuv: ${toHexString(Y)} ${toHexString(U)} ${toHexString(V)} -> rgb: ${toHexString(R)} ${toHexString(G)} ${toHexString(B)}")return Triple(R.toByte(), G.toByte(), B.toByte())}fun yv12BytesToYuv444Bytes(width: Int, height: Int, yBytes: ByteArray, uBytes: ByteArray, vBytes: ByteArray): Array<ByteArray> {var yIndex = 0val yuv444Bytes = Array(height) { ByteArray(width * 3) }val oneLineUvSize = width / 2 // 在YV12中,一行中的U或V的数量var twoLineIndex = -1 // 每两行的计数for (rowIndex in 0 until height) {val oneLineBytes = yuv444Bytes[rowIndex]var u: Byte = 0var v: Byte = 0// 因为每两行读取UV的时起始位置是一样的,所以我们只在这两行的偶数行时把twoLineIndex进行加加即可if (rowIndex % 2 == 0) {twoLineIndex++}// 计算每一行在取UV时uvIndex的起始位置var uvIndex = twoLineIndex * oneLineUvSizefor (columnIndex in oneLineBytes.indices step 3) {if (yIndex % 2 == 0) {// 一行之中,每两个Y只取一次UVu = uBytes[uvIndex]v = vBytes[uvIndex]uvIndex++}val y = yBytes[yIndex++]oneLineBytes[columnIndex + 0] = yoneLineBytes[columnIndex + 1] = uoneLineBytes[columnIndex + 2] = v}}return yuv444Bytes}private fun yuv444BytesToYv12Bytes(yuv444Bytes: Array<ByteArray>): Triple<ByteArray, ByteArray, ByteArray> {val width = yuv444Bytes[0].size / 3 // 每个像素占3个字节,所以要除以3val height = yuv444Bytes.sizeval ySize = width * heightval vSize = ySize / 4val yBytes = ByteArray(ySize)val uBytes = ByteArray(vSize)val vBytes = ByteArray(vSize)var yIndex = 0var uIndex = 0var vIndex = 0var saveU = truevar saveV = truefor (rowIndex in 0 until height) {val oneLine = yuv444Bytes[rowIndex]for (columnIndex in oneLine.indices step 3) {val y = oneLine[columnIndex + 0]val u = oneLine[columnIndex + 1]val v = oneLine[columnIndex + 2]yBytes[yIndex++] = yif (rowIndex % 2 == 0) {// 偶数行取U,隔一个取一个if (saveU) {uBytes[uIndex++] = u}saveU = !saveU} else {// 单数行取V,隔一个取一个if (saveV) {vBytes[vIndex++] = v}saveV = !saveV}}}return Triple(yBytes, uBytes, vBytes)}fun printYUV444(yuv444Bytes: Array<ByteArray>) {println("下面输出YUV444数据")for (oneLine in yuv444Bytes) {for (columnIndex in oneLine.indices step 3) {val y = oneLine[columnIndex + 0]val u = oneLine[columnIndex + 1]val v = oneLine[columnIndex + 2]print("$y $u $v | ")}println()}}fun printYV12(yBytes: ByteArray, uBytes: ByteArray, vBytes: ByteArray) {// 以16进制进行打印println("下面输出YV12数据")println("下面输出Y数据")yBytes.forEach { print("${toHexString(byteToInt(it))} ") }println("\n下面输出V数据")vBytes.forEach { print("${toHexString(byteToInt(it))} ") }println("\n下面输出U数据")uBytes.forEach { print("${toHexString(byteToInt(it))} ") }println()}}
import java.io.*object BmpUtil {/** 创建Bitmap的示例:通过读取一个bmp文件的像素,再把这些像素写入一个新的bmp文件 */fun createBitmapDemo2() {val bmpFilePixelBytes = readBmpFilePixelBytes(File("C:\\Users\\Even\\Pictures\\海琴烟.bmp"))//printPixelBytes(bmpFilePixelBytes)createBmpFile(bmpFilePixelBytes, File("C:\\Users\\Even\\Pictures\\demo.bmp"))}/** 创建Bitmap的示例:创建一个上一半为红色,下一半为绿色的bmp文件 */fun createBitmapDemo() {val width = 300 // 注意:宽高要设置为4的倍数,以避免需要进行补位的操作val height = 200val pixelBytes = createRgbBytes(width, height)//printPixelBytes(pixelBytes)val bmpFile = File("C:\\Users\\Even\\Pictures\\demo.bmp")createBmpFile(pixelBytes, bmpFile)}fun readBmpFilePixelBytes(bmpFile: File): Array<ByteArray> {// 得到bmp文件的所有字节val bmpFileBytes = bmpFile.readBytes()// 从bmp文件中获取图像的宽和高的字节数组val widthLittleEndianBytes = ByteArray(4)val heightLittleEndianBytes = ByteArray(4)System.arraycopy(bmpFileBytes, 0x12, widthLittleEndianBytes, 0, 4)System.arraycopy(bmpFileBytes, 0x16, heightLittleEndianBytes, 0, 4)// 把小端的字节数组转换为Intval width = littleEndianBytesToInt(widthLittleEndianBytes)val height = littleEndianBytesToInt(heightLittleEndianBytes)println("读取到bmp图像width = $width, height = $height")val pixelBytes = Array(height) { ByteArray(width * 3) }var rowIndex = height - 1 // 因为bmp图片是从最后一行开始保存的,读取的时候我们把它往到正确的位置var columnIndex = 0var oneLineBytes = pixelBytes[rowIndex]val oneLineBytesSize = oneLineBytes.size// 像素值都是从0x36的位置开始保存的,而且每个像素点3个字节for (i in 0x36 until bmpFileBytes.size step 3) {if (columnIndex == oneLineBytesSize) {// 存满一行了,需要换行保存了。这里--rowIndex是因为原图片是从最后一行向前面行的顺序保存的oneLineBytes = pixelBytes[--rowIndex]columnIndex = 0}// 注意:bmp文件的颜色是按蓝、绿、红的顺序保存的val blue = bmpFileBytes[i + 0]val green = bmpFileBytes[i + 1]val red = bmpFileBytes[i + 2]oneLineBytes[columnIndex++] = redoneLineBytes[columnIndex++] = greenoneLineBytes[columnIndex++] = blue}return pixelBytes}/** 把小端的字节数组转换为int */private fun littleEndianBytesToInt(littleEndianBytes: ByteArray): Int {val bigEndianBytes = littleEndianBytes.reversedArray()val bais = ByteArrayInputStream(bigEndianBytes)val dis = DataInputStream(bais)return dis.readInt()}/** 创建像素矩阵,注意:宽要设置为4的倍数 */fun createRgbBytes(width: Int, height: Int) : Array<ByteArray> {val redColor = 0xFF0000val greenColor = 0x00FF00val redBytes = getColorBytes(redColor)val greenBytes = getColorBytes(greenColor)val rgbBytes = Array(height) { ByteArray(width * 3) }for (rowIndex in 0 until height) {val colorBytes = if (rowIndex < height / 2) redBytes else greenBytesval oneLineBytes = rgbBytes[rowIndex]for (columnIndex in oneLineBytes.indices step 3) {val red = colorBytes[0x00]val green = colorBytes[0x01]val blue = colorBytes[0x02]oneLineBytes[columnIndex + 0] = redoneLineBytes[columnIndex + 1] = greenoneLineBytes[columnIndex + 2] = blue}}return rgbBytes}fun getColorBytes(color: Int): ByteArray {val red = (color and 0xFF0000 ushr 16).toByte()val green = (color and 0x00FF00 ushr 8).toByte()val blue = (color and 0x0000FF).toByte()val colorBytes = byteArrayOf(red, green, blue)return colorBytes}/** 打印颜色值,可打印rgb颜色值,也可以打印yuv444颜色值 */fun printColorBytes(pixelBytes: Array<ByteArray>) {for (rowIndex in pixelBytes.indices) {val oneLine = pixelBytes[rowIndex]for (columnIndex in oneLine.indices step 3) {// 获取1个像素的3个颜色通道:R、G、B 或 Y、U、Vval colorChannel1 = oneLine[columnIndex + 0]val colorChannel2 = oneLine[columnIndex + 1]val colorChannel3 = oneLine[columnIndex + 2]// 把byte转为int,再以16进制进行输出val colorChannelInt1 = toHexString(byteToInt(colorChannel1))val colorChannelInt2 = toHexString(byteToInt(colorChannel2))val colorChannelInt3 = toHexString(byteToInt(colorChannel3))// 以16进制进行打印print("$colorChannelInt1 $colorChannelInt2 $colorChannelInt3| ")}println()}}fun byteToInt(byte: Byte): Int = byte.toInt() shl 24 ushr 24fun toHexString(int: Int): String = Integer.toHexString(int)/** 根据给定的像素二维数据,按照bmp文件规范保存到指定的bmp文件中 */fun createBmpFile(pixelBytes: Array<ByteArray>, saveFile: File) {// 因为一行像素中每个像素是占3个字节的,除以3就得到图像的宽度了val pixelWidth = pixelBytes[0].size / 3val pixelHeight = pixelBytes.size// 每个像素占3个byte,所以要乘以3val pixelBytesCount = pixelWidth * pixelHeight * 3// 文件总大小为:像素数据大小 + 头文件大小val fileBytesCount = pixelBytesCount + 54// 创建一个byte数组,用于保存bmp文件的所有byte数据val bmpFileBytes = ByteArray(fileBytesCount)// 往bmpFileBytes中添加bmp文件头addBmpFileHeader(pixelWidth, pixelHeight, bmpFileBytes)// 往bmpFileBytes中添加像素数据addPixelBytes(pixelBytes, bmpFileBytes)// 把所有的字节写到文件saveFile.writeBytes(bmpFileBytes)}fun addBmpFileHeader(width: Int, height: Int, bmpFileBytes: ByteArray) {val pixelBytesCount = width * height * 3val fileBytesCount = pixelBytesCount + 54// 424dbmpFileBytes[0x00] = 0x42bmpFileBytes[0x01] = 0x4d// 文件大小var bytes = getLittleEndianBytes(fileBytesCount)bmpFileBytes[0x02] = bytes[0]bmpFileBytes[0x03] = bytes[1]bmpFileBytes[0x04] = bytes[2]bmpFileBytes[0x05] = bytes[3]// 保留数据bmpFileBytes[0x06] = 0x00bmpFileBytes[0x07] = 0x00bmpFileBytes[0x08] = 0x00bmpFileBytes[0x09] = 0x00// 像素存储位置bmpFileBytes[0x0a] = 0x36bmpFileBytes[0x0b] = 0x00bmpFileBytes[0x0c] = 0x00bmpFileBytes[0x0d] = 0x00// bmp头文件大小bmpFileBytes[0x0e] = 0x28bmpFileBytes[0x0f] = 0x00bmpFileBytes[0x10] = 0x00bmpFileBytes[0x11] = 0x00// 图像宽度bytes = getLittleEndianBytes(width)bmpFileBytes[0x12] = bytes[0]bmpFileBytes[0x13] = bytes[1]bmpFileBytes[0x14] = bytes[2]bmpFileBytes[0x15] = bytes[3]// 图像高度bytes = getLittleEndianBytes(height)bmpFileBytes[0x16] = bytes[0]bmpFileBytes[0x17] = bytes[1]bmpFileBytes[0x18] = bytes[2]bmpFileBytes[0x19] = bytes[3]// 色彩平面数bmpFileBytes[0x1a] = 0x01bmpFileBytes[0x1b] = 0x00// 像素位数bmpFileBytes[0x1c] = 0x18bmpFileBytes[0x1d] = 0x00// 压缩方式bmpFileBytes[0x1e] = 0x00bmpFileBytes[0x1f] = 0x00bmpFileBytes[0x20] = 0x00bmpFileBytes[0x21] = 0x00// 像素数据大小bytes = getLittleEndianBytes(pixelBytesCount)bmpFileBytes[0x22] = bytes[0]bmpFileBytes[0x23] = bytes[1]bmpFileBytes[0x24] = bytes[2]bmpFileBytes[0x25] = bytes[3]// 横向分辨率bmpFileBytes[0x26] = 0x00bmpFileBytes[0x27] = 0x00bmpFileBytes[0x28] = 0x00bmpFileBytes[0x29] = 0x00// 纵向分辨率bmpFileBytes[0x2a] = 0x00bmpFileBytes[0x2b] = 0x00bmpFileBytes[0x2c] = 0x00bmpFileBytes[0x2d] = 0x00// 调色板颜色数bmpFileBytes[0x2e] = 0x00bmpFileBytes[0x2f] = 0x00bmpFileBytes[0x30] = 0x00bmpFileBytes[0x31] = 0x00// 重要颜色数bmpFileBytes[0x32] = 0x00bmpFileBytes[0x33] = 0x00bmpFileBytes[0x34] = 0x00bmpFileBytes[0x35] = 0x00}/** 把指定的像素数据添加到bmp文件数组中 */fun addPixelBytes(pixelBytes: Array<ByteArray>, bmpFileBytes: ByteArray) {val height = pixelBytes.sizevar index = 0x36// 设置像素数据,注意:要从像素的最后一行开始进行存储for (rowIndex in height - 1 downTo 0) {val oneLineBytes = pixelBytes[rowIndex]for (columnIndex in oneLineBytes.indices step 3) {val red = oneLineBytes[columnIndex + 0]val green = oneLineBytes[columnIndex + 1]val blue = oneLineBytes[columnIndex + 2]// 每个像素的三原色按倒序存储bmpFileBytes[index++] = bluebmpFileBytes[index++] = greenbmpFileBytes[index++] = red}}}/** 把int转换为byte数组,默认是大端方式的数组,返回转换为小端方式的数组 */fun getLittleEndianBytes(number: Int): ByteArray {val baos = ByteArrayOutputStream()val dos = DataOutputStream(baos)dos.writeInt(number)val bigEndianBytes = baos.toByteArray()val littleEndianBytes = bigEndianBytes.reversedArray()return littleEndianBytes}}
fun main() {YuvUtil.bmpFileToYV12FileDemo()//YuvUtil.bmpFileToYV12FileDemo2()
}
这里我们写了两个Demo:bmpFileToYV12FileDemo()、bmpFileToYV12FileDemo2(),第一个Demo是通过代码的方式创建的rgbBytes数据,只有红色和绿色,而且是4 x 2的大小,这样方便我们查看数据是否正确,这在得不到正确结果是排查问题会很方便,运行结果如下:
下面输出RGB像素数据:
ff 0 0| ff 0 0| ff 0 0| ff 0 0|
0 ff 0| 0 ff 0| 0 ff 0| 0 ff 0|
下面输出YUV像素数据:
4c 54 ff| 4c 54 ff| 4c 54 ff| 4c 54 ff|
95 2b 15| 95 2b 15| 95 2b 15| 95 2b 15|
下面输出YV12数据
下面输出Y数据
4c 4c 4c 4c 95 95 95 95
下面输出V数据
15 15
下面输出U数据
54 54
因为数据量很少,可以看到数据是正确的,甚至可以用16进制打开生成的demo.yuv查看数据,如下:
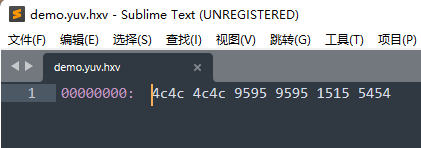
因为数据量很少,所以很容易查看数据是否有误。现在我们这个数据是对的,然后我们就可以运行bmpFileToYV12FileDemo2()这个函数,这个是读了了一张bmp图片,宽高为640 x 480,下面是bmp图片,和生成的yuv图片效果对比:

左边是用Windows 11自带的看图软件打开的bmp图片,右边是用YUV Player打开的yuv图片,可以看到bmp转换为yuv后颜色是有偏差的,而且是能看的出来的,也不知道是不是我选的公式不对导致的问题。
YUV Player下载地址:https://github.com/latelee/YUVPlayer/tree/master/bin,这个已经很久没更新了,但是使用简单。更多更新的有另一个,但是这个设置感觉比较复杂,不知道怎么调参数:https://github.com/IENT/YUView,下载地址:https://github.com/IENT/YUView/releases
YUV图片转bmp图片
import java.io.BufferedOutputStream
import java.io.File
import java.io.FileOutputStreamobject YuvUtil {fun yv12FileToBmpFile() {val yv12File = File("C:\\Users\\Even\\Pictures\\海琴烟.yuv")val bmpFile = File("C:\\Users\\Even\\Pictures\\海琴烟(yuv转bmp).bmp")val (yBytes, uBytes, vBytes) = readYuvFilePlanarBytes(yv12File, 640, 480)val yuv444Bytes = yv12BytesToYuv444Bytes(640, 480, yBytes, uBytes, vBytes)val rgbBytes = yuv444BytesToRgbBytes(yuv444Bytes)BmpUtil.createBmpFile(rgbBytes, bmpFile)}fun bmpFileToYV12FileDemo() {val grbBytes = BmpUtil.createRgbBytes(4, 2)println("下面输出RGB像素数据:")BmpUtil.printColorBytes(grbBytes)val yuv444Bytes = rgbBytesToYuv444Bytes(grbBytes)println("下面输出YUV像素数据:")BmpUtil.printColorBytes(yuv444Bytes)val (yBytes, uBytes, vBytes) = yuv444BytesToYv12Bytes(yuv444Bytes)printYV12(yBytes, uBytes, vBytes)val yv12File = File("C:\\Users\\Even\\Pictures\\demo.yuv")writeYv12BytesToFile(yv12File, yBytes, vBytes, uBytes)}fun bmpFileToYV12FileDemo2() {val bmpFile = File("C:\\Users\\Even\\Pictures\\海琴烟.bmp")val yv12File = File("C:\\Users\\Even\\Pictures\\海琴烟.yuv")val rgbBytes = BmpUtil.readBmpFilePixelBytes(bmpFile)val yuv444Bytes = rgbBytesToYuv444Bytes(rgbBytes)val (yBytes, uBytes, vBytes) = yuv444BytesToYv12Bytes(yuv444Bytes)writeYv12BytesToFile(yv12File, yBytes, vBytes, uBytes)}/** 读取YUV文件的三个平面保存到三个数组中,分别保存Y、U、V三个平面 */fun readYuvFilePlanarBytes(yuvFile: File, width: Int, height: Int): Triple<ByteArray, ByteArray, ByteArray> {return readYuvFilePlanarBytes(yuvFile.readBytes(), width, height)}fun readYuvFilePlanarBytes(yuvBytes: ByteArray, width: Int, height: Int): Triple<ByteArray, ByteArray, ByteArray> {val ySize = width * heightval vSize = ySize / 4val yBytes = ByteArray(ySize)val uBytes = ByteArray(vSize)val vBytes = ByteArray(vSize)var i = 0yuvBytes.forEachIndexed { index, byte ->val bytes = when {index < ySize -> yBytesindex < ySize + vSize -> vByteselse -> uBytes}if (index == ySize || index == ySize + vSize) {i = 0}bytes[i++] = byte}return Triple(yBytes, uBytes, vBytes)}private fun writeYv12BytesToFile(yv12File: File, yBytes: ByteArray, vBytes: ByteArray, uBytes: ByteArray) {FileOutputStream(yv12File).use { fos ->BufferedOutputStream(fos).use { bos ->bos.write(yBytes)bos.write(vBytes)bos.write(uBytes)}}}fun rgbBytesToYuv444Bytes(rgbBytes: Array<ByteArray>): Array<ByteArray> {val yuv444Bytes = Array(rgbBytes.size) { ByteArray(rgbBytes[0].size) }for (rowIndex in rgbBytes.indices) {val oneLineBytes = rgbBytes[rowIndex]val oneLineYuv444Bytes = yuv444Bytes[rowIndex]for (columnIndex in oneLineBytes.indices step 3) {val red   = oneLineBytes[columnIndex + 0]val green = oneLineBytes[columnIndex + 1]val blue  = oneLineBytes[columnIndex + 2]val (Y, U, V) = rgbToYuv(red, green, blue)oneLineYuv444Bytes[columnIndex + 0] = YoneLineYuv444Bytes[columnIndex + 1] = UoneLineYuv444Bytes[columnIndex + 2] = V}}return yuv444Bytes}fun byteToInt(byte: Byte): Int = byte.toInt() shl 24 ushr 24fun verify(int: Int) = if (int < 0) 0 else if (int > 255) 255 else intfun toHexString(int: Int): String = Integer.toHexString(int)fun rgbToYuv(R: Byte, G: Byte, B: Byte): Triple<Byte, Byte, Byte> {// 注:R、G、B值的范围是0 ~ 255,是没有负数的,需要转换为正数的int。// 一个负数用byte.toInt()转换后还是一个负数,所以我们通过位运算符来进行转换,Byte的-1转换为Int值应该是255return rgbToYuv(byteToInt(R), byteToInt(G), byteToInt(B))}fun rgbToYuv(R: Int, G: Int, B: Int): Triple<Byte, Byte, Byte> {var Y = (0.299 * R + 0.587 * G + 0.114 * B).toInt()var U = (-0.169 * R - 0.331 * G + 0.499 * B + 128).toInt()var V = (0.499 * R - 0.418 * G - 0.0813 * B + 128).toInt()Y = verify(Y)U = verify(U)V = verify(V)//println("rgb: ${toHexString(R)} ${toHexString(G)} ${toHexString(B)} -> yuv: ${toHexString(Y)} ${toHexString(U)} ${toHexString(V)}")return Triple(Y.toByte(), U.toByte(), V.toByte())}fun yuvToRgb(Y: Byte, U: Byte, V: Byte): Triple<Byte, Byte, Byte> {// 注:Y、U、V值的范围是0 ~ 255,是没有负数的,需要转换为正数的int。// 一个负数用byte.toInt()转换后还是一个负数,所以我们通过位运算符来进行转换,Byte的-1转换为Int值应该是255return yuvToRgb(byteToInt(Y), byteToInt(U), byteToInt(V))}fun yuvToRgb(Y: Int, U: Int, V: Int): Triple<Byte, Byte, Byte> {var R = (Y + 1.4075 * (V - 128)).toInt()var G = (Y - 0.3455 * (U - 128) - 0.7169 * (V - 128)).toInt()var B = (Y + 1.779 * (U - 128)).toInt()R = verify(R)G = verify(G)B = verify(B)//println("yuv: ${toHexString(Y)} ${toHexString(U)} ${toHexString(V)} -> rgb: ${toHexString(R)} ${toHexString(G)} ${toHexString(B)}")return Triple(R.toByte(), G.toByte(), B.toByte())}fun yv12BytesToYuv444Bytes(width: Int, height: Int, yBytes: ByteArray, uBytes: ByteArray, vBytes: ByteArray): Array<ByteArray> {var yIndex = 0val yuv444Bytes = Array(height) { ByteArray(width * 3) }val oneLineUvSize = width / 2 // 在YV12中,一行中的U或V的数量var twoLineIndex = -1  // 每两行的计数for (rowIndex in 0 until height) {val oneLineBytes = yuv444Bytes[rowIndex]var u: Byte = 0var v: Byte = 0// 因为每两行读取UV的时起始位置是一样的,所以我们只在这两行的偶数行时把twoLineIndex进行加加即可if (rowIndex % 2 == 0) {twoLineIndex++}// 计算每一行在取UV时uvIndex的起始位置var uvIndex = twoLineIndex * oneLineUvSizefor (columnIndex in oneLineBytes.indices step 3) {if (yIndex % 2 == 0) {// 一行之中,每两个Y只取一次UVu = uBytes[uvIndex]v = vBytes[uvIndex]uvIndex++}val y = yBytes[yIndex++]oneLineBytes[columnIndex + 0] = yoneLineBytes[columnIndex + 1] = uoneLineBytes[columnIndex + 2] = v}}return yuv444Bytes}private fun yuv444BytesToYv12Bytes(yuv444Bytes: Array<ByteArray>): Triple<ByteArray, ByteArray, ByteArray> {val width = yuv444Bytes[0].size / 3  // 每个像素占3个字节,所以要除以3val height = yuv444Bytes.sizeval ySize = width * heightval vSize = ySize / 4val yBytes = ByteArray(ySize)val uBytes = ByteArray(vSize)val vBytes = ByteArray(vSize)var yIndex = 0var uIndex = 0var vIndex = 0var saveU = truevar saveV = truefor (rowIndex in 0 until height) {val oneLine = yuv444Bytes[rowIndex]for (columnIndex in oneLine.indices step 3) {val y = oneLine[columnIndex + 0]val u = oneLine[columnIndex + 1]val v = oneLine[columnIndex + 2]yBytes[yIndex++] = yif (rowIndex % 2 == 0) {// 偶数行取U,隔一个取一个if (saveU) {uBytes[uIndex++] = u}saveU = !saveU} else {// 单数行取V,隔一个取一个if (saveV) {vBytes[vIndex++] = v}saveV = !saveV}}}return Triple(yBytes, uBytes, vBytes)}fun yuv444BytesToRgbBytes(yuv444Bytes: Array<ByteArray>): Array<ByteArray> {val rgbBytes = Array(yuv444Bytes.size) { ByteArray(yuv444Bytes[0].size) }for (rowIndex in yuv444Bytes.indices) {val oneLineYuv444Bytes = yuv444Bytes[rowIndex]val oneLineRgbBytes = rgbBytes[rowIndex]for (columnIndex in oneLineYuv444Bytes.indices step 3) {val Y   = oneLineYuv444Bytes[columnIndex + 0]val U = oneLineYuv444Bytes[columnIndex + 1]val V  = oneLineYuv444Bytes[columnIndex + 2]val (R, G, B) = yuvToRgb(Y, U, V)oneLineRgbBytes[columnIndex + 0] = RoneLineRgbBytes[columnIndex + 1] = GoneLineRgbBytes[columnIndex + 2] = B}}return rgbBytes}fun printYUV444(yuv444Bytes: Array<ByteArray>) {println("下面输出YUV444数据")for (oneLine in yuv444Bytes) {for (columnIndex in oneLine.indices step 3) {val y = oneLine[columnIndex + 0]val u = oneLine[columnIndex + 1]val v = oneLine[columnIndex + 2]print("$y $u $v | ")}println()}}fun printYV12(yBytes: ByteArray, uBytes: ByteArray, vBytes: ByteArray) {// 以16进制进行打印println("下面输出YV12数据")println("下面输出Y数据")yBytes.forEach { print("${toHexString(byteToInt(it))} ") }println("\n下面输出V数据")vBytes.forEach { print("${toHexString(byteToInt(it))} ") }println("\n下面输出U数据")uBytes.forEach { print("${toHexString(byteToInt(it))} ") }println()}}
import java.io.*object BmpUtil {/** 创建Bitmap的示例:通过读取一个bmp文件的像素,再把这些像素写入一个新的bmp文件 */fun createBitmapDemo2() {val bmpFilePixelBytes = readBmpFilePixelBytes(File("C:\\Users\\Even\\Pictures\\海琴烟.bmp"))//printPixelBytes(bmpFilePixelBytes)createBmpFile(bmpFilePixelBytes, File("C:\\Users\\Even\\Pictures\\demo.bmp"))}/** 创建Bitmap的示例:创建一个上一半为红色,下一半为绿色的bmp文件 */fun createBitmapDemo() {val width = 300 // 注意:宽高要设置为4的倍数,以避免需要进行补位的操作val height = 200val pixelBytes = createRgbBytes(width, height)//printPixelBytes(pixelBytes)val bmpFile = File("C:\\Users\\Even\\Pictures\\demo.bmp")createBmpFile(pixelBytes, bmpFile)}fun readBmpFilePixelBytes(bmpFile: File): Array<ByteArray> {// 得到bmp文件的所有字节val bmpFileBytes = bmpFile.readBytes()// 从bmp文件中获取图像的宽和高的字节数组val widthLittleEndianBytes = ByteArray(4)val heightLittleEndianBytes = ByteArray(4)System.arraycopy(bmpFileBytes, 0x12, widthLittleEndianBytes, 0, 4)System.arraycopy(bmpFileBytes, 0x16, heightLittleEndianBytes, 0, 4)// 把大端的字节数组转换为Intval width = littleEndianBytesToInt(widthLittleEndianBytes)val height = littleEndianBytesToInt(heightLittleEndianBytes)println("读取到bmp图像width = $width, height = $height")val pixelBytes = Array(height) { ByteArray(width * 3) }var rowIndex = height - 1 // 因为bmp图片是从最后一行开始保存的,读取的时候我们把它往到正确的位置var columnIndex = 0var oneLineBytes = pixelBytes[rowIndex]val oneLineBytesSize = oneLineBytes.size// 像素值都是从0x36的位置开始保存的,而且每个像素点3个字节for (i in 0x36 until bmpFileBytes.size step 3) {if (columnIndex == oneLineBytesSize) {// 存满一行了,需要换行保存了。这里--rowIndex是因为原图片是从最后一行向前面行的顺序保存的oneLineBytes = pixelBytes[--rowIndex]columnIndex = 0}// 注意:bmp文件的颜色是按蓝、绿、红的顺序保存的val blue = bmpFileBytes[i + 0]val green = bmpFileBytes[i + 1]val red = bmpFileBytes[i + 2]oneLineBytes[columnIndex++] = redoneLineBytes[columnIndex++] = greenoneLineBytes[columnIndex++] = blue}return pixelBytes}/** 把小端的字节数组转换为int */private fun littleEndianBytesToInt(littleEndianBytes: ByteArray): Int {val bigEndianBytes = littleEndianBytes.reversedArray()val bais = ByteArrayInputStream(bigEndianBytes)val dis = DataInputStream(bais)return dis.readInt()}/** 创建像素矩阵,注意:宽要设置为4的倍数 */fun createRgbBytes(width: Int, height: Int) : Array<ByteArray> {val redColor = 0xFF0000val greenColor = 0x00FF00val redBytes = getColorBytes(redColor)val greenBytes = getColorBytes(greenColor)val rgbBytes = Array(height) { ByteArray(width * 3) }for (rowIndex in 0 until height) {val colorBytes = if (rowIndex < height / 2) redBytes else greenBytesval oneLineBytes = rgbBytes[rowIndex]for (columnIndex in oneLineBytes.indices step 3) {val red = colorBytes[0x00]val green = colorBytes[0x01]val blue = colorBytes[0x02]oneLineBytes[columnIndex + 0] = redoneLineBytes[columnIndex + 1] = greenoneLineBytes[columnIndex + 2] = blue}}return rgbBytes}fun getColorBytes(color: Int): ByteArray {val red = (color and 0xFF0000 ushr 16).toByte()val green = (color and 0x00FF00 ushr 8).toByte()val blue = (color and 0x0000FF).toByte()val colorBytes = byteArrayOf(red, green, blue)return colorBytes}/** 打印颜色值,可打印rgb颜色值,也可以打印yuv444颜色值 */fun printColorBytes(pixelBytes: Array<ByteArray>) {for (rowIndex in pixelBytes.indices) {val oneLine = pixelBytes[rowIndex]for (columnIndex in oneLine.indices step 3) {// 获取1个像素的3个颜色通道:R、G、B 或 Y、U、Vval colorChannel1 = oneLine[columnIndex + 0]val colorChannel2 = oneLine[columnIndex + 1]val colorChannel3 = oneLine[columnIndex + 2]// 把byte转为int,再以16进制进行输出val colorChannelInt1 = toHexString(byteToInt(colorChannel1))val colorChannelInt2 = toHexString(byteToInt(colorChannel2))val colorChannelInt3 = toHexString(byteToInt(colorChannel3))// 以16进制进行打印print("$colorChannelInt1 $colorChannelInt2 $colorChannelInt3| ")}println()}}fun byteToInt(byte: Byte): Int = byte.toInt() shl 24 ushr 24fun toHexString(int: Int): String = Integer.toHexString(int)/** 根据给定的像素二维数据,按照bmp文件规范保存到指定的bmp文件中 */fun createBmpFile(rgbBytes: Array<ByteArray>, saveFile: File) {// 因为一行像素中每个像素是占3个字节的,除以3就得到图像的宽度了val pixelWidth = rgbBytes[0].size / 3val pixelHeight = rgbBytes.size// 每个像素占3个byte,所以要乘以3val pixelBytesCount = pixelWidth * pixelHeight * 3// 文件总大小为:像素数据大小 + 头文件大小val fileBytesCount = pixelBytesCount + 54// 创建一个byte数组,用于保存bmp文件的所有byte数据val bmpFileBytes = ByteArray(fileBytesCount)// 往bmpFileBytes中添加bmp文件头addBmpFileHeader(pixelWidth, pixelHeight, bmpFileBytes)// 往bmpFileBytes中添加像素数据addPixelBytes(rgbBytes, bmpFileBytes)// 把所有的字节写到文件saveFile.writeBytes(bmpFileBytes)}fun addBmpFileHeader(width: Int, height: Int, bmpFileBytes: ByteArray) {val pixelBytesCount = width * height * 3val fileBytesCount = pixelBytesCount + 54// 424dbmpFileBytes[0x00] = 0x42bmpFileBytes[0x01] = 0x4d// 文件大小var bytes = getLittleEndianBytes(fileBytesCount)bmpFileBytes[0x02] = bytes[0]bmpFileBytes[0x03] = bytes[1]bmpFileBytes[0x04] = bytes[2]bmpFileBytes[0x05] = bytes[3]// 保留数据bmpFileBytes[0x06] = 0x00bmpFileBytes[0x07] = 0x00bmpFileBytes[0x08] = 0x00bmpFileBytes[0x09] = 0x00// 像素存储位置bmpFileBytes[0x0a] = 0x36bmpFileBytes[0x0b] = 0x00bmpFileBytes[0x0c] = 0x00bmpFileBytes[0x0d] = 0x00// bmp头文件大小bmpFileBytes[0x0e] = 0x28bmpFileBytes[0x0f] = 0x00bmpFileBytes[0x10] = 0x00bmpFileBytes[0x11] = 0x00// 图像宽度bytes = getLittleEndianBytes(width)bmpFileBytes[0x12] = bytes[0]bmpFileBytes[0x13] = bytes[1]bmpFileBytes[0x14] = bytes[2]bmpFileBytes[0x15] = bytes[3]// 图像高度bytes = getLittleEndianBytes(height)bmpFileBytes[0x16] = bytes[0]bmpFileBytes[0x17] = bytes[1]bmpFileBytes[0x18] = bytes[2]bmpFileBytes[0x19] = bytes[3]// 色彩平面数bmpFileBytes[0x1a] = 0x01bmpFileBytes[0x1b] = 0x00// 像素位数bmpFileBytes[0x1c] = 0x18bmpFileBytes[0x1d] = 0x00// 压缩方式bmpFileBytes[0x1e] = 0x00bmpFileBytes[0x1f] = 0x00bmpFileBytes[0x20] = 0x00bmpFileBytes[0x21] = 0x00// 像素数据大小bytes = getLittleEndianBytes(pixelBytesCount)bmpFileBytes[0x22] = bytes[0]bmpFileBytes[0x23] = bytes[1]bmpFileBytes[0x24] = bytes[2]bmpFileBytes[0x25] = bytes[3]// 横向分辨率bmpFileBytes[0x26] = 0x00bmpFileBytes[0x27] = 0x00bmpFileBytes[0x28] = 0x00bmpFileBytes[0x29] = 0x00// 纵向分辨率bmpFileBytes[0x2a] = 0x00bmpFileBytes[0x2b] = 0x00bmpFileBytes[0x2c] = 0x00bmpFileBytes[0x2d] = 0x00// 调色板颜色数bmpFileBytes[0x2e] = 0x00bmpFileBytes[0x2f] = 0x00bmpFileBytes[0x30] = 0x00bmpFileBytes[0x31] = 0x00// 重要颜色数bmpFileBytes[0x32] = 0x00bmpFileBytes[0x33] = 0x00bmpFileBytes[0x34] = 0x00bmpFileBytes[0x35] = 0x00}/** 把指定的像素数据添加到bmp文件数组中 */fun addPixelBytes(pixelBytes: Array<ByteArray>, bmpFileBytes: ByteArray) {val height = pixelBytes.sizevar index = 0x36// 设置像素数据,注意:要从像素的最后一行开始进行存储for (rowIndex in height - 1 downTo 0) {val oneLineBytes = pixelBytes[rowIndex]for (columnIndex in oneLineBytes.indices step 3) {val red = oneLineBytes[columnIndex + 0]val green = oneLineBytes[columnIndex + 1]val blue = oneLineBytes[columnIndex + 2]// 每个像素的三原色按倒序存储bmpFileBytes[index++] = bluebmpFileBytes[index++] = greenbmpFileBytes[index++] = red}}}/** 把int转换为byte数组,默认是小端方式的数组,返回转换为大端方式的数组 */fun getLittleEndianBytes(number: Int): ByteArray {val baos = ByteArrayOutputStream()val dos = DataOutputStream(baos)dos.writeInt(number)val bigEndianBytes = baos.toByteArray()val littleEndianBytes = bigEndianBytes.reversedArray()return littleEndianBytes}}
fun main() {
//    YuvUtil.bmpFileToYV12FileDemo()
//    YuvUtil.bmpFileToYV12FileDemo2()YuvUtil.yv12FileToBmpFile()
}
运行效果如下:

最左边为截图软件截图后保存的bmp原始文件,中间为bmp转换的yuv图片,右边为yuv转换回的bmp图片,不知道可有差别啊,感觉差别还是比较小的,如果没有原图对比的话一般是感觉不到差别的!
YUV444、YUV422、YUV420、YUV420P、YUV420SP、YV12、YU12、NV12、NV21
如标题,YUV的格式如此之多,了解起来确实困难,在前面,我们主要讲解了YV12格式,不论你要了解哪一种YUV格式,在了解了最复杂的YV12格式之后,再来了解其它的格式就轻而易举了,这就是为什么我把这些多个格式的区别放到最后讲解的原因。
为什么使用YUV而不用RGB
R(red)、G(green)、B(blue)被称为三原色,通过这三原色可以组合成任意的颜色,我们修改RGB的值,颜色就会改变,而且颜色的亮度也会发生改变,可以说RGB的亮度信息和颜色信息是混合在一起的。
Y、U、V简单理解,Y表示亮度,U和V表示颜色。与RGB相比,YUV将亮度和颜色信息分开,这种编码方式非常适合人眼,根据研究,人眼对亮度信息比对颜色信息更敏感,举个例子,你把一个红色调的没那么红,可能看起来你发现不了红色被下调了,而你把红色的亮度调暗了,就比较容易发现,根据这个特点,我们在采集图像信息时,就可以把亮度全部采集了,但是采集颜色信息时就可以丢掉一些,因为丢掉一些之后人的眼睛也发现不了,这样,我们通过YUV得到了质量比较好的图像,而需要的存储空间又比RGB方式要小。
YUV把亮度和颜色信息分开,也比较方便我们对亮度和颜色分别进行处理,比如要把图像调亮一些,把Y的值调大即可,而对于RGB,要把一个颜色调亮你需要修改3个值,比如你把3个值都改大,可能颜色也发生变化了,不单单是亮度的改变,调起来就比较困难。
另外一个好处就是可以兼容黑白电视机和彩色电视机,对于黑白电视机,只要解析Y信息即可,对于彩色电视机就解析YUV信息。
YUV根据采样方式分类
YUV根据采样方式主要分为三种:
- YUV444,每4个Y,有对应的4个U和4个V,所以叫YUV444
- YUV422,每4个Y,有对应的2个U和2个V,所以叫YUV422
- YUV420,每4个Y,有对应的2个U和0个V,或者每4个Y有对应的2个V和0个U,所以叫YUV420
1、YUV444的采样方式

如上图,对于每个像素,它都采集Y、U、V值,所以每4个像素都会有4个Y、4个U、4个V,这是YUV444名称的由来。
2、YUV422的采样方式

如上图,对于每个像素,Y都是采集的,而U或V只采集其中一个,如上图的规律为,第一个像素采集U,第二个像素采集V,第三个像素采集U,第四个像素采集V。。。如此重复循环,则每4个像素必然有4个Y、2个U、2个V,这就是YUV422名称的由来。
在还原的时候,每两个Y共用一对UV,这还原后肯定不能和之前一模一样了,但是我们前面有说过,人眼对颜色信息的感觉是比较低的,只要亮度没变,我们修改了U或Y的值,一般是感觉不出来有变化的,而且大多数相邻的两个像素颜色是差不多的,也就是说大多数相邻的两个像素的U和V值差不了多少,这就是为什么第1个像素用第2个像素的V,第2个像素用第1个像素的U,而我们也感觉不到图像颜色不对的原因了!
3、YUV420的采样方式

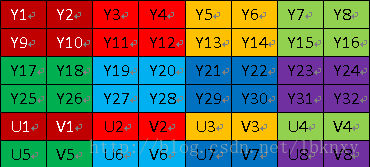
如上图,对于每个像素,Y都是采集的。对于U和V都是采一行隔一行的,如下:
第1行:采集1个U,隔一个再采集一个U。。。依次类推
第2行:采集1个V,隔一个再采集一个V。。。依次类推
如果还有更多的行,也是这个规律采集,如下:
第3行:采集1个U,隔一个再采集一个U。。。依次类推
第4行:采集1个V,隔一个再采集一个V。。。依次类推
第一行,每4个Y就会有2个U和0个V。
第二行,每4个Y就会有2个V和0个U。
这或许就是YUV420的由来,我也没找到官网说明,反正这也算是一个合理的解释吧!
在还原的时候,两行合起来看,第一行的两个Y和第二行的两个Y共用1个U和1个V,也就是说4个Y对应1个U和1个V,相比YUV422还原的精度就更低了,但是用人眼看依然是看不出什么区别的,这就是YUV的强大这处了,所以由此可知,YUV420的采集方式应该是最常用的,因为它最省空间,而且图像质量也很好嘛!
YUV根据存储方式分类
YUV格式首先按采集方式进行一次分类,然后还可以按照存储方式进行第二次分类,比如YUV420格式,这是按采集格式分类的,YUV420存储的时候按照不同的方式存储时又可以分为多种格式,比如:YV12、YU12、NV21、NV12,这4种格式都是以YUV420的方式采样的,只是存储的时候存储顺序有点不一样而已。
YV12、YU12

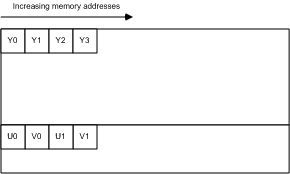
如上图,把Y、U、V都分开存储的方式叫Planar(平面)格式,结合YUV420就叫YUV420P。在存储的时候先存V再存U的叫YV12,先存U再存V的叫YU12(也叫 I420)。YV12格式和YU12格式属于YUV420P格式下的子格式。
NV21、NV12

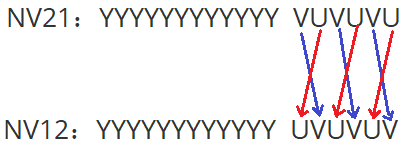
如上图,Y和UV是分开的存储的,属于Planar(平面)格式,但是U和V是每两个打包(Packed)在一起的,所以叫Semi-Planar(半平面)格式,和YUV420组合起来就是YUV420SP。在U和V的顺序中,先存V后存U的是NV21格式,先存U后存V的是NV12格式,NV21和NV12都是YUV420SP的子格式。
对于Planar、Semi-Planar的格式,还有一种叫Packed(打包)格式,比如在YUV444格式中,存储时把每个像素的Y、U、V都打包到一起来存储,这种就叫Packed格式,示例如下:

由于YUV420是最常用的,所以我这里把YUV420的种格式分类统计一下:

格式之间的转换
了解了各种格式的原理之后,其实不用去网上搜索转换公式的,自己写代码实现即可,当然,如果要追求效率的,要找开源库,比如 libyuv 库。
这里简单介绍一下常用格式的转换,如下:
YU12转YV12:
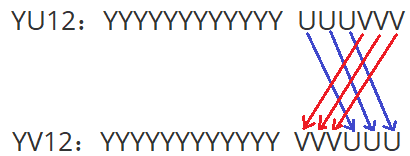
YU12转NV12:
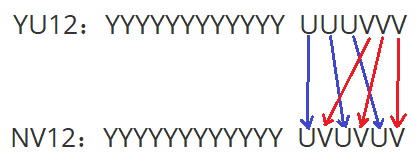
NV21转NV12:
