- Spring FrameWork
- 一、 前言
- 二、IOC(控制反转)
- 2.1 对于IOC的理解
- 2.2如何使用IOC
- 2.3配置文件的解读
- 2.4IOC容器创建bean的两种方式
- 2.5从IOC容器中取bean
- 2.6bean的属性如果包含特殊字符
- 三、DI(依赖注入)
- 四、Spring中的bean
- 五、Spring中的继承
- 六、Spring的依赖
- 七、Spring读取外部资源
- 八、Spring的p命名空间
- 九、Spring工厂方法
- 9.1静态工厂方法
- 9.2实例工厂方法
- 十、Spring IOC 自动装配 autowire
- 10.1自动装配
- 10.2 Spring IOC基于注解的开发
- 10.3实际开发中的使用
- 十一、Spring AOP
📃个人主页: 不断前进的皮卡丘
🌞博客描述: 梦想也许遥不可及,但重要的是追梦的过程,用博客记录自己的成长,记录自己一步一步向上攀登的印记
🔥网站推荐:千里之行,始于足下。每天坚持刷题,巩固所学知识,也为将来找工作,面试做好准备----- 刷题神器
文章是看楠哥的视频写的笔记
这篇博客内容把Spring的基本知识点都讲到了,篇幅比较长,大家可以用于复习,也可以在学习相关知识点的时候,来看看对应内容。对于一些难点,IOC,AOP等,我通过流程图,代码,文字结合来进行讲解,可以更好的理解
Spring FrameWork
一、 前言
- Spring是当前Java开发的行业标准,第一框架
- Spring FrameWork已经从最初取代EJB的框架逐步发展成一套完整的生态,最新的版本是5.x
- Spring架构体系图
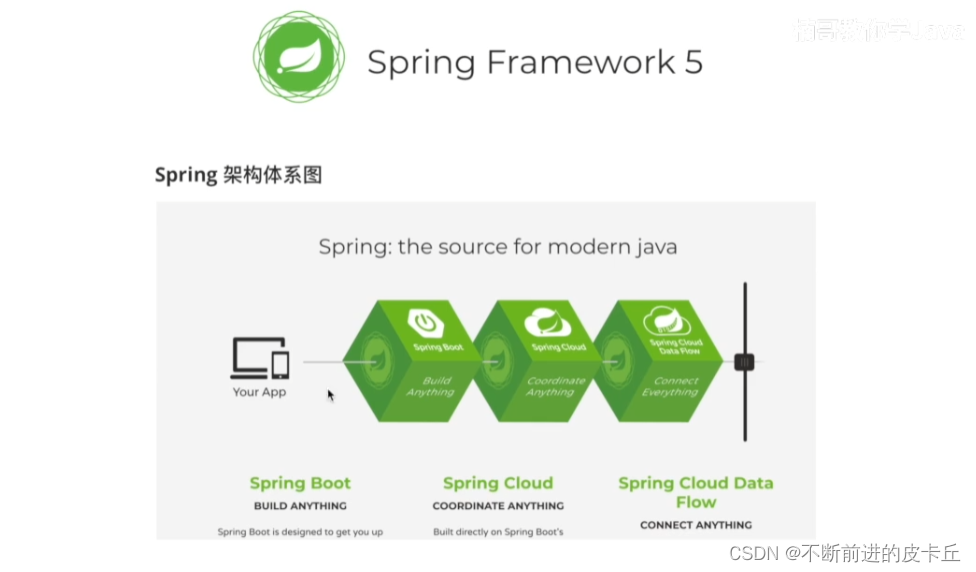
- Spring两大核心机制:
- IOC:工厂模式
- AOP:代理模式
二、IOC(控制反转)
2.1 对于IOC的理解
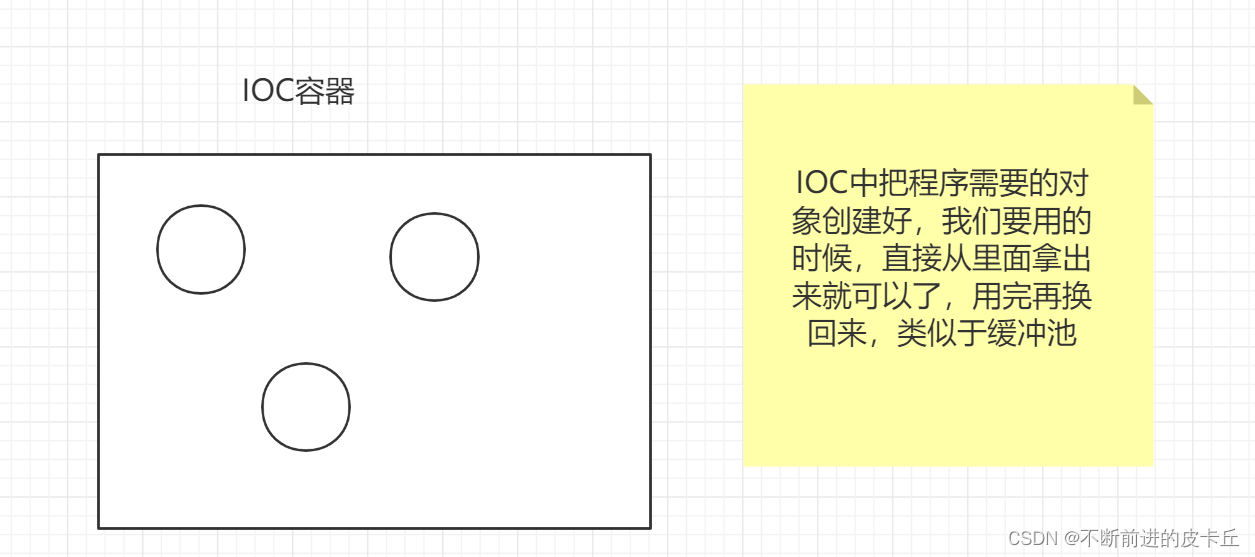
传统开发中,需要调用对象的时候,需要调用者手动来创建被调用者的实例,即对象是由调用者new出来的
但是在Spring框架中,创建对象的工作不再由调用者来完成,而是交给IOC容器来创建,再推送给调用者,整个流程完成反转,所以是控制反转
就比如说假设买东西,以前我们需要自己去超市买东西,但是现在我们可以不用自己去超市,我们只要把购物袋放在家门口,IOC就会自己去把我们想要的东西买回来,然后放在袋子里面,我们打开袋子拿起来用就可以了
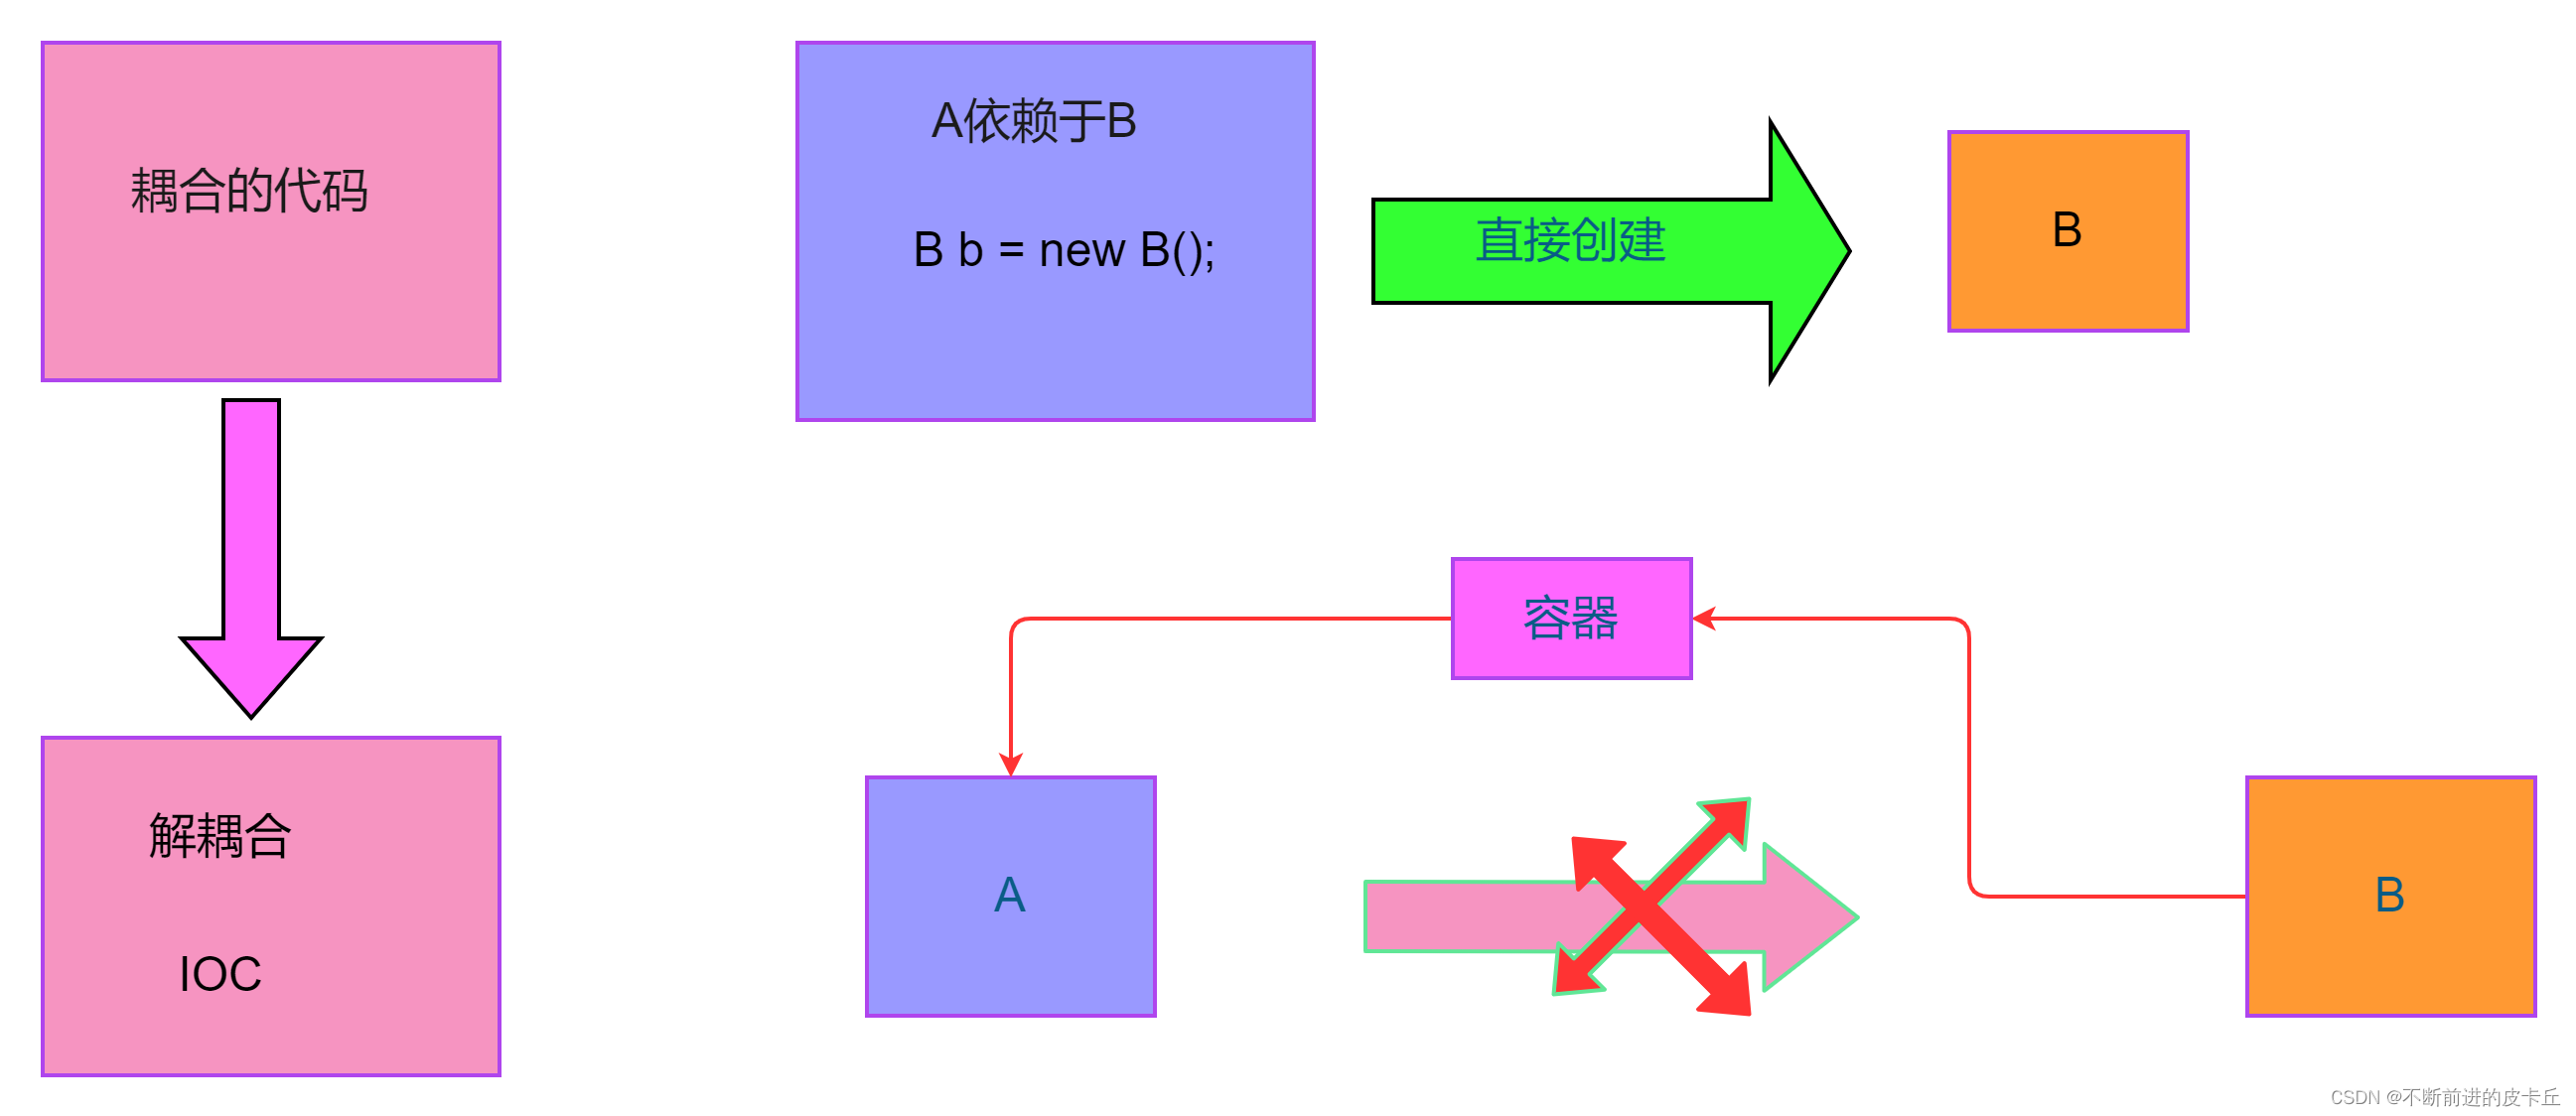
IOC的特点是解耦合。
比如说A需要用到B,传统的开发,我们要直接创建B的实例,但是在Spring中,IOC这个容器会创建B的实例,然后把这个B注入到A
2.2如何使用IOC
- 创建maven工程,在pom.xml中导入相关依赖
<?xml version="1.0" encoding="UTF-8"?>
<project xmlns="http://maven.apache.org/POM/4.0.0"xmlns:xsi="http://www.w3.org/2001/XMLSchema-instance"xsi:schemaLocation="http://maven.apache.org/POM/4.0.0 http://maven.apache.org/xsd/maven-4.0.0.xsd"><modelVersion>4.0.0</modelVersion><groupId>org.example</groupId><artifactId>springioc</artifactId><version>1.0-SNAPSHOT</version><properties><maven.compiler.source>8</maven.compiler.source><maven.compiler.target>8</maven.compiler.target></properties><dependencies><dependency><groupId>org.springframework</groupId><artifactId>spring-context</artifactId><version>5.3.18</version></dependency></dependencies></project>
- 创建实体类Student
public class Student {private long id;private String name;private int age;public long getId() {return id;}public void setId(long id) {this.id = id;}public String getName() {return name;}public void setName(String name) {this.name = name;}public int getAge() {return age;}public void setAge(int age) {this.age = age;}@Overridepublic String toString() {return "Student{" +"id=" + id +", name='" + name + '\'' +", age=" + age +'}';}
}- 在resources路径下创建applicationContext.xml配置文件
<?xml version="1.0" encoding="UTF-8"?>
<beans xmlns="http://www.springframework.org/schema/beans"xmlns:xsi="http://www.w3.org/2001/XMLSchema-instance"xsi:schemaLocation="http://www.springframework.org/schema/beans http://www.springframework.org/schema/beans/spring-beans.xsd"><bean id="stu" class="com.zyh.pojo.Student"></bean>
</beans>
- 传统的开发方式:手动new Student
Student stu =new Student();stu .setAge(25);stu.setId(1001);stu.setName("张三");System.out.println(stu);
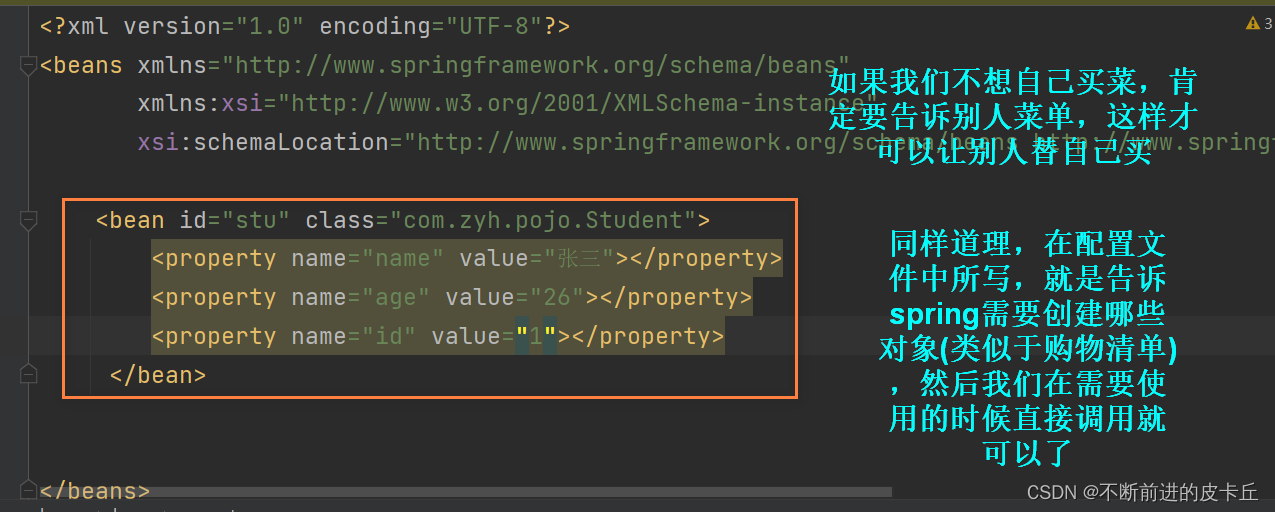
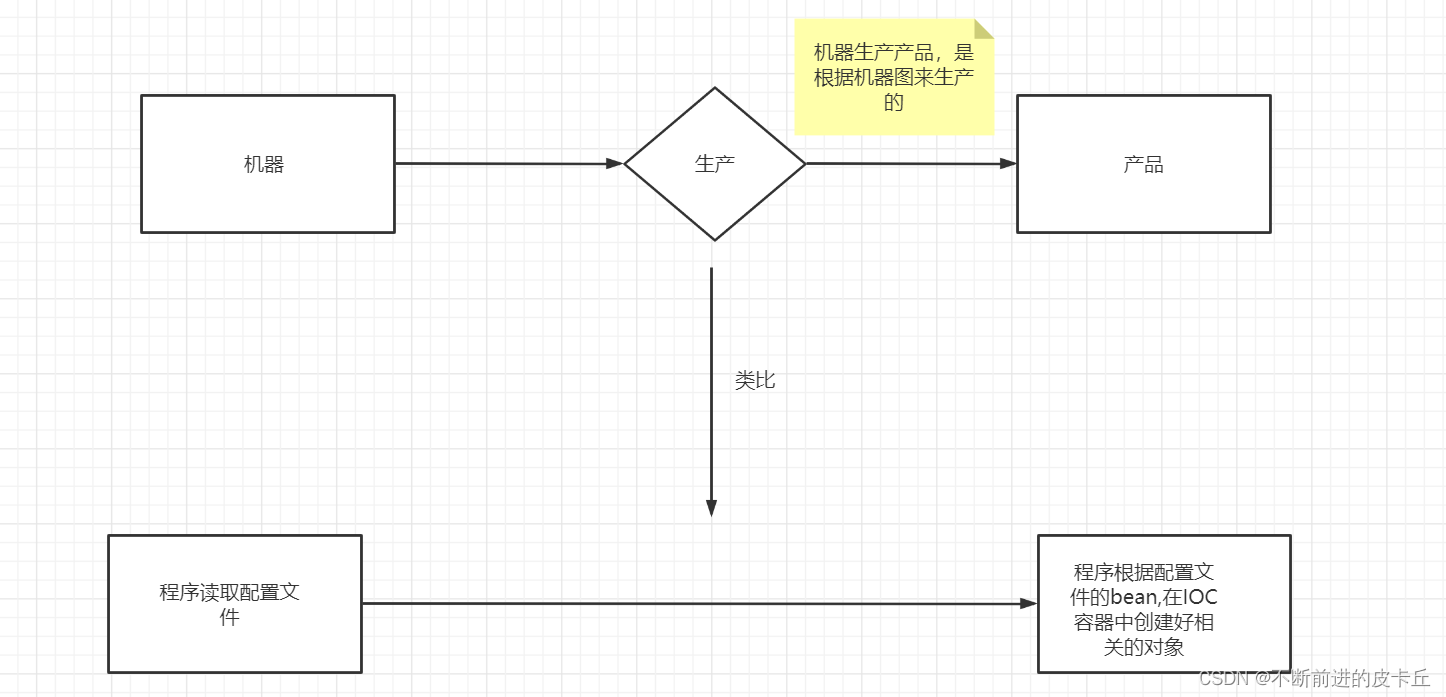
- IOC容器通过读取配置文件,加载配置
bean标签来创建对象 - 就像买菜一样,我们不需要自己亲自买,但是要写一张单子,告诉说要买什么,程序也是类似的,我们要告诉Spring框架要创建哪些对象,怎样创建对象
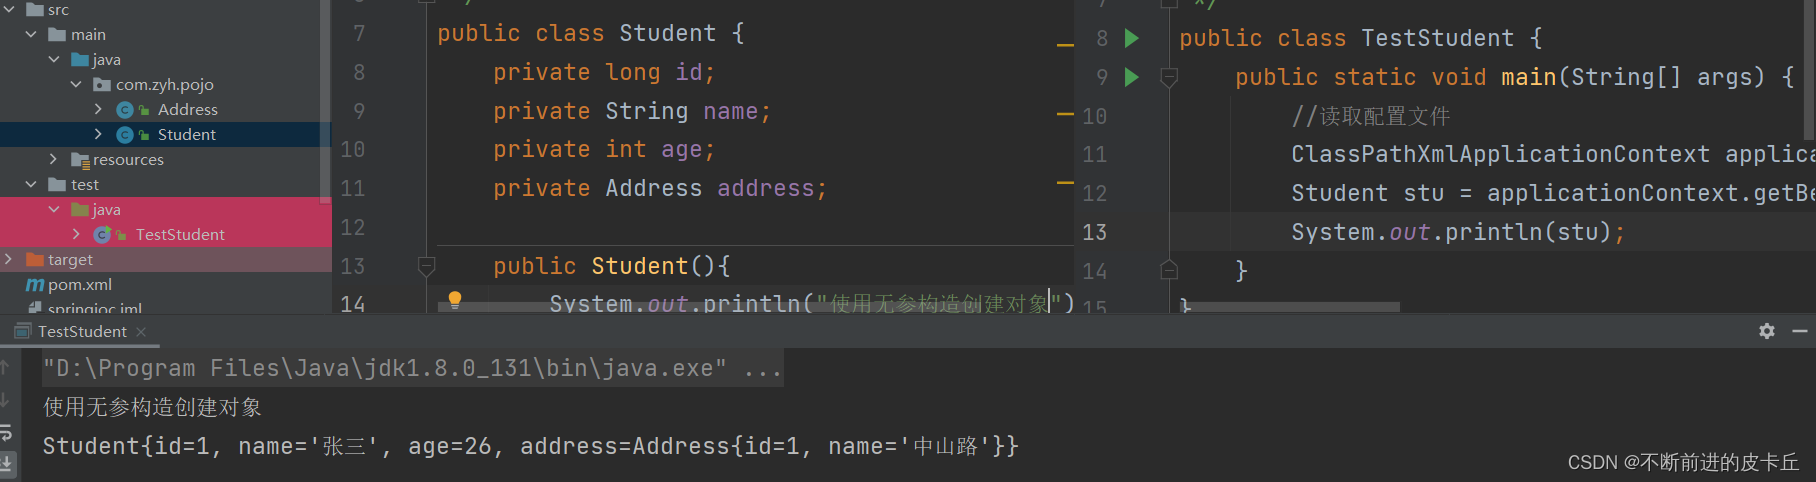
- 调用API,从IOC获取对象
//读取配置文件ClassPathXmlApplicationContext applicationContext = new ClassPathXmlApplicationContext("applicationContext.xml");Student stu = applicationContext.getBean("stu", Student.class);System.out.println(stu);
2.3配置文件的解读
- 通过配置
bean标签来完成对象的管理 id:对象名class:对象的模板类(所有交给IOC容器来管理的类必须要有无参构造函数,因为Spring底层是通过反射机制来创建对象,调用的是无参构造)- 对象的成员变量通过
property标签完成赋值name:成员变量名value:成员变量值(基本数据类型,String可以直接赋值,如果是其他引用类型不可以通过value赋值)ref:把IOC中的另一个bean赋给当前成员变量(DI)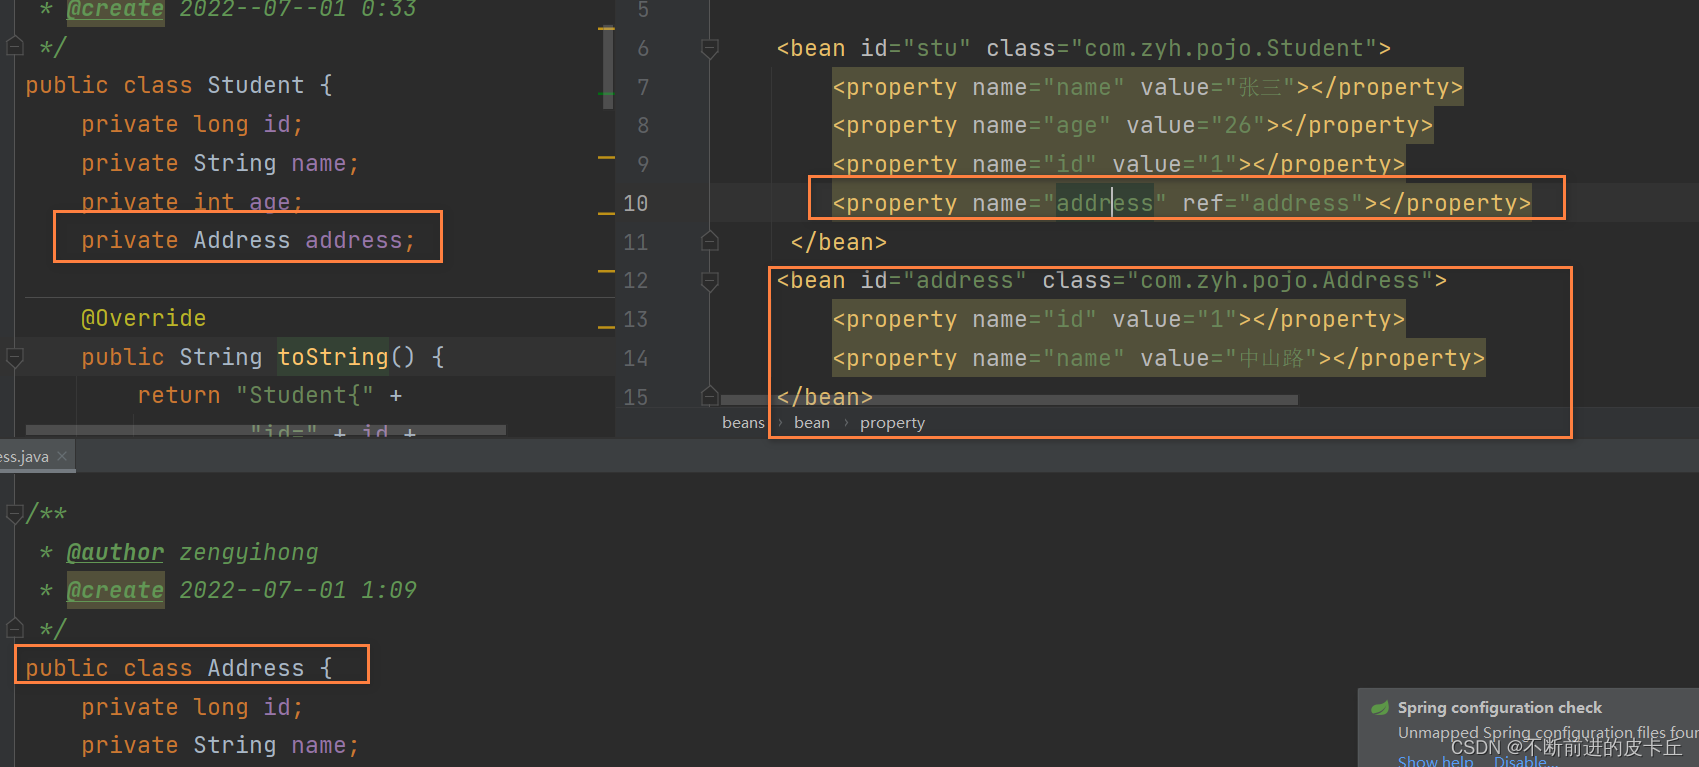
2.4IOC容器创建bean的两种方式
-
无参构造函数(需要提供对应的set方法)
-
-
有参构造函数
<bean id="stu1" class="com.zyh.pojo.Student"><constructor-arg name="id" value="1"> </constructor-arg><constructor-arg name="name" value="李四"></constructor-arg></bean>
<bean id="stu1" class="com.zyh.pojo.Student"><constructor-arg index=0 value="1"> </constructor-arg><constructor-arg index=1 value="李四"></constructor-arg></bean>
2.5从IOC容器中取bean
- 通过id取值
Student stu = (Student)applicationContext.getBean("stu");
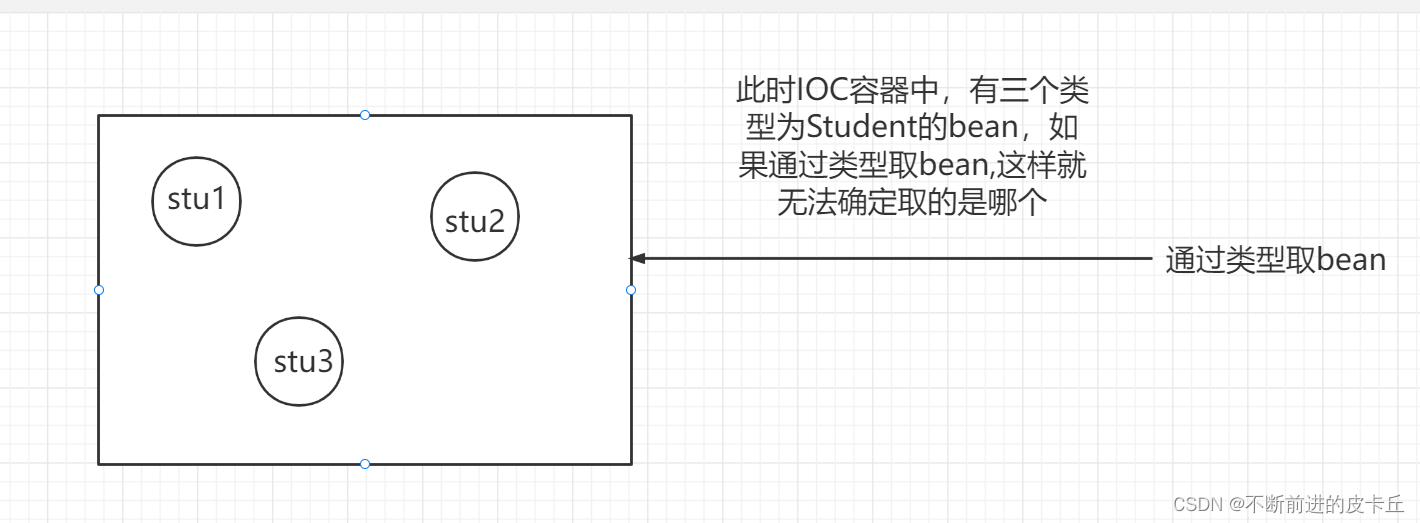
- 通过类型取值
Student stu = applicationContext.getBean( Student.class);
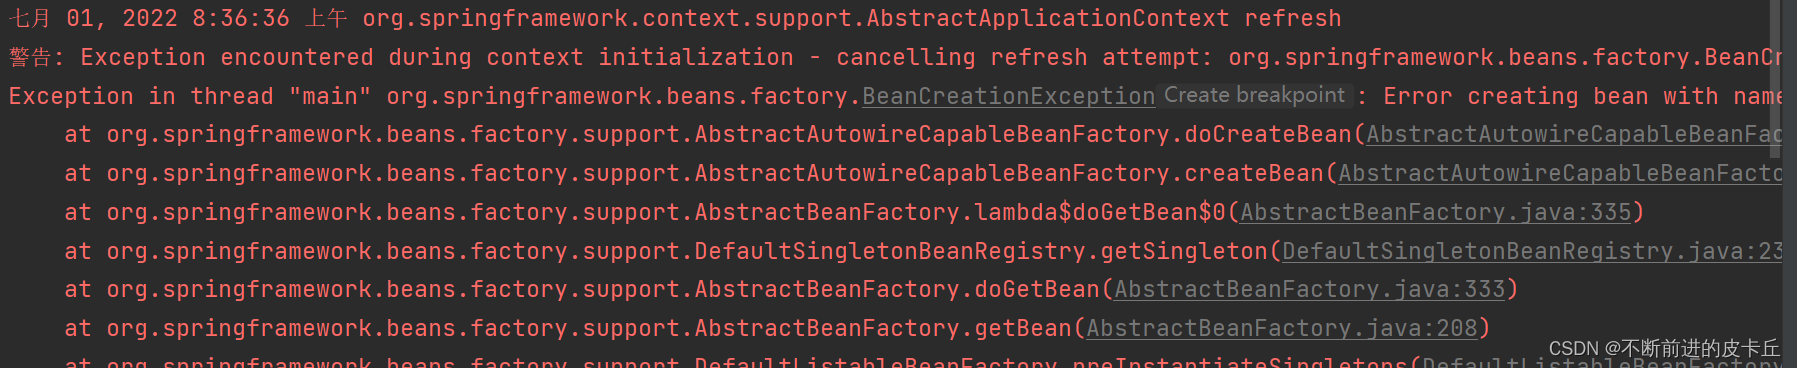
- 当IOC容器中存在两个以上Student Bean的时候就会抛出异常,因为此时没有唯一的bean
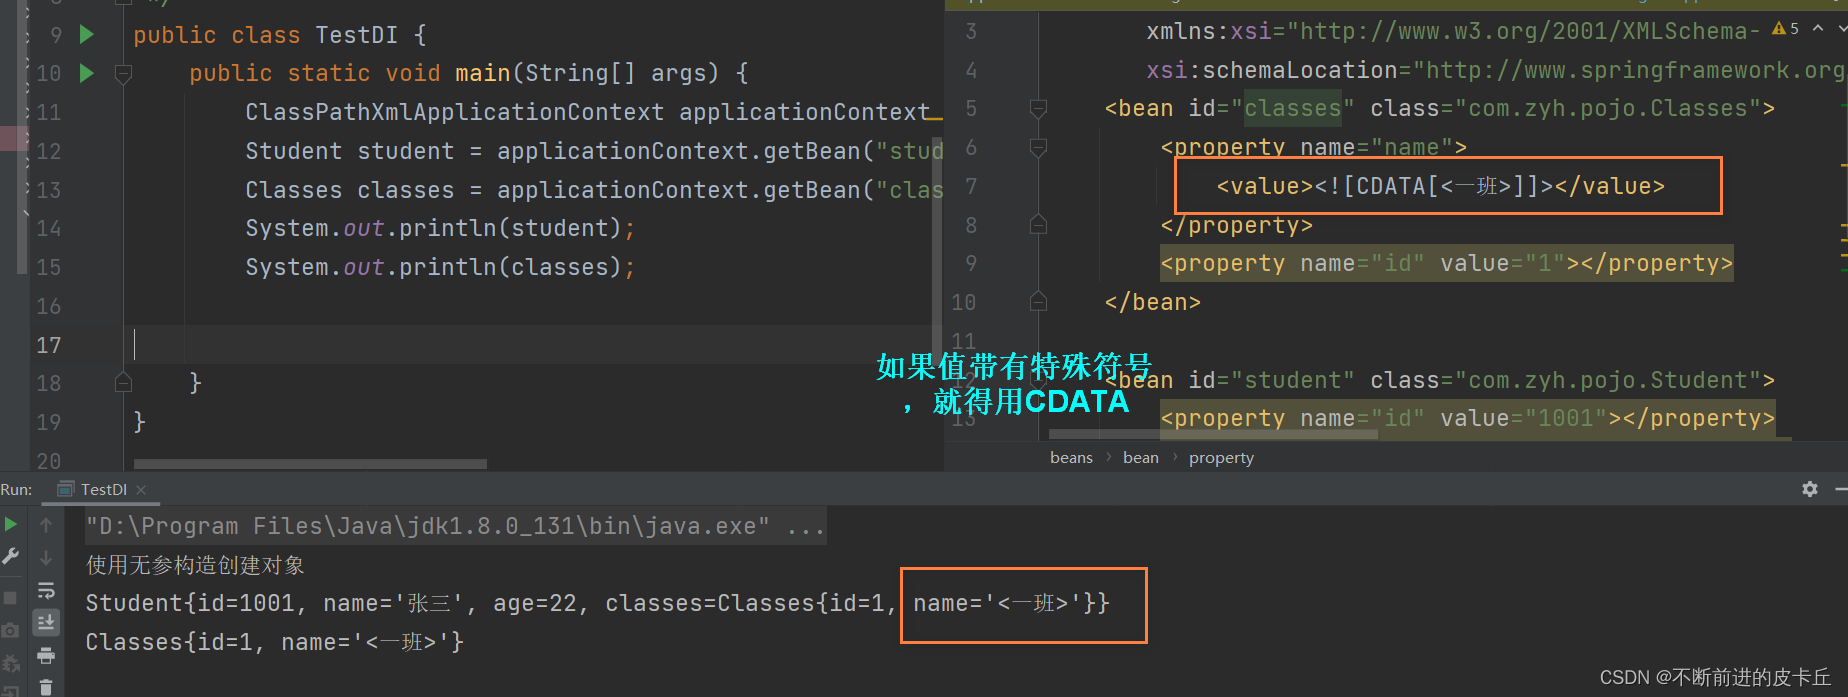
2.6bean的属性如果包含特殊字符
三、DI(依赖注入)
- DI:指bean之间的依赖注入,设置对象之间的级联关系
- Classes
public class Classes {private Integer id;private String name;还有对应的get,set方法
}
- Student
public class Student {private long id;private String name;private int age;private Classes classes;public Student(){System.out.println("使用无参构造创建对象");}public Student(long id,String name){this.id = id;this.name = name;}  public Classes getClasses() {return classes;}public void setClasses(Classes classes) {this.classes = classes;}public long getId() {return id;}public void setId(long id) {this.id = id;}public String getName() {return name;}public void setName(String name) {this.name = name;}public int getAge() {return age;}public void setAge(int age) {this.age = age;}@Overridepublic String toString() {return "Student{" +"id=" + id +", name='" + name + '\'' +", age=" + age +", classes=" + classes +'}';}
}
applicationContext-di.xml
<?xml version="1.0" encoding="UTF-8"?>
<beans xmlns="http://www.springframework.org/schema/beans"xmlns:xsi="http://www.w3.org/2001/XMLSchema-instance"xsi:schemaLocation="http://www.springframework.org/schema/beans http://www.springframework.org/schema/beans/spring-beans.xsd"><bean id="classes" class="com.zyh.pojo.Classes"><property name="name" value="1班"></property><property name="id" value="1"></property></bean><bean id="student" class="com.zyh.pojo.Student"><property name="id" value="1001"></property><property name="name" value="张三"></property><property name="age" value="22"></property><property name="classes" ref="classes"></property></bean></beans>
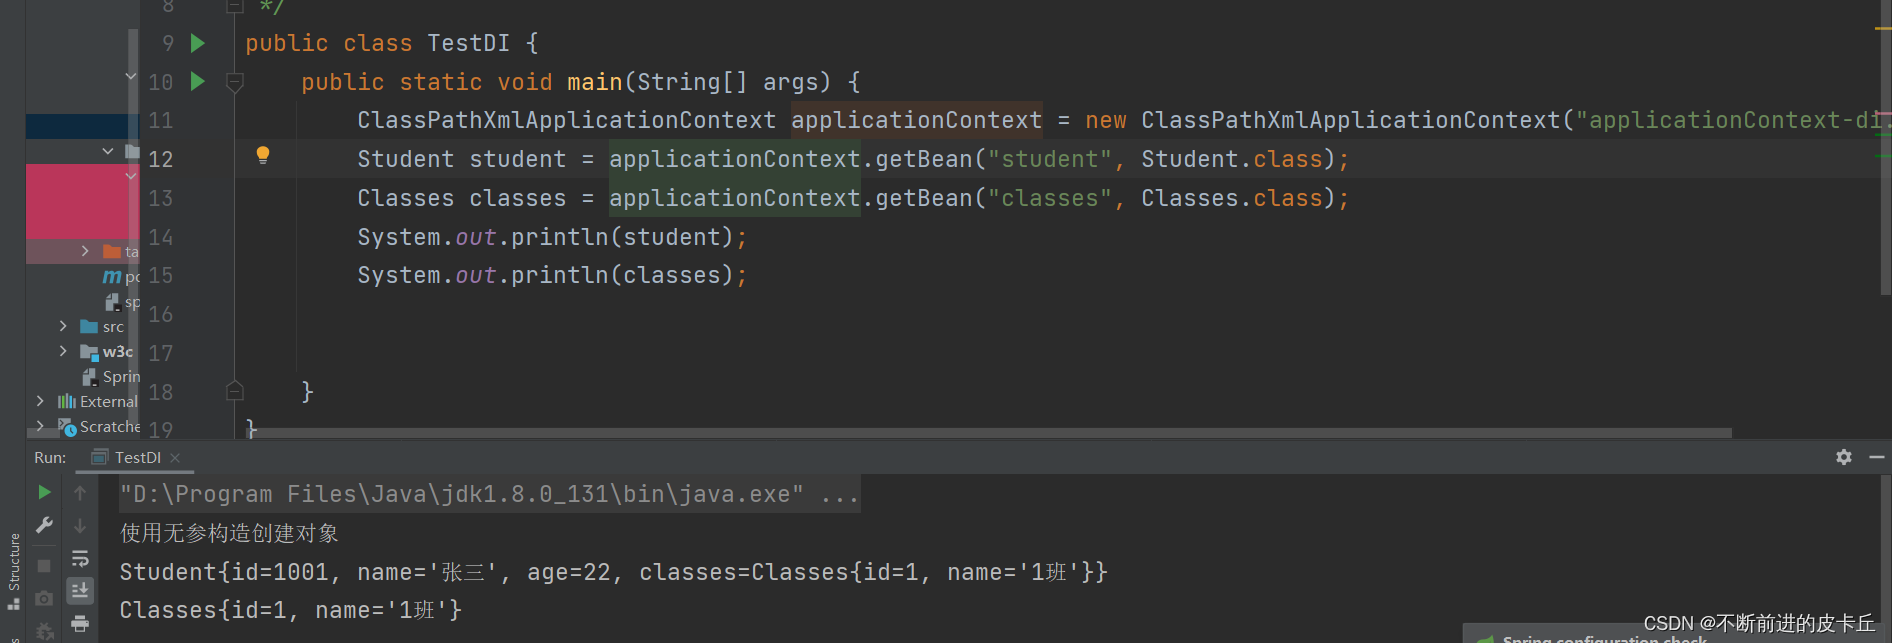
bean之间的级联需要使用ref属性,而不能用value属性,否则会抛出类型转换异常

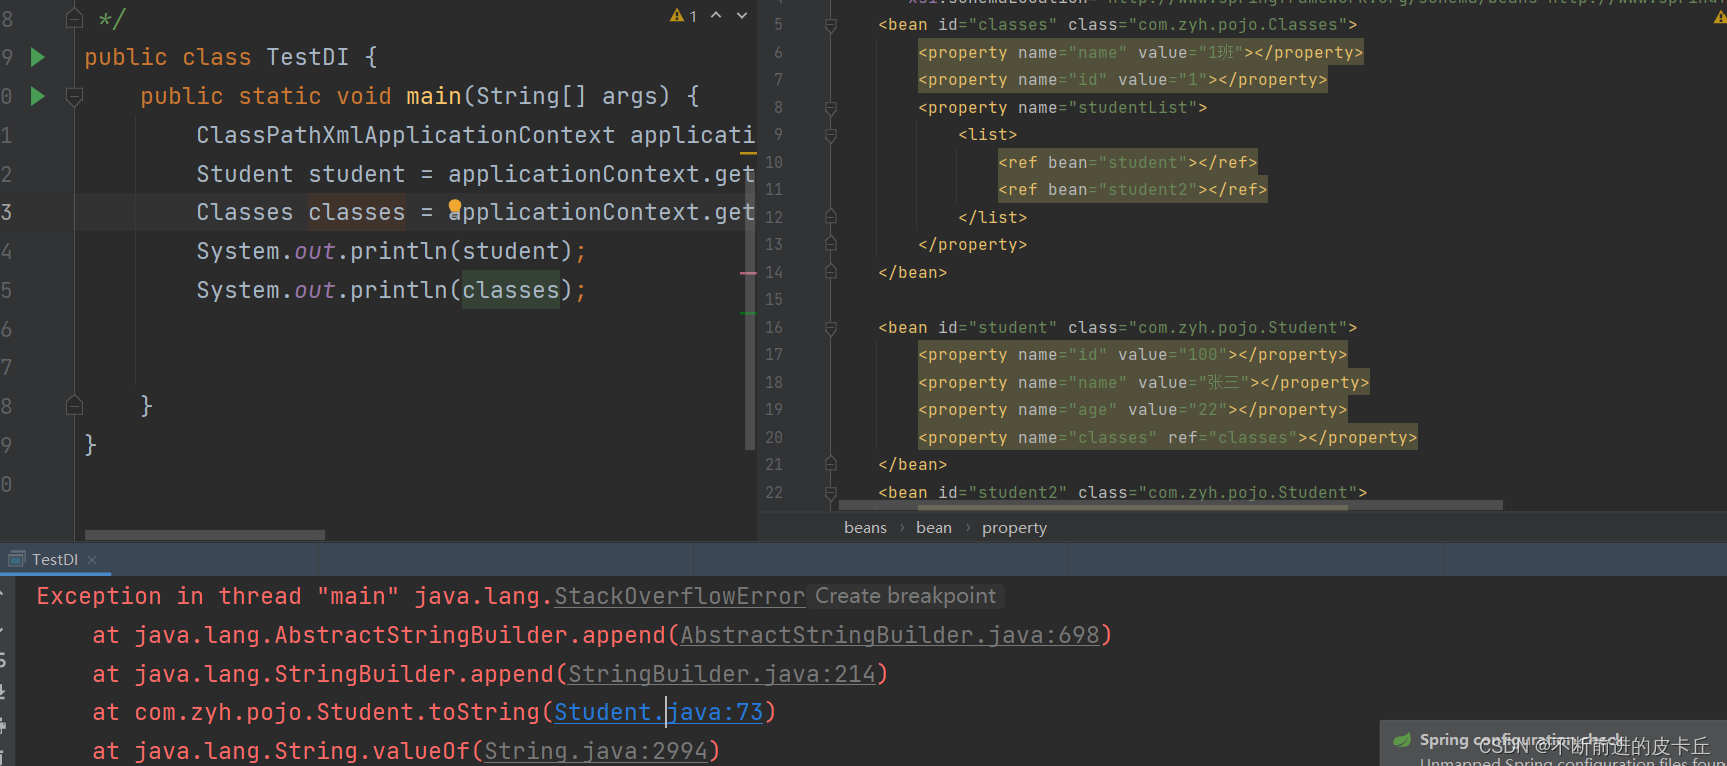
<?xml version="1.0" encoding="UTF-8"?>
<beans xmlns="http://www.springframework.org/schema/beans"xmlns:xsi="http://www.w3.org/2001/XMLSchema-instance"xsi:schemaLocation="http://www.springframework.org/schema/beans http://www.springframework.org/schema/beans/spring-beans.xsd"><bean id="classes" class="com.zyh.pojo.Classes"><property name="name" value="1班"></property><property name="id" value="1"></property><property name="studentList"><list><ref bean="student"></ref><ref bean="student2"></ref></list></property></bean><bean id="student" class="com.zyh.pojo.Student"><property name="id" value="100"></property><property name="name" value="张三"></property><property name="age" value="22"></property><property name="classes" ref="classes"></property></bean><bean id="student2" class="com.zyh.pojo.Student"><property name="id" value="200"></property><property name="age" value="18"></property><property name="name" value="李四"></property><property name="classes" ref="classes"></property></bean></beans>
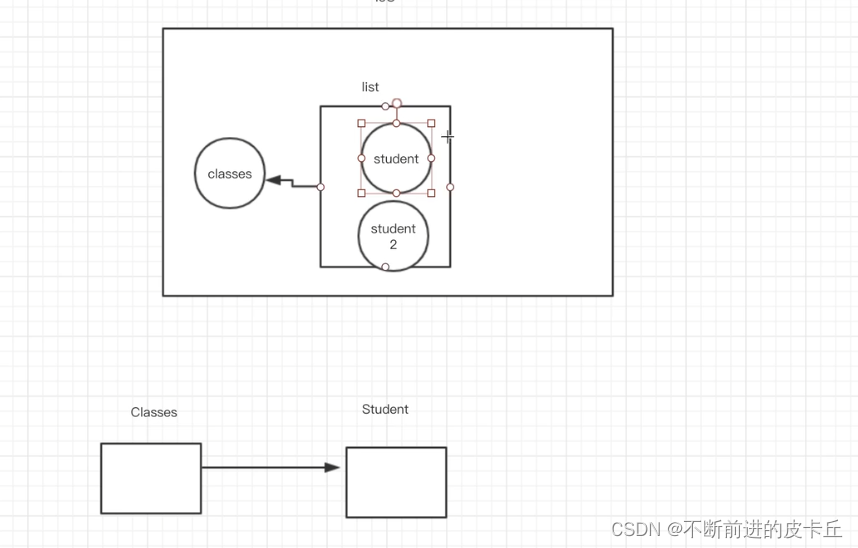
如果把学生装到班级里面,又把班级装到学生里面,就导致无限递归循环装配,最终栈溢出
四、Spring中的bean
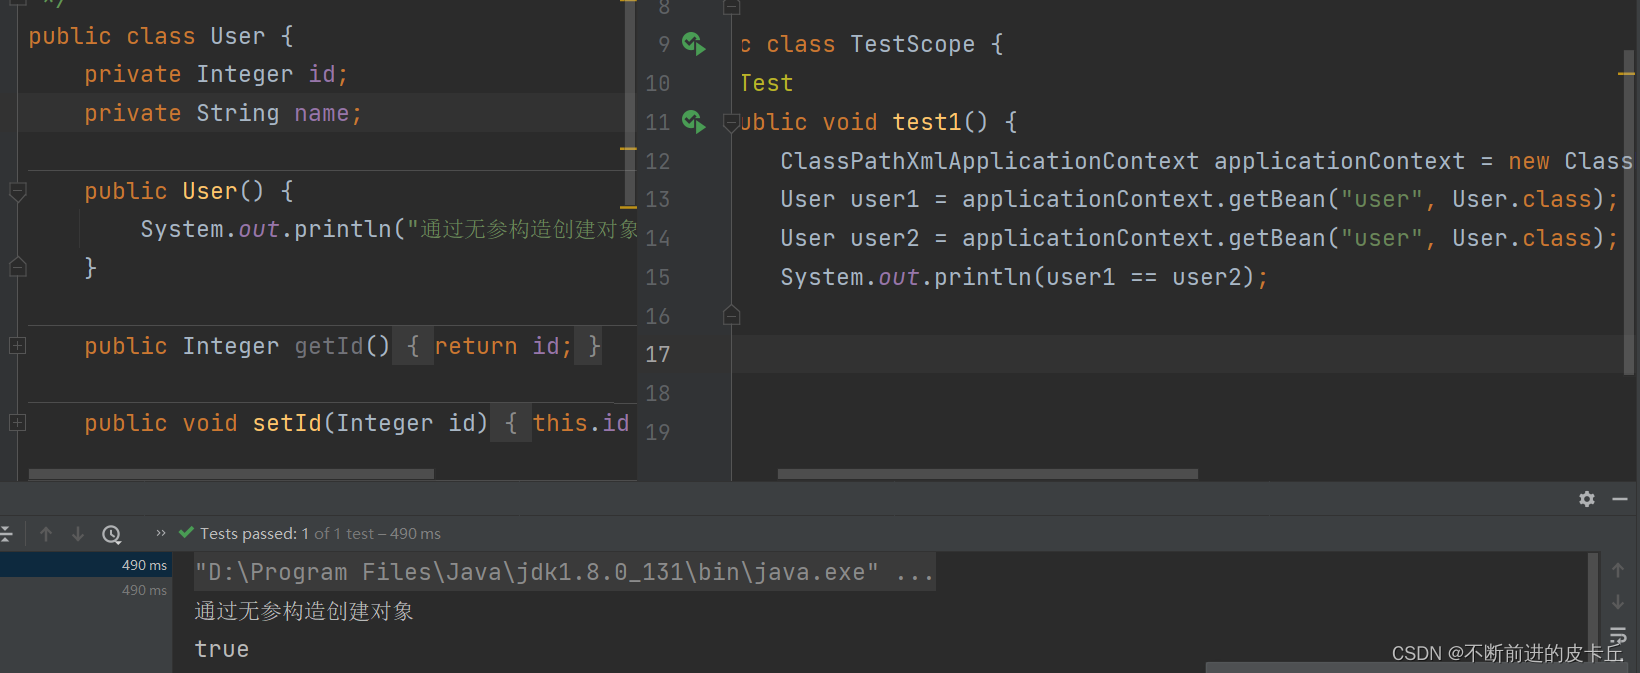
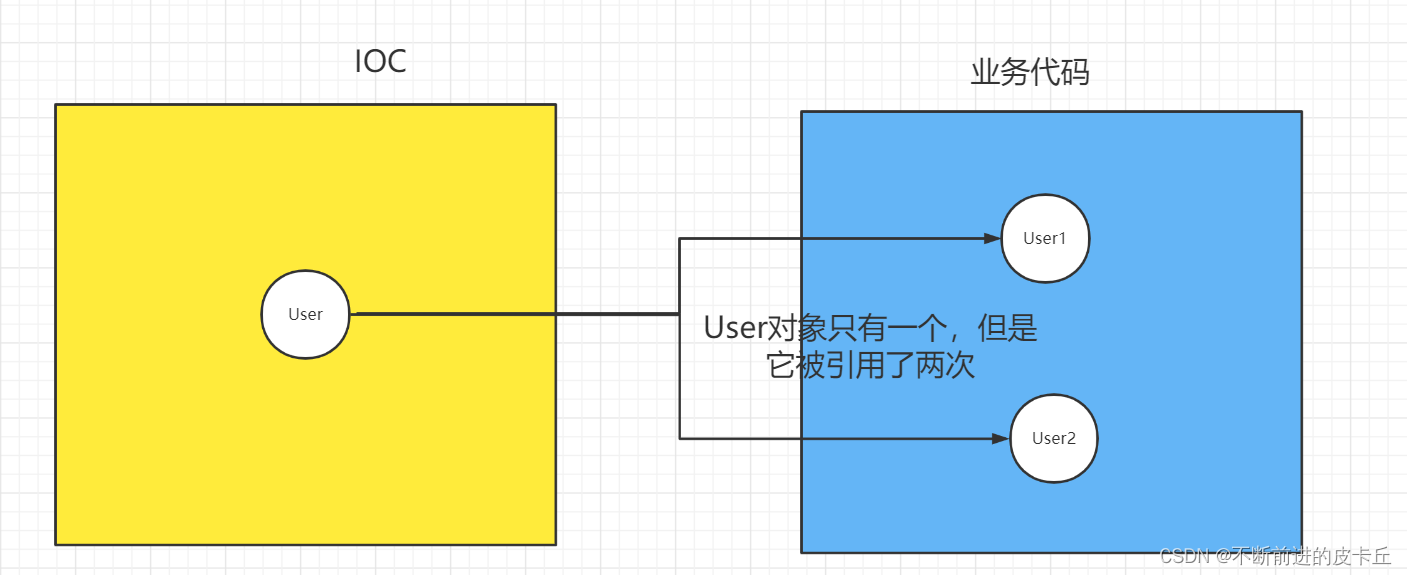
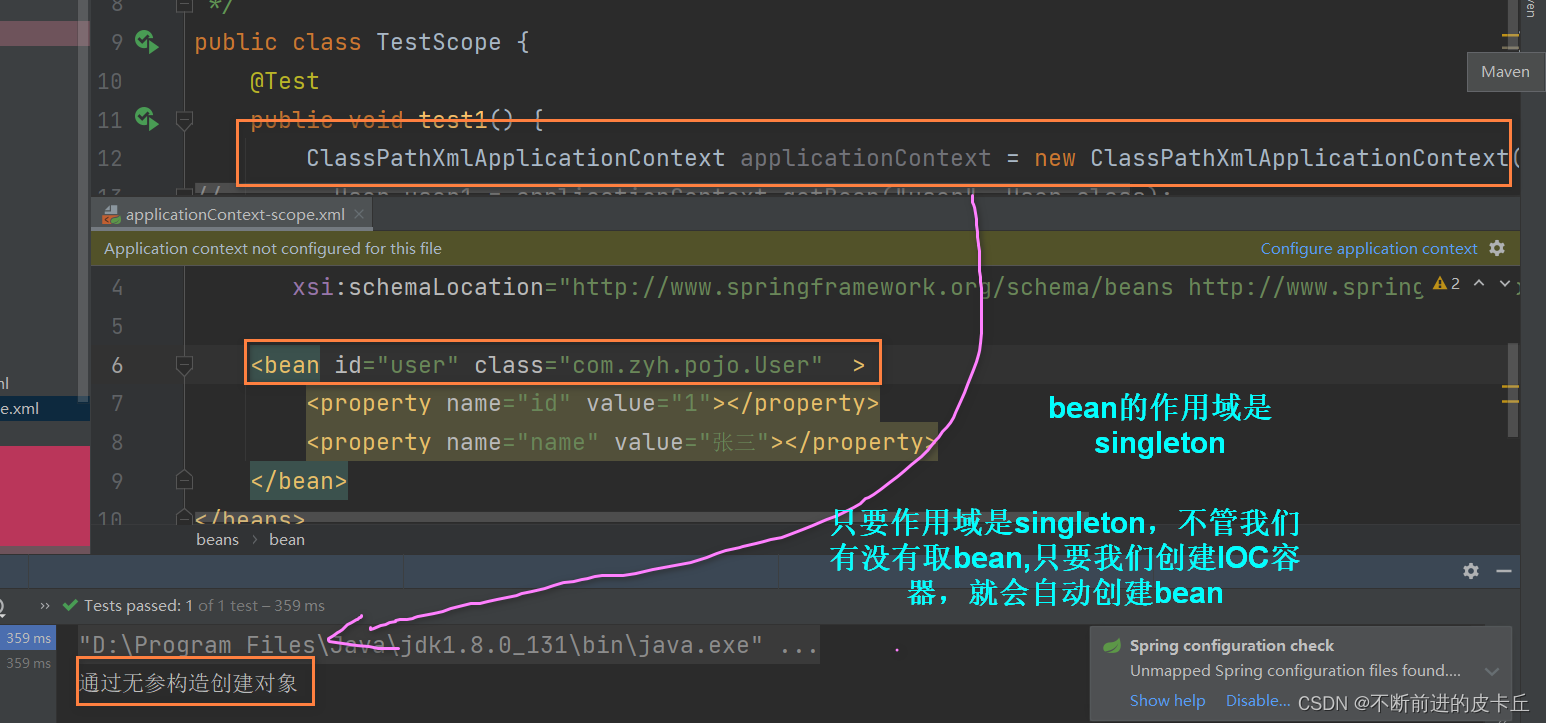
bean是根据scope来生成的,表示bean的作用域,scope有4种类型
-
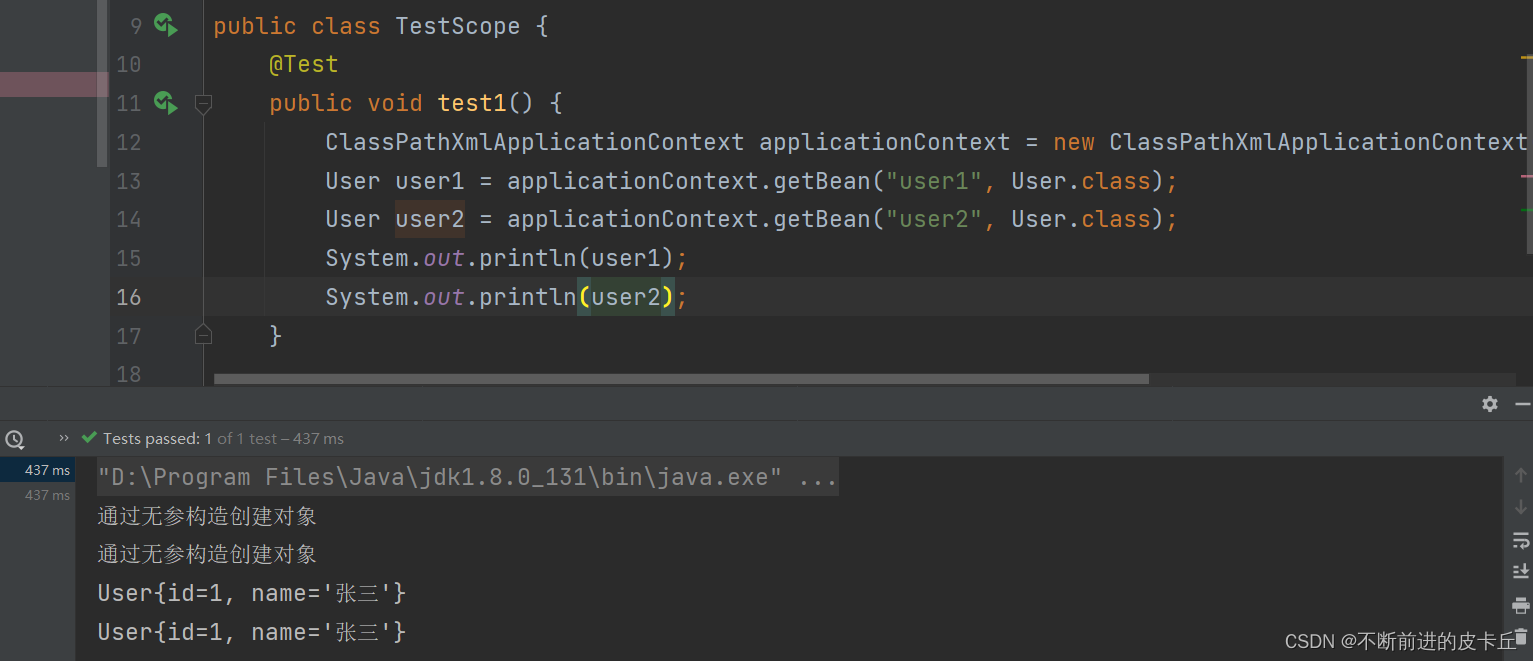
singleton,单例,表示通过Spring容器获取的对象是唯一的,是默认值
-
-
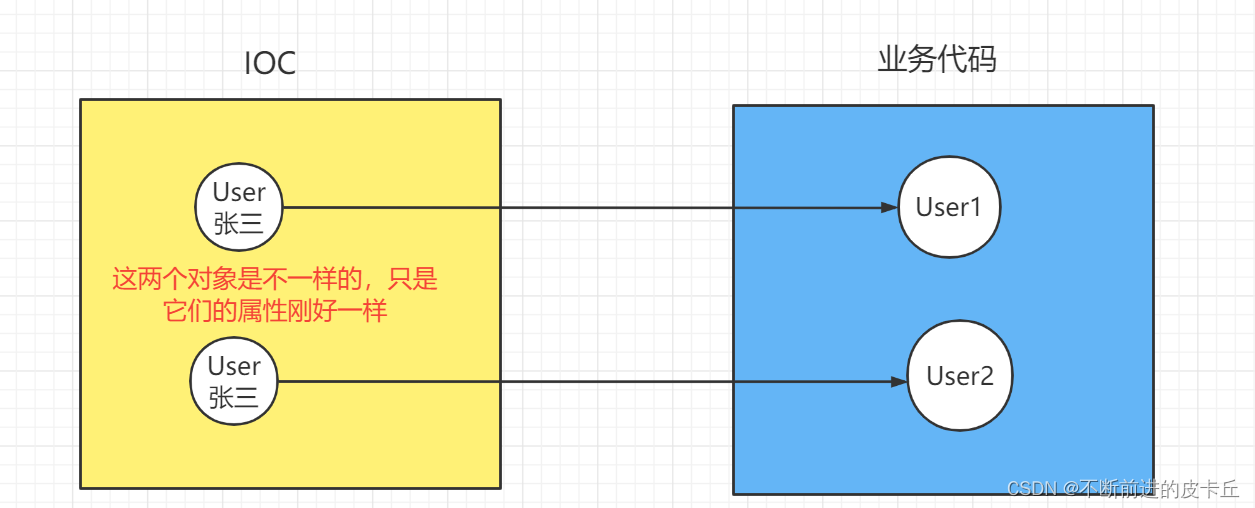
prototype,原型,表示通过Spring容器获取的对象是不同的
- 配置文件
<bean id="user" class="com.zyh.pojo.User" scope="prototype"><property name="id" value="1"></property><property name="name" value="张三"></property></bean>
- request,请求,表示在异常HTTP请求内有效
- session,会话,表示在一个用户会话内有效
request和session一般用于web项目
singleton模式下,只要加载IOC容器,不管是否从IOC种取出bean,配置文件中的bean都会被创建,而且只会创建一个对象
prototype模式下,如果不从IOC中取出bean,则不创建对象,取一次bean,就会创建一个对象
五、Spring中的继承
Spring中的继承不同于Java中的继承
Java中的继承是针对于类的
Spring中的继承是针对于对象(bean)
<?xml version="1.0" encoding="UTF-8"?>
<beans xmlns="http://www.springframework.org/schema/beans"xmlns:xsi="http://www.w3.org/2001/XMLSchema-instance"xsi:schemaLocation="http://www.springframework.org/schema/beans http://www.springframework.org/schema/beans/spring-beans.xsd"><bean id="user1" class="com.zyh.pojo.User"  ><property name="id" value="1"></property><property name="name" value="张三"></property></bean><bean id="user2" class="com.zyh.pojo.User" parent="user1"></bean>
</beans>
- 通过设置bean标签的parent属性建立继承关系,同时子bean可以覆盖父bean的属性值
- Spring的继承是针对对象的,所以子bean和父bean并不需要同一个数据类型,只要其成员变量列表一致即可
六、Spring的依赖
- 用来设置两个bean的创建顺序
- IOC容器默认情况下是通过applicationContext.xml中bean的配置顺序来决定创建顺序的,配置在前面的bean会先被创建
- 在不更改applicationContext.xml配置顺序的前提下,通过设置bean之间的依赖关系来调整bean的创建顺序

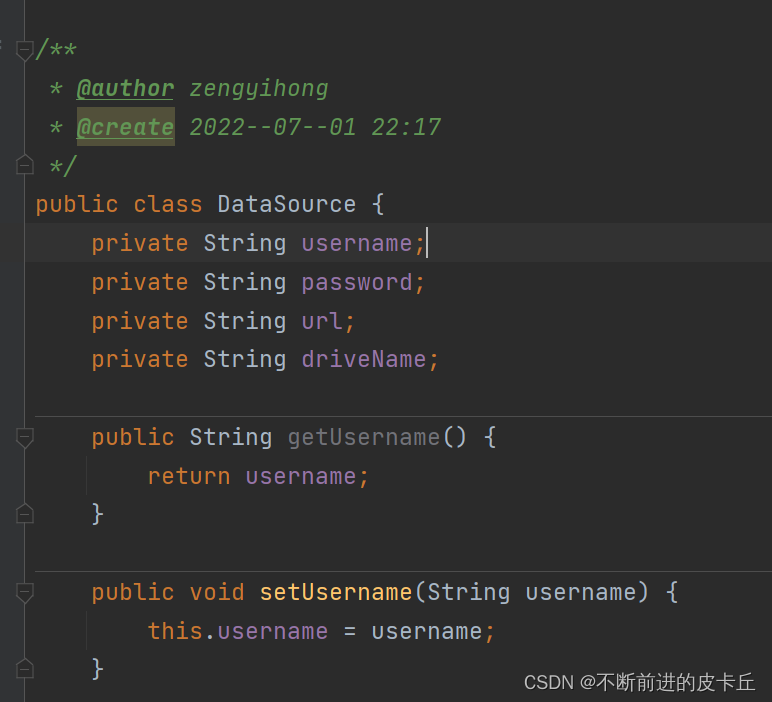
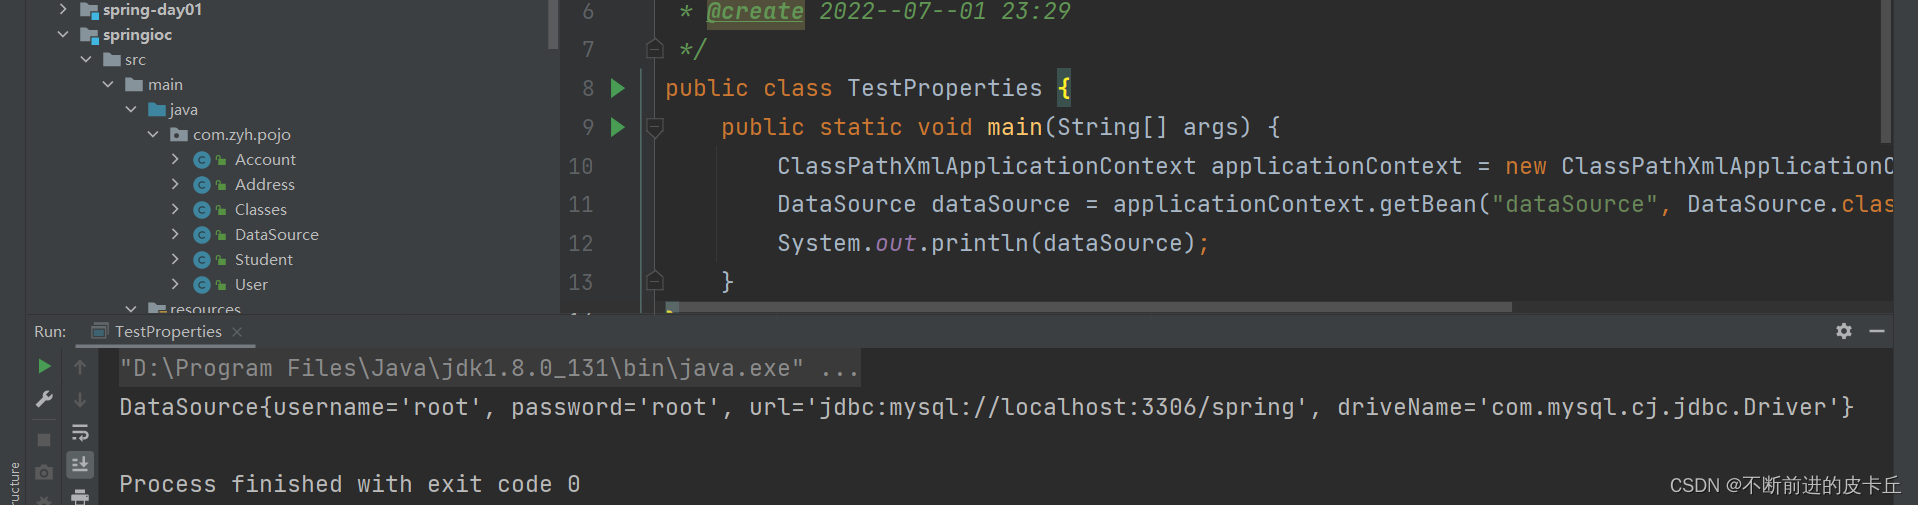
七、Spring读取外部资源
- 在实际开发中,数据库的配置会一般会单独保存到后缀为properties的文件,方便维护和修改
- 如果用Spring来加载数据源,就需要在applicationContext.xml中读取properties中的数据,这就是读取外部资源
jdbc.properties
user=root
password=root
url=jdbc:mysql://localhost:3306/spring
driverName=com.mysql.cj.jdbc.Driver
spring-properties.xml
<?xml version="1.0" encoding="UTF-8"?>
<beans xmlns="http://www.springframework.org/schema/beans"xmlns:xsi="http://www.w3.org/2001/XMLSchema-instance"xmlns:context="http://www.springframework.org/schema/context"xsi:schemaLocation="http://www.springframework.org/schema/beans http://www.springframework.org/schema/beans/spring-beans.xsd http://www.springframework.org/schema/context https://www.springframework.org/schema/context/spring-context.xsd"><!--导入外部资源 --><context:property-placeholder location="classpath:jdbc.properties"></context:property-placeholder><bean id="dataSource" class="com.zyh.pojo.DataSource"><property name="username" value="${user}"></property><property name="password" value="${password}"></property><property name="url" value="${url}"></property><property name="driveName" value="${driverName}"></property></bean></beans>
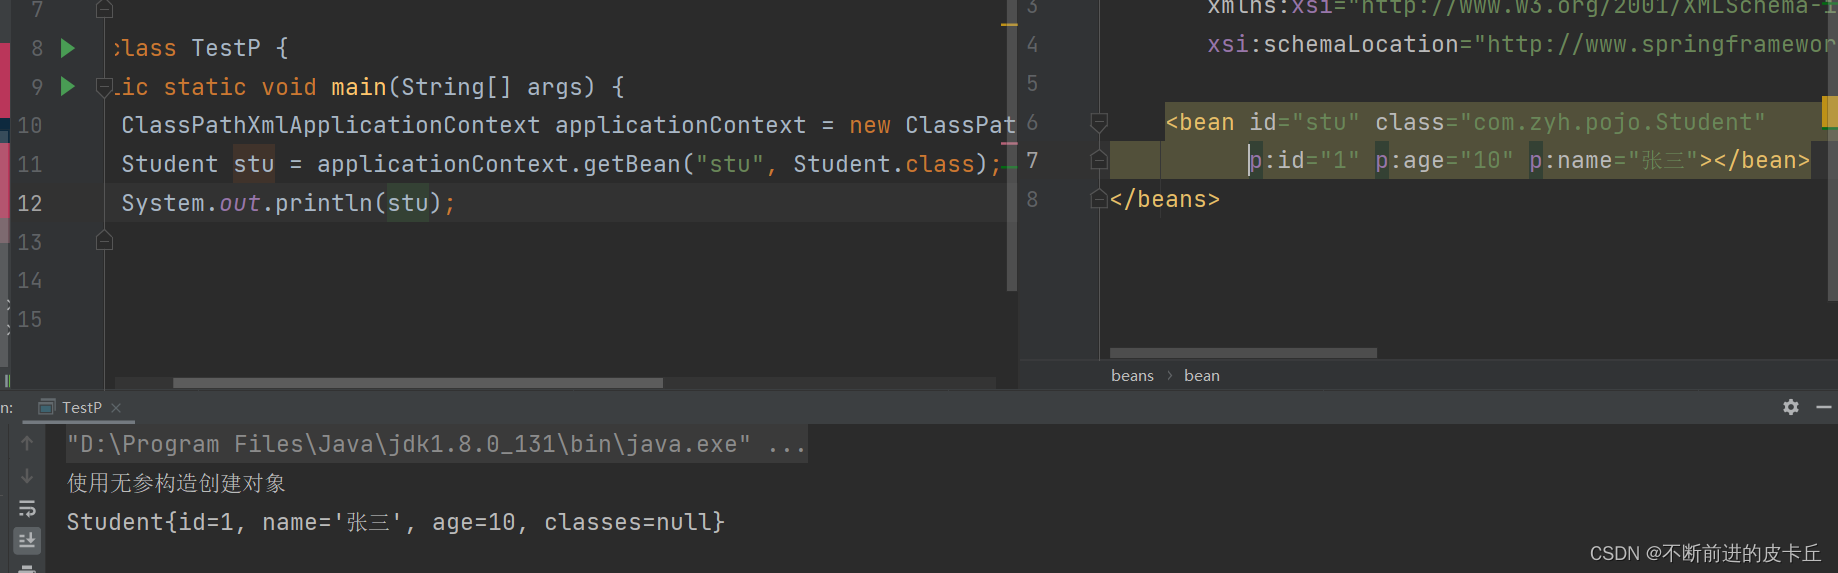
八、Spring的p命名空间
- 用来简化xml配置
<?xml version="1.0" encoding="UTF-8"?>
<beans xmlns="http://www.springframework.org/schema/beans"xmlns:xsi="http://www.w3.org/2001/XMLSchema-instance" xmlns:p="http://www.springframework.org/schema/p"xsi:schemaLocation="http://www.springframework.org/schema/beans http://www.springframework.org/schema/beans/spring-beans.xsd"><bean id="stu" class="com.zyh.pojo.Student" p:id="1" p:age="10" p:name="张三" p:classes-ref="classes"></bean><bean id="classes" class="com.zyh.pojo.Classes" p:name="一班" p:id="1"></bean></beans>
九、Spring工厂方法
IOC通过工厂模式创建bean有两种方式:
- 静态工厂方法
- 实例工厂方法
- 静态工厂类不需要实例化,实例工厂类需要实例化
9.1静态工厂方法
- 创建Car类
public class Car {private Integer num;private String brand;public Car() {}public Car(Integer num, String brand) {this.num = num;this.brand = brand;}public Integer getNum() {return num;}public void setNum(Integer num) {this.num = num;}public String getBrand() {return brand;}public void setBrand(String brand) {this.brand = brand;}@Overridepublic String toString() {return "Car{" +"num=" + num +", brand='" + brand + '\'' +'}';}
}- 创建静态工厂类,静态工厂方法
public class StaticCarFactory {private static Map<Integer, Car> carMap;static {carMap = new HashMap<>();carMap.put(1, new Car(1, "奥迪"));carMap.put(2, new Car(2,"奥拓"));}/*** 写一个方法,从map集合取数据*/public static Car getCar(Integer num ){return carMap.get(num);}
}- spring-factory.xml
<?xml version="1.0" encoding="UTF-8"?>
<beans xmlns="http://www.springframework.org/schema/beans"xmlns:xsi="http://www.w3.org/2001/XMLSchema-instance"xsi:schemaLocation="http://www.springframework.org/schema/beans http://www.springframework.org/schema/beans/spring-beans.xsd"><bean id="car" class="com.zyh.factory.StaticCarFactory" factory-method="getCar"><constructor-arg  name="num" value="1"></constructor-arg></bean></beans>
- factory-method 指向静态方法
- constructor-arg的value属性是调用静态方法传入的参数
9.2实例工厂方法
- 创建实例工厂类,工厂方法
public class InstanceCarFactory {private Map<Integer, Car> carMap;public InstanceCarFactory() {carMap = new HashMap<>();carMap.put(1, new Car(1, "奥迪"));carMap.put(2, new Car(2, "奥拓"));}public Car getCar(Integer num){return carMap.get(num);}}
- spring.xml
<!--    实例工厂类--><bean id="instanceCarFactory" class="com.zyh.factory.InstanceCarFactory"></bean>
<!--    通过实例工厂获取Car--><bean id="car1"  factory-bean="instanceCarFactory" factory-method="getCar"><constructor-arg value="2"></constructor-arg></bean>
区别:
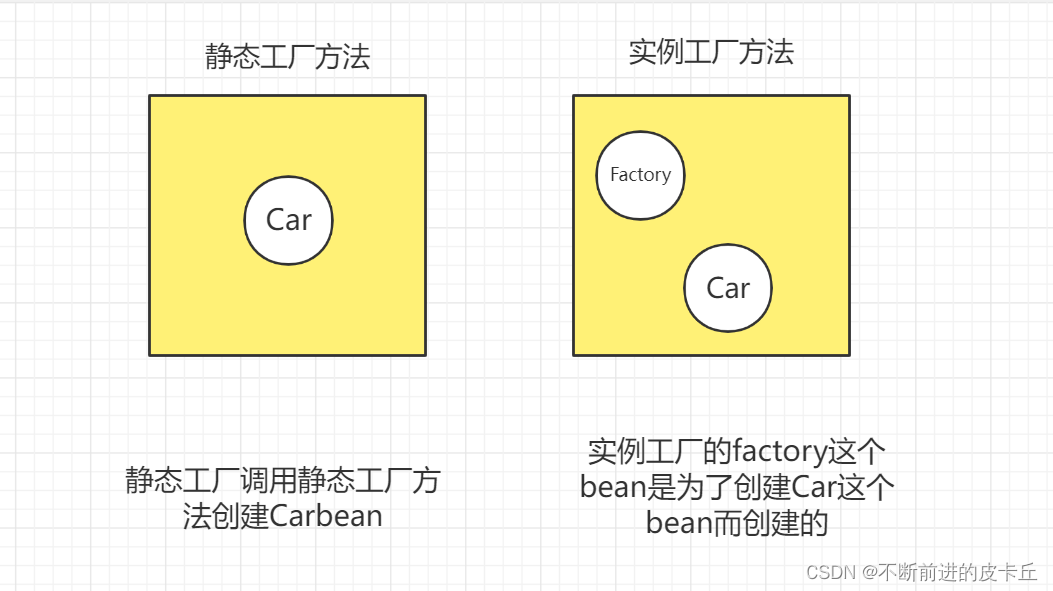
- 静态工厂方法创建Car对象,不需要实例化工厂对象,因为静态工厂的静态方法,不需要创建对象就可以调用了
- 实例工厂方法创建Car对象,需要实例化工厂对象,因为getCar方法是非静态的,就必须通过实例化对象才能调用,所以 必须创建工厂对象,spring.xml需要配置两个bean,一个是工厂bean,一个是Car Bean
- spring.xml中 class+factory-method的形式是直接调用类中的工厂方法
- spring.xml中factory-bean+factory-method的形式是调用工厂bean中的工厂方法,就必须先创建工厂bean
十、Spring IOC 自动装配 autowire
10.1自动装配
- 自动装载是Spring提供的一种更加简便的方式来完成DI,不需要手动配置property,IOC 容器会自动选择bean来完成注入
- 自动装载有两种方式:
- byName:通过属性名完成自动装载
- byType:通过属性对应的数据类型完成自动装载
byName的操作如下:
- 创建Person实体类
public class Person {private Integer id;private String name;private Car car;public Integer getId() {return id;}public void setId(Integer id) {this.id = id;}public String getName() {return name;}public void setName(String name) {this.name = name;}public Car getCar() {return car;}public void setCar(Car car) {this.car = car;}@Overridepublic String toString() {return "Person{" +"id=" + id +", name='" + name + '\'' +", car=" + car +'}';}
}
- 在spring.xml中配置Car和Person对应的bean,并且通过自动装载完成依赖注入
<?xml version="1.0" encoding="UTF-8"?>
<beans xmlns="http://www.springframework.org/schema/beans"xmlns:xsi="http://www.w3.org/2001/XMLSchema-instance"xsi:schemaLocation="http://www.springframework.org/schema/beans http://www.springframework.org/schema/beans/spring-beans.xsd"><bean id="car2" class="com.zyh.pojo.Car"><constructor-arg name="num" value="1"></constructor-arg><constructor-arg name="brand" value="奥迪"></constructor-arg></bean><bean id="car" class="com.zyh.pojo.Classes"></bean><bean id="person" class="com.zyh.pojo.Person" autowire="byName" ><property name="name" value="张三"></property><property name="id" value="2"></property></bean></beans>
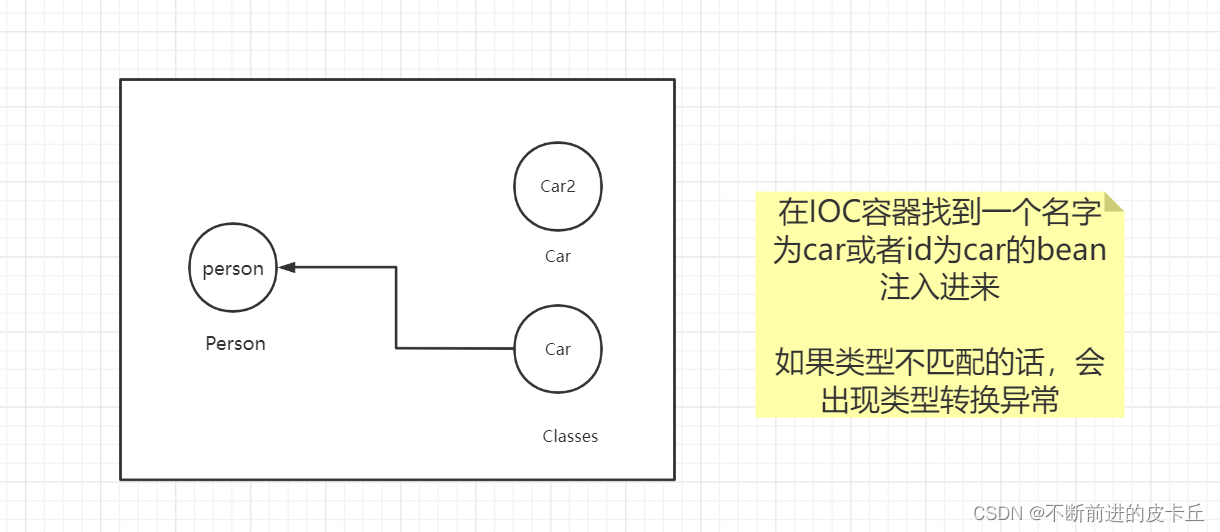
注:如果bean的id有多个一致的,会报错,如Bean name 'car' is already used in this <beans> element
byType的操作如下:
<?xml version="1.0" encoding="UTF-8"?>
<beans xmlns="http://www.springframework.org/schema/beans"xmlns:xsi="http://www.w3.org/2001/XMLSchema-instance"xsi:schemaLocation="http://www.springframework.org/schema/beans http://www.springframework.org/schema/beans/spring-beans.xsd"><bean id="car2" class="com.zyh.pojo.Car"><constructor-arg name="num" value="1"></constructor-arg><constructor-arg name="brand" value="奥迪"></constructor-arg></bean><bean id="car" class="com.zyh.pojo.Classes"></bean><bean id="person" class="com.zyh.pojo.Person" autowire="byType" ><property name="name" value="张三"></property><property name="id" value="2"></property></bean></beans>
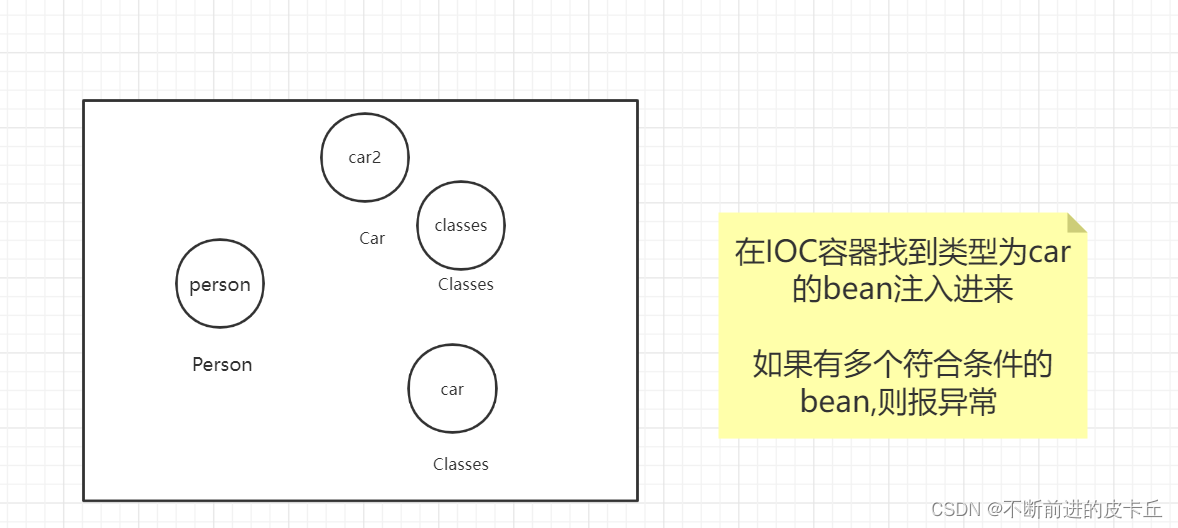
使用byType进行自动装配的时候,必须保证IOC中有且只有一个符合,如果有多个符合,则报下面的异常:

10.2 Spring IOC基于注解的开发
Spring IOC的作用是帮助开发者创建项目中所需要的bean,同时完成bean之间的依赖注入关系,DI
实现该功能有两种方式:
- 基于XML配置
- 基于注解
基于注解有两步操作,缺一不可:
- 配置自动扫包
- 添加注解
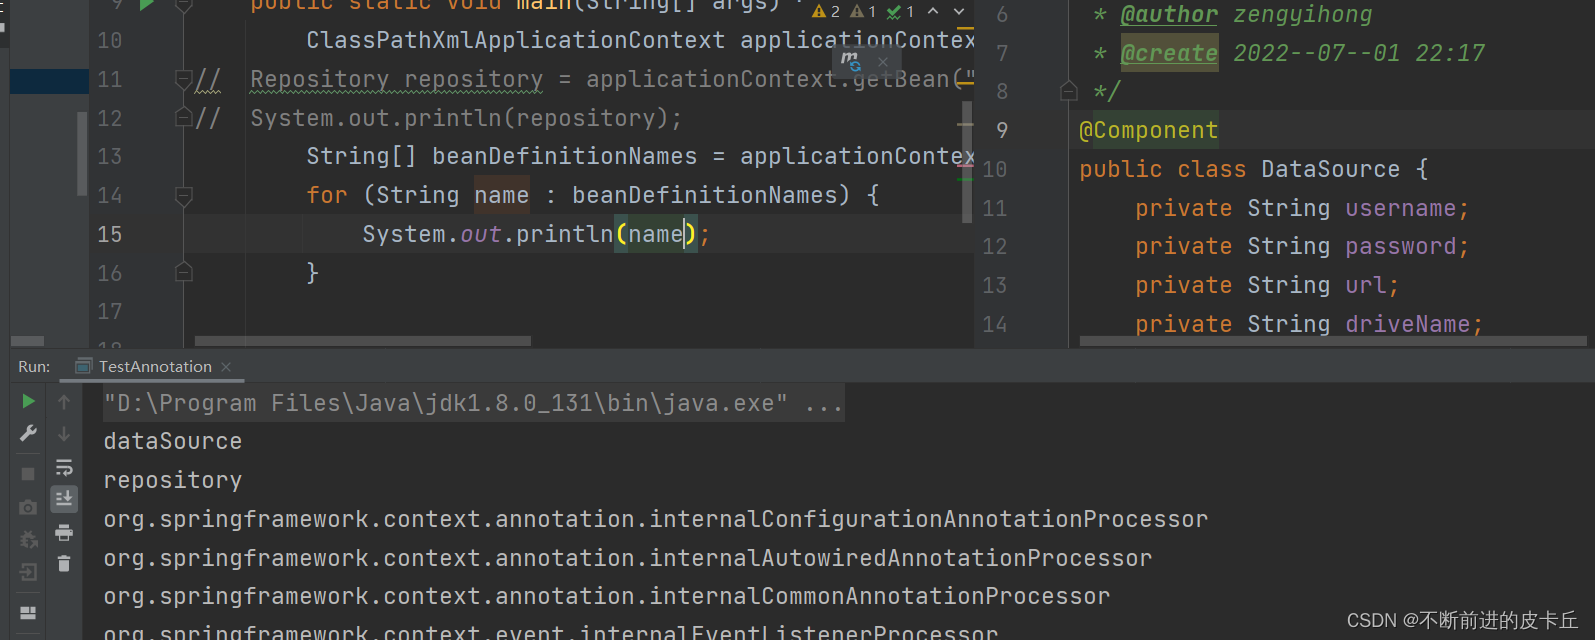
<?xml version="1.0" encoding="UTF-8"?>
<beans xmlns="http://www.springframework.org/schema/beans"xmlns:xsi="http://www.w3.org/2001/XMLSchema-instance"xmlns:context="http://www.springframework.org/schema/context"xsi:schemaLocation="http://www.springframework.org/schema/beans http://www.springframework.org/schema/beans/spring-beans.xsd http://www.springframework.org/schema/context https://www.springframework.org/schema/context/spring-context.xsd"><!--    配置自动扫包--><context:component-scan base-package="com.zyh.pojo"></context:component-scan>
<!--    <bean id="repository" class="com.zyh.pojo.Repository"></bean>--></beans>
@Component(value="repository")
public class Repository {private DataSource dataSource;public DataSource getDataSource() {return dataSource;}public void setDataSource(DataSource dataSource) {this.dataSource = dataSource;}@Overridepublic String toString() {return "Repository{" +"dataSource=" + dataSource +'}';}
}
DI
注解默认的beanid是类名以小写开头,我们可以通过value来设置
如果我们想要把datasource也注入进来需要怎么做呢?
首先我们要把DataSource先扫进来
@Component
public class Repository {@Autowiredprivate DataSource dataSource;public DataSource getDataSource() {return dataSource;}public void setDataSource(DataSource dataSource) {this.dataSource = dataSource;}@Overridepublic String toString() {return "Repository{" +"dataSource=" + dataSource +'}';}
}
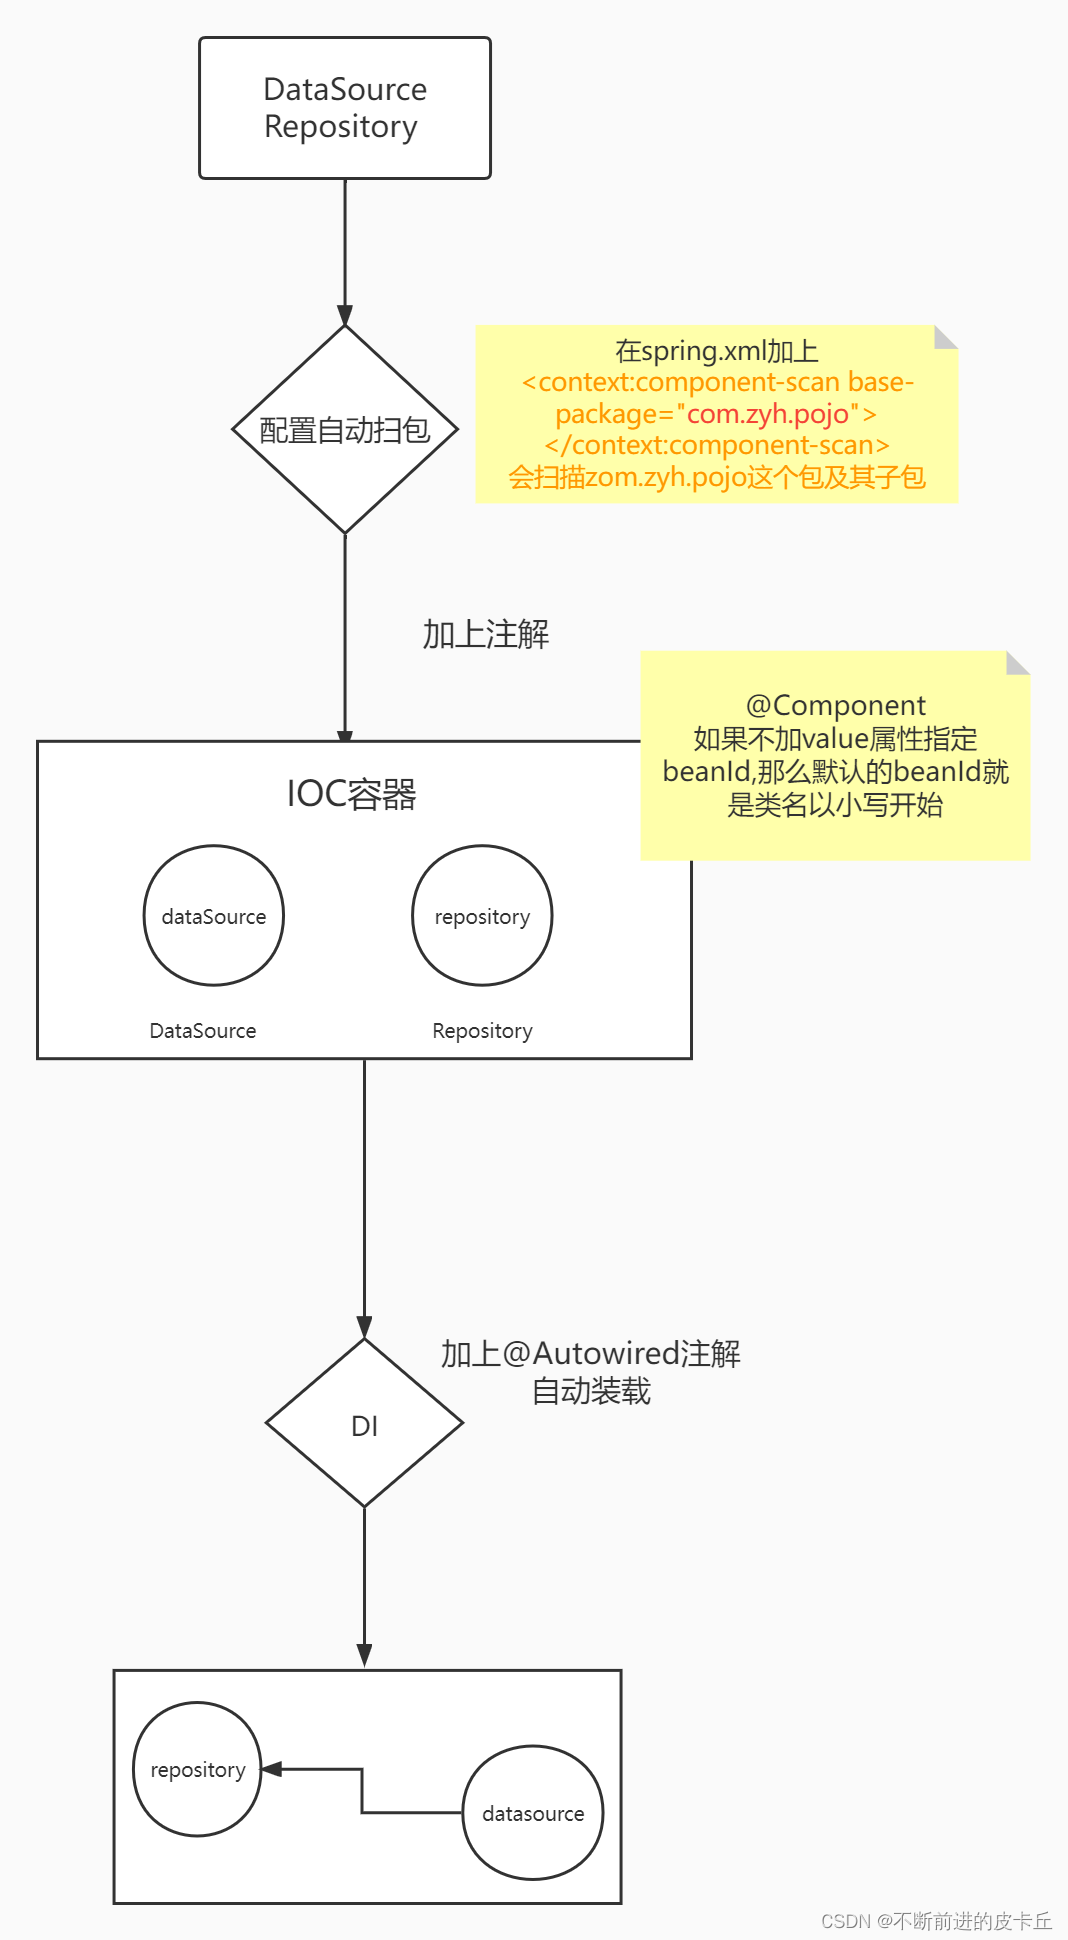
- @Autowired默认是通过byType进行装配,如果要改为byName,需要配合@Qualifier注解来完成
@Component
public class Repository {@Autowired@Qualifier(value = "datasource")private DataSource dataSource;public DataSource getDataSource() {return dataSource;}public void setDataSource(DataSource dataSource) {this.dataSource = dataSource;}@Overridepublic String toString() {return "Repository{" +"dataSource=" + dataSource +'}';}
}
这表明把IOC中id为datasource的bean注入到repository中
实体类中普通的成员变量(String,包装类等),可以通过@Value注解来赋值
@Component
public class DataSource {@Value("root")private String username;@Value("123456")private String password;@Value("jdbc:mysql://localhost:3306/spring")private String url;@Value("com.mysql.cj.jdbc.Driver")private String driveName;}
10.3实际开发中的使用
实际开发中我们会把程序分成三层:
- Controller
- Service
- Repository(DAO)
- 关系Controller—>Service---->Repository

@Component注解是把标注的类加载到IOC容器中,实际开发中可以根据业务需求分别使用@Controller,@Service,@Repository注解来标注控制层类,业务层类,持久层类
十一、Spring AOP
- AOP (Aspect Oriented Programming) 面向切面编程
- OOP (Object Oriented Programming) 面向对象编程,用对象化的思想来完成程序
- AOP是对OOP的一个补充,是在另外一个维度上抽象出对象
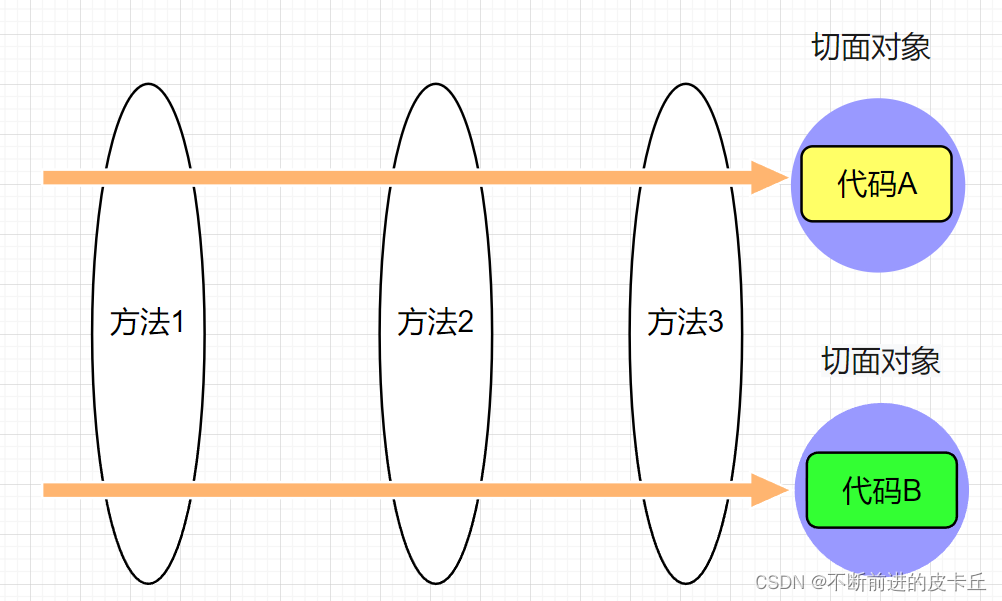
- 具体指程序运行时动态地把非业务代码切入到业务代码中,从而实现程序的解耦合,把非业务代码抽象成一个对象,对对象编程就是面向切面编程
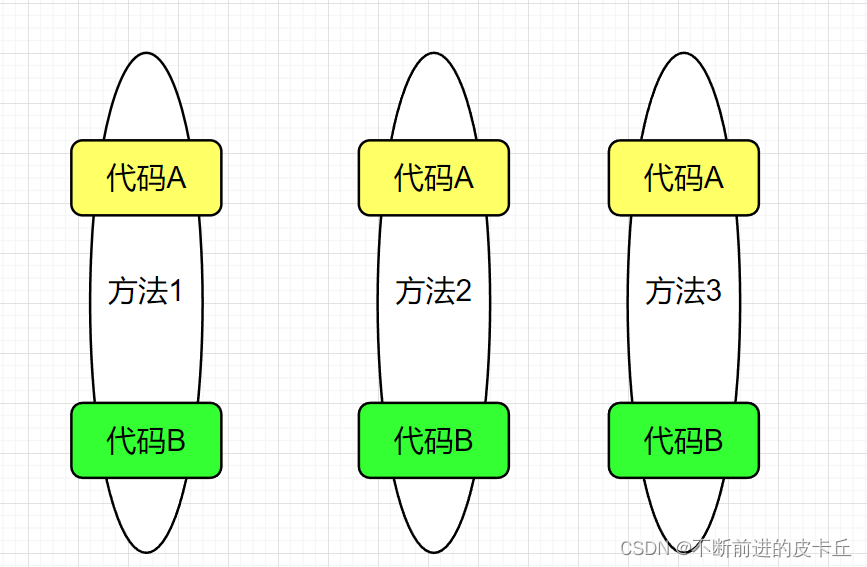
- 上面这种形式的代码维护性很差,代码复用性差
AOP的优点:- 可以降低模块之间的耦合性
- 提供代码的复用性
- 提高代码的维护性
- 集中管理非业务代码,便于维护
- 业务代码不受非业务代码影响,逻辑更加清晰
通过一个例子来理解AOP。
- 创建一个计算器接口Cal
public interface Cal {public int add(int num1,int num2);public int sub(int num1,int num2);public int mul(int num1,int num2);public int div(int num1,int num2);
}- 创建接口的实现类
public class CalImpl implements Cal {@Overridepublic int add(int num1, int num2) {int res = num1 + num2;return res;}@Overridepublic int sub(int num1, int num2) {int res = num1 - num2;return res;}@Overridepublic int mul(int num1, int num2) {int res = num1 * num2;return res;}@Overridepublic int div(int num1, int num2) {int res=num1/num2;return res;}
}
日志打印
- 在每个方法开始位置输出参数信息
- 在每个方法结束位置输出结果信息
对于计算器来说,加减乘除就是业务代码,日志打印就是非业务代码
AOP如何实现? 使用动态代理的方式来实现
代理首先要具备CalImpl的所有功能(实现同一个接口),并且在这个基础上,扩展出打印日志的功能
- 删除CalImpl方法中国所有打印日志的代码,只保留业务代码
- 创建MyInvocationHandler类(不是动态代理类),实现InvocationHandler接口,生成动态代理类 。动态代理类需要动态生成,需要获取到委托类的接口信息,根据这些接口信息动态生成一个代理类,然后再由ClassLoader用来把动态生成的类加载到JVM
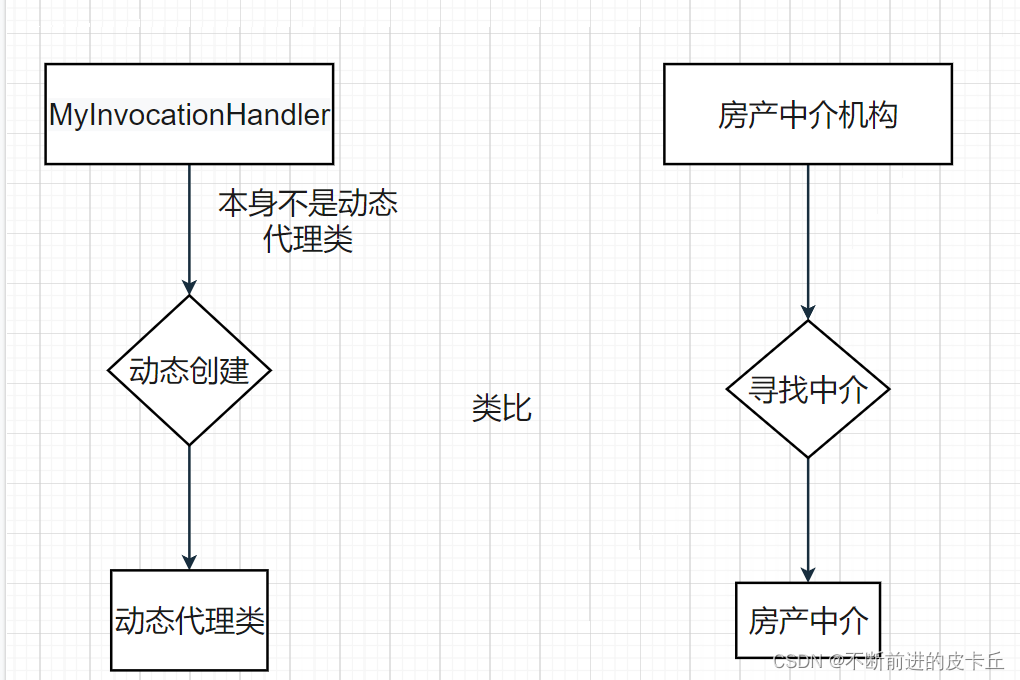
ClassLoader用来把动态生成的类加载到JVM中
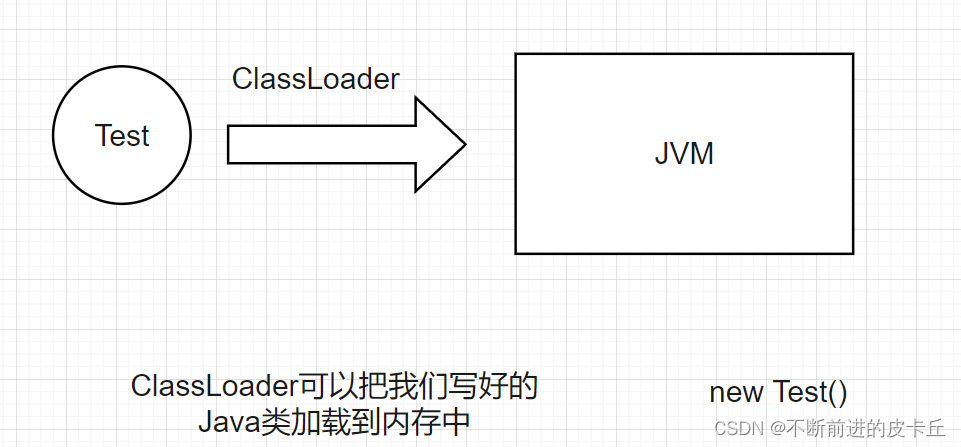
代理类需要有和委托类一样的功能,所以委托类和代理类需要实现同样的接口,因此,我们要获取到委托类的接口信息,根据这个接口信息就可以生成一个类,再通过ClassLoader加载到内存里面
public class MyInvocationHandler implements InvocationHandler {//委托对象private Object object = null;//返回代理对象public Object bind(Object object) {this.object = object;return Proxy.newProxyInstance(object.getClass().getClassLoader(),object.getClass().getInterfaces(),this);}@Overridepublic Object invoke(Object proxy, Method method, Object[] args) throws Throwable {//实现业务代码和非业务代码的解耦合System.out.println(method.getName()+"方法的参数是:"+ Arrays.toString(args));Object res = method.invoke(this.object, args);System.out.println(method.getName()+"方法的结果是:"+res);return res;}
}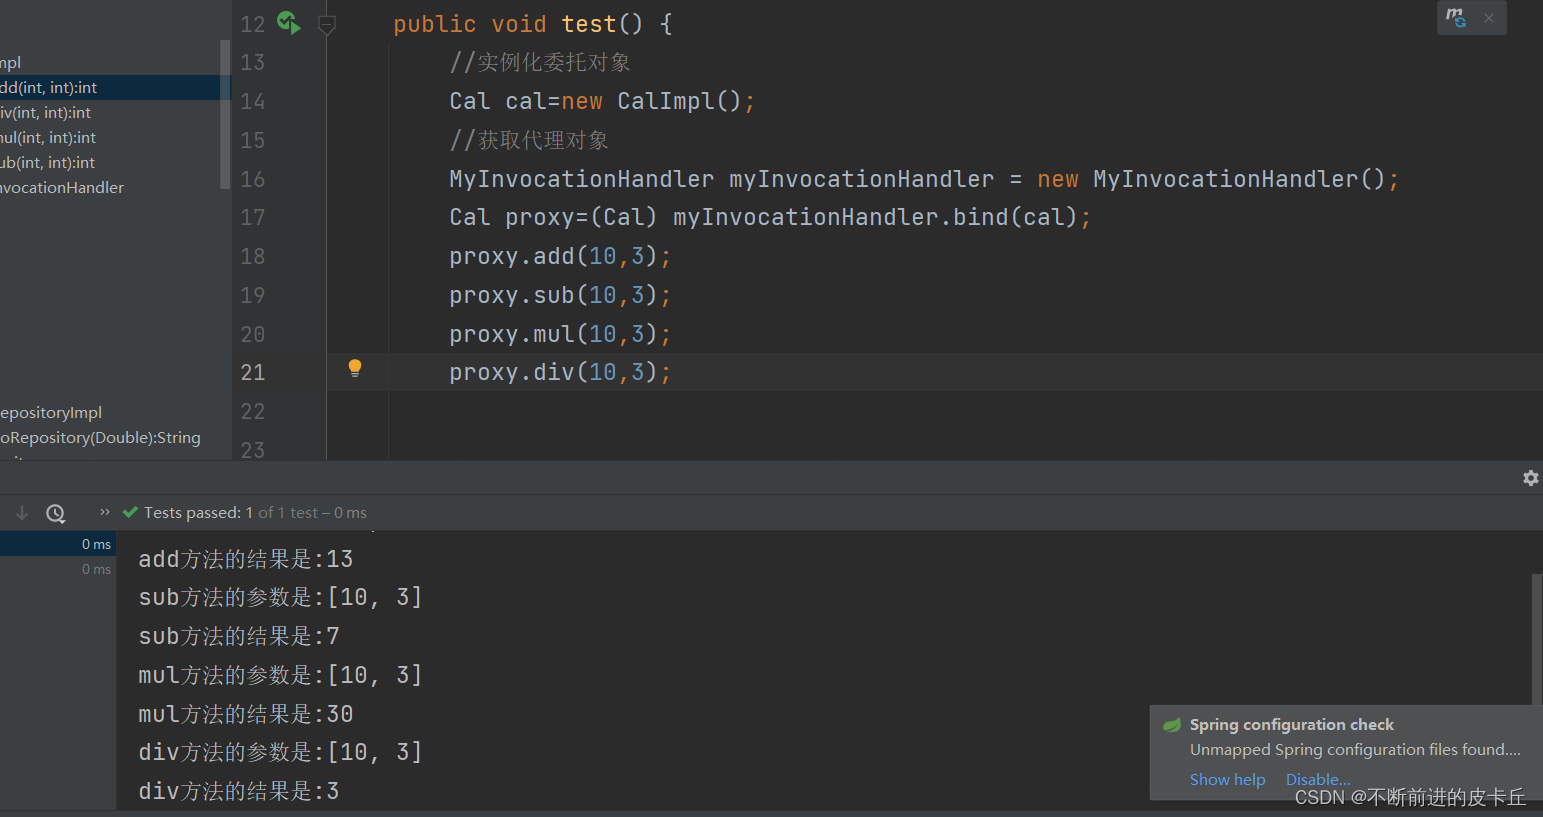
上述代码通过动态代理机制实现了业务代码和非业务代码的解耦合,这是Spring AOP的底层实现机制,真正使用 Spring AOP进行开发的时候,不需要这么复杂
Spring AOP的开发步骤
- 创建切面类 Loggerspect
@Component
@Aspect
public class LoggerAspect {@Before("execution(public int com.zyh.aop.impl.CalImpl.*(..))")public void before(JoinPoint joinPoint) {String name = joinPoint.getSignature().getName();Object[] args = joinPoint.getArgs();System.out.println(name + "方法的参数是:" + Arrays.toString(args));}@After("execution(* com.zyh.aop.impl.CalImpl.*(..))")public void after(JoinPoint joinPoint){String name = joinPoint.getSignature().getName();System.out.println(name+"方法执行完毕");}@AfterReturning(value = "execution(* com.zyh.aop.impl.CalImpl.*(..))",returning = "rs")public void afterReturning(JoinPoint joinPoint,Object rs){String name = joinPoint.getSignature().getName();System.out.println(name+"方法执行的结果是:"+rs);}
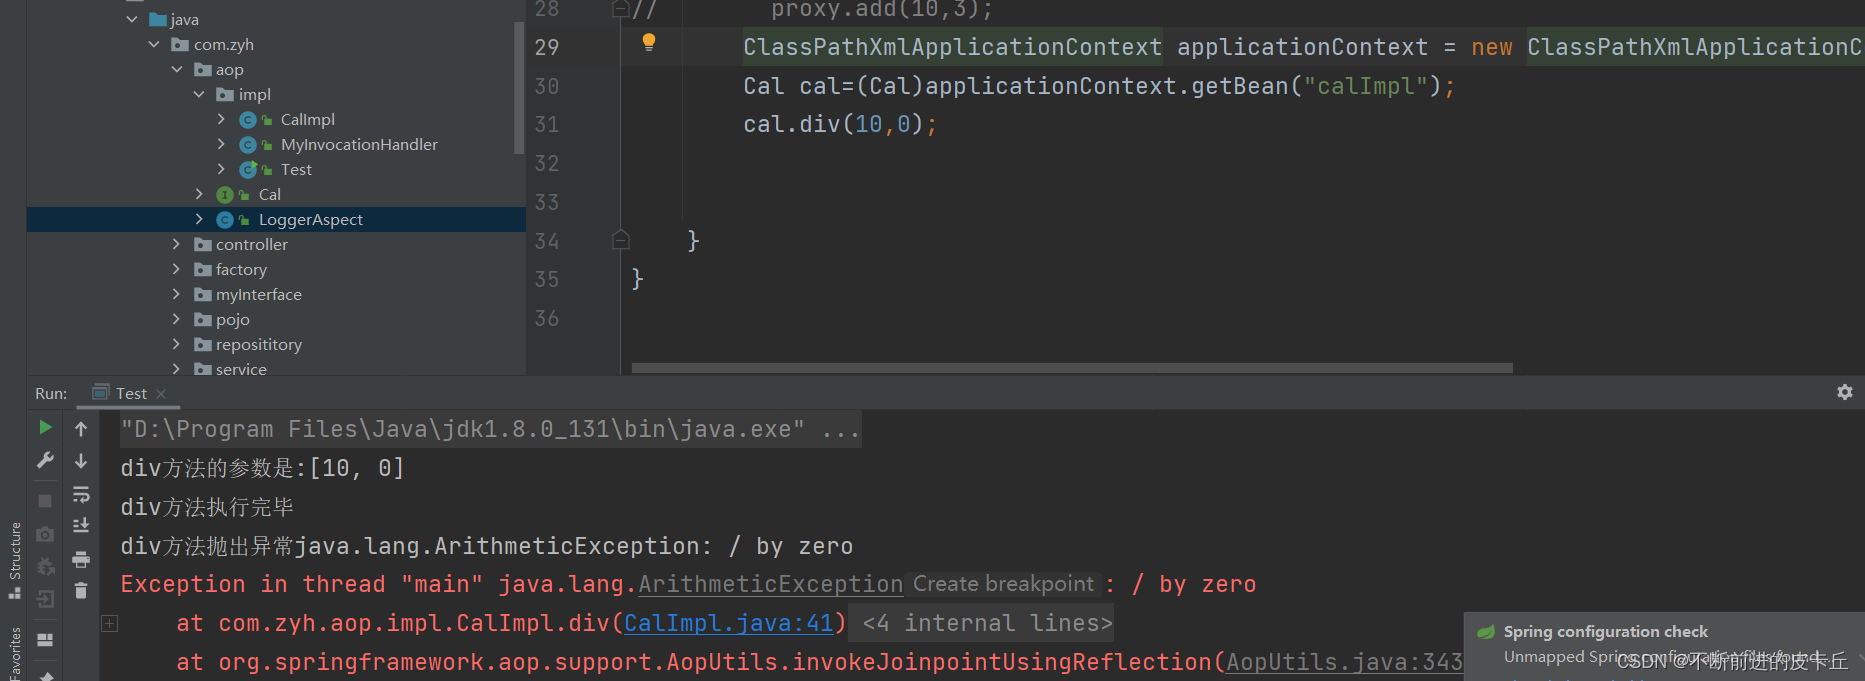
@AfterThrowing(value = "execution(* com.zyh.aop.impl.CalImpl.*(..))",throwing = "ex")public void afterThrowing(JoinPoint joinPoint,Exception ex){String name = joinPoint.getSignature().getName();System.out.println(name+"方法抛出异常"+ex);
}}- @Component,把切面类加载到IOC容器中
- @Aspect,表示该类是一个切面类
- @Before,表示方法的执行时机是在业务方法之前,execution表达式表示切入点是CalImpl中的所有方法
- @After,表示方法的执行时机是在业务方法结束以后,execution表达式表示切入点是CalImpl类中的方法
- @AfterReturning,表示方法的执行时机是在业务方法返回结果后,execution表达式表示切入点是CalImpl类中的方法,returning是把业务方法的返回值和切面类方法的形参进行绑定
- @AfterThrowing,表示方法的执行时机是在业务方法抛出异常后,execution表达式表示切入点是CalImpl类中的方法,throwing是把业务方法的异常和切面类方法的形参进行绑定
- 委托类也需要添加@Component
@Component
public class CalcImpl implements Calc{@Overridepublic int add(int a, int b) {int result=a+b;return result;}@Overridepublic int sub(int a, int b) {int result=a-b;return result;}@Overridepublic int mul(int a, int b) {int result= a*b;return result;}@Overridepublic int div(int a, int b) {int result= a/b;return result;}
}
3.spring-aop.xml
<?xml version="1.0" encoding="UTF-8"?>
<beans xmlns="http://www.springframework.org/schema/beans"xmlns:xsi="http://www.w3.org/2001/XMLSchema-instance"xmlns:context="http://www.springframework.org/schema/context"xmlns:aop="http://www.springframework.org/schema/aop"xsi:schemaLocation="http://www.springframework.org/schema/beans http://www.springframework.org/schema/beans/spring-beans.xsd http://www.springframework.org/schema/context https://www.springframework.org/schema/context/spring-context.xsd http://www.springframework.org/schema/aop http://www.springframework.org/schema/aop/spring-aop.xsd"><!-- 自动扫包--><context:component-scan base-package="com.zyh.aop"></context:component-scan>
<!--   为委托对象自动生成代理对象--><aop:aspectj-autoproxy></aop:aspectj-autoproxy>
</beans>
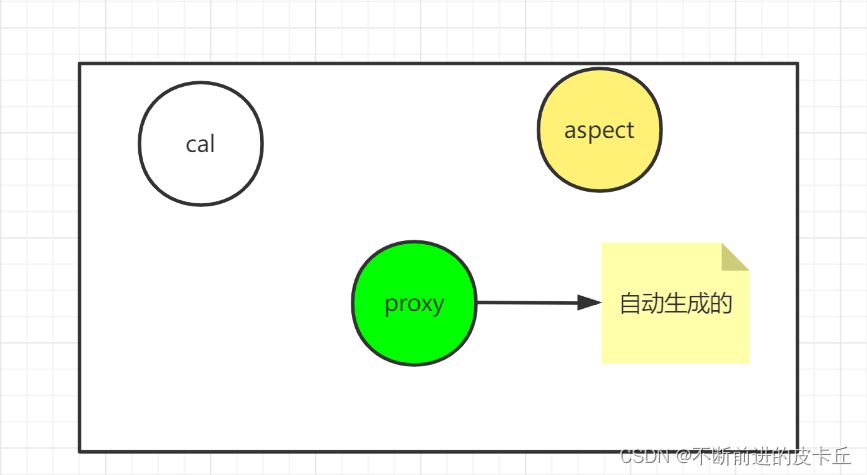
- aspectj-autoproxy ,Spring IOC容器会结合切面对象和委托对象自动生成动态代理对象,AOP底层就是通过动态代理机制来实现的
4.测试
AOP的概念
- 切面对象:根据切面抽象出来的对象,CalImpl所有方法中需要加入日志的部分LoggerAspect
- 通知:切面对象具体执行的代码,即非业务代码,LoggerAspect对象打印日志的代码
- 目标:被横切的对象,即CalImpl,把通知加入其中
- 代理:切面对象,通知,目标混合后的结果,即我们通过JDK动态代理机制创建的对象
- 连接点:需要被横切的位置,即通知要插入业务代码的具体位置