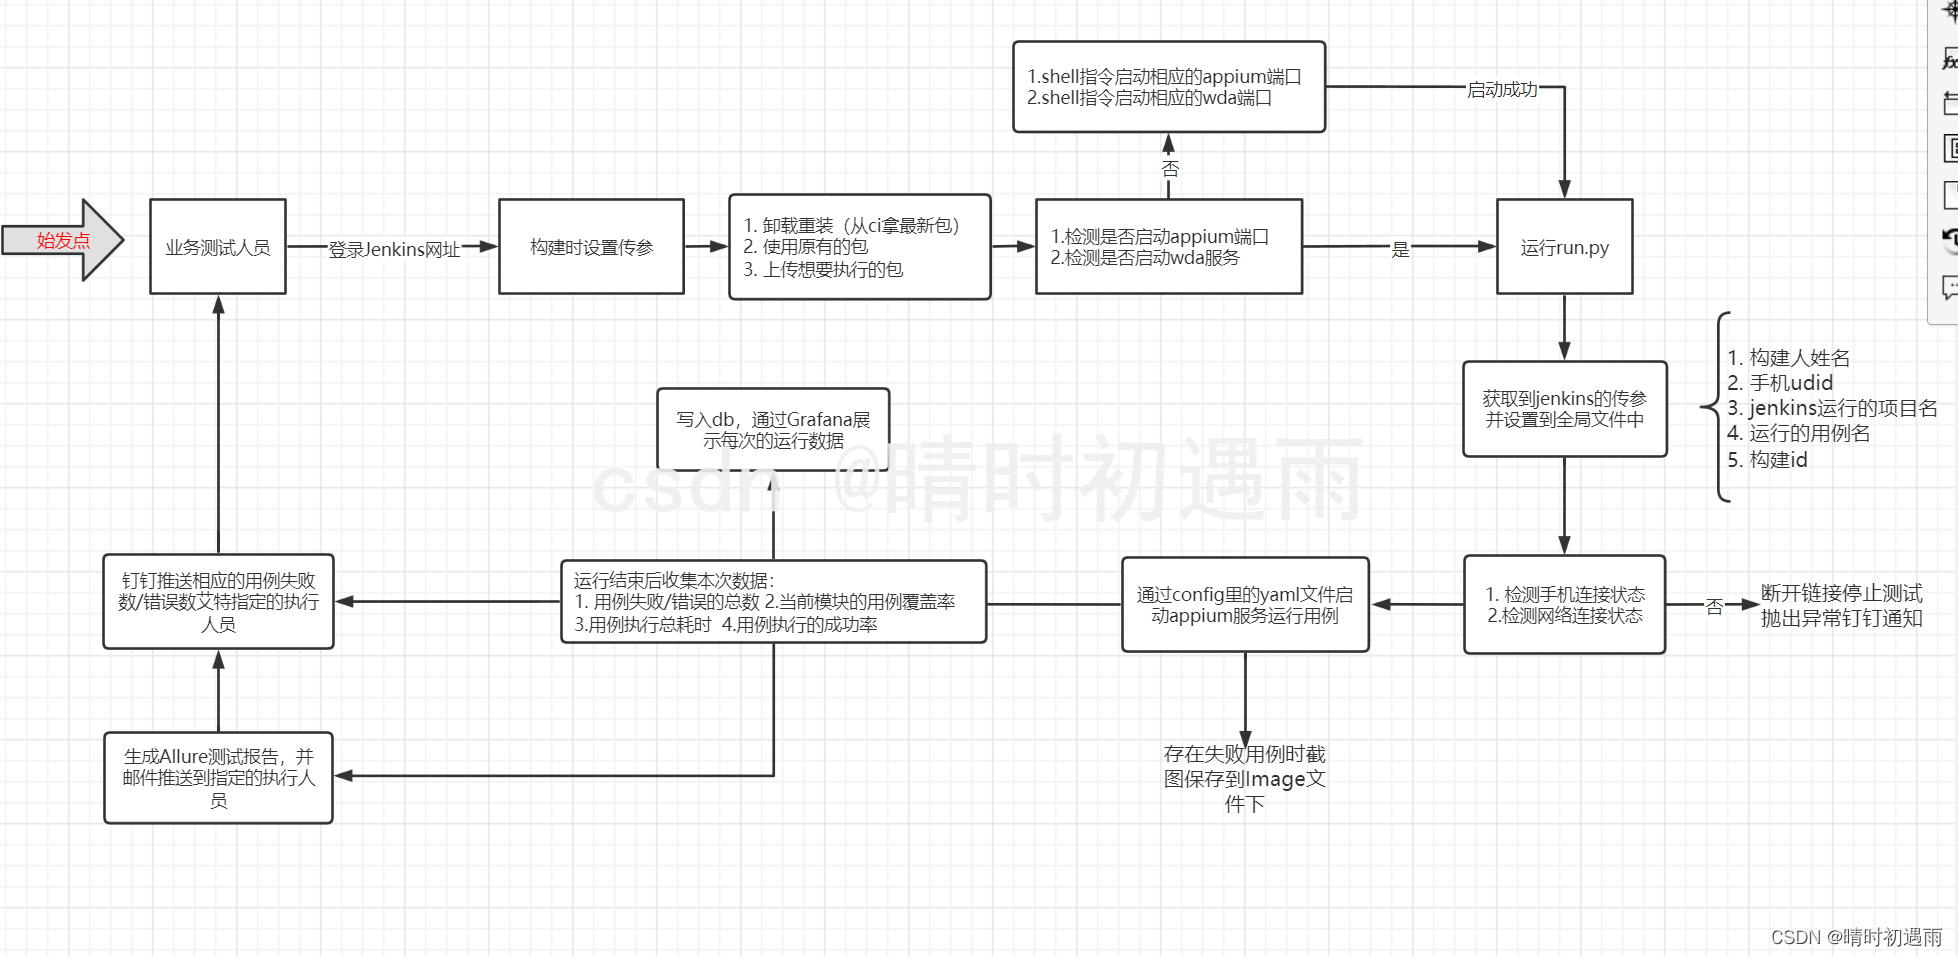
这一节学习一下ios中的tableview控件的简单使用
UiTableView使用必须实现连个协议 <UITableViewDataSource,UITableViewDelegate>来进行对tableview进行数据管理
1)创建一个新的项目learn3
2)添加一个定义模块view FragmentTableView 并实现连个接口协议 UITableViewDataSource,UITableViewDelegate 并定义一个局部的TableView变量
如FragmentTableView.h代码所示
#import <UIKit/UIKit.h>@interface FragmentTableView : UIView<UITableViewDataSource,UITableViewDelegate>{UITableView *mUiTableView;NSArray *datalist;
}
@end
3) 在 FragmentTableView.m 中对tableview进行管理
1.在 initWithFrame 中进行对 FragmentTableView.h 中声明好的tableview变量进行初始化
如.m中代码:
#import "FragmentTableView.h"@implementation FragmentTableView- (id)initWithFrame:(CGRect)frame
{self = [super initWithFrame:frame];if (self) {// Initialization code// 初始化局部变量mUiTableView = [[UITableView alloc] initWithFrame:CGRectMake(0, 0, 320, 480)];[mUiTableView setDataSource:self]; //设置数据源为本身[mUiTableView setDelegate:self]; // 设置协议为本身[self addSubview:mUiTableView]; // 添加tableview控件[mUiTableView release];// 初始化一些测试数据datalist = [[NSArray alloc]initWithObjects:@"上海",@"北京",@"广州",@"深圳",@"香港",@"澳门",@"杭州",@"西湖",@"重庆",@"南京", nil];}return self;
}-(void)dealloc{[datalist release];[super dealloc];
}
/*
// Only override drawRect: if you perform custom drawing.
// An empty implementation adversely affects performance during animation.
- (void)drawRect:(CGRect)rect
{// Drawing code
}
*/@end
2.接下来我们来实现必要的接口
(1)在没有看api的 我其实也不知道接下来怎么做了
所以还是了解一下UITableview :command+鼠标点击去可以看到他也有实现的
搜 @protocol (command+f)可以看到也定义了几个协议 UITableViewDataSource,UITableViewDelegate
我们关心的 是要做什么 接下来我们就要找 必须实现的 接口协议了继续搜 @required 可以看到下面有连个方法 如下面代码,这样我们就知道该怎么做了 必须实现的
@protocol UITableViewDataSource<NSObject>@required- (NSInteger)tableView:(UITableView *)tableView numberOfRowsInSection:(NSInteger)section;// Row display. Implementers should *always* try to reuse cells by setting each cell's reuseIdentifier and querying for available reusable cells with dequeueReusableCellWithIdentifier:
// Cell gets various attributes set automatically based on table (separators) and data source (accessory views, editing controls)- (UITableViewCell *)tableView:(UITableView *)tableView cellForRowAtIndexPath:(NSIndexPath *)indexPath;实现 UITableViewDataSource 第一个必须实现的方法
- (NSInteger)tableView:(UITableView *)tableView numberOfRowsInSection:(NSInteger)section{// 从本方法的名称定义 可以看到是所有行的number// 返回数组的总数return datalist.count;
}- (UITableViewCell *)tableView:(UITableView *)tableView cellForRowAtIndexPath:(NSIndexPath *)indexPath{// 返回 UITableViewCell 对象 根据方法名称意思是 indexPath cell 每行上 就是每行cell的填充// 先初始化一个 UITableViewCell 这次初始化就不和以前一样 规定他的坐标位置了 直接定义他的样式 并设置标识UITableViewCell *cell = [[UITableViewCell alloc] initWithStyle:UITableViewCellStyleDefault reuseIdentifier:[NSString stringWithFormat:@"cell"]];NSUInteger row = [indexPath row]; // 初始化一个无符号intNSLog(@"row:%i",row);cell.textLabel.text = [datalist objectAtIndex:row];return cell;
}ok该实现的我们也都写好了 接下来在 Viewcontroller.m viewDidLoad 方法中添加FragmentUItableview进行显示
FragmentTableView *tableView = [[FragmentTableView alloc]initWithFrame:CGRectMake(0, 0, 320, 300)];[self.view addSubview:tableView];[tableView release]
4)接下来对上面代码进行优化并设计的复杂一点
1.在 - (UITableViewCell *)tableView:(UITableView *)tableView cellForRowAtIndexPath:(NSIndexPath *)indexPath 接口中进行修改 如下代码
- (UITableViewCell *)tableView:(UITableView *)tableView cellForRowAtIndexPath:(NSIndexPath *)indexPath{
//    // 返回 UITableViewCell 对象 根据方法名称意思是 indexPath cell 每行上 就是每行cell的填充
//    // 先初始化一个 UITableViewCell 这次初始化就不和以前一样 规定他的坐标位置了 直接定义他的样式 并设置标识
//    UITableViewCell *cell = [[UITableViewCell alloc] initWithStyle:UITableViewCellStyleDefault reuseIdentifier:[NSString stringWithFormat:@"cell"]];
//    NSUInteger row = [indexPath row]; // 初始化一个无符号int
//    NSLog(@"row:%i",row);
//    cell.textLabel.text = [datalist objectAtIndex:row];
//    return cell;// command+/ 进行注释上面的代码// 接下来进行优化上面的代码// 定义一个标识static NSString *stringIdentifier = @"cell";int row = [indexPath row];// 声明一个UITableViewCell 并接受 参数tableview中的一个标识cellUITableViewCell *cell = [tableView dequeueReusableCellWithIdentifier:stringIdentifier];// 判断cell 是否为空 如果为空进行初始化 这样的好处是节省系统资源if (cell == nil) {cell = [[[UITableViewCell alloc] initWithStyle:UITableViewCellStyleDefault reuseIdentifier:stringIdentifier]autorelease];}// 接下来设置cell显示内容 可以多添加一点控件进去 我们对这个城市列表加上数字编号 并加一些背景等等// 和上面一样设置显示内容cell.textLabel.text = [datalist objectAtIndex:row];[cell.textLabel setTextAlignment:NSTextAlignmentCenter]; // 设置文字居中显示// 设置cell点击背景 这个只提供了 setSelectedBackgroundView方法 所以必须设置图片 我就随便截了个图用用吧 新建 New Group 文件夹命名为 images 鼠标右键添加截好的图片UIImageView *selectBgView = [[UIImageView alloc] initWithFrame:CGRectMake(0, 0, 320, 75/2)];[selectBgView setImage:[UIImage imageNamed:@"bg_item_red.png"]];[cell setSelectedBackgroundView:selectBgView];[selectBgView release];// 添加地区编号 背景图片UIImageView *idNumBgView = [[UIImageView alloc] initWithFrame:CGRectMake(20, (75-45)/4, 45/2, 45/2)];[idNumBgView setImage:[UIImage imageNamed:@"bg_item_circle.png"]];[cell addSubview:idNumBgView];[idNumBgView release];// 添加编号UILabel *idNumLable = [[UILabel alloc]initWithFrame:CGRectMake(20, (75-45)/4, 45/2, 45/2)];[idNumLable setText:[NSString stringWithFormat:@"%i",row]];[idNumLable setTextAlignment:NSTextAlignmentCenter];[idNumLable setFont:[UIFont systemFontOfSize:12]];[idNumLable setBackgroundColor:[UIColor clearColor]];[cell addSubview:idNumLable];return cell;
}


运行效果
2.接下来进行添加点击后获得item下标值 这样更符合我们需求
(1)接下来我们实现 UITableviewDelegate 中的 用户改变item选择方法
// Called after the user changes the selection.
- (void)tableView:(UITableView *)tableView didSelectRowAtIndexPath:(NSIndexPath *)indexPath;
// Called after the user changes the selection.
- (void)tableView:(UITableView *)tableView didSelectRowAtIndexPath:(NSIndexPath *)indexPath{int row = [indexPath row];if (row != [datalist count]) {UIAlertView *alert = [[UIAlertView alloc] initWithTitle:@"温馨提示"message:[NSString stringWithFormat:@"您选择的是:%@",[datalist objectAtIndex:row]]delegate:selfcancelButtonTitle:@"确定"otherButtonTitles:nil];[alert show];[alert release];}
}
运行结果

5)总结
1.这节专门学习了UITableview的实现具体步骤 及 UITableview item 简单的布局