文章目录
- 1、创建自己的测试号
- 2、测试号管理信息填写(注意仔细一步步对照)
- 3、手动获取openid
- 4、使用SDK获取openid
1、创建自己的测试号
通过申请链接:https://mp.weixin.qq.com/debug/cgi-bin/sandbox?t=sandbox/login
微信扫码登录
2、测试号管理信息填写(注意仔细一步步对照)
1.测试号信息
创建登录自己的测试号之后,会自动给你 appID和appsecret,用于后面微信开发的使用
2.接口配置信息

-
URL配置信息参考:可以使用本地的也可以使用外网穿透方法
https://blog.csdn.net/mys_mys/article/details/123691740
https://blog.csdn.net/qq_41583828/article/details/82930289
https://blog.csdn.net/qq_34096082/article/details/79985141 -
Controller测试代码:
package com.mys.controller;import org.slf4j.Logger;
import org.slf4j.LoggerFactory;
import org.springframework.stereotype.Controller;
import org.springframework.web.bind.annotation.RequestMapping;
import org.springframework.web.bind.annotation.RequestMethod;
import org.springframework.web.bind.annotation.RequestParam;
import org.springframework.web.bind.annotation.ResponseBody;import javax.servlet.http.HttpServletRequest;/*** @author mys* @date 2022/3/25 22:07*/
@Controller
@RequestMapping("/sign")
public class GetWxSginController {private  Logger logger = LoggerFactory.getLogger(GetWxSginController.class);@ResponseBody@RequestMapping(value = "/test", method = RequestMethod.GET, produces = { "application/json;charset=utf-8" })public String getWxUserInfo(HttpServletRequest request,@RequestParam(required = false) String echostr,@RequestParam(required = false) String signature,@RequestParam(required = false) String timestamp,@RequestParam(required =false) String nonce) {try {//只需要把微信请求的 echostr, 返回给微信就可以了logger.info("测试来过===================" + echostr);logger.info("测试来过===================" + signature);logger.info("测试来过===================" + timestamp);logger.info("测试来过===================" + nonce);return echostr;} catch (Exception e) {logger.info("测试微信公众号的接口配置信息发生异常:", e);return "错误!!!";}}
}
3.JS接口安全域名
此处还有点问题,后面具体使用时再来完善,因为一个月只有三次修改机会,不敢随便修改


4.微信扫码登录测试公众号
注意:此处一定要用使用的微信扫码,登录关注公众号才能使用

5.修改网页授权获取用户基本信息


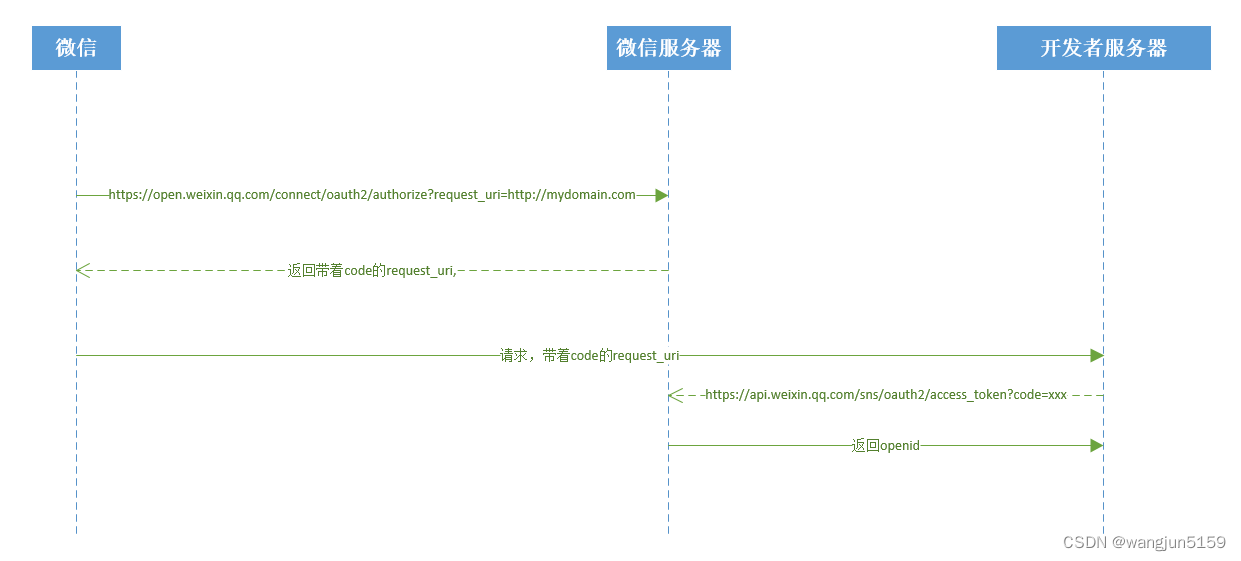
3、手动获取openid
查看微信开放文档:
链接:https://developers.weixin.qq.com/doc/offiaccount/OA_Web_Apps/Wechat_webpage_authorization.html
文档说明中使用步骤:

1.获取code
用微信访问链接需要修改的部分:
填写自己的appid,redirect_uri,scope可选snsapi_base或者snsapi_userinfo,具体作用可以查看文档,写的很详细。

redirect_uri与自己写的测试代码有关,就是用测试代码的访问链接,比如我的链接是:

写一个Controller进行测试,测试代码如下:
package com.mys.controller;import lombok.extern.slf4j.Slf4j;
import org.springframework.web.bind.annotation.GetMapping;
import org.springframework.web.bind.annotation.RequestMapping;
import org.springframework.web.bind.annotation.RequestParam;
import org.springframework.web.bind.annotation.RestController;
import org.springframework.web.client.RestTemplate;/*** @author mys* @date 2022/3/23 15:02*/
@RestController
@RequestMapping("/weixin")
@Slf4j
public class WeixinController {@GetMapping("/auth")public void auth(@RequestParam("code") String code) {log.info("进入auth方法");log.info("code={}", code);}
}
运行结果如下:

2.获取access_token
第1步获取到code之后,用下面的请求链接,获取access_token,会返回一个json格式的数据,其中里面就包含了openid,这个很重要的信息,用于唯一标识用户
链接需要修改的地方:填写自己的appid、secret,上面测试号管理信息中有,code换成第1步获取到的code,具体可查看测试代码

测试代码:
package com.mys.controller;import lombok.extern.slf4j.Slf4j;
import org.springframework.web.bind.annotation.GetMapping;
import org.springframework.web.bind.annotation.RequestMapping;
import org.springframework.web.bind.annotation.RequestParam;
import org.springframework.web.bind.annotation.RestController;
import org.springframework.web.client.RestTemplate;/*** @author mys* @date 2022/3/23 15:02*/
@RestController
@RequestMapping("/weixin")
@Slf4j
public class WeixinController {@GetMapping("/auth")public void auth(@RequestParam("code") String code) {log.info("进入auth方法");log.info("code={}", code);String url = "https://api.weixin.qq.com/sns/oauth2/access_token?appid=自己的appid&secret=自己的secret&code="+ code + "&grant_type=authorization_code";RestTemplate restTemplate = new RestTemplate();String response = restTemplate.getForObject(url, String.class);log.info("response={}", response);}
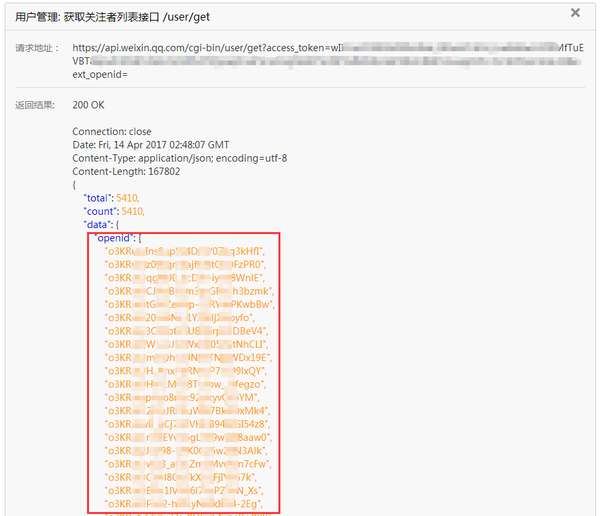
}运行结果:

复制出来的json数据如下:

4、使用SDK获取openid
目前已经有开源写好了一些微信开发的相关操作,我们可以直接引入maven直接使用即可,官方也写了很详细的参考文档:https://gitee.com/binary/weixin-java-tools
主要步骤:
1.配置
2.调用方法
1.引入依赖 pom.xml
<dependency><groupId>com.github.binarywang</groupId><artifactId>weixin-java-mp</artifactId><version>4.2.0</version>
</dependency>
2.修改配置文件 application.yml,并写配置

WechatAccountConfig
package com.mys.config;import lombok.Data;
import org.springframework.boot.context.properties.ConfigurationProperties;
import org.springframework.stereotype.Component;/*** @author mys* @date 2022/3/23 15:53*/
@Data
@Component
@ConfigurationProperties(prefix = "wechat")
public class WechatAccountConfig {/*** 公众平台id*/private String mpAppId;/*** 公众平台密钥*/private String mpAppSecret;
}
WechatMpConfig
package com.mys.config;import me.chanjar.weixin.mp.api.WxMpConfigStorage;
import me.chanjar.weixin.mp.api.WxMpInMemoryConfigStorage;
import me.chanjar.weixin.mp.api.WxMpService;
import me.chanjar.weixin.mp.api.impl.WxMpServiceImpl;
import org.springframework.beans.factory.annotation.Autowired;
import org.springframework.context.annotation.Bean;
import org.springframework.stereotype.Component;/*** @author mys* @date 2022/3/23 15:47*/
@Component
public class WechatMpConfig {@Autowiredprivate WechatAccountConfig accountConfig;@Beanpublic WxMpService wxMpService() {WxMpService wxMpService = new WxMpServiceImpl();wxMpService.setWxMpConfigStorage(wxMpConfigStorage());return wxMpService;}@Beanpublic WxMpConfigStorage wxMpConfigStorage() {WxMpInMemoryConfigStorage wxMpConfigStorage = new WxMpInMemoryConfigStorage();wxMpConfigStorage.setAppId(accountConfig.getMpAppId());wxMpConfigStorage.setSecret(accountConfig.getMpAppSecret());return wxMpConfigStorage;}
}
3.查看文档,编写代码
文档链接:https://github.com/Wechat-Group/WxJava/wiki/%E5%85%AC%E4%BC%97%E5%8F%B7%E5%BC%80%E5%8F%91%E6%96%87%E6%A1%A3
也就是上面参考文档里面的一个子链接,下面代码就是一个获取openid的案例,其他学习可查看文档,写的很全面。

package com.mys.controller;import com.mys.enums.ResultEnum;
import com.mys.exception.SellException;
import lombok.extern.slf4j.Slf4j;
import me.chanjar.weixin.common.api.WxConsts;
import me.chanjar.weixin.common.exception.WxErrorException;
import me.chanjar.weixin.mp.api.WxMpService;
import me.chanjar.weixin.mp.bean.result.WxMpOAuth2AccessToken;
import org.springframework.beans.factory.annotation.Autowired;
import org.springframework.stereotype.Controller;
import org.springframework.web.bind.annotation.GetMapping;
import org.springframework.web.bind.annotation.RequestMapping;
import org.springframework.web.bind.annotation.RequestParam;import java.net.URLEncoder;/*** @author mys* @date 2022/3/23 15:44*/
@Controller
@RequestMapping("/wechat")
@Slf4j
public class WechatController {@Autowiredprivate WxMpService wxMpService;@GetMapping("/authorize")public String authorize(@RequestParam("returnUrl") String returnUrl) {//先在application.xml中配置appid和secret,再调用方法//1.构造网页授权urlString url = "http://xqmys.natapp1.cc/sell/wechat/userInfo";//调用此方法跳转到redirectUrl便于观看结果String redirectUrl = wxMpService.oauth2buildAuthorizationUrl(url, WxConsts.OAUTH2_SCOPE_BASE, URLEncoder.encode(returnUrl));return "redirect:" + redirectUrl;}@GetMapping("/userInfo")public String userInfo(@RequestParam("code") String code,@RequestParam("state") String returnUrl) {WxMpOAuth2AccessToken wxMpOAuth2AccessToken = new WxMpOAuth2AccessToken();try {//2.获取access tokenwxMpOAuth2AccessToken = wxMpService.oauth2getAccessToken(code);} catch (WxErrorException e) {log.error("【微信网页授权】{}", e);throw new SellException(ResultEnum.WECHAT_MP_ERROR.getCode(), e.getError().getErrorMsg());}//3.获取openidString openId = wxMpOAuth2AccessToken.getOpenId();return "redirect:" + returnUrl + "?openid=" + openId;}
}
调试运行结果:

很想感叹一下,看中文的注释太清晰了!

总结:以上便是自己通过看视频、查文章学习的步骤,花了挺长时间才搞定的。一开始听说是必须要微信公众号的服务号才能使用,但是服务号个人不能申请,必须要有营业执照之类的,最后查到可以使用微信管理的测试号,并且测试号的一些权限接口还挺多的,对于大部分开发来说是足够的。如果上述有问题,欢迎大家指正,非常感谢!