上篇博客【ZED-2】基于WebSockets库,通过多线程方式推送数据流_WXG1011的博客-CSDN博客采用多线程方式,基于websockets库实现数据流的推送,这篇博客主要实现将前端(nx板)代码移植到flask框架中,通过http方式展示,便于其他客户端访问,主要难点在于flask app的ip地址与websockets ip地址冲突。
基础介绍-flask框架
注:该Demo解决了通过http访问时,视频流卡顿的问题。
flask_demo.py
# 测试rtsp视频流在前端的稳定性
from flask import Flask, render_template, Response
import cv2
import queue
import threading
import timeapp = Flask(__name__)@app.route('/video_feed')
def video_feed():# 通过将一帧帧的图像返回,就达到了看视频的目的。multipart/x-mixed-replace是单次的http请求-响应模式,如果网络中断,会导致视频流异常终止,必须重新连接才能恢复return Response(Display(), mimetype='multipart/x-mixed-replace; boundary=frame')@app.route('/')
def index():return render_template('index.html')q = queue.Queue()def Receive():print("start Reveive")cap = cv2.VideoCapture(0)# cap = cv2.VideoCapture("rtsp://admin:sdiit888@10.1.93.5/Streaming/Channels/1")while True:q.put(cap.read()[1])# 移除队列中的旧图q.get() if q.qsize() > 1 else time.sleep(0.01)def Display():print("Start Displaying")while True:if q.empty() != True:frame = q.get()ret, buffer = cv2.imencode('.jpg', frame)frame = buffer.tobytes()# 使用yield语句,将帧数据作为响应体返回,content-type为image/jpegyield (b'--frame\r\n'b'Content-Type: image/jpeg\r\n\r\n' + frame + b'\r\n')if __name__ == '__main__':threads = [threading.Thread(target=Receive), threading.Thread(target=Display)]for t in threads:t.start()for t in threads:t.join()threading.Thread(target=app.run(debug=True)).start()
index.html
<!DOCTYPE html>
<html lang="en">
<head><meta charset="UTF-8"><title>AI功能展示</title><style>.divcss5{text-align: center}</style>
</head>
<body><h1 align="center"><font size="6" face="arial" color="black">视频展示</font></h1><div class="divcss5"><img src="{{ url_for('video_feed') }}" height="900px" width="3400px">#}</div><h1 align="center"><font size="5" face="arial" color="black">*****</font></h1>
</body>
</html>
下面进入本博客重点!!!
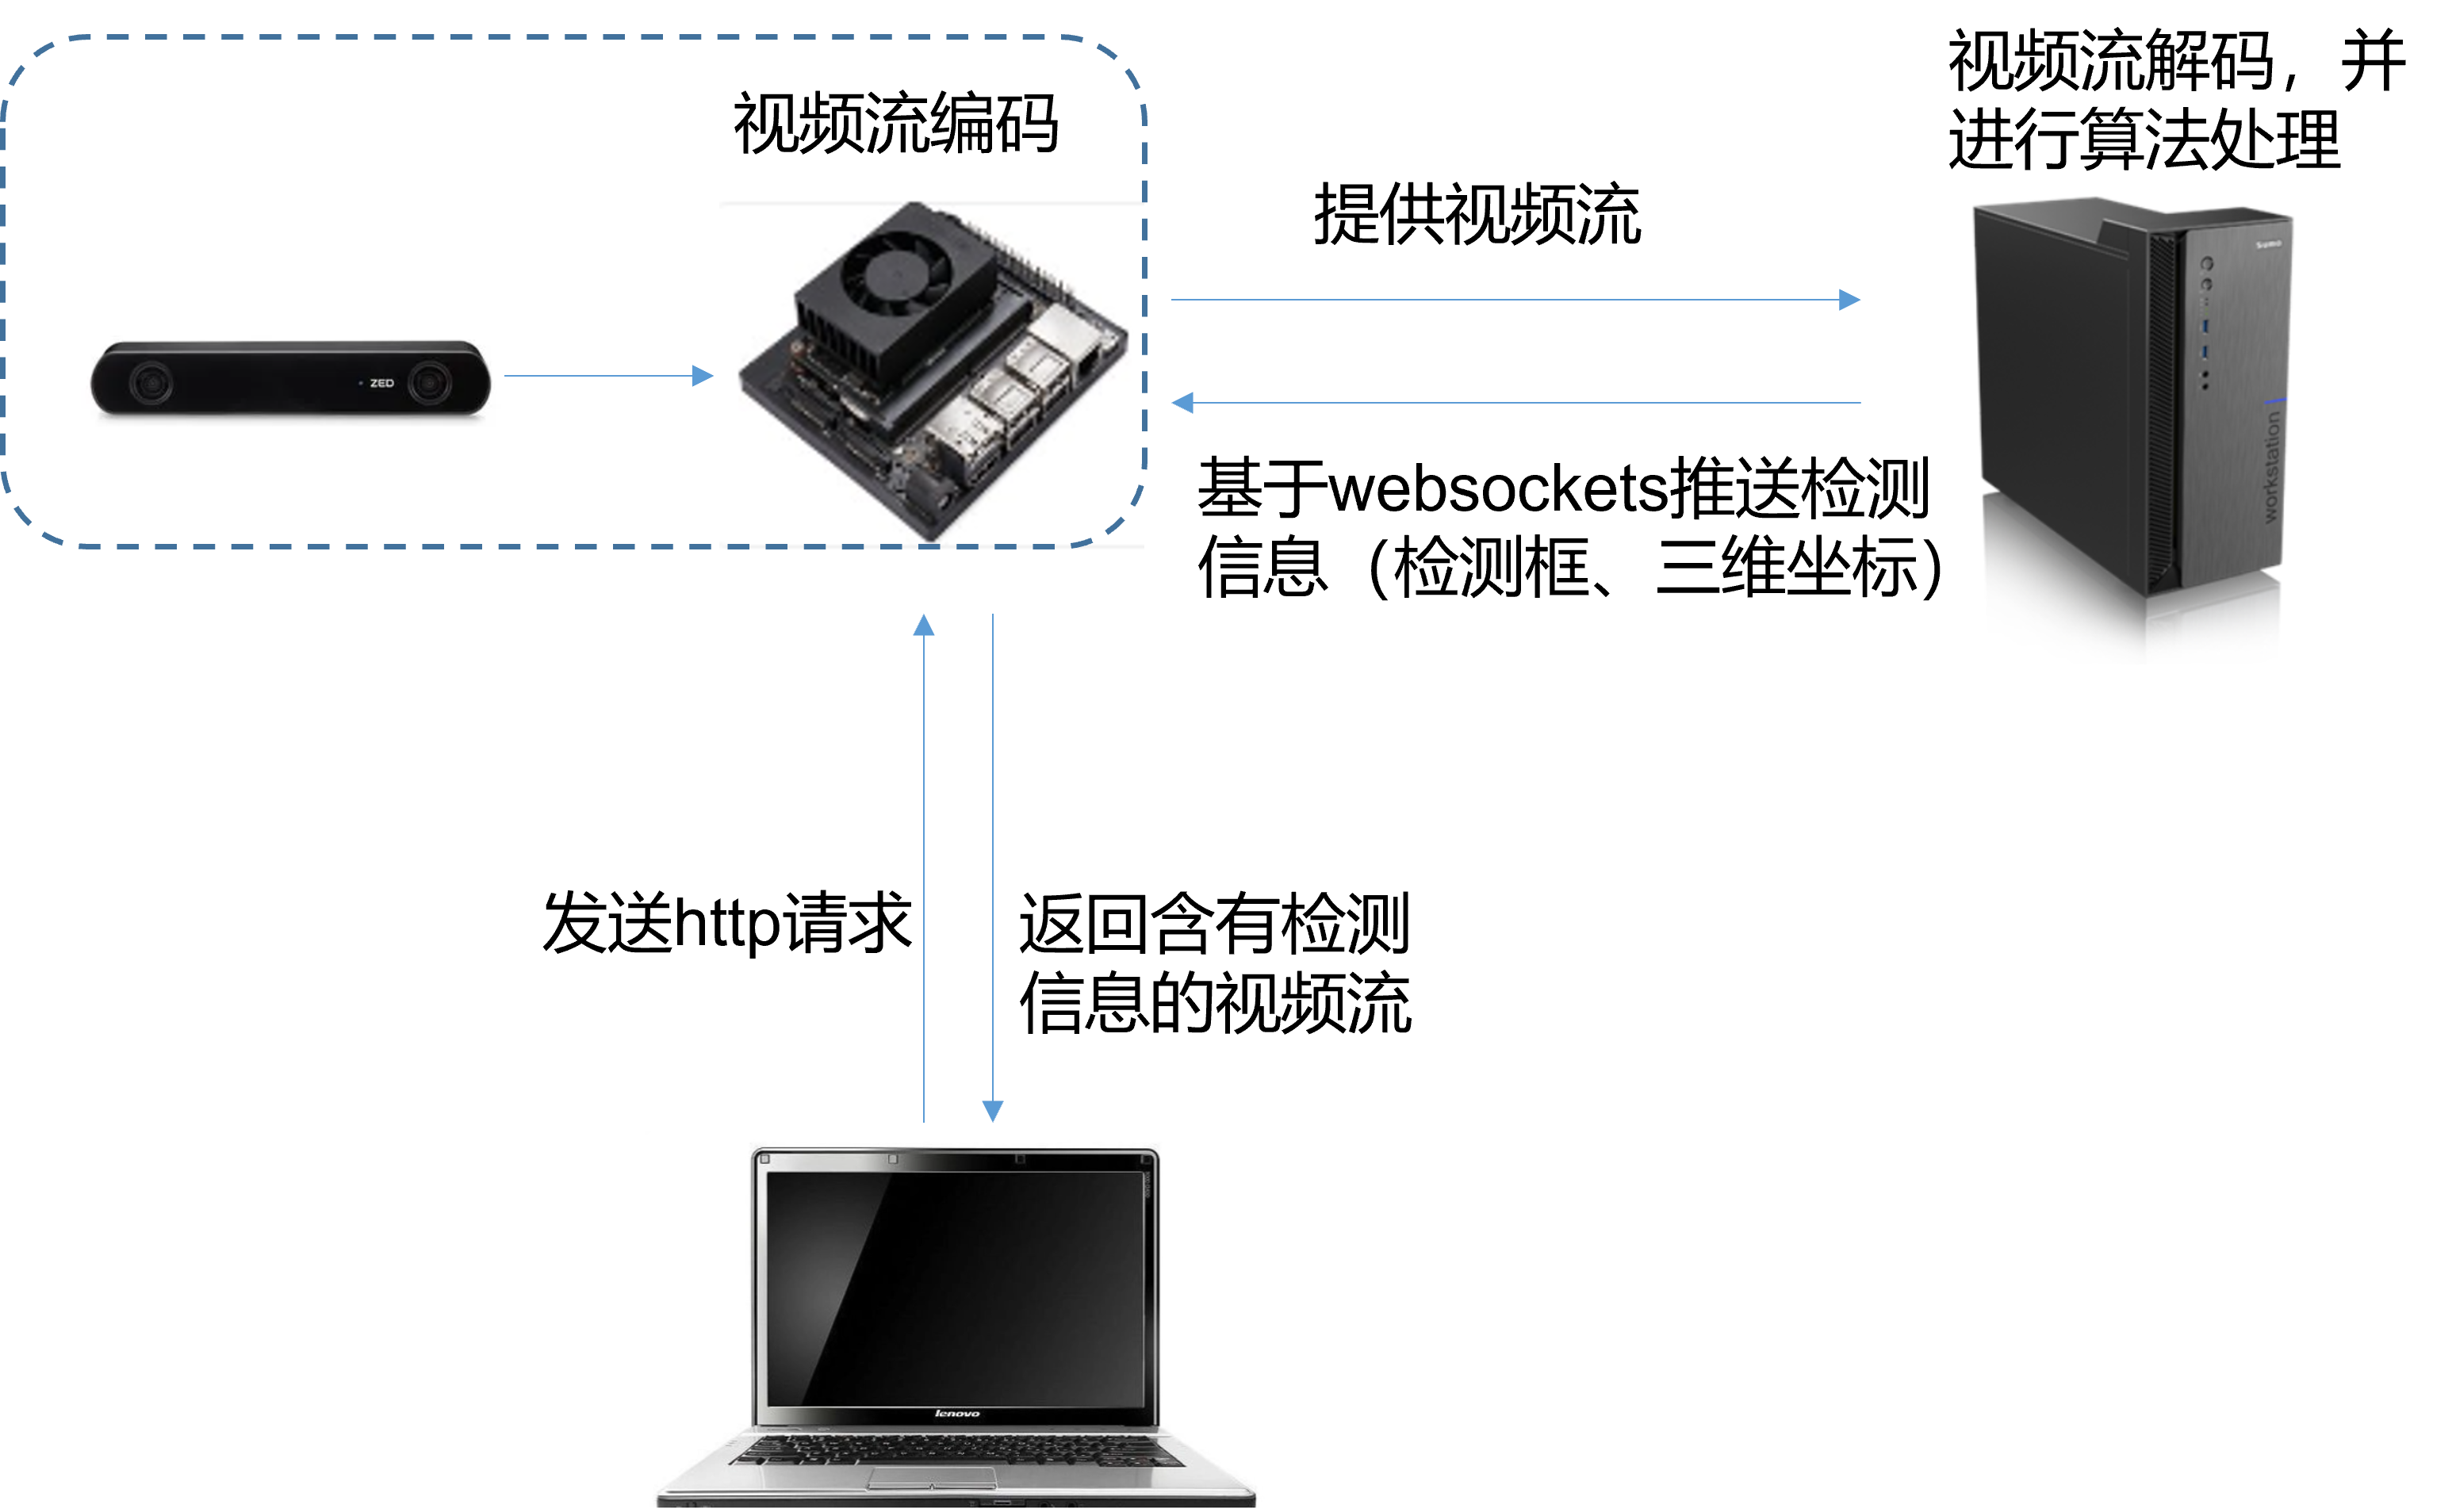
nx板代码,为后端(服务器)提供视频流,并叠加显示推送的检测信息。
from flask import Flask, render_template, Response
import asyncio
import websockets
import threading
import pyzed.sl as sl
import cv2
import json
import numpy as npreceive_dict = []
receive_location = []
receive_count = ""
img = Noneinit = sl.InitParameters()
init.camera_resolution = sl.RESOLUTION.HD720
init.depth_mode = sl.DEPTH_MODE.NONE
cam = sl.Camera()
status = cam.open(init)
if status != sl.ERROR_CODE.SUCCESS:print(repr(status))exit(1)runtime = sl.RuntimeParameters()
mat = sl.Mat()stream = sl.StreamingParameters()
stream.codec = sl.STREAMING_CODEC.H264
stream.bitrate = 4000
status = cam.enable_streaming(stream)
if status != sl.ERROR_CODE.SUCCESS:print(repr(status))exit(1)print("  Quit : CTRL+C\n")# Websocket服务端
class WebsocketChatServer():def __init__(self):passasync def run(self, port):start_server = websockets.serve(self.handler, "", port, ping_interval=None)await start_serverprint(f'  > server start ok! on port {port}')await asyncio.Future()           # run foreverasync def handler(self, websocket, path):global receive_dict, receive_location, receive_countasync for message in websocket:receive_data = messagereceive_count = json.loads(receive_data)["person_count"]receive_dict = json.loads(receive_data)["detection_box"]receive_location = json.loads(receive_data)["location"]# print(receive_count)# 初始化和定义flask
app = Flask(__name__)@app.route('/')
def index():test_dict = 'Welcome to use the impediment perception web service!'return test_dict@app.route("/demo")
def demo():return render_template("index.html")@app.route("/video_feed")
def video_feed():return Response(generate(), mimetype="multipart/x-mixed-replace; boundary=frame")# main函数主要实现向后端(服务器)推送视频流,并在视频流上叠加后端(服务器)推送的检测信息
def main():global imgwhile True:err = cam.grab(runtime)if (err == sl.ERROR_CODE.SUCCESS):cam.retrieve_image(mat, sl.VIEW.LEFT)# image = cv2.cvtColor(mat.get_data(), cv2.COLOR_RGB2BGR)# image_cv = mat.get_data()# image = image_cv[:, :, 0:3]image = mat.get_data()if len(receive_location) != 0 and len(receive_dict) != 0:if len(receive_location) != 1:last_data = receive_location[len(receive_location)-1]for i in range(len(last_data)):location_dict = last_data[i]# dict2strlocation_str = json.dumps(location_dict)# str2jsonlocation_json = json.loads(location_str)# print(location_json)if receive_count != 0:text = "(" + str(location_json['x']) + " " + str(location_json['y']) + " " + str(location_json['z']) + ")"cv2.circle(image, (int(location_json['x0']), int(location_json['y0'])), 2, (0, 0, 255),thickness=3)cv2.putText(image, text, (int(location_json['x0']), int(location_json['y0'])),cv2.FONT_HERSHEY_PLAIN, 2.0, (0, 0, 255), 2)else:if len(receive_location[0]) != 0:# print(receive_location)location_str = json.dumps(receive_location[0][0])location_json = json.loads(location_str)if receive_count != 0:text = "(" + str(location_json['x']) + " " + str(location_json['y']) + " " + str(location_json['z']) + ")"cv2.circle(image, (int(location_json['x0']), int(location_json['y0'])), 2, (0, 0, 255),thickness=3)cv2.putText(image, text, (int(location_json['x0']), int(location_json['y0'])),cv2.FONT_HERSHEY_PLAIN, 2.0, (0, 0, 255), 2)if len(receive_dict) == 1:# print(receive_dict)if len(receive_dict[0]) != 0:box_str = json.dumps(receive_dict[0][0])box_json = json.loads(box_str)if receive_count != 0:cv2.putText(image, "person", (int(box_json["x1"]), int(box_json["y1"])-5),cv2.FONT_HERSHEY_PLAIN, 2.0, (255, 0, 0), 2)img = cv2.rectangle(image, (int(box_json["x1"]), int(box_json["y1"])),(int(box_json["x2"]), int(box_json["y2"])), (255, 0, 0), 2)else:img = imagecv2.imshow("ZED", img)key = cv2.waitKey(1)else:last_box = receive_dict[len(receive_dict) - 1]# print(last_box)for i in range(len(last_box)):# print(receive_dict[len(receive_dict) - 1])box_dict = last_box[i]# dict2strbox_str = json.dumps(box_dict)# str2jsonbox_json = json.loads(box_str)# print(box_json)if receive_count != 0:cv2.putText(image, "person", (int(box_json["x1"]), int(box_json["y1"]) - 5),cv2.FONT_HERSHEY_PLAIN, 2.0, (255, 0, 0), 2)img = cv2.rectangle(image, (int(box_json["x1"]), int(box_json["y1"])),(int(box_json["x2"]), int(box_json["y2"])), (255, 0, 0), 2)else:img = imagecv2.imshow("ZED", img)key = cv2.waitKey(1)# else:#     cv2.imshow("ZED", image)#     key = cv2.waitKey(1)else:key = cv2.waitKey(1)cam.disable_streaming()cam.close()def generate():# global img_result, lock# loop over frames from the output streamwhile True:# wait until the lock is acquired# with lock:if img is None:continue# print("-----------------")# cv2.imshow("ZED", img)# key = cv2.waitKey(1)(flag, encodedImage) = cv2.imencode(".jpg", img)if not flag:continue# yield the output frame in the byte formatframe = encodedImage.tobytes()# yield(b'--frame\r\n' b'Content-Type: image/jpeg\r\n\r\n' +#       bytearray(encodedImage) + b'\r\n')yield (b'--frame\r\n' b'Content-Type: image/jpeg\r\n\r\n' +frame + b'\r\n')# 启动函数
def main01():# 在新线程中启动flask# print(app.url_map)# 启动websocket serverprint('> starting server...')server = WebsocketChatServer()tasks = [server.run(2333),]# loop = asyncio.get_event_loop()loop = asyncio.new_event_loop()asyncio.set_event_loop(loop)try:loop.run_until_complete(asyncio.wait(tasks))except KeyboardInterrupt:for task in asyncio.Task.all_tasks():task.cancel()loop.stop()loop.run_forever()loop.close()if __name__ == '__main__':flask_thread = threading.Thread(target=app.run, args=('0.0.0.0', 5000))flask_thread.start()# socket_thread = threading.Thread(target=main)# socket_thread.start()threads = [threading.Thread(target=main), threading.Thread(target=main01)]for t in threads:t.start()for t in threads:t.join()注:asyncio.wait()搜集所有任务;
运用线程,首先要生成一个loop对象,然后loop.run_xxx()就可以运行线程了,而如何创建这个loop, 方法有两种:1、对于主线程是loop=get_event_loop();2、对于其他线程需要首先loop=new_event_loop(),然后set_event_loop(loop)。new_event_loop()是创建一个event loop对象,而set_event_loop(eventloop对象)是将event loop对象指定为当前线程的event loop。一个线程任务,不能运行在两个及两个以上不同的循环中,一个循环体可以运行多个不同的协程任务。
index.html
<html><head><link rel="icon" href="{{ url_for('static', filename='favicon.ico') }}" type="image/x-icon"><title>感知效果示意</title><style type="text/css">.item .pic { float:left;margin-left:39%;width:30px;height:30px; }.item .content {float:left;width:290px;}.item .pic2 { float:left;margin-left:0px;width:30px;height:30px; }</style><div class="item"><div class="pic"><img src="{{ url_for('static', filename='favicon.ico') }}" width='30px' height='30px'></div><div class="content" style="font-size:22px; "> 感知效果  </div><div class="pic2"><img src="{{ url_for('static', filename='favicon.ico') }}" width='30px' height='30px'></div></div><br><br></head><body><div style="text-align: center;" ><img src="{{url_for('video_feed')}}" width='1400px' height='800px'></div><div style="font-size:16px; text-align: center;">Copyright © ***</div></body>
</html>
后端(服务器)代码与博客【ZED-2】基于WebSockets库,通过多线程方式推送数据流_WXG1011的博客-CSDN博客一致,这里不再粘贴。
参考链接 nohtypython | 同时使用flask和websockets - Mz1 - 博客园p