前言
在Kernel启动的初始阶段,首先去创建虚拟的根文件系统(rootfs),接下来再去调用do_mount来加载真正的文件系统,并将根文件系统切换到真正的文件系统,也即真实的文件系统。
接下来结核内核代码(内核版本:linux-3.14.28),讲解整个流程。
1、文件系统的分类
文件系统大体可以分为基于内存的文件系统(initrd)和非基于内存的文件系统(noinitrd),想要了解根文件系统的挂载流程,首先要了解各种文件的特性及使用方法。
rootfs: 一个基于内存的文件系统,是linux在初始化时加载的第一个文件系统。
realfs: 用户最终使用的真正的文件系统。
initramfs: 在内核镜像中附加一个cpio包,这个cpio包中包含了一个小型的文件系统,当内核启动时,内核将这个cpio包解开,并且将其中包含的文件系统释放到rootfs中,内核中的一部分初始化代码会放到这个文件系统中,作为用户层进程来执行。这样带来的明显的好处是精简了内核的初始化代码,而且使得内核的初始化过程更容易定制。Linux 2.6.12内核的initramfs还没有什么实质性的东西,一个包含完整功能的initramfs的实现可能还需要一个缓慢的过程。
cpio-initrd: cpio格式的initrd。一般作为最终的根文件系统。
image-initrd: 专指传统的文件镜像格式的initrd,如ext2格式。可以作为最终的根文件系统,也可以作为过渡,由Image-initrd里的init来加载最终的根文件系统。
noinitrd: 如jffs2,yaffs2等格式的根文件系统,作为最终的根文件系统。
2、initrd的处理流程
initrd有CPIO-initrd和Image-initrd两种格式,取决于制作initrd文件系统映像的工具和方法。initramfs是内核自动生成的一个简单的CPIO-initrd。
initramfs的处理流程:
1.如果内核支持initrd,但是并没有配置CONFIG_INITRAMFS_SOURCE选项的话,内核在编译的时候会自动生成一个最小的cpio包附在内核中(这个cpio包的内容与由default_rootfs生成的一样),除非你使用了ramdisk作为文件系统,否则内核按initramfs文件系统启动。
2.将initramfs的内容释放到rootfs中。
3.挂载真实的文件系统。
cpio-initrd 的处理流程:
1.bootloader 把内核以及 initrd 文件系统分别加载到内存的特定位置。然后启动内核,并告诉内核initrd在内存的位置。
2.内核判断initrd的文件格式,如果是cpio格式。
3.将initrd的内容释放到rootfs中。即这时候rootfs就是真正的根文件系统。
4.执行initrd中的/init文件,执行到这一点,内核的工作全部结束,完全交给/init文件处理。
image-initrd的处理流程:
1.bootloader 把内核以及 initrd 文件系统分别加载到内存的特定位置。然后启动内核,并告诉内核initrd在内存的位置
2.内核判断initrd的文件格式,如果不是cpio格式,将其作为image-initrd处理。
3.内核将initrd的内容保存在rootfs下的/initrd.image文件中。
4.内核将/initrd.image的内容读入/dev/ram0设备中,也就是读入了一个内存盘中。
5.接着内核以可读写的方式把/dev/ram0设备挂载为原始的根文件系统。
6.执行initrd上的/linuxrc文件,linuxrc通常是一个脚本文件,负责加载内核访问根文件系统必须的驱动, 以及加载根文件系统。
7.如果/dev/ram0被指定为真正的根文件系统,那么内核跳至最后一步(即第9步)正常启动。
8.否则, 将真实根文件系统(如/dev/mtdblock3或nfs)挂载到rootfs下。
9.在常规根文件系统上进行正常启动过程 ,执行/sbin/init。
二者比较:
1、cpio-initrd的处理流程更加简单,并没有使用额外的ramdisk,而是将其内容直接输入到rootfs中,其实rootfs本身也是一个基于内存的文件系统。这样就省掉了ramdisk的挂载、卸载等步骤。cpio-initrd不再象image-initrd那样作为linux内核启动的一个中间步骤,而是作为内核启动的终点,内核将控制权交给cpio-initrd的/init文件后,内核的任务就结束了,所以在/init文件中,我们可以做更多的工作,而不比担心同内核后续处理的衔接问题。
2、而对于image-initrd,如果最终的真实根文件系统不在Root_RAM0(比如在/dev/mtdblock3或nfs),则内核在执行完image-initrd 里的/linuxrc进程后,还要进行一些收尾工作。并挂载最终执行真正的根文件系统和执行最终真正根文件系统里的init。如果最终的真实根文件系统在Root_RAM0,则挂载最终执行真正的根文件系统和执行最终真正根文件系统里的init。
3、整体流程解读
3.1 根文件系统的注册
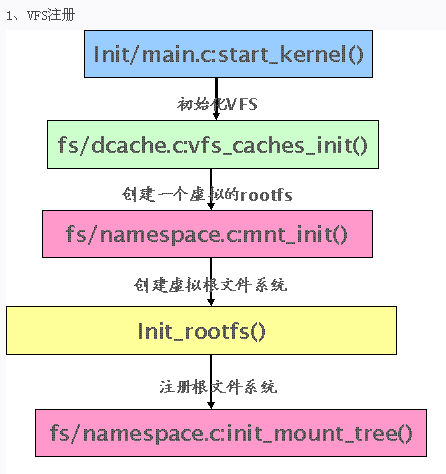
首先不得不从老掉牙的Linux系统的函数start_kernel()说起。函数start_kernel()中会去调用vfs_caches_init()来初始化VFS。
void __init vfs_caches_init(unsigned long mempages)
{ …//创建一个rootfs,这是个虚拟的rootfs,即内存文件系统,后面还会指向真实的文件系统 mnt_init();
}void __init mnt_init(void)
{…//创建虚拟根文件系统(调用register_filesystem(&rootfs_fs_type)注册rootfs,即根文件系统); init_rootfs(); /********************************************************************************挂载根文件系统(”/”其实这只是个空目录,是后面挂载实际根文件系统的根节点)。 *init_mount_tree会调用 vfs_kern_mount(“rootfs”, 0, “rootfs”, NULL)为 VFS 建立根目*录“/”,而一旦有了根,那么这棵数就可以发展壮大。同时挂载前面已经注册了的 rootfs 文件系统到*根目录“/”下。最后调用set_fs_pwd和set_fs_root切换进程的根目录和当前目录为”/”.这也就是根*目录的由来 ********************************************************************************/init_mount_tree();
}
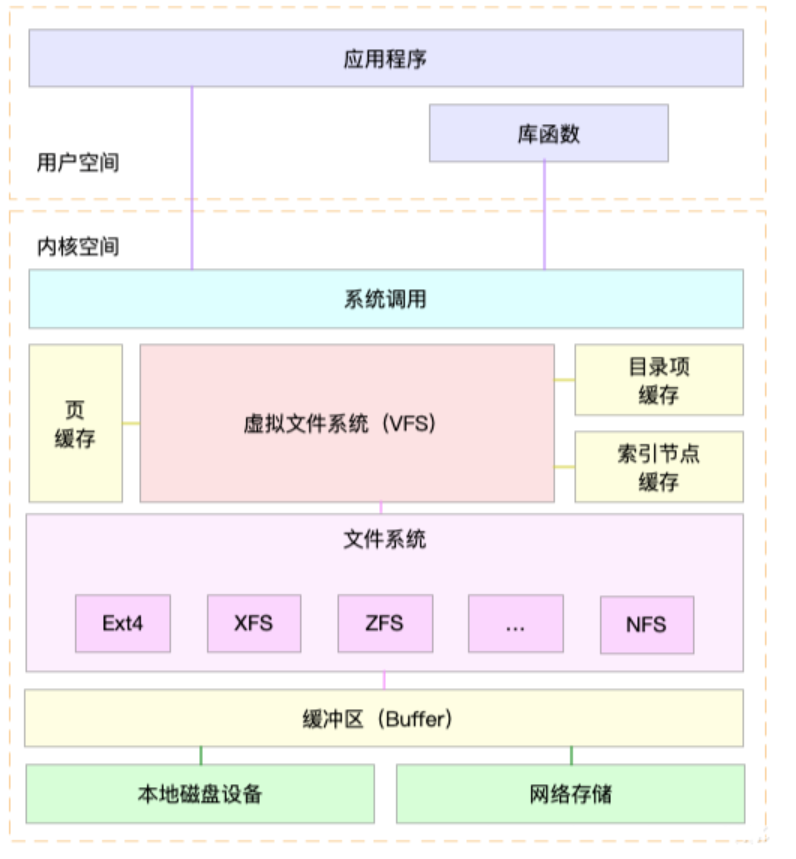
这个流程如下图所示:
3.2 根文件系统的初始化
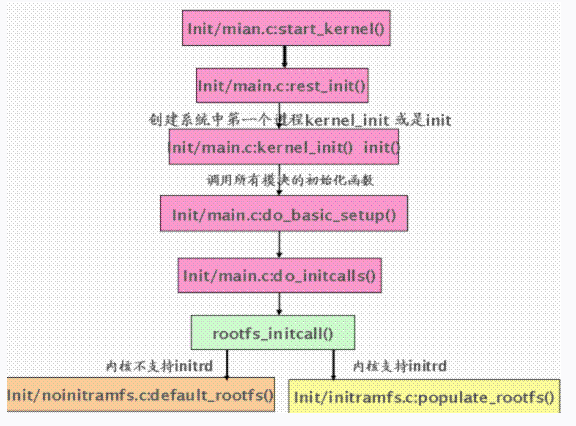
3.2.1 noinitrd初始化流程
针对noinitrd的情况,初始化一个简单的rootfs。主要往里面创建两个目录/dev和/root,还有一个结点/dev/console。
/** Create a simple rootfs that is similar to the default initramfs*/
static int __init default_rootfs(void)
{int err;err = sys_mkdir((const char __user __force *) "/dev", 0755);if (err < 0)goto out;err = sys_mknod((const char __user __force *) "/dev/console",S_IFCHR | S_IRUSR | S_IWUSR,new_encode_dev(MKDEV(5, 1)));if (err < 0)goto out;err = sys_mkdir((const char __user __force *) "/root", 0700);if (err < 0)goto out;return 0;out:printk(KERN_WARNING "Failed to create a rootfs\n");return err;
}
rootfs_initcall(default_rootfs);
3.2.2initrd初始化流程
(1)当内核支持initrd时,rootfs_initcall调用initramfs.c中的populate_rootfs()函数。
针对initrd的情况,在kernel启动之前,uboot会把initrd映像(即真实根文件系统)拷贝到外部sram的指定位置。
如果是cpio-initrd,则直接填充到rootfs根目录下,这时rootfs即从vfs变成真实的根文件系统。
如果是Image-initrd,则Image-initrd里面的内容保存到/initrd.image里面。
unpack_to_rootfs顾名思义,就是解压包到rootfs文件系统中。
static int __init populate_rootfs(void)
{char *err = unpack_to_rootfs(__initramfs_start, __initramfs_size);if (err)panic("%s", err); /* Failed to decompress INTERNAL initramfs *//***********************************如果内核支持initrd,但是并没有配置CONFIG_INITRAMFS_SOURCE选项的话,*initrd_start为0。***********************************/if (initrd_start) {
/************************
*支持ramdisk的话,必须定义宏CONFIG_BLK_DEV_RAM
************************/
#ifdef CONFIG_BLK_DEV_RAMint fd;printk(KERN_INFO "Trying to unpack rootfs image as initramfs...\n");err = unpack_to_rootfs((char *)initrd_start,initrd_end - initrd_start);if (!err) {free_initrd();goto done;} else {clean_rootfs();unpack_to_rootfs(__initramfs_start, __initramfs_size);}printk(KERN_INFO "rootfs image is not initramfs (%s)""; looks like an initrd\n", err);fd = sys_open("/initrd.image",O_WRONLY|O_CREAT, 0700);if (fd >= 0) {sys_write(fd, (char *)initrd_start,initrd_end - initrd_start);sys_close(fd);free_initrd();}done:
#elseprintk(KERN_INFO "Unpacking initramfs...\n");err = unpack_to_rootfs((char *)initrd_start,initrd_end - initrd_start);if (err)printk(KERN_EMERG "Initramfs unpacking failed: %s\n", err);free_initrd();
#endif/** Try loading default modules from initramfs.  This gives* us a chance to load before device_initcalls.*/load_default_modules();}return 0;
}
rootfs_initcall(populate_rootfs);
(2)检测根文件系统中是否存在ramdisk_execute_command文件。
这个值由uboot传给内核的参数中rdinit=指定,如果未指定则采用默认的/init。如果ramdisk_execute_command文件不存在则执行prepare_namespace()挂载根文件系统。
如果是cpio-initrd,populate_rootfs已经成功解压cpio-initrd到rootfs中,这种情况下rootfs就是真实的根文件系统,所以这时一般会存在ramdisk_execute_command。
如果是Image-initrd或者noinitrd的情况,一般不会存在ramdisk_execute_command,所以执行prepare_namespace()挂载根文件系统。
start_kernel->rest_init->kernel_init->kernel_init_freeable
static noinline void __init kernel_init_freeable(void)
{/** Wait until kthreadd is all set-up.*/wait_for_completion(&kthreadd_done);/* Now the scheduler is fully set up and can do blocking allocations */gfp_allowed_mask = __GFP_BITS_MASK;/** init can allocate pages on any node*/set_mems_allowed(node_states[N_MEMORY]);/** init can run on any cpu.*/set_cpus_allowed_ptr(current, cpu_all_mask);cad_pid = task_pid(current);smp_prepare_cpus(setup_max_cpus);do_pre_smp_initcalls();lockup_detector_init();smp_init();sched_init_smp();do_basic_setup();/* Open the /dev/console on the rootfs, this should never fail */if (sys_open((const char __user *) "/dev/console", O_RDWR, 0) < 0)pr_err("Warning: unable to open an initial console.\n");(void) sys_dup(0);(void) sys_dup(0);/** check if there is an early userspace init.  If yes, let it do all* the work*/if (!ramdisk_execute_command)ramdisk_execute_command = "/init";if (sys_access((const char __user *) ramdisk_execute_command, 0) != 0) {ramdisk_execute_command = NULL;prepare_namespace();}/** Ok, we have completed the initial bootup, and* we're essentially up and running. Get rid of the* initmem segments and start the user-mode stuff..*//* rootfs is available now, try loading default modules */load_default_modules();
}
(3)挂载真实的根文件系统,并把真实的根文件系统的根目录作为进程的根目录。本函数的具体流程,请看注释。
void __init prepare_namespace(void)
{int is_floppy;/**************************对于将根文件系统存在usb或者scsi的情况,*kernel需要等待这些耗费时间比较久的驱动*加载完毕,所以这里存在一个delay。*************************/if (root_delay) {printk(KERN_INFO "Waiting %d sec before mounting root device...\n",root_delay);ssleep(root_delay);}/** wait for the known devices to complete their probing** Note: this is a potential source of long boot delays.* For example, it is not atypical to wait 5 seconds here* for the touchpad of a laptop to initialize.*//*********************等待根文件系统所在的设备的探测函数的完成。********************/wait_for_device_probe();md_run_setup();/*******************************saved_root_name是uboot传进来的参数root=/dev/mtdblock3******************************/if (saved_root_name[0]) {root_device_name = saved_root_name;if (!strncmp(root_device_name, "mtd", 3) ||!strncmp(root_device_name, "ubi", 3)) {mount_block_root(root_device_name, root_mountflags);goto out;}/**********************ROOT_DEV存放saved_root_name的设备节点号。*********************/ROOT_DEV = name_to_dev_t(root_device_name);if (strncmp(root_device_name, "/dev/", 5) == 0)root_device_name += 5;}/*************************************挂载Image-initrd,如果bootargs指定了noinitrd,*那么initrd_load()是空操作。*************************************/if (initrd_load())goto out;/* wait for any asynchronous scanning to complete */if ((ROOT_DEV == 0) && root_wait) {printk(KERN_INFO "Waiting for root device %s...\n",saved_root_name);while (driver_probe_done() != 0 ||(ROOT_DEV = name_to_dev_t(saved_root_name)) == 0)msleep(100);async_synchronize_full();}is_floppy = MAJOR(ROOT_DEV) == FLOPPY_MAJOR;if (is_floppy && rd_doload && rd_load_disk(0))ROOT_DEV = Root_RAM0;/***********************把真实的根文件系统挂在到rootfs的/root目录下。**********************/mount_root();
out:devtmpfs_mount("dev");/*****************************************将真实根文件系统从当前目录移动到rootfs的根目录后,*并进入根目录。*然后将当前目录设置为系统的根目录,即作为当前进程的根目录。*所以,最终把虚拟的文件系统切换到了真实的根文件系统。****************************************/sys_mount(".", "/", NULL, MS_MOVE, NULL);sys_chroot(".");
}
(4)initrd_load()是针对Image-initrd的函数,注意,前面已经把Image-initrd解压到了/initrd.image里面。
int __init initrd_load(void)
{/************************************mount_initrd的默认值为1,如果uboot传给kernel*的参数指明noinitrd,则mount_initrd被置成0。***********************************/if (mount_initrd) {create_dev("/dev/ram", Root_RAM0);/** Load the initrd data into /dev/ram0. Execute it as initrd* unless /dev/ram0 is supposed to be our actual root device,* in that case the ram disk is just set up here, and gets* mounted in the normal path.*//******************************************rd_load_image函数将/initrd.image的内容释放到/dev/ram设备节点。*如果根文件系统设备号不是Root_RAM0,即给内核指定的参数不是/dev/ram,*则会调用handle_initrd()。但是一般我们给内核指定的参数是/dev/ram。******************************************/if (rd_load_image("/initrd.image") && ROOT_DEV != Root_RAM0) {sys_unlink("/initrd.image");handle_initrd();return 1;}}sys_unlink("/initrd.image");return 0;
}
(5)执行/linuxrc脚本确定真实的根文件系统,接着调用mount_root将真实的根文件系统挂载到rootfs的/root目录下。
static void __init handle_initrd(void)
{struct subprocess_info *info;static char *argv[] = { "linuxrc", NULL, };extern char *envp_init[];int error;/***********************************real_root_dev为一个全局变量,用来保存真实根文件系统的设备号。**********************************/real_root_dev = new_encode_dev(ROOT_DEV);/***********************************************/dev/root.old的设备号是Root_RAM0,而前面已经把Image-initrd释放到了*Root_RAM0,所以/dev/root.old下的内容就是真实的根文件系统Image-initrd。**********************************************/create_dev("/dev/root.old", Root_RAM0);/* mount initrd on rootfs' /root *//*************************************将真实的根文件系统挂载到rootfs的/root目录下。************************************/mount_block_root("/dev/root.old", root_mountflags & ~MS_RDONLY);sys_mkdir("/old", 0700);sys_chdir("/old");/* try loading default modules from initrd */load_default_modules();/** In case that a resume from disk is carried out by linuxrc or one of* its children, we need to tell the freezer not to wait for us.*/current->flags |= PF_FREEZER_SKIP;info = call_usermodehelper_setup("/linuxrc", argv, envp_init,GFP_KERNEL, init_linuxrc, NULL, NULL);if (!info)return;call_usermodehelper_exec(info, UMH_WAIT_PROC);current->flags &= ~PF_FREEZER_SKIP;/* move initrd to rootfs' /old */sys_mount("..", ".", NULL, MS_MOVE, NULL);/* switch root and cwd back to / of rootfs */sys_chroot("..");if (new_decode_dev(real_root_dev) == Root_RAM0) {sys_chdir("/old");return;}sys_chdir("/");/**************************************执行完linuxrc后,真实的根文件系统已经确定,则执行*mount_root将真实的根文件系统挂载到rootfs的/root目录下。**************************************/ROOT_DEV = new_decode_dev(real_root_dev);mount_root();printk(KERN_NOTICE "Trying to move old root to /initrd ... ");error = sys_mount("/old", "/root/initrd", NULL, MS_MOVE, NULL);if (!error)printk("okay\n");else {int fd = sys_open("/dev/root.old", O_RDWR, 0);if (error == -ENOENT)printk("/initrd does not exist. Ignored.\n");elseprintk("failed\n");printk(KERN_NOTICE "Unmounting old root\n");sys_umount("/old", MNT_DETACH);printk(KERN_NOTICE "Trying to free ramdisk memory ... ");if (fd < 0) {error = fd;} else {error = sys_ioctl(fd, BLKFLSBUF, 0);sys_close(fd);}printk(!error ? "okay\n" : "failed\n");}
}




![[架构之路-30]:目标系统 - 系统软件 - Linux OS根文件系统rootfs的概念、组成、制作以及用busybox制作根文件系统](https://img-blog.csdnimg.cn/img_convert/7b85b3443fb00918f0a28a3894240143.png)


