序
这一系列的文章旨在介绍一个方便大家开始开发自己CAD的方法。需要指出的是,本人主要希望通过分享一些相关技术,提升国人软件自主的意识和途径。通过本文构建自己的CAD只是软件自主化的非常非常小的一步,希望大家在不停尝试的过程中有所提升。同时也鼓励大家相互沟通。沟通才是创新源泉。最后还需提示一下,读者需要有一些基础的编程知识才能更好的理解。
正文
本方法是基于Opencascade框架的。Opencascade是一个开源的CAD,CAM为主图形框架。其功能涵盖CAD,CAM的功能。第一章涵盖三个主要任务:1 获取相关软件文件并安装,2在微软Windows 10操作系统下,基于微软Visual Studio的开发环境搭建;3 用c++编程语言生成第一个长方体。
郑重声明
本文的程序及变量是参考一个博文(http://www.zyh1690.org/used-in-the-mfc-opencascade-example/)。但是今天访问那个网页,发现已经它已经过期。本站内也有类似内容的贴子,不知道是不是原创。如果是的话,请联系我。我会添加引用或者修改程序。谢谢。(坚决坚持学术正气,杜绝剽窃歪风。)
## 获取相关安装文件并安装
Opencascade 下载
Opencascade官网提供两种安装文件:I 编译过的文件集合; II 未经编译的源代码。它们都可以从官网上免费下载。下载页面为:Download - Open CASCADE Technology。需要注意的是,下载地址可能会因官网更新而变更。本人注意到下载地址至少因此变更了一次。
I 编译过的安装文件
初次接触Opencascade的开发者使用这个版本的安装文件应该比较省事。目前官网只提供Visual Studio 2017 64位的已编译文件如图。因此,用户需要在Visual Studio Installer中选中安装Visual Studio 2017 64位 c++ 开发包。
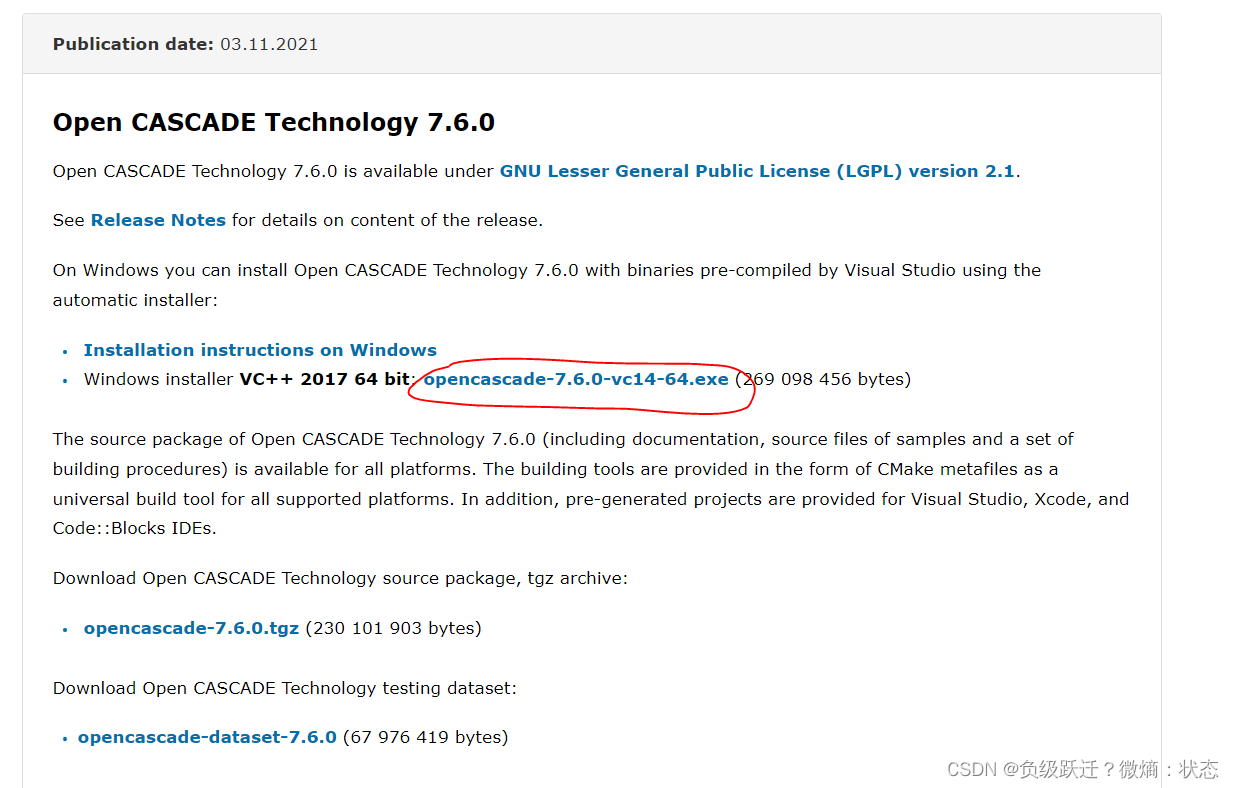
(图片截图于Opencascade官网)
开发者点击红圈位置,会弹出一个提示,需要用户注册或者登录。接下来按提示填入个人资料信息,激活账户,就可以顺利下载了。
II 为编译过的源文件
蓝圈中的文件是未经编译的文件。这个主要是,用户开发环境不一样时,需要自己重新编译。比如,你如果安装的是Visual studio 2020和相关的c++开发包,而且你不想重新安装Visual studio 2017版本。这时候,就需要你重新编译。具体如何编译,本人会再写一篇文章详述。
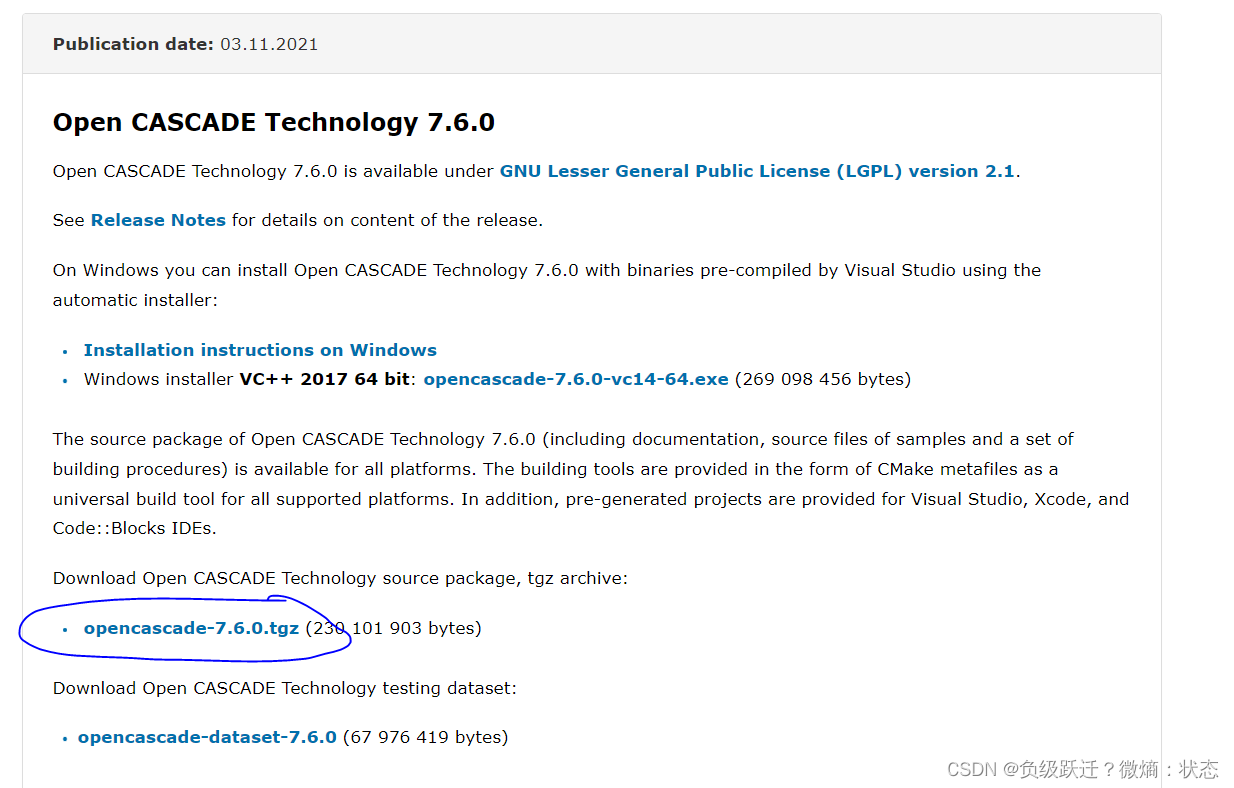
(图片截图于Opencascade官网)
安装Visual Studio 2017
进入微软的官网(Visual Studio Older Downloads - 2019, 2017, 2015 & Previous Versions),点击红圈位置。会有对话框弹出,提示登录微软账户。
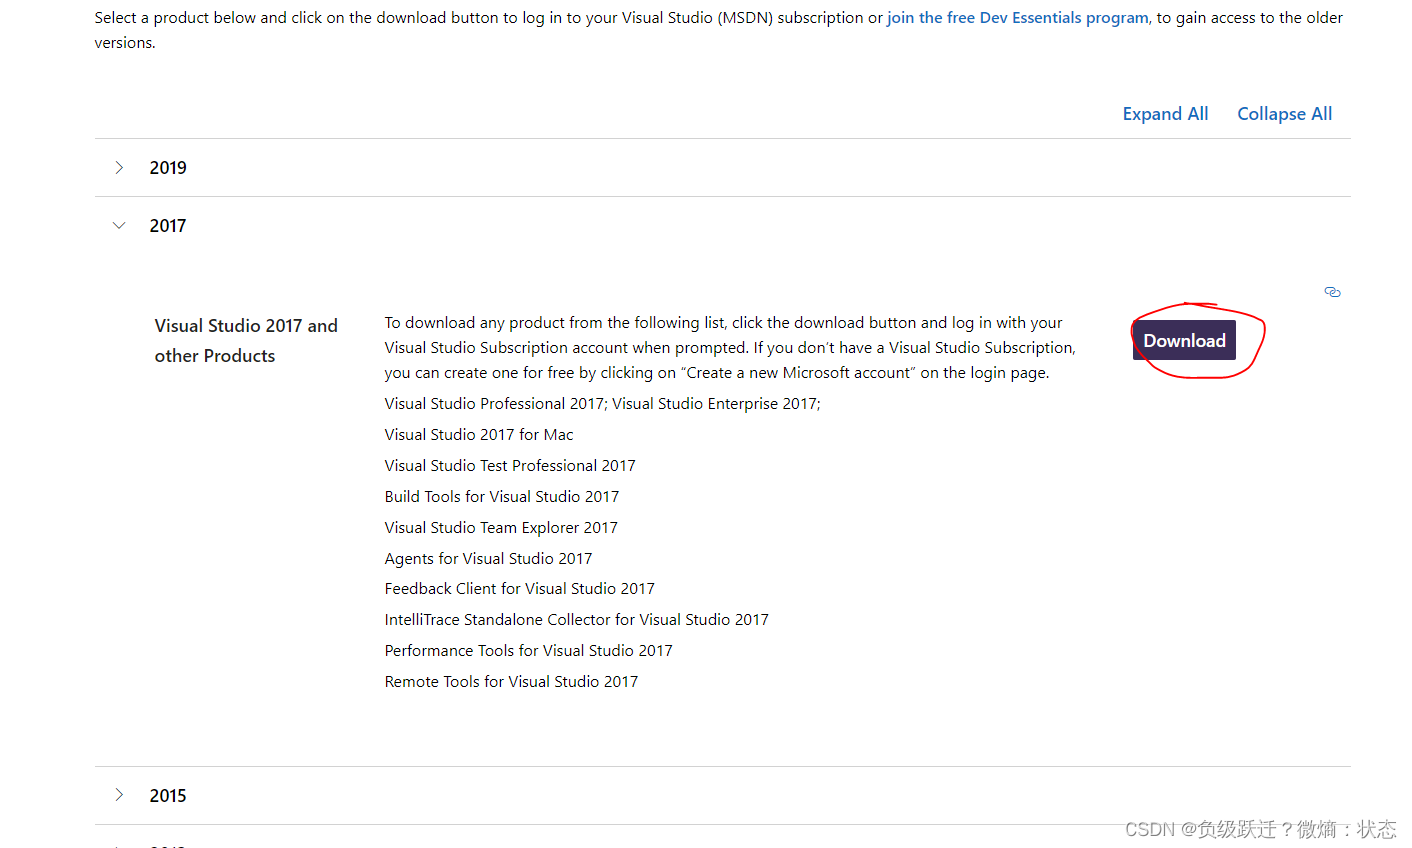
登录后,可以点击下图红圈位置下载安装文件。

(图片截图于微软官网)
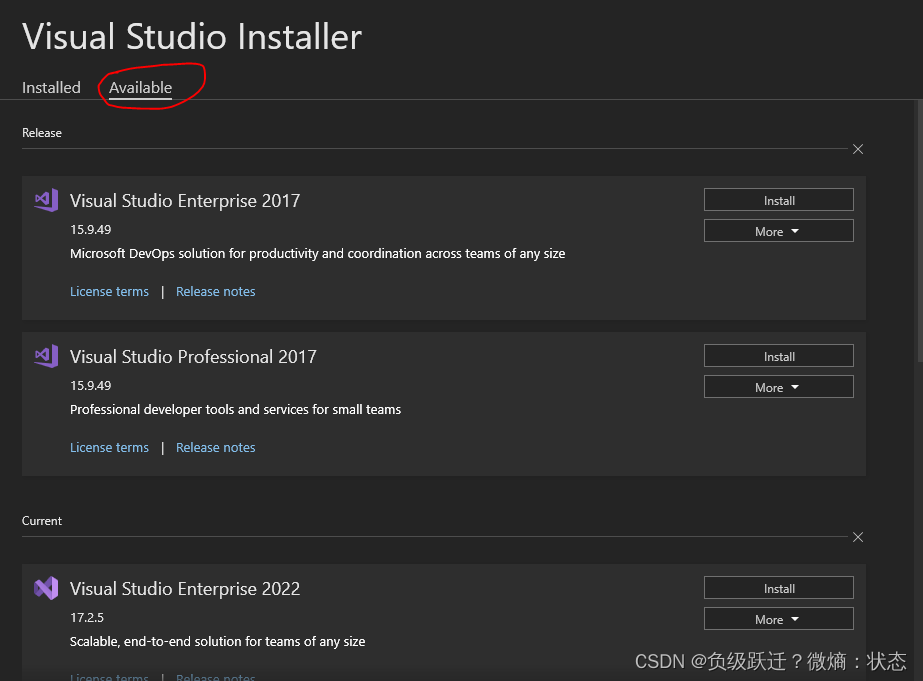
下载完毕后,鼠标右键点击下载文件,用管理员权限打开安装文件。之后 在“Available”模块下找到 "Visual Studio Community 2017",点击"Install"。
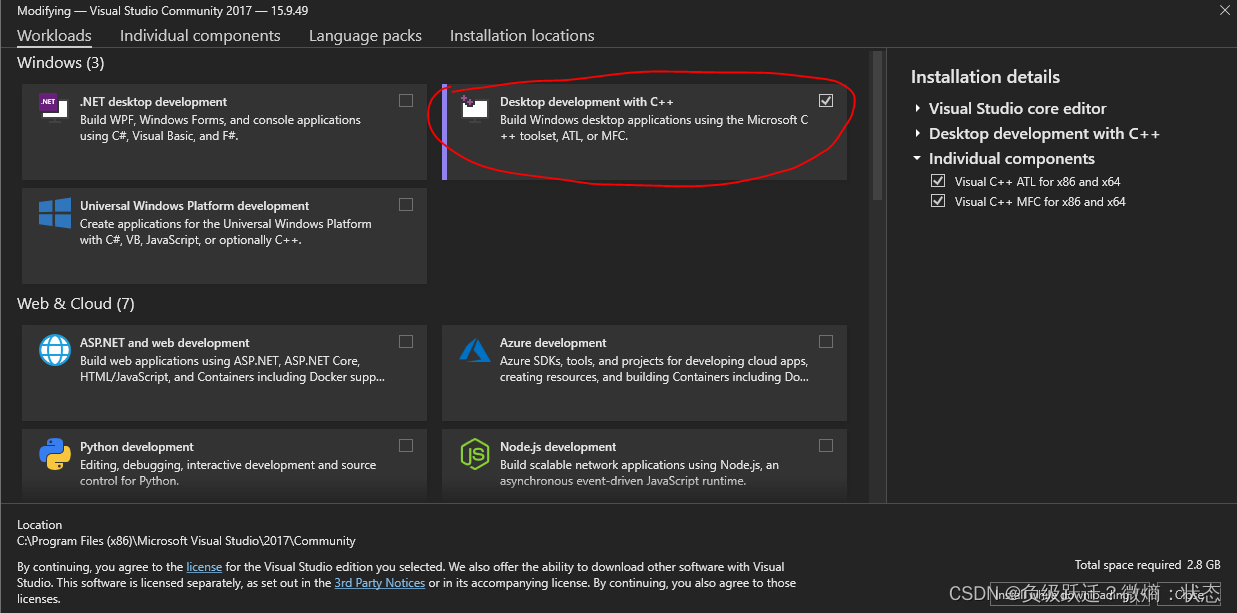
在下图模块选择界面点击学者红圈部分的模块。然后点击右下角"Install"按钮。
Opencascade安装
用管理员权限(不一定用管理员权限)打开前面已下载的已编译文件,然后按照提示安装在自己制定的位置(默认是系统C盘的根目录)。
至此,已经完成了主要软件的安装。
## 基于微软Visual Studio MFC的开发环境搭建
创建MFC项目
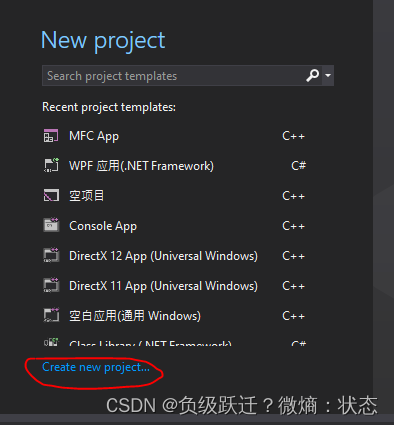
打开Visual Studio 2017,并在起始窗口点击红圈位置。
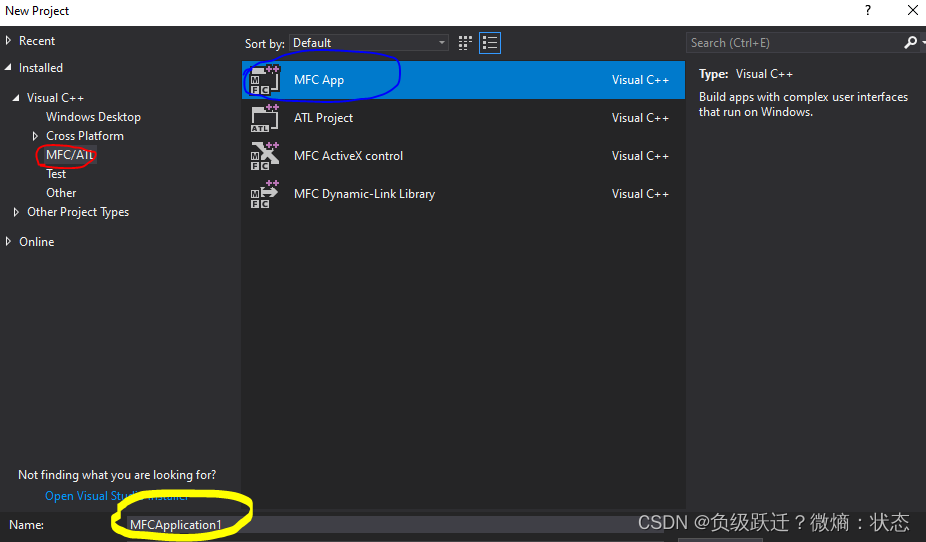
在弹出的子窗口中选择蓝圈位置。在黄圈位置输入项目名称,并且点击右下角"OK"按钮。
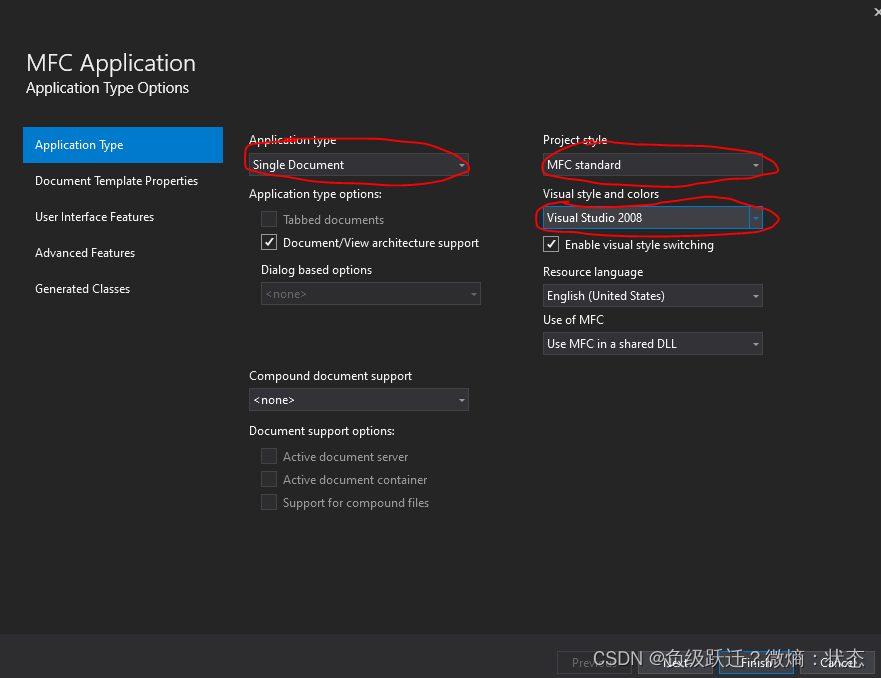
 在下图弹出的项目属性对话框中 ,确保选中如红圈标示的选择项。然后点"Finish"。
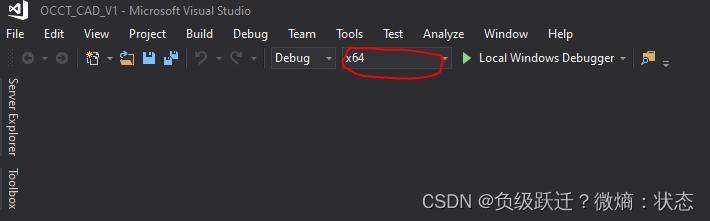
在弹出的新窗口(正式开发窗口)中,在红圈位置选中“x64”。这个代表你的软件将是64位的。 顺带提一下,你按Ctrl+F5就可以编译运行你的项目了。
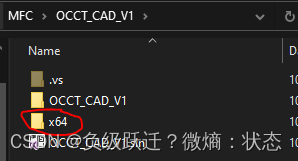
运行后在项目目录会出现一个新的文件夹“x64”。里面还有一个文件夹叫做“Debug”。这个文件夹很重要。
设置项目
1 找到Opencascade的安装目录,如下图所示
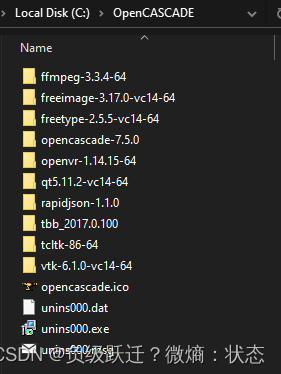
搜索所有.dll文件,并拷贝到前面提到的"Debug"文件夹下。
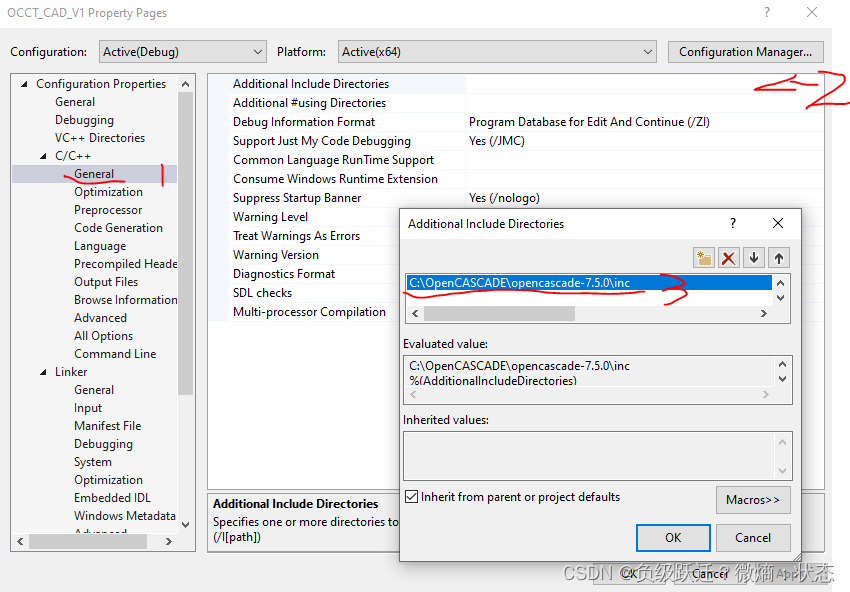
2 头文件设置
一次点开项目菜单栏的的“Project”->“Properties”。然后按照下图的顺序依次点击,最后在蓝色部分指定opencascade下的”inc“文件夹。
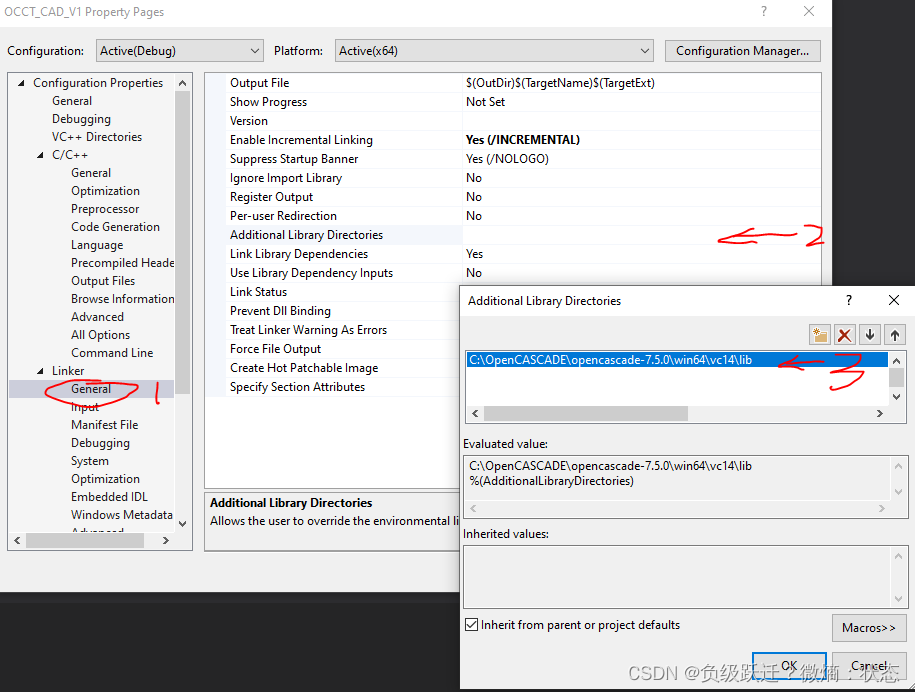
3 静态库路径设置
类似的,按照下图的顺序一次点击,然后在蓝色部分指定opencascade的win64\vc14\lib文件夹。
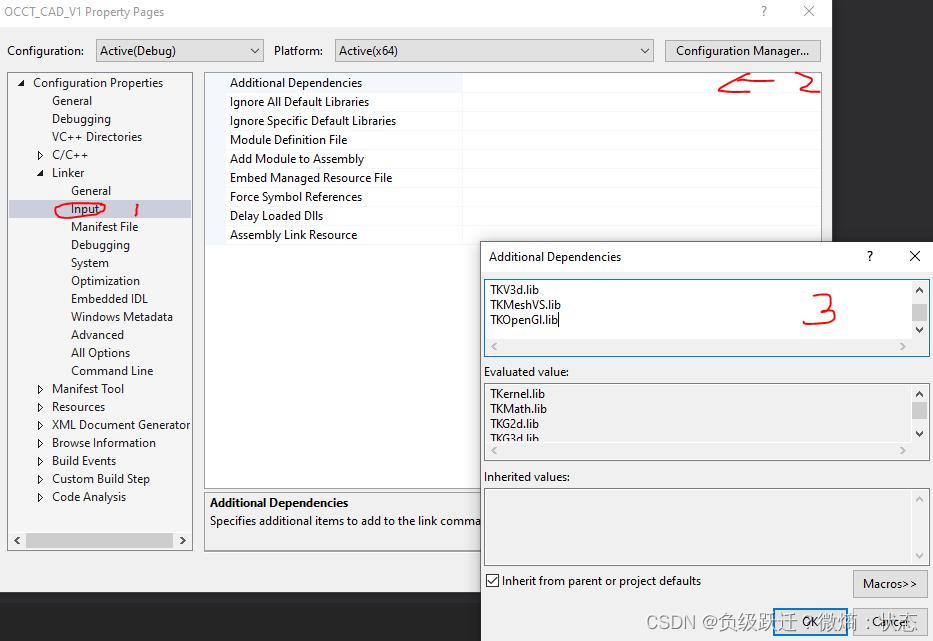
4 静态文件库链接
按照下图的顺序一次点击,然后在路径下依次输入所有opencascade的win64\vc14\lib文件夹中的.lib文件。以我为例,所有文件的名称为
TKernel.lib
TKMath.lib
TKG2d.lib
TKG3d.lib
TKXSBase.lib
TKIGES.lib
TKGeomBase.lib
TKBRep.lib
TKGeomAlgo.lib
TKTopAlgo.lib
TKBO.lib
TKPrim.lib
TKBool.lib
TKShHealing.lib
TKMesh.lib
TKFillet.lib
TKHLR.lib
TKFeat.lib
TKXMesh.lib
TKOffset.lib
TKService.lib
TKV3d.lib
TKMeshVS.lib
TKOpenGl.lib
点击右下角的”OK“,和”Apply“。完成设置。
代码环境设置
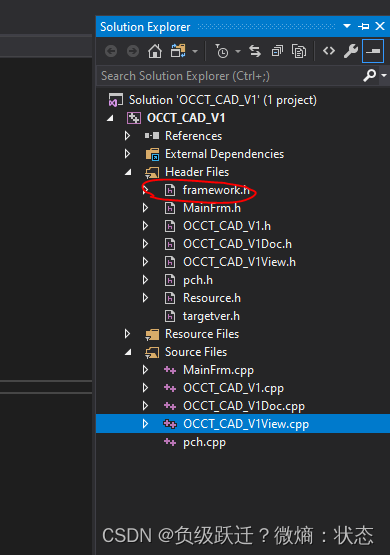
1 头文件
双击打开framework.h.
主窗口应该会自动显示其内容。在下图位置粘贴
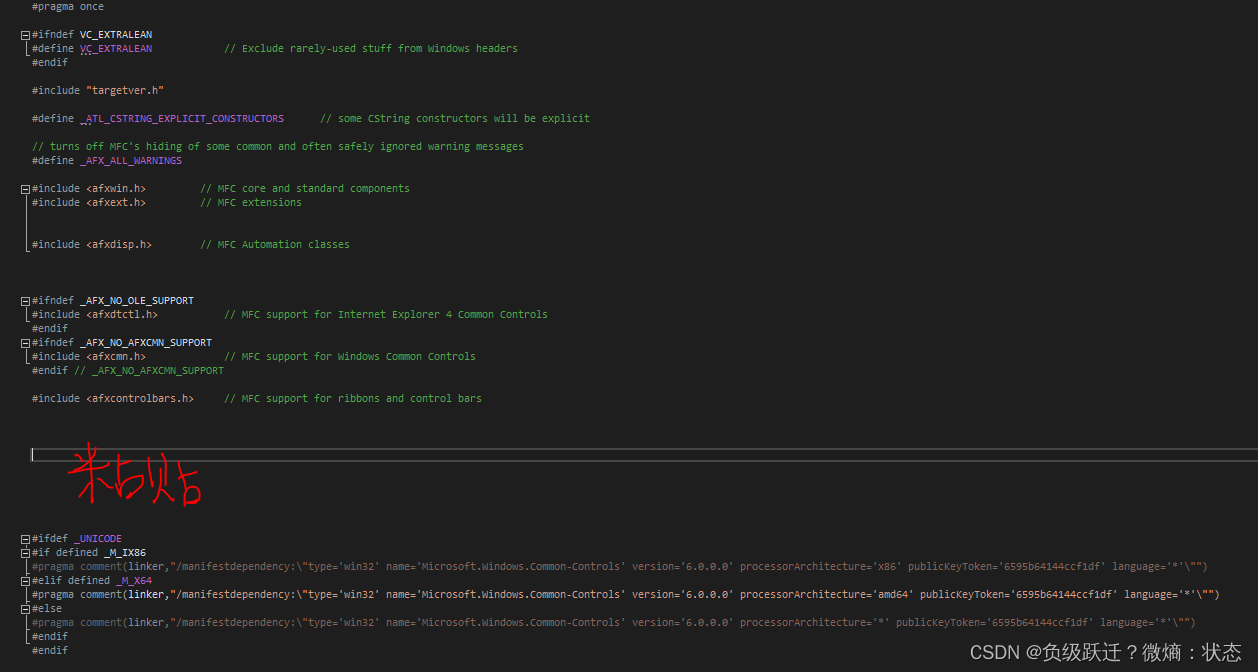
#pragma warning ( disable : 4244 ) // Issue warning 4244
#include "Standard_ShortReal.hxx"
#pragma warning ( default : 4244 ) // Issue warning 4244
#include <Standard.hxx>
#include <Standard_PrimitiveTypes.hxx>
#include <AIS_InteractiveContext.hxx>
#include <AIS_Line.hxx>
#include <AIS_Shape.hxx>
//#include <AIS_Drawer.hxx>
#include <AIS_Point.hxx>
#include <AIS_TexturedShape.hxx>
#include <Aspect_Grid.hxx>
#include <Aspect_PolygonOffsetMode.hxx>
//#include <Aspect_TypeOfText.hxx>
#include <Aspect_DisplayConnection.hxx>
//#include <Aspect_AspectMarker.hxx>
#include <BRep_Tool.hxx>
#include <BRepTools.hxx>
#include <BRepBuilderAPI_NurbsConvert.hxx>
#include <BRepPrimAPI_MakeCylinder.hxx>
#include <BRepPrimAPI_MakeBox.hxx>
#include <BRepPrimAPI_MakeSphere.hxx>
#include <BRepBuilderAPI_MakeEdge.hxx>
#include <BRepBuilderAPI_MakeWire.hxx>
#include <BRepBuilderAPI_MakeFace.hxx>
#include <BRepBndLib.hxx>
#include <BRepAdaptor_HArray1OfCurve.hxx>
#include <BRepAdaptor_Curve2d.hxx>
#include <BRepBuilderAPI_MakeVertex.hxx>
#include <Geom_BezierCurve.hxx>
#include <BRepFeat_MakePipe.hxx>
#include <BRepOffsetAPI_MakePipe.hxx>
#include <GCPnts_QuasiUniformDeflection.hxx>
#include <Geom2d_TrimmedCurve.hxx>
#include <GeomLib.hxx>
#include <Geom_Surface.hxx>
#include <Geom_Curve.hxx>
#include <Geom_Plane.hxx>
#include <Geom_CartesianPoint.hxx>
#include <GeomAPI_Interpolate.hxx>
#include <Graphic3d_Group.hxx>
#include <Graphic3d_HorizontalTextAlignment.hxx>
#include <Graphic3d_VerticalTextAlignment.hxx>
//#include <Graphic3d_Array1OfVertex.hxx>
#include <Graphic3d_ArrayOfPolylines.hxx>
//#include <Graphic3d.hxx>
#include <OpenGl_GraphicDriver.hxx> //Replace Graphic3d.hxx by OpenGl_GraphicDriver.hxx
#include <Graphic3d_GraphicDriver.hxx>
//#include <Graphic3d_ExportFormat.hxx>
#include <Graphic3d_ArrayOfPolylines.hxx>
#include <Graphic3d_AspectFillArea3d.hxx>
#include <Graphic3d_AspectText3d.hxx>
#include <Graphic3d_AspectLine3d.hxx>
#include <Graphic3d_AspectMarker3d.hxx>
#include <Graphic3d_Texture1Dsegment.hxx>
#include <gp_Pln.hxx>
#include <gp.hxx>
#include <gp_Pnt2d.hxx>
#include <Prs3d_Root.hxx>
#include <Prs3d_Drawer.hxx>
#include <Prs3d_IsoAspect.hxx>
#include <Prs3d_ShadingAspect.hxx>
#include <Prs3d_Presentation.hxx>
#include <PrsMgr_PresentationManager3d.hxx>
#include <Prs3d_TextAspect.hxx>
#include <Prs3d_Text.hxx>
#include <Select3D_SensitiveBox.hxx>
#include <Select3D_SensitiveCurve.hxx>
#include <Select3D_SensitiveGroup.hxx>
#include <SelectMgr_Selection.hxx>
#include <SelectMgr_SequenceOfOwner.hxx>
#include <SelectMgr_EntityOwner.hxx>
#include <ShapeBuild_Edge.hxx>
#include <StdSelect_ViewerSelector3d.hxx>
#include <StdPrs_ShadedShape.hxx>
#include <StdPrs_HLRPolyShape.hxx>
#include <StdSelect_BRepSelectionTool.hxx>
#include <StdPrs_WFShape.hxx>
#include <StdPrs_ToolRFace.hxx>
#include <StdSelect.hxx>
#include <StdSelect_BRepOwner.hxx>
#include <StdSelect_BRepSelectionTool.hxx>
#include <TCollection_AsciiString.hxx>
#include "TopExp.hxx"
#include <TopExp_Explorer.hxx>
#include <TopoDS.hxx>
#include <TopoDS_Builder.hxx>
#include <TopoDS_Compound.hxx>
#include <TopoDS_ListOfShape.hxx>
#include <TopoDS_ListIteratorOfListOfShape.hxx>
#include <TopoDS_Iterator.hxx>
#include "TopoDS_Edge.hxx"
#include "TopoDS_Vertex.hxx"
#include <TopTools_HSequenceOfShape.hxx>
#include <TopTools_IndexedMapOfShape.hxx>
#include <Graphic3d_CView.hxx>
#include <V3d_Viewer.hxx>
#include <V3d_View.hxx>
#include <WNT_Window.hxx>
#include <Xw_Window.hxx>
#include <Standard_Macro.hxx>
#include <Graphic3d_GraphicDriver.hxx>
#include <Standard_Failure.hxx>
#include <BRepAlgoAPI_Fuse.hxx>
#include <BRepAlgoAPI_Common.hxx>
#include <BRepAlgoAPI_Cut.hxx>
#include <BRepBuilderAPI_Transform.hxx>
#include <BRepFilletAPI_MakeFillet.hxx>
#include <BRepLib.hxx>
#include <BRepOffsetAPI_MakeThickSolid.hxx>
#include <BRepOffsetAPI_ThruSections.hxx>
#include <BRepOffsetAPI_MakePipeShell.hxx>
#include <BRepOffsetAPI_MakePipe.hxx>
#include <BRepPrimAPI_MakePrism.hxx>
#include <GC_MakeArcOfCircle.hxx>
#include <GC_MakeSegment.hxx>
#include <GC_MakeCircle.hxx>
#include <GCE2d_MakeSegment.hxx>
#include <gp_Ax1.hxx>
#include <gp_Ax2.hxx>
#include <gp_Ax2d.hxx>
#include <gp_Dir.hxx>
#include <gp_Dir2d.hxx>
#include <gp_Pnt.hxx>
#include <gp_Pnt2d.hxx>
#include <gp_Trsf.hxx>
#include <gp_Vec.hxx>
#include <Geom_CylindricalSurface.hxx>
#include <Geom_BSplineCurve.hxx>
#include <Geom2d_Ellipse.hxx>
#include <GeomAPI_PointsToBSpline.hxx>
#include <TopoDS_Face.hxx>
#include <TopoDS_Wire.hxx>
#include <TopoDS_Shape.hxx>
#include <V3d_BadValue.hxx>
#include <AIS_InteractiveObject.hxx>
#include <AIS_ListOfInteractive.hxx>
//#include <AIS_LocalContext.hxx>
#include <SelectMgr_EntityOwner.hxx>
#include <ShapeFix.hxx>
#include <ShapeFix_Wire.hxx>
#include <math.h>
#include <math.hxx>
#include <TopTools_ListOfShape.hxx>
#include <TopTools_ListIteratorOfListOfShape.hxx>
2 主程序源代码添加内容
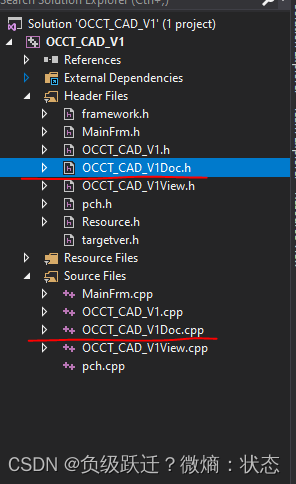
你创建MFC项目后,项目文件里面应该有以你的项目名来命名的.h文件和.cpp文件。以我为例,我的项目名称是OCCT_CAD_V1,则如下图,项目里面有OCCT_CAD_V1.h和OCCT_CAD_V1.cpp文件。
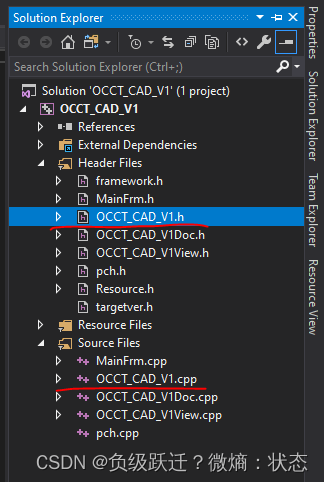
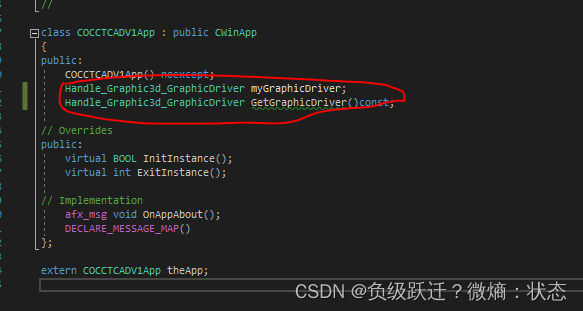
双击打开OCCT_CAD_V1.h。在如下图红圈位置添加
Handle_Graphic3d_GraphicDriver myGraphicDriver;
Handle_Graphic3d_GraphicDriver GetGraphicDriver()const;
来创建显示驱动。
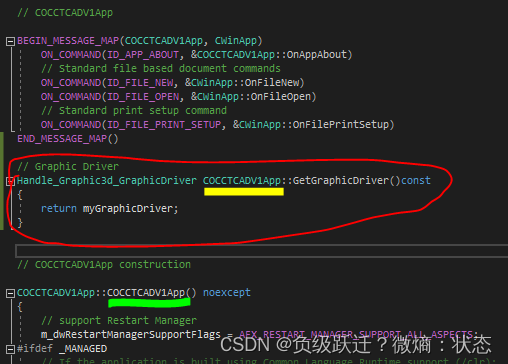
双击打开OCCT_CAD_V1.cpp。在如下图红圈位置添加
// Graphic Driver
Handle_Graphic3d_GraphicDriver COCCTCADV1App::GetGraphicDriver()const
{
return myGraphicDriver;
}
注意黄色部分名称要和绿色部分名称一致。
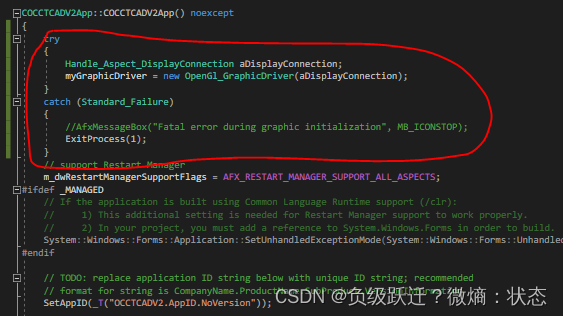
再添加一下代码到下图红圈位置
try
{
Handle_Aspect_DisplayConnection aDisplayConnection;
myGraphicDriver = new OpenGl_GraphicDriver(aDisplayConnection);
}
catch (Standard_Failure)
{
//AfxMessageBox("Fatal error during graphic initialization", MB_ICONSTOP);
ExitProcess(1);
}
2 MFC 文件代码添加
同样,项目文件里面应该有以你的项目名来命名的.h文件和.cpp文件。
以我为例,双击打开OCCT_CAD_V1Doc.h。在如下图红圈位置添加
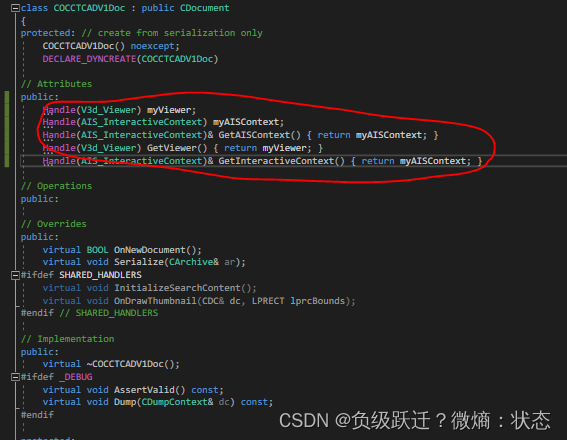
Handle(V3d_Viewer) myViewer;
Handle(AIS_InteractiveContext) myAISContext;
Handle(AIS_InteractiveContext)& GetAISContext() { return myAISContext; }
Handle(V3d_Viewer) GetViewer() { return myViewer; }
Handle(AIS_InteractiveContext)& GetInteractiveContext() { return myAISContext; }
双击打开OCCT_CAD_V1Doc.cpp。在下图红圈位置1的地方注释掉这三行代码(Ctrl+k+c)。
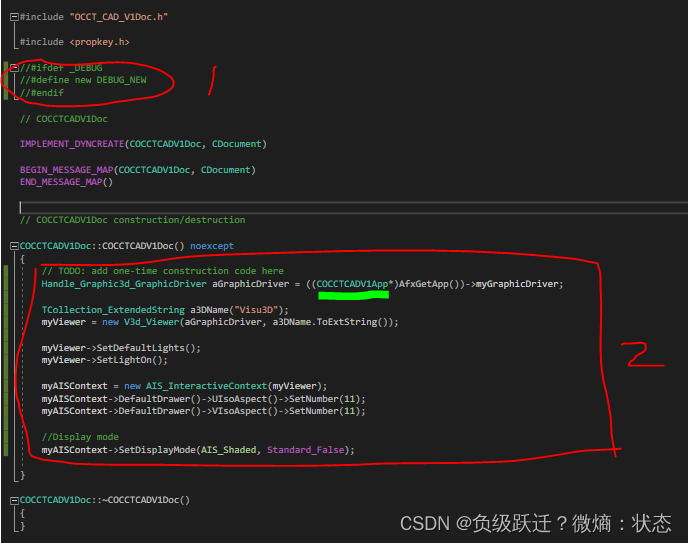
在上图红圈位置2添加
// TODO: add one-time construction code here
Handle_Graphic3d_GraphicDriver aGraphicDriver = ((COccMFC5App*)AfxGetApp())->myGraphicDriver;
TCollection_ExtendedString a3DName("Visu3D");
myViewer = new V3d_Viewer(aGraphicDriver, a3DName.ToExtString());
myViewer->SetDefaultLights();
myViewer->SetLightOn();
myAISContext = new AIS_InteractiveContext(myViewer);
myAISContext->DefaultDrawer()->UIsoAspect()->SetNumber(11);
myAISContext->DefaultDrawer()->VIsoAspect()->SetNumber(11);
//Display mode
myAISContext->SetDisplayMode(AIS_Shaded, Standard_False);
注意:绿色部分的名称应该是<项目名称+App>。
3 设置View文件代码添加
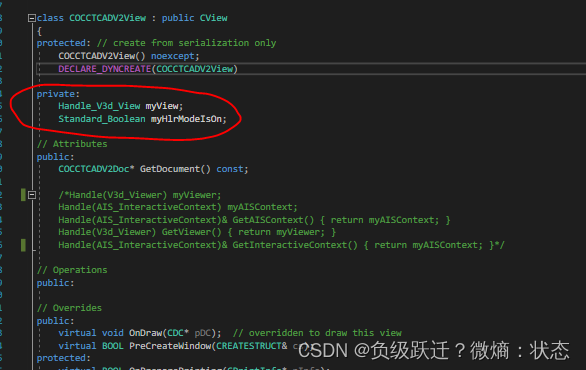
双击打开OCCT_CAD_V1View.h。在下图红圈位置,插入代码
private:
Handle_V3d_View myView;
Standard_Boolean myHlrModeIsOn;
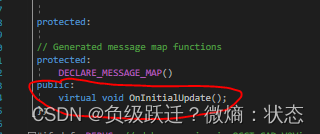
再添加
public:
virtual void OnInitialUpdate();
到下图红圈位置。
双击打开OCCT_CAD_V1View.cpp。在下图红圈位置,插入代码
myView->Redraw();
并且在空白地方添加一个函数
void COCCTCADV2View::OnInitialUpdate()
{
CView::OnInitialUpdate();
//Display mode
myView = ((COCCTCADV2Doc*)GetDocument())->myViewer->CreateView();
myHlrModeIsOn = Standard_False;
myView->SetComputedMode(myHlrModeIsOn);
Handle_WNT_Window aWNTWindow = new WNT_Window(GetSafeHwnd());
myView->SetWindow(aWNTWindow);
if (!aWNTWindow->IsMapped()) aWNTWindow->Map();
aWNTWindow->SetBackground(Quantity_NOC_SLATEBLUE2);
}
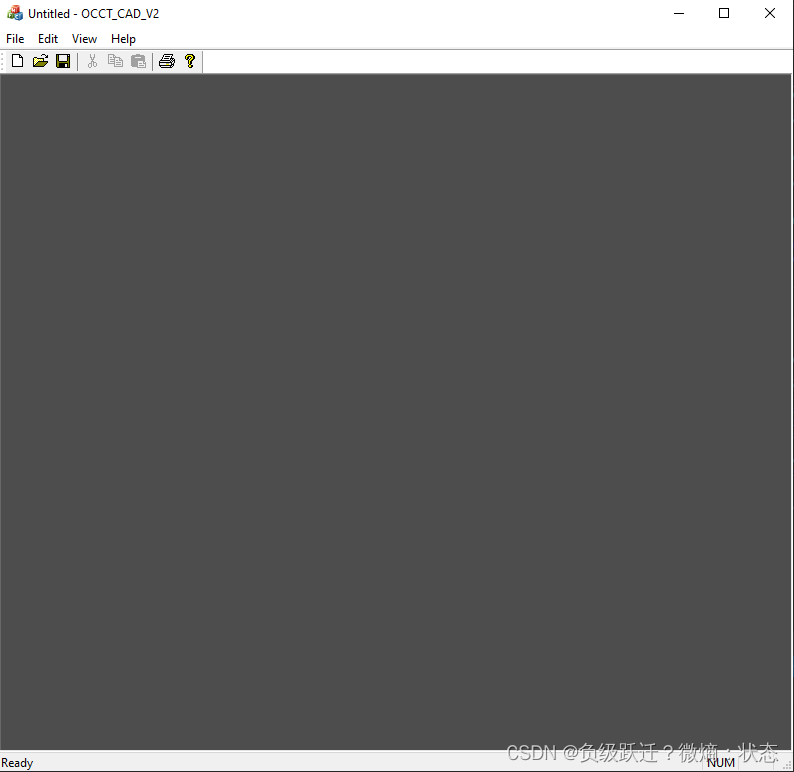
注意“COCCTCADV2View::”这个需要换成你的项目名称。
至此,按Ctrl+F5运行如果得到下图。则一切顺利。
## 创建并显示长方体
更新前面添加的OnInitialUpdate函数的内容(添加红色部分)
void COCCTCADV2View::OnInitialUpdate()
{
CView::OnInitialUpdate();
//Display mode
myView = ((COCCTCADV2Doc*)GetDocument())->myViewer->CreateView();
myHlrModeIsOn = Standard_False;
myView->SetComputedMode(myHlrModeIsOn);
Handle_WNT_Window aWNTWindow = new WNT_Window(GetSafeHwnd());
myView->SetWindow(aWNTWindow);
if (!aWNTWindow->IsMapped()) aWNTWindow->Map();
aWNTWindow->SetBackground(Quantity_NOC_SLATEBLUE2);
TopoDS_Shape aRes = BRepPrimAPI_MakeBox(3, 3, 3);
Handle_AIS_Shape ashape = new AIS_Shape(aRes);
GetDocument()->myAISContext->SetColor(ashape, Quantity_NOC_AQUAMARINE2, Standard_False);
GetDocument()->myAISContext->SetMaterial(ashape, Graphic3d_NOM_BRONZE, Standard_False);
GetDocument()->myAISContext->Display(ashape, Standard_True);
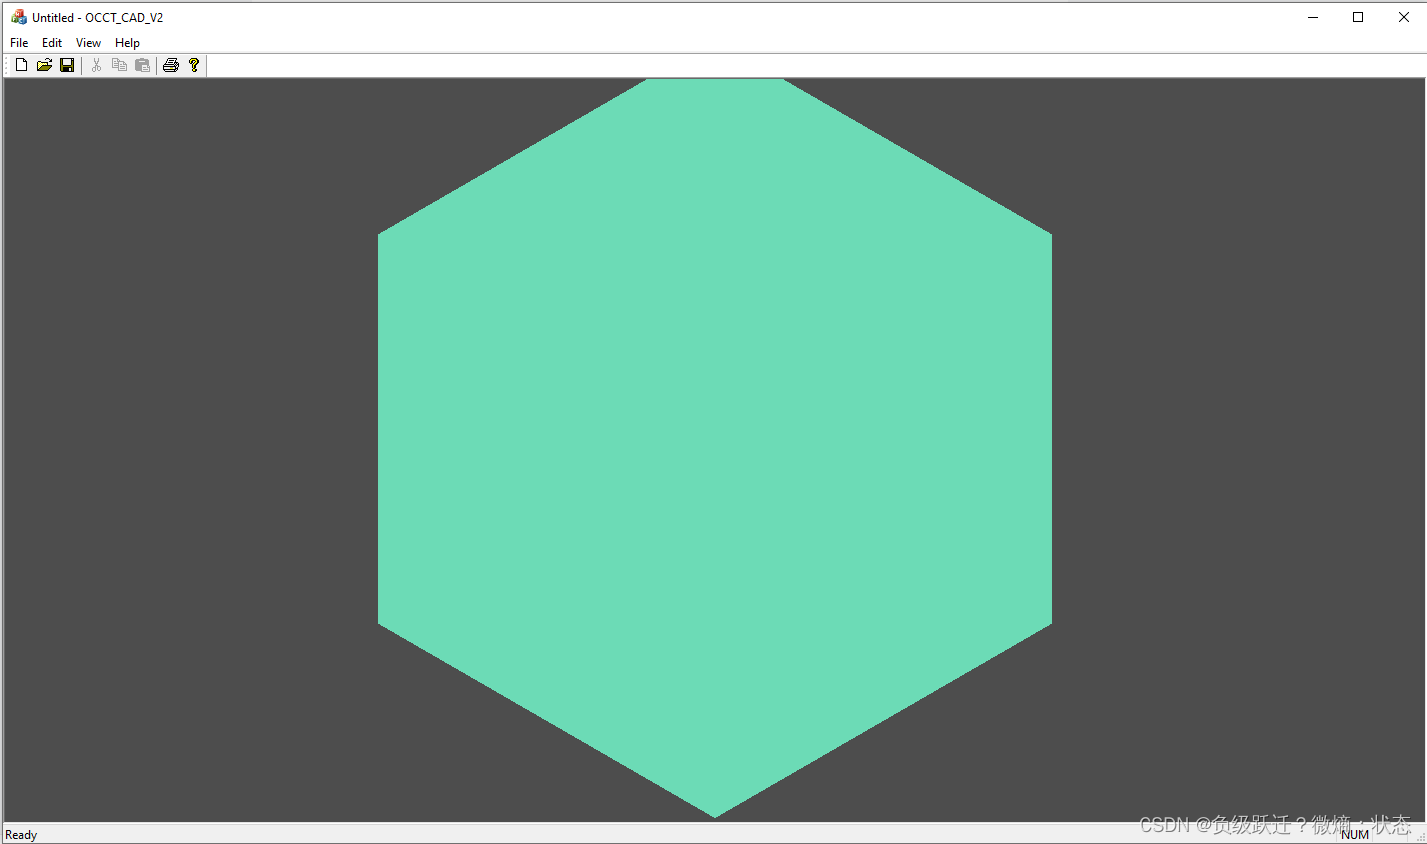
myView->FitAll();
}
Ctrl+s保存后。Ctrl+F5编译运行。如果成功的话,你将看到下图画面
## 本文至此已经介绍完毕
如果大家尝试有遇到什么问题,欢迎留言。所有文字都是原创自己码的。没有进行查重。如有雷同,完全纯属巧合。如果有涉及到利益冲突,请及时联系我。


![基于 Octotree 的[码云]文件树插件](https://img-blog.csdnimg.cn/20191025113723820.png?x-oss-process=image/watermark,type_ZmFuZ3poZW5naGVpdGk,shadow_10,text_aHR0cHM6Ly9ibG9nLmNzZG4ubmV0L2dhbnF1YW56aG9uZw==,size_16,color_FFFFFF,t_70)